OrcaSlicer- An Introduction and How to Get Started
Try JusPrin, the first GenAI 3D printing tool built on OrcaSlicer.
Introduction
The Bambu Slicer goes well with how fast and well the Bambu machines are. It has a lot of features, is easy to use, and produces high-quality prints. Still, it's not perfect and has some flaws of its own.
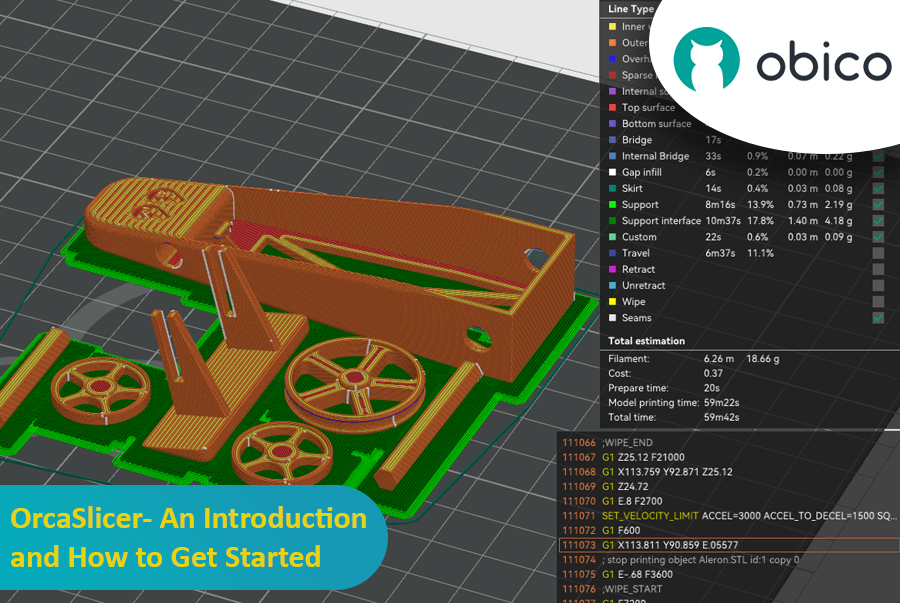
Orca Slicer comes into play at this point. OrcaSlicer adds some interesting features to the basic Bambu Studio. You get more printer presets, more detailed print settings, and a bunch of other advanced tools that all make 3D printing better.
This page will talk about everything Orca Slicer. What it is, why it exists, and why it is a good option to its original source. Hold on to your boats because we're going to go deep into Orca Slicer and look at it in detail.
What is OrcaSlicer?
When a programmer begins to use a BambuLab 3D printer, the result is OrcaSlicer. Realizing the original slicing program falls short of their expectations, they set out to develop their own replacement.
Except for the slicer, almost all of the Bambu environment is pretty closed-source. The PrusaSlicer is a fork of the original SliC3r program, and the Bambu Studio is a fork of the PrusaSlicer. If Bambu Labs wanted to use its slicing software, it had to be open-source.
Someone was bound to make their own version of the Bambu Studio at some point. And as it stands, a user called Softfever made Orca Slicer as a fork of the Bambu Studio slicer. It's one of Bambu Slicer's most famous forks, and users rate it highly.
OrcaSlicer takes a great slicer and makes it even better with a few small changes. At first, the Bambu Studio and Orca Slicer won't seem too different from each other. But once you start using it, you'll start to enjoy the small add-ons that all help improve the quality of your 3D prints.
To understand how Orca Slicer compares with other popular slicers, such as PrusaSlicer and Cura, check out the detailed analysis: Orca Slicer vs PrusaSlicer vs Cura article. This comparison will help you understand the strengths and unique features of each slicer, assisting you in choosing the best one for your 3D printing needs.
A Glance at the Features
Let's take a quick look at some of the unique characteristics of Orca Slicer, which help it stand out from Bambu Studio.
- Additional Printer profiles
- Custom printer profiles
- Auto calibrations for all printers
- Sandwich(inner-outer-inner) mode - an improved version of the External perimeters' first mode
- Precise wall
- Multi-plate option
- Calibration Menu
- Support Klipper Exclude Objects natively
- Klipper support
How to Download and Install Orca Slicer
Orca Slicer is well-documented and designed to be user-friendly, even for first-time users. Follow these steps to download and install Orca Slicer on your machine quickly:
- Visit the Orca Slicer Releases Page on GitHub:
Navigate to the Orca Slicer Releases page on GitHub. The latest release will be listed at the top.
- Download the Appropriate File:
In the "Assets" section, you'll find the files ready for download. Choose the file that corresponds to your operating system (Windows, Mac, or Linux).
- Run Orca Slicer:
If you're using Windows, download the .exe file and run it to start Orca Slicer.
That's all you need to do for the initial setup. The next step is to configure the slicer for your specific 3D printer.
Setting up Orca Slicer
When you run the.exe file for the first time, a Setup screen will appear to help you set up the OrcaSlicer. Setting up is easy and takes only about 4–5 steps.
Step 1: Set the Login Region
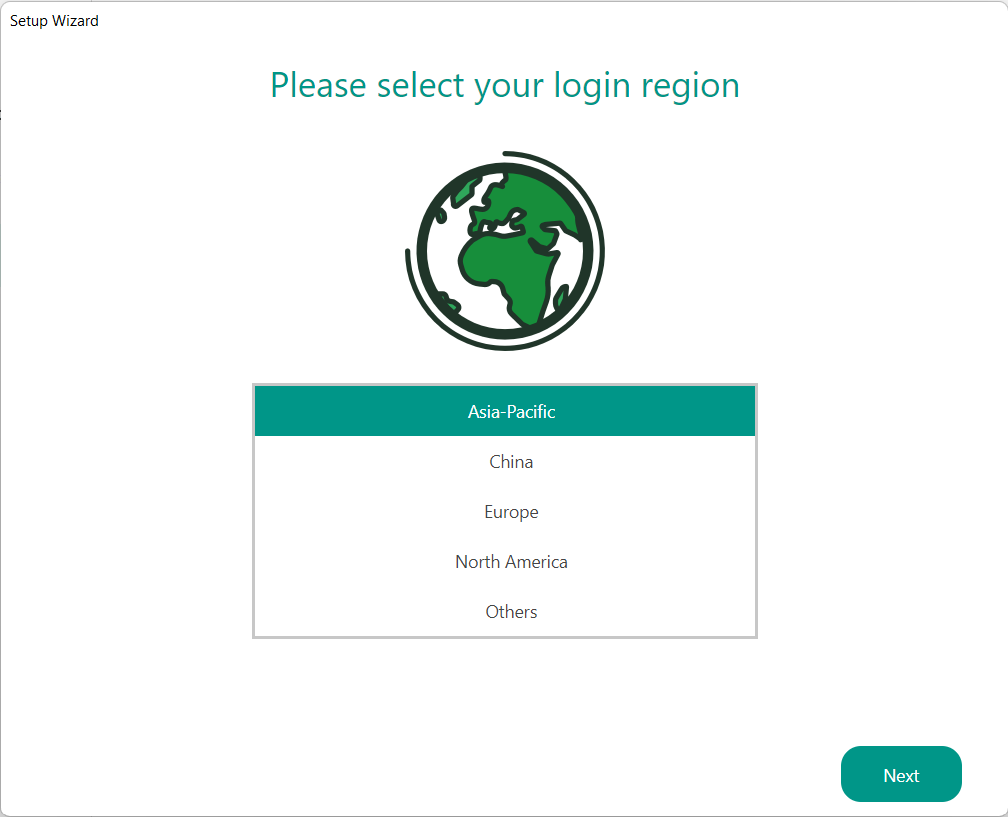
Choose the location where you will use your 3D printer. Your login location and account location are only detected by BambuLab 3D printers. Therefore, this information is only relevant to those machines. They should both come from the same place.
Step 2: Choose a 3D printer
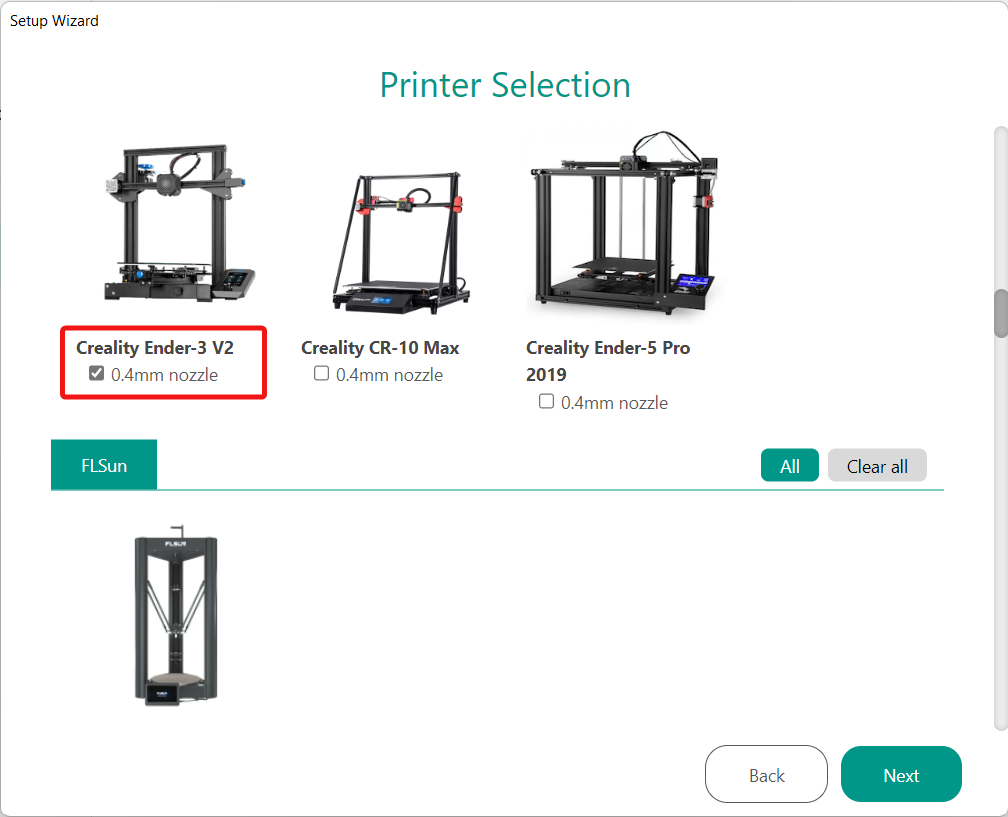
Orca Slicer has a large number of 3D printer settings that are already set up. You can choose the printer from the menu or set up a Klipper or Marlin 3D printer the way you want it. We've chosen the Ender 3 V2 3D printer for our needs.
One recent significant improvement in Orca Slicer is the extensive list of 3D printer options available. there are now hundreds of printer profiles to choose from, making it probably the most robust and comprehensive printer list of all slicers.
If you want more detailed guidance on how to set up your 3D printer in OrcaSlicer, including how to add a custom printer profile, check out the comprehensive guide on How to Setup a 3D Printer in Orca Slicer. This guide will walk you through the steps of adding a new printer, configuring filament settings, and setting up slicing parameters to get you started quickly.
Step 3: Select the Filaments
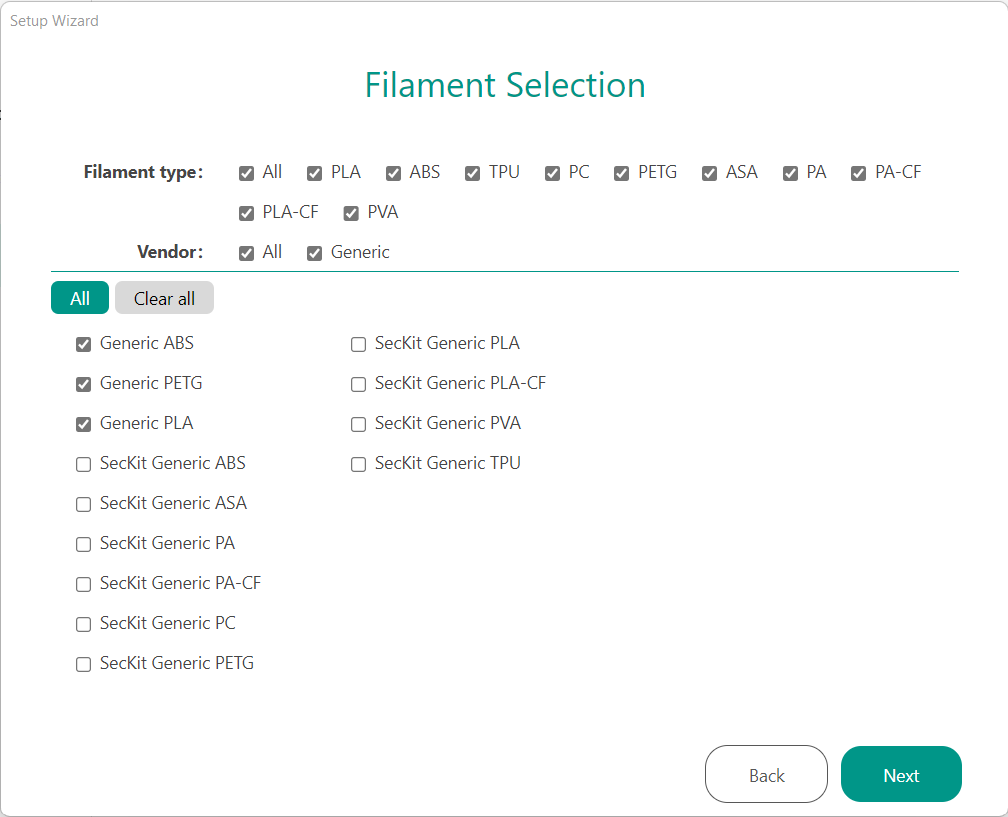
Orca Slicer lets you choose from a number of filament types. You can choose the kind of material that works with your 3D printer. All the settings for temperature, diameter, and other things linked to these profiles will already be in place. This will make it easy for you to slice the models.
Step 4: Install Bambu Network Plug-in
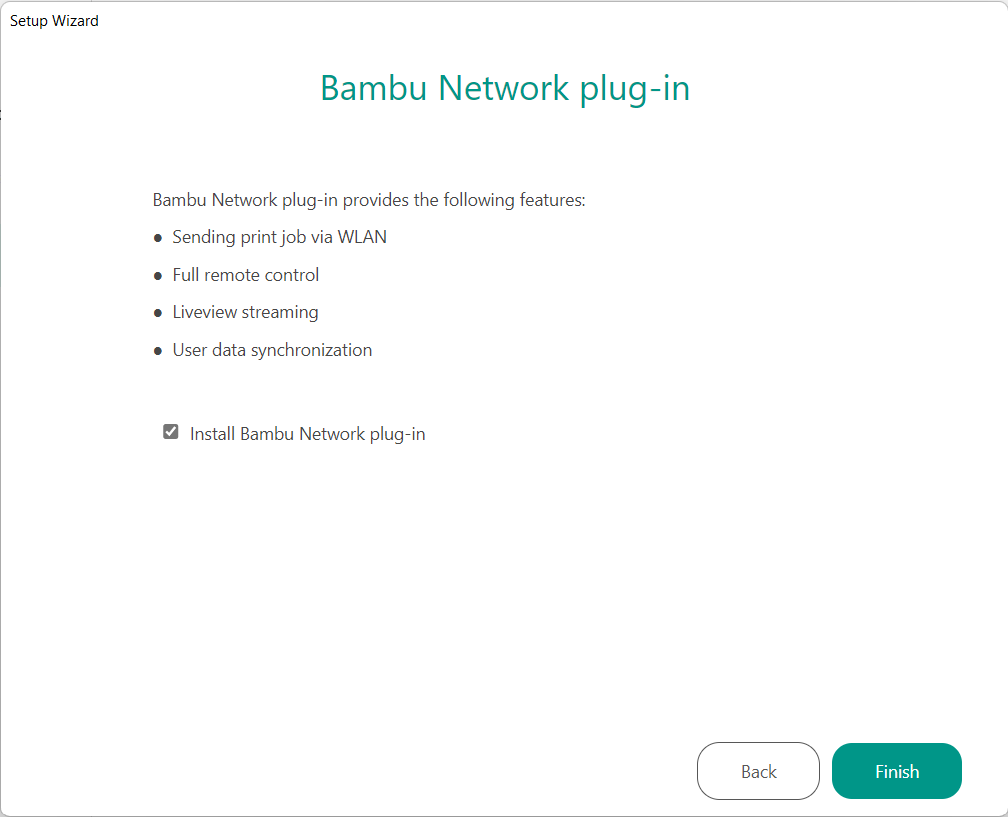
With the Bambu Network Plug-in, you can connect wirelessly to your 3D printer. It works well with both Bambu and Klipper 3D printers and makes it easy to connect to your printers from anywhere.
Step 5: (Optional) Sign in to your BambuLab account
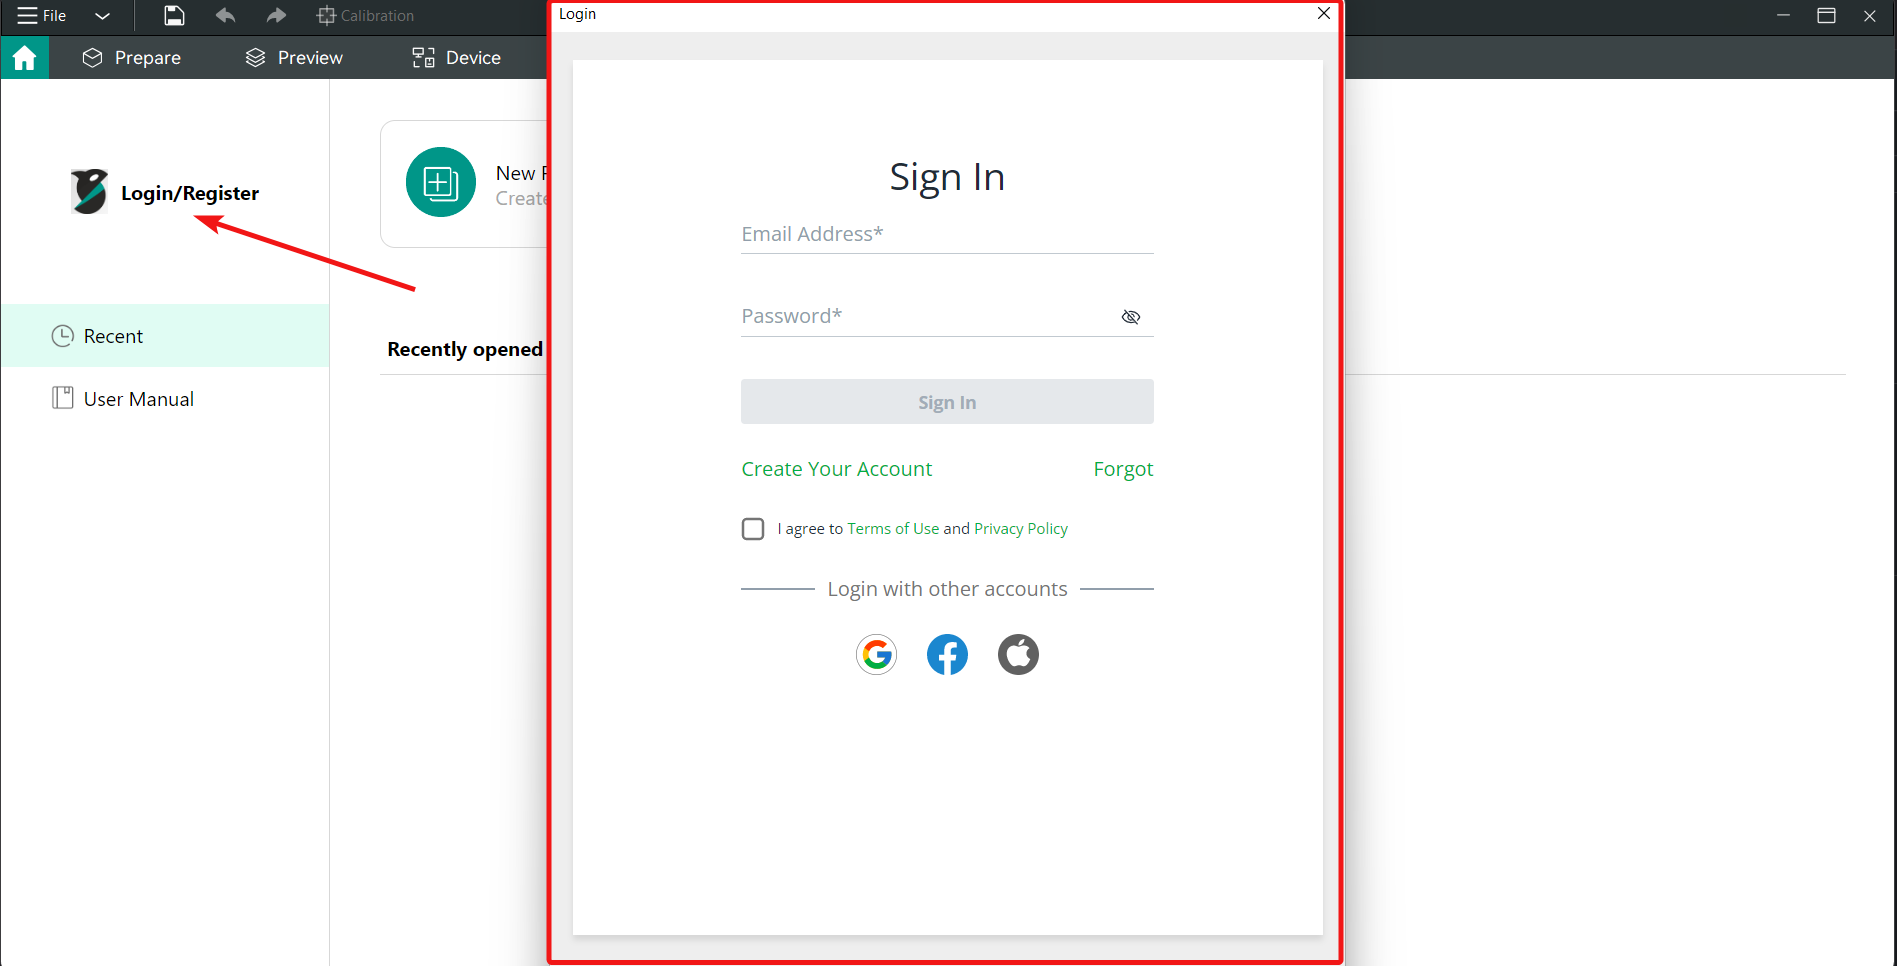
If you have a Bambu 3D printer, you can access it through the Bambu Handy app by logging in to your BambuLab account. It gives you full control over your 3D printer and lets you handle the machine from other devices.
If you do not have a Bambu 3D printer, you can skip this step. In this case, the account won't be very useful.
All done. You are now ready to use the Orca Slicer to start your first 3D print.
Basic Workflow
When you are done setting up your printer, you will go to the slicer screen. We'll quickly show you how to send your first 3D model to the printer and how the process works.
Step 1: Load your Model
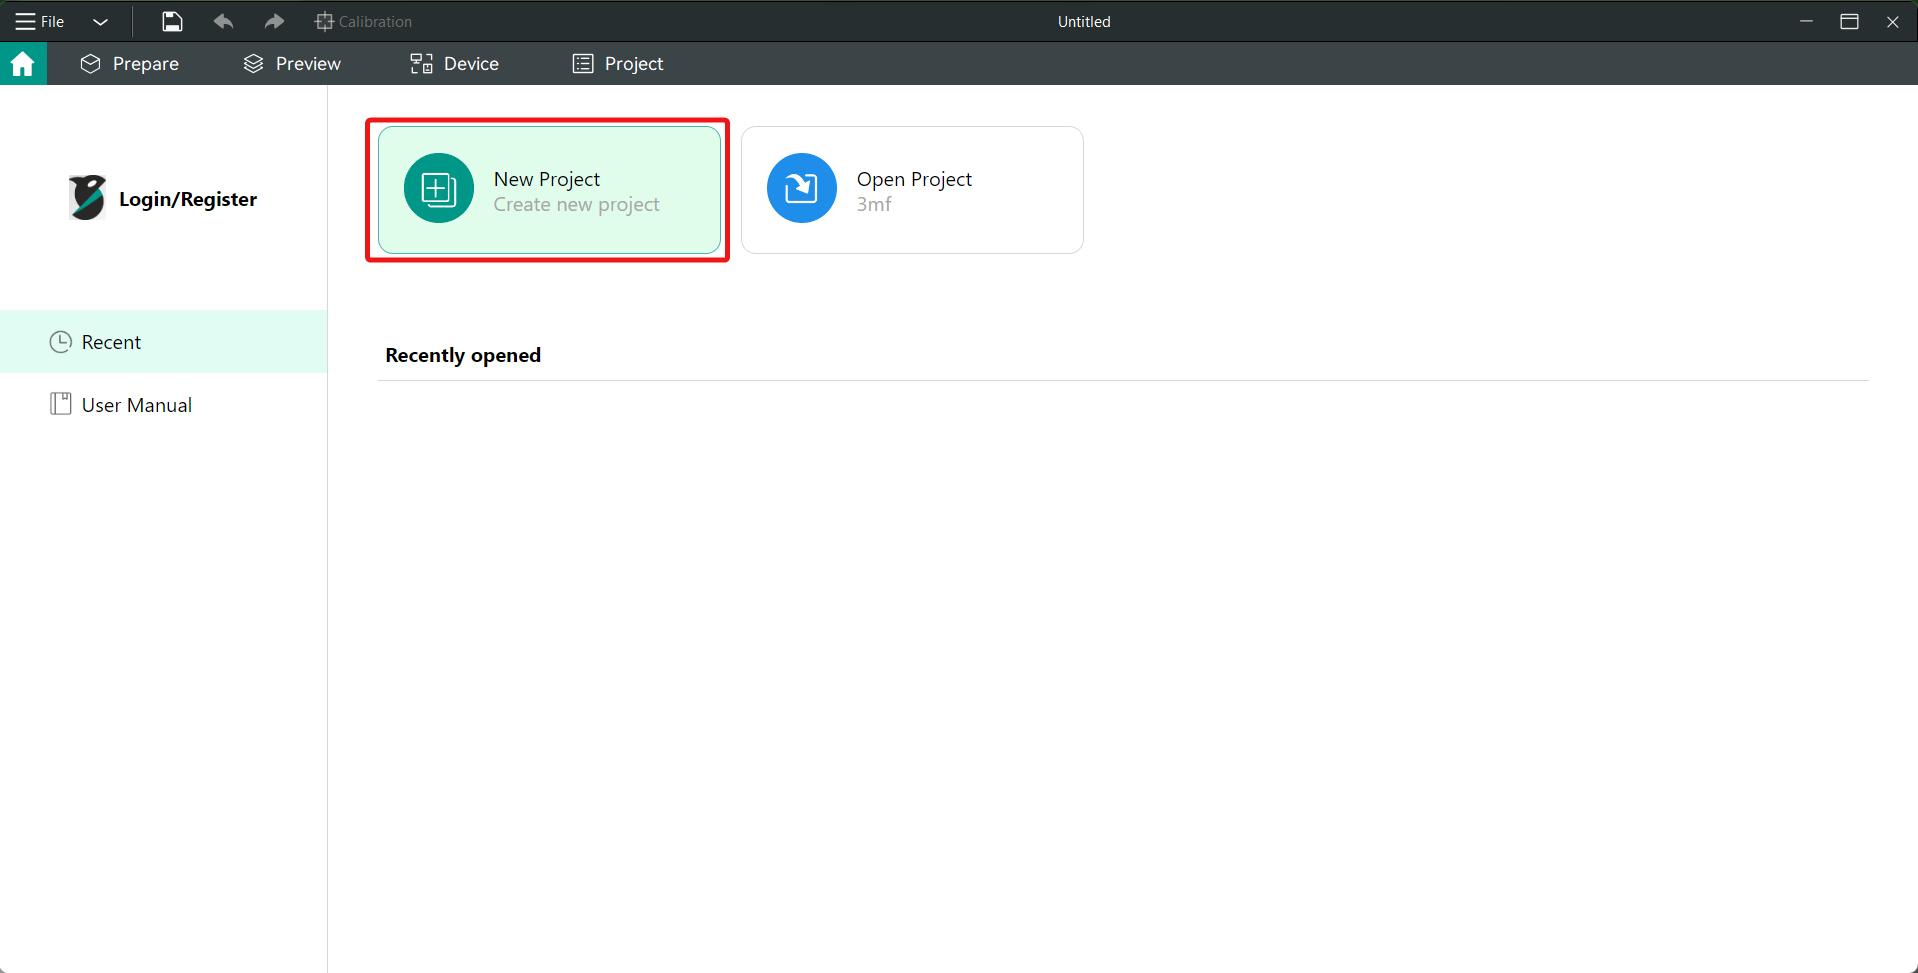
On the main screen, you'll see a New Project option. Create a new project. This will bring up the screen for slicing. On top of the slice window, you'll see a menu bar. Click on the icon on the far left. This starts with the file viewer, which you can use to load the model into the Orca Slicer environment.
Step 2: Select Slicing Settings
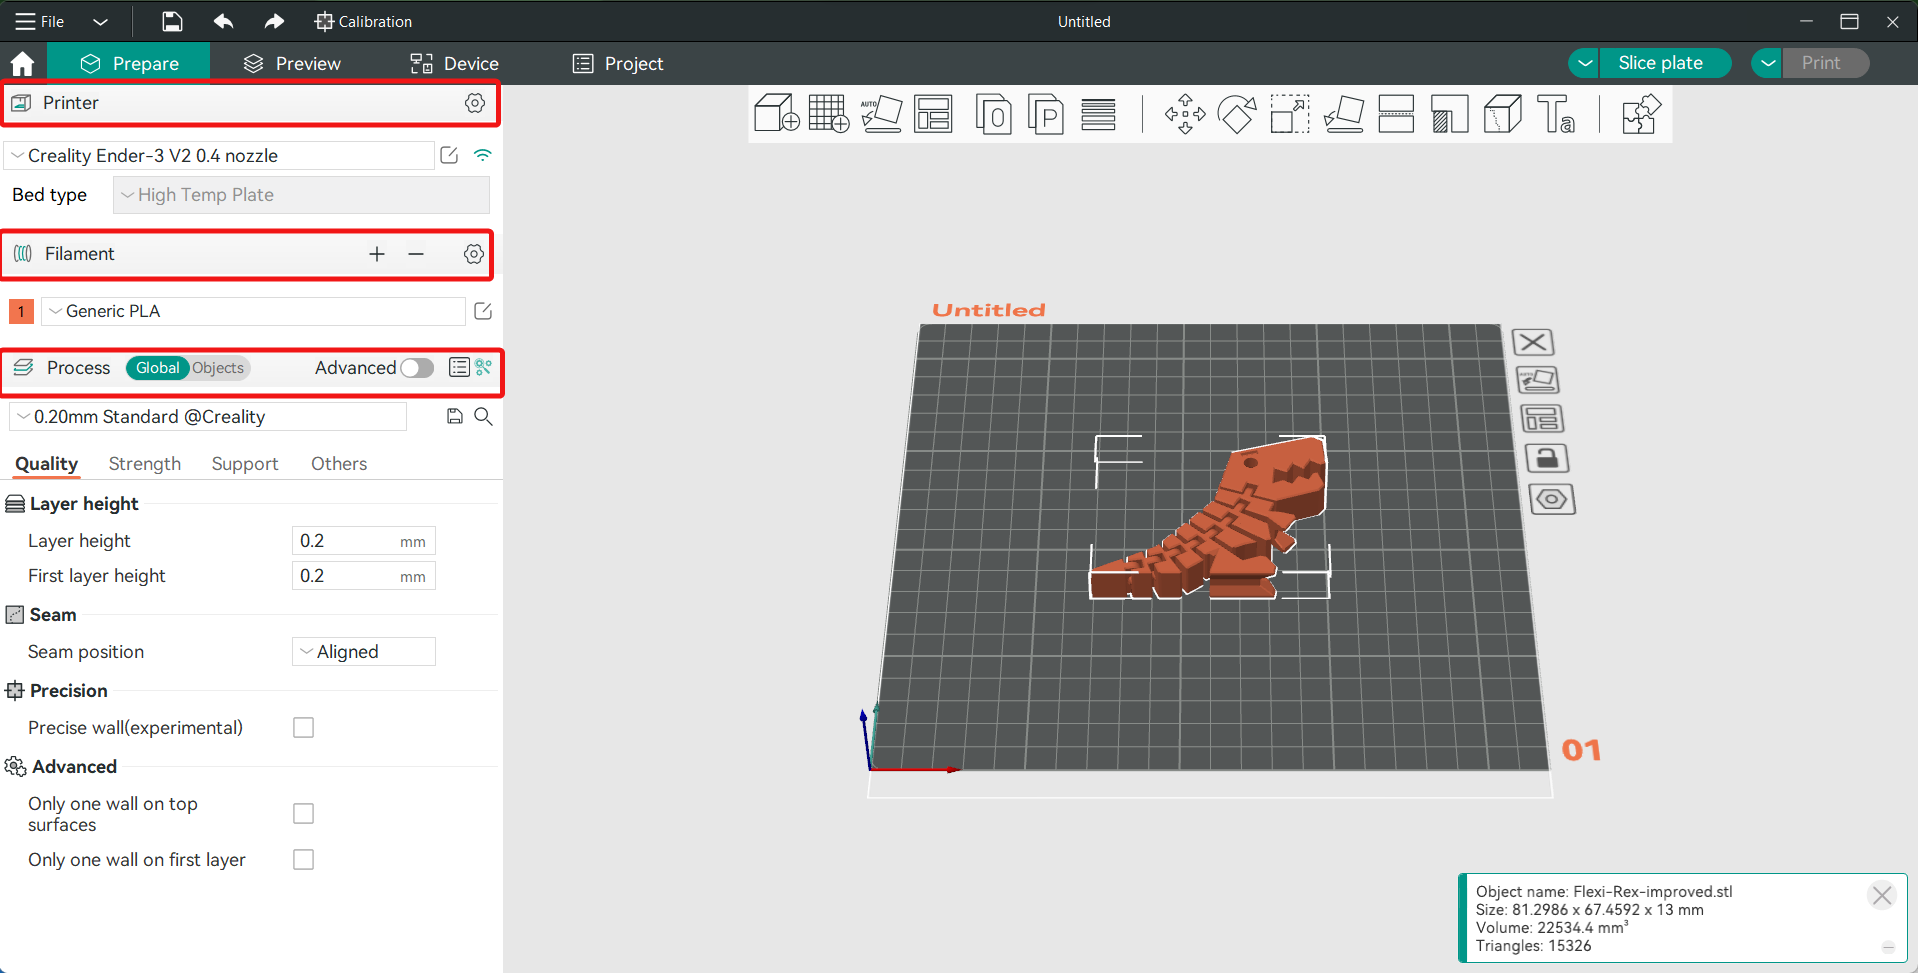
On the left, you can change the settings for your 3D printer, its material, and how it slices. If you click on the Whiteboard icon next to the printer’s name, you can change each setting.
For the slicing parameters, you can select from four different presets based on your printer's nozzle. Also, there are four different sections: Quality, Strength, Support, and Others.
If you are using a printer setup that has already been set up, you can leave them as they are for now. If not, adjust the parameters to fit the goals of your job.
Step 3: Slice the model
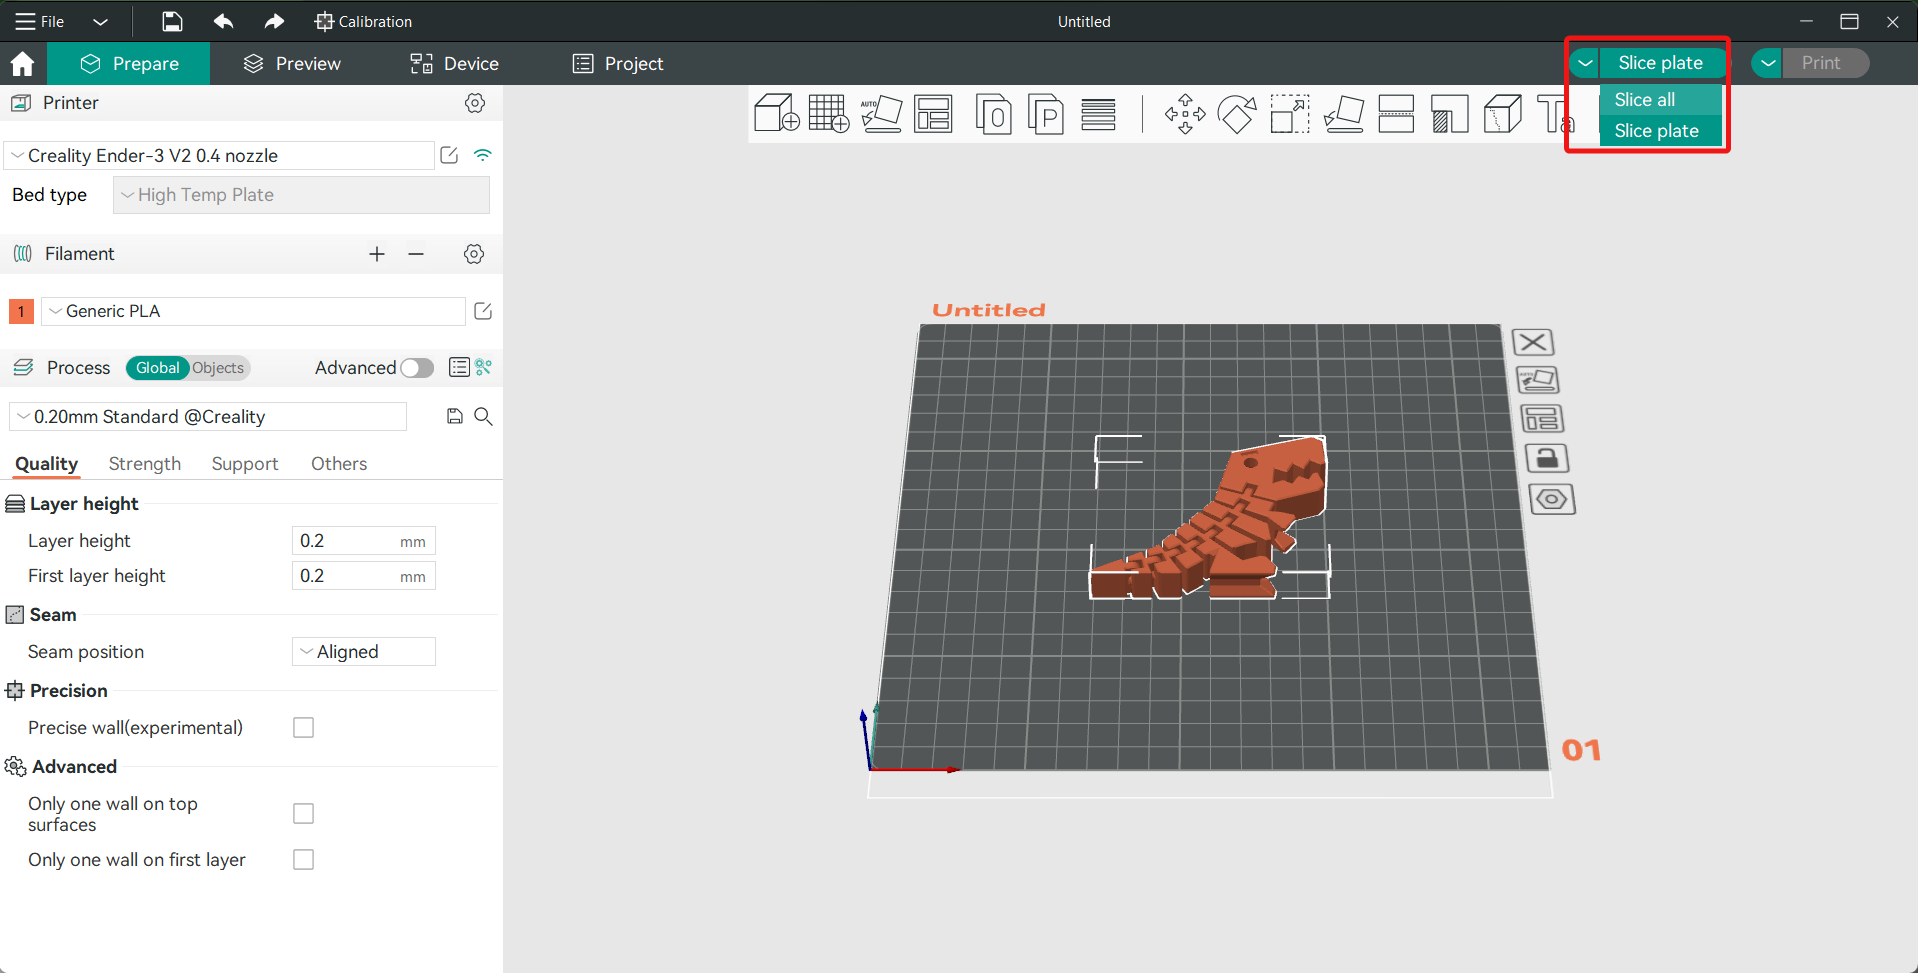
When you are happy with the choices, click the "Slice plate" button in the upper right corner. Depending on how complicated your model is and how you want to make it, the slicing process can take a long time. Once the slicing is done, you can look at a preview of the sliced model and check all the details for your print.
Step 4: Export the file
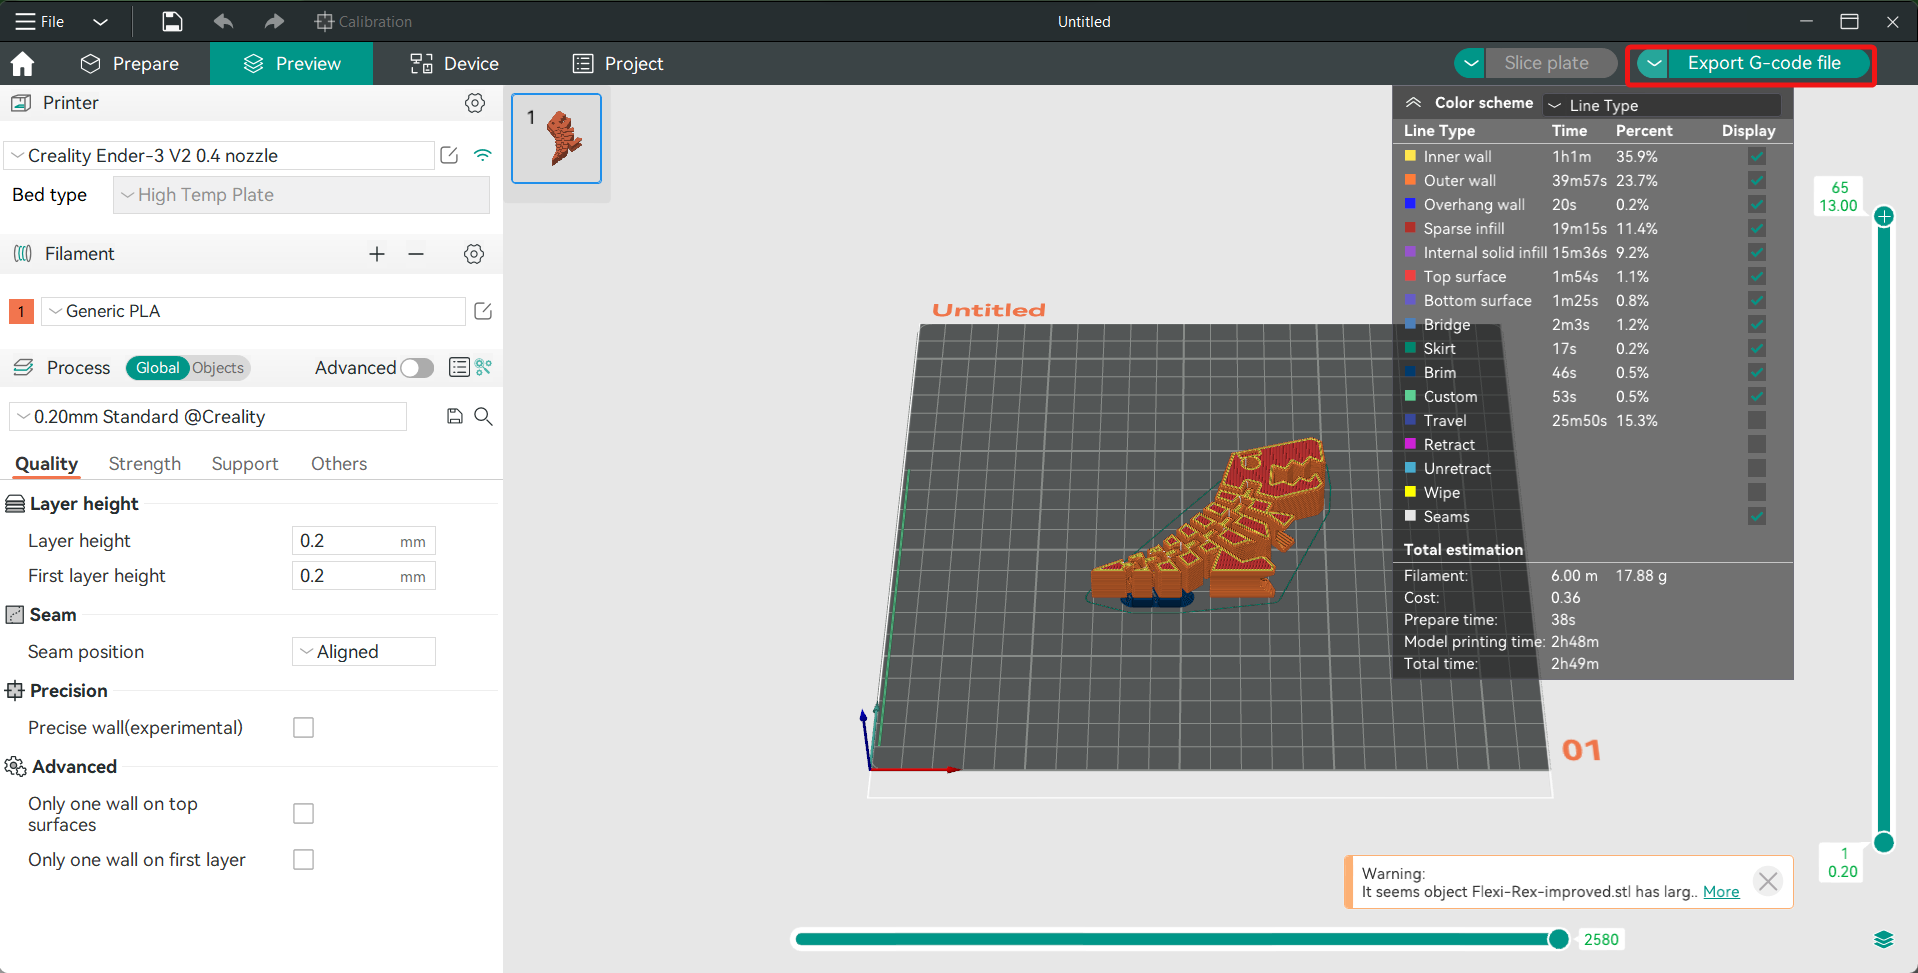
If you like how the sliced file looks, you can send it to your 3D printer. Select the Export Gcode file option by clicking on the down arrow next to the Slice plate choice.
Put the SD card into your computer and save the file straight to the SD card. You can now make the 3D model straight from the SD card.
Step 4.1: Send the File to the Printer
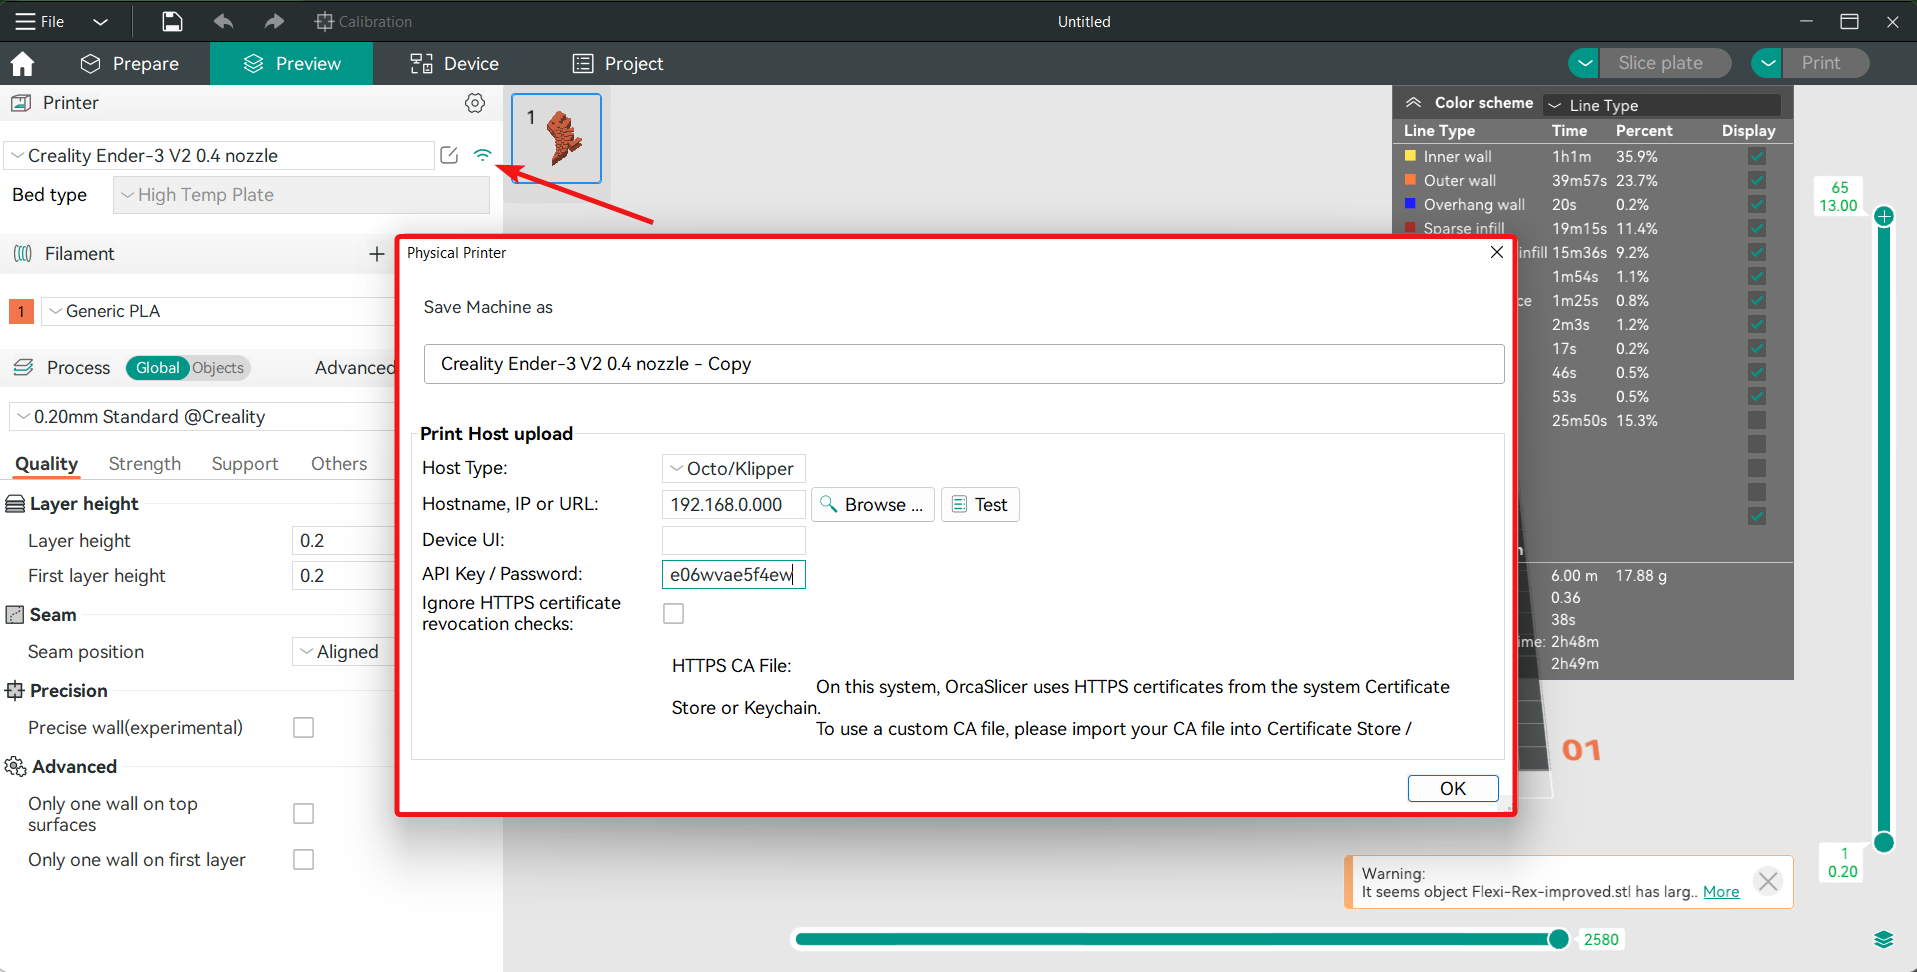
If your 3D printer uses Octoprint or Klipper, Obico, you can send the sliced file from Orca Slicer straight to your printer. You will need to set up your printer's Wi-Fi link settings first.
Click on the Wi-Fi icon next to the name of your printer. Choose whether your printer's interface is Octoprint/Klipper or something else. Enter the printer's IP address and test it. If there is an API key or a password, you should also put that in. Click OK and close the window.
You can now send the file directly to your 3D printer. After you share the sliced 3D file, the printer will show a message that says it worked.
For linking Obico to OrcaSlicer, we have a detailed guide available for you here: How to connect Orca Slicer to Obico
Step 5: Print the model
If you use the SD card method, just plug the card into your computer and choose the cut model you want to print.
Using the Device option in the top menu bar, you can open the control window for Octoprint and Klipper. From here, you can choose the file you want to print and start making your 3D model.
All done! So, now you know everything you need to know to make your first 3D model. If the output meets your expectations, you may keep printing with the default settings after adjusting a few simple factors.
Orca Slicer settings
Orca Slicer has a lot more to give than its simple settings. Its advanced mode gives you a lot of other options for slicing, which you can use to fine-tune almost every part of the process.
In this section, we'll look at some important Orca Slicer settings that make it different from Bambu Studio's standard slicer. The goal is to learn about these settings and tweak them to get the best results from printing.
Before we start, please click the button next to the word "Process" that says "Advanced Mode." It will show you all the settings, giving you more precise control over the slicing factors. Alright, let's get started.
Precise Wall
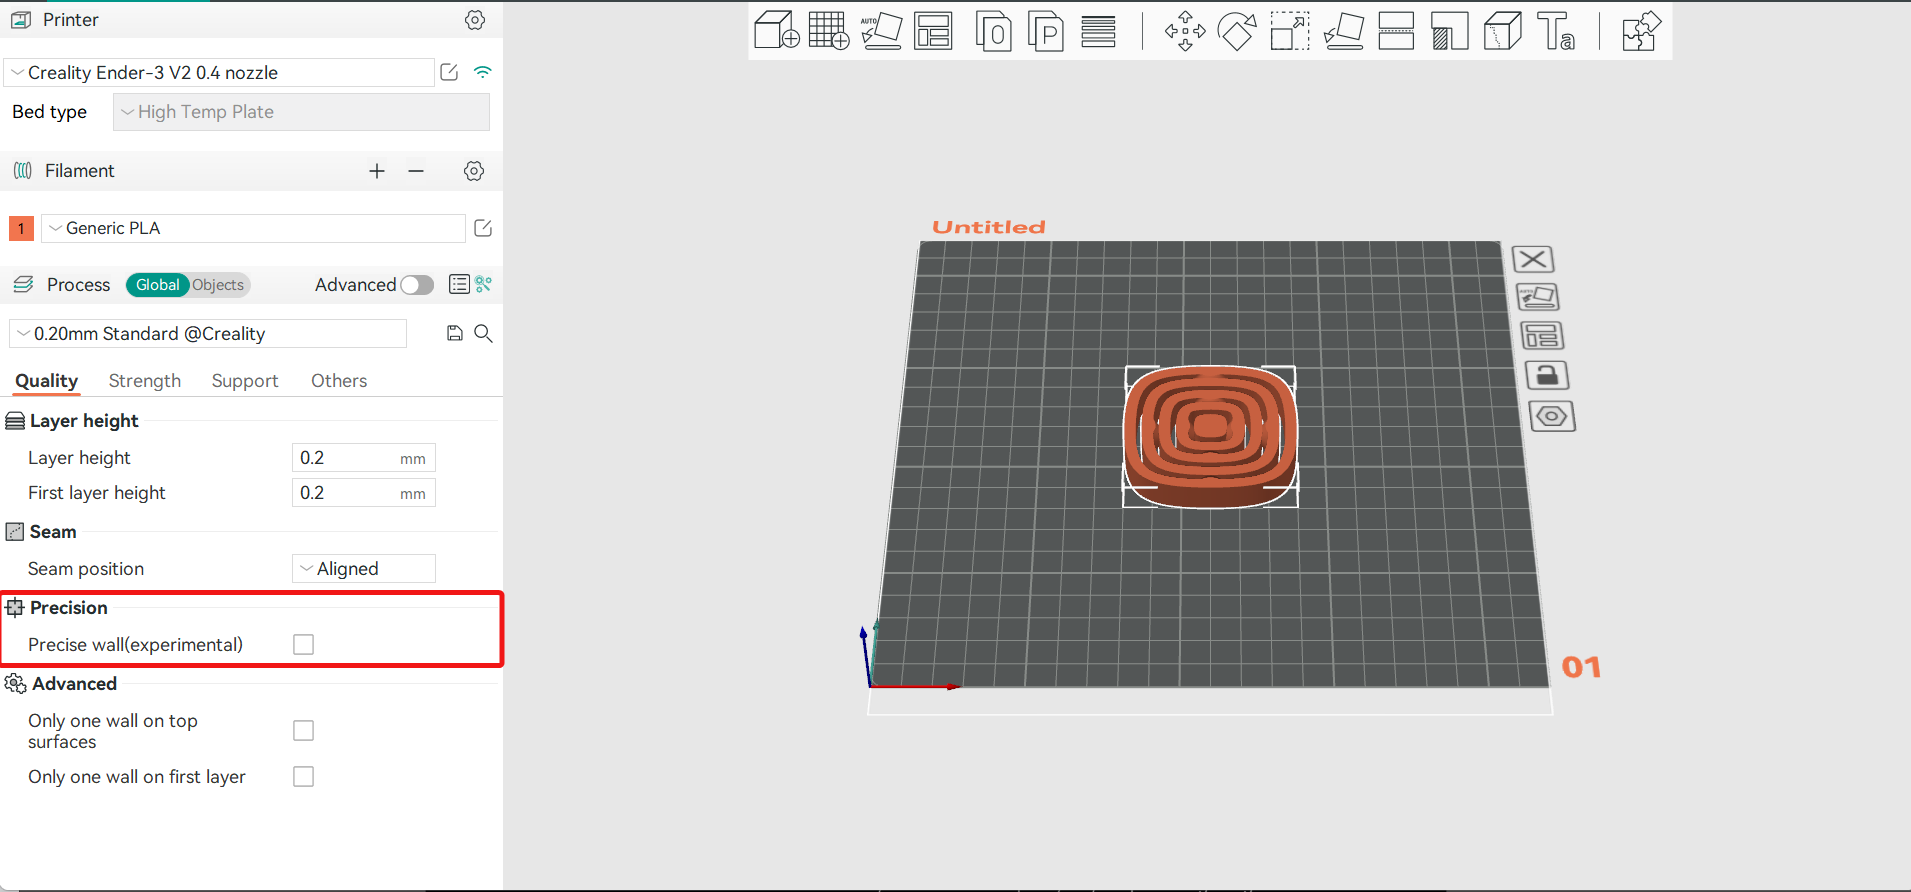
The Precise wall parameter allows you to fine-tune the space between your models' inner and exterior walls. It was made to keep your models consistent and accurate, especially with plastics like ABS that change shape when the temperature changes.
This choice lets you change the flow rate of the extrusion during the printing of both walls. In practice, it should help you make better walls and get the right size for your model.
Seam Gap and Orca Slicer Seam Settings
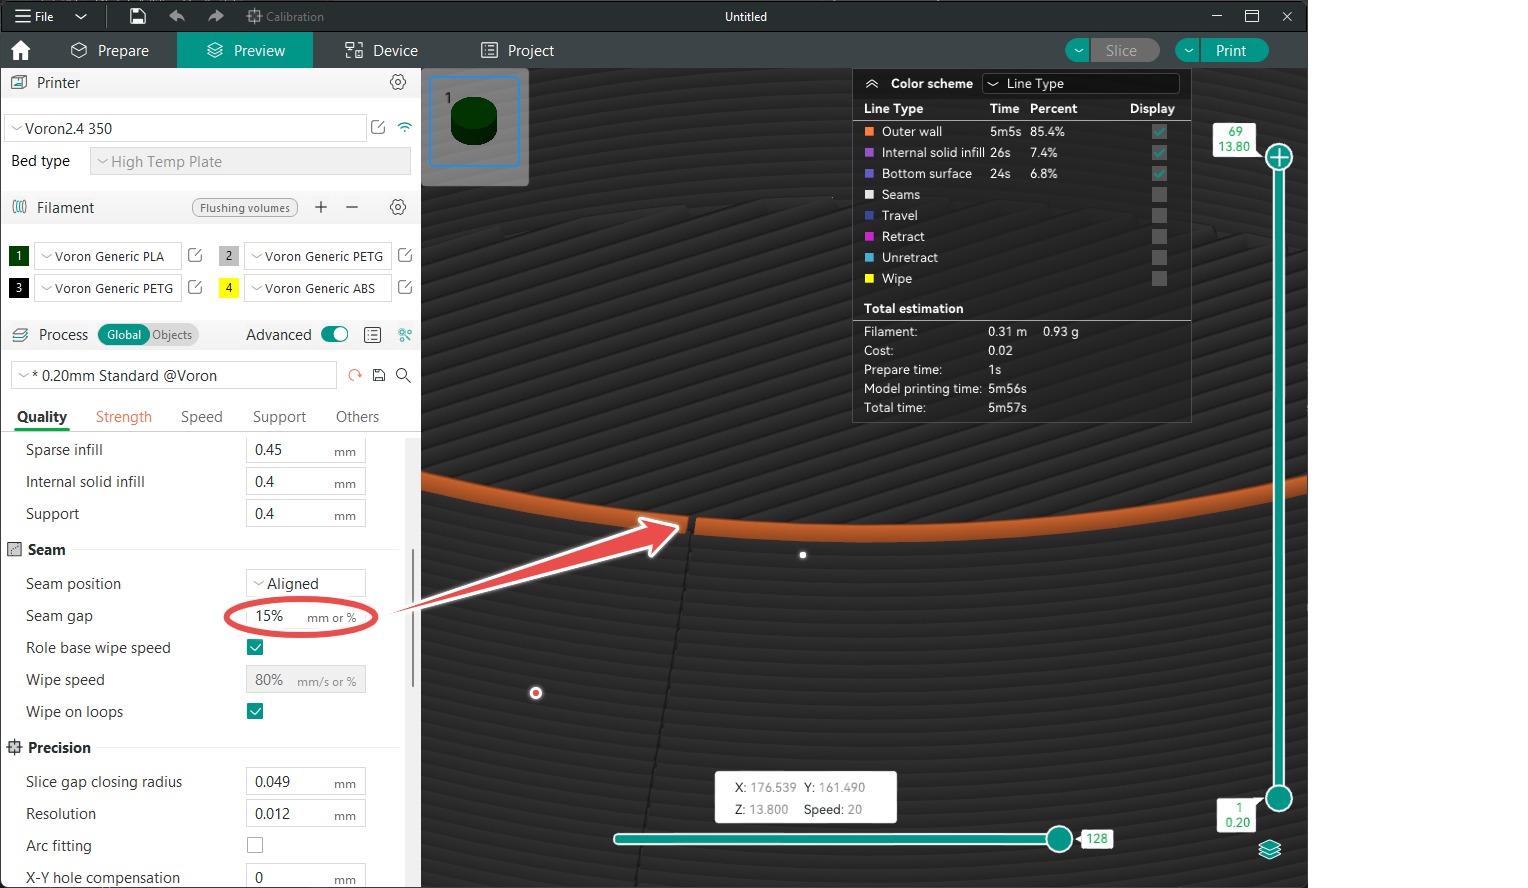
Z-seam is an inevitable phenomenon in FDM 3D printing. It is a result of excess material extruded by the nozzle during the layer change or retraction move.
OrcaSlicer's Seam Gap feature tries to stop the release of material right before the end of a layer. This should make it less likely that blobs or pimples will show up on the surface of the print and that there will be a Z-seam.
The usual number is 15%, which means that the gap is 15% of the diameter of the nozzle or 15% of 0.4 mm. If you see big blobs on the prints, raise this number by 5–10%. And if you see a space between the layers, you should lower this number.
Additionally, Orca Slicer offers a range of settings that help you manage the seams in your 3D prints more effectively. Seam visibility can affect the overall appearance of a print, so it's crucial to understand how to control and minimize it. For detailed guidance on how to adjust seam settings effectively, check out Orca Slicer Seam Settings guide.
Wipe on Loops
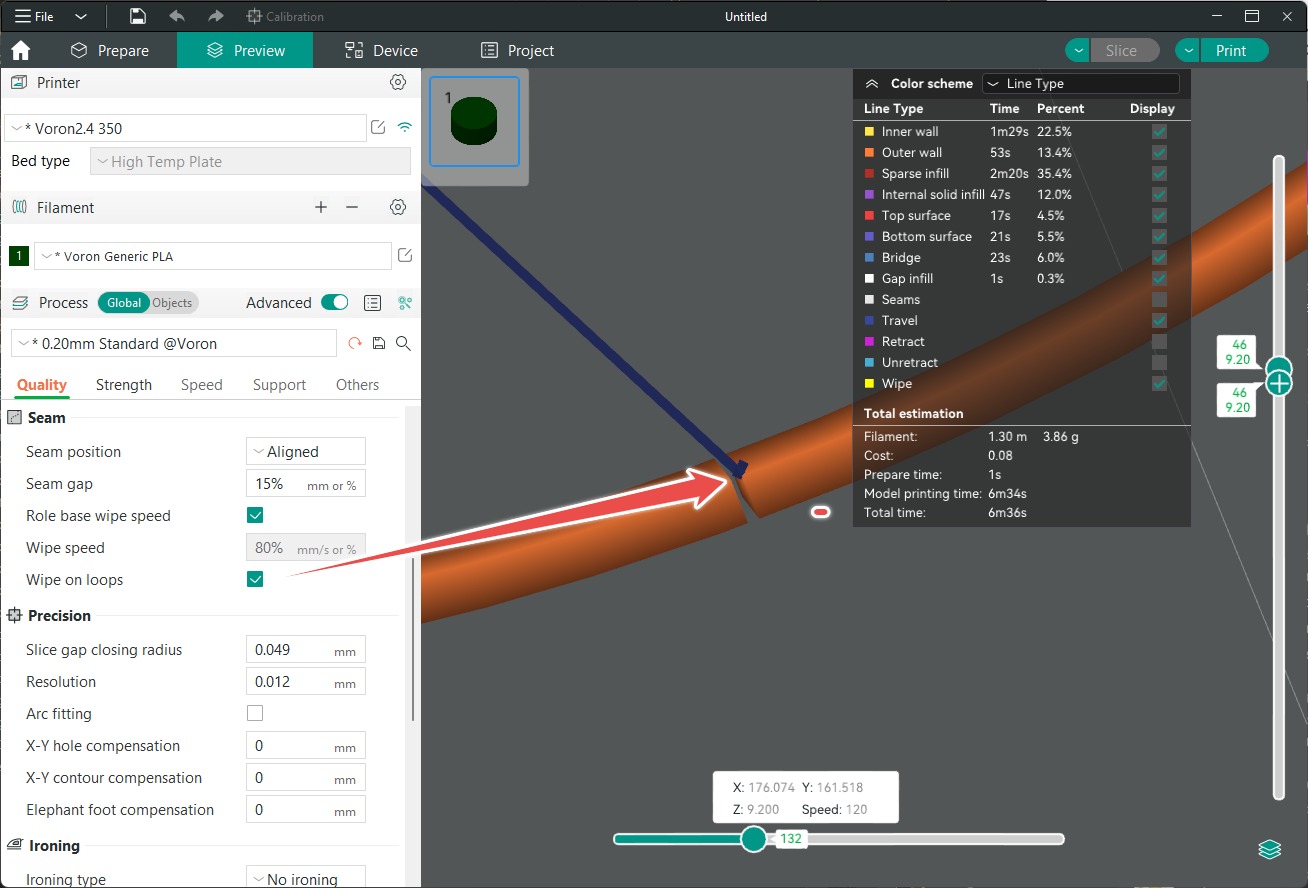
When the Wipe on Loops setting is used, the nozzle is moved slightly inwards as the layer loop is closed. This is another thing that helps to hide seam lines and is turned on by default in Orca Slicer. It's best to leave it on unless you find that the quality of your prints is getting worse.
Detect Overhang Walls
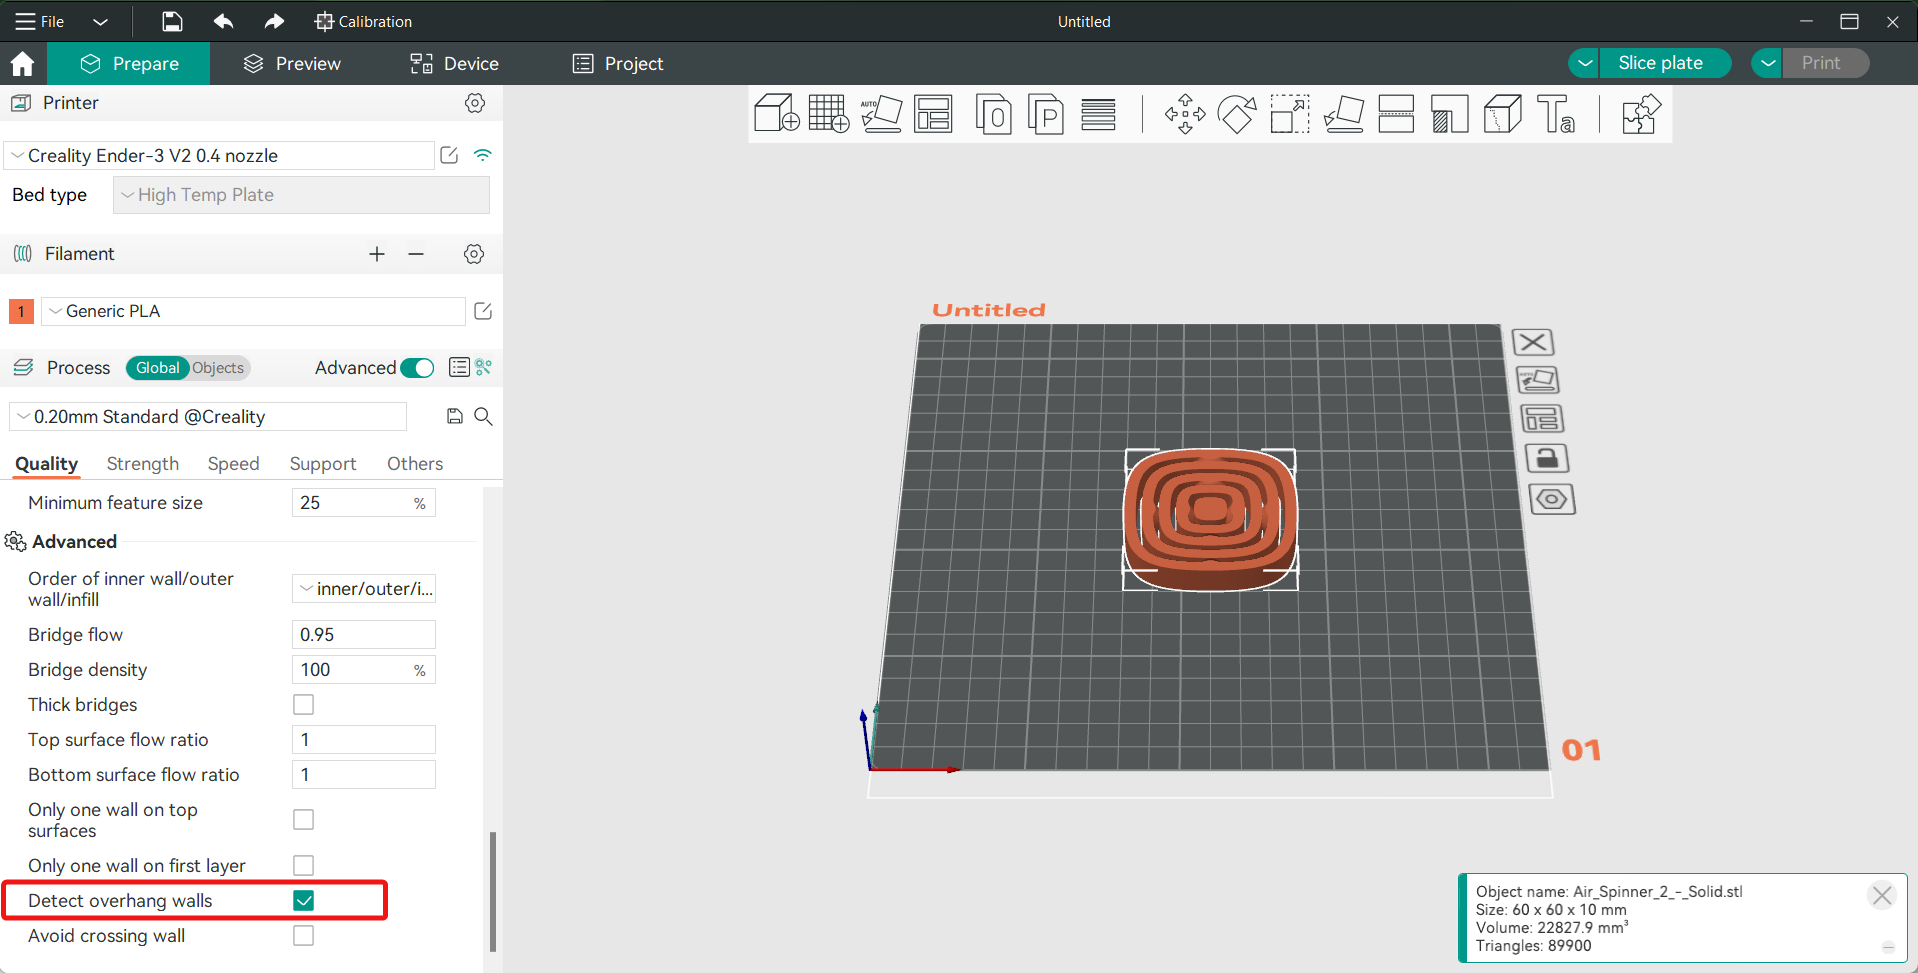
OrcaSlicer can tell when your prints have overhangs, and this setting lets it print them at a different speed. This reduces layer drooling and improves the overhang quality.
Initial Layer Travel Speed
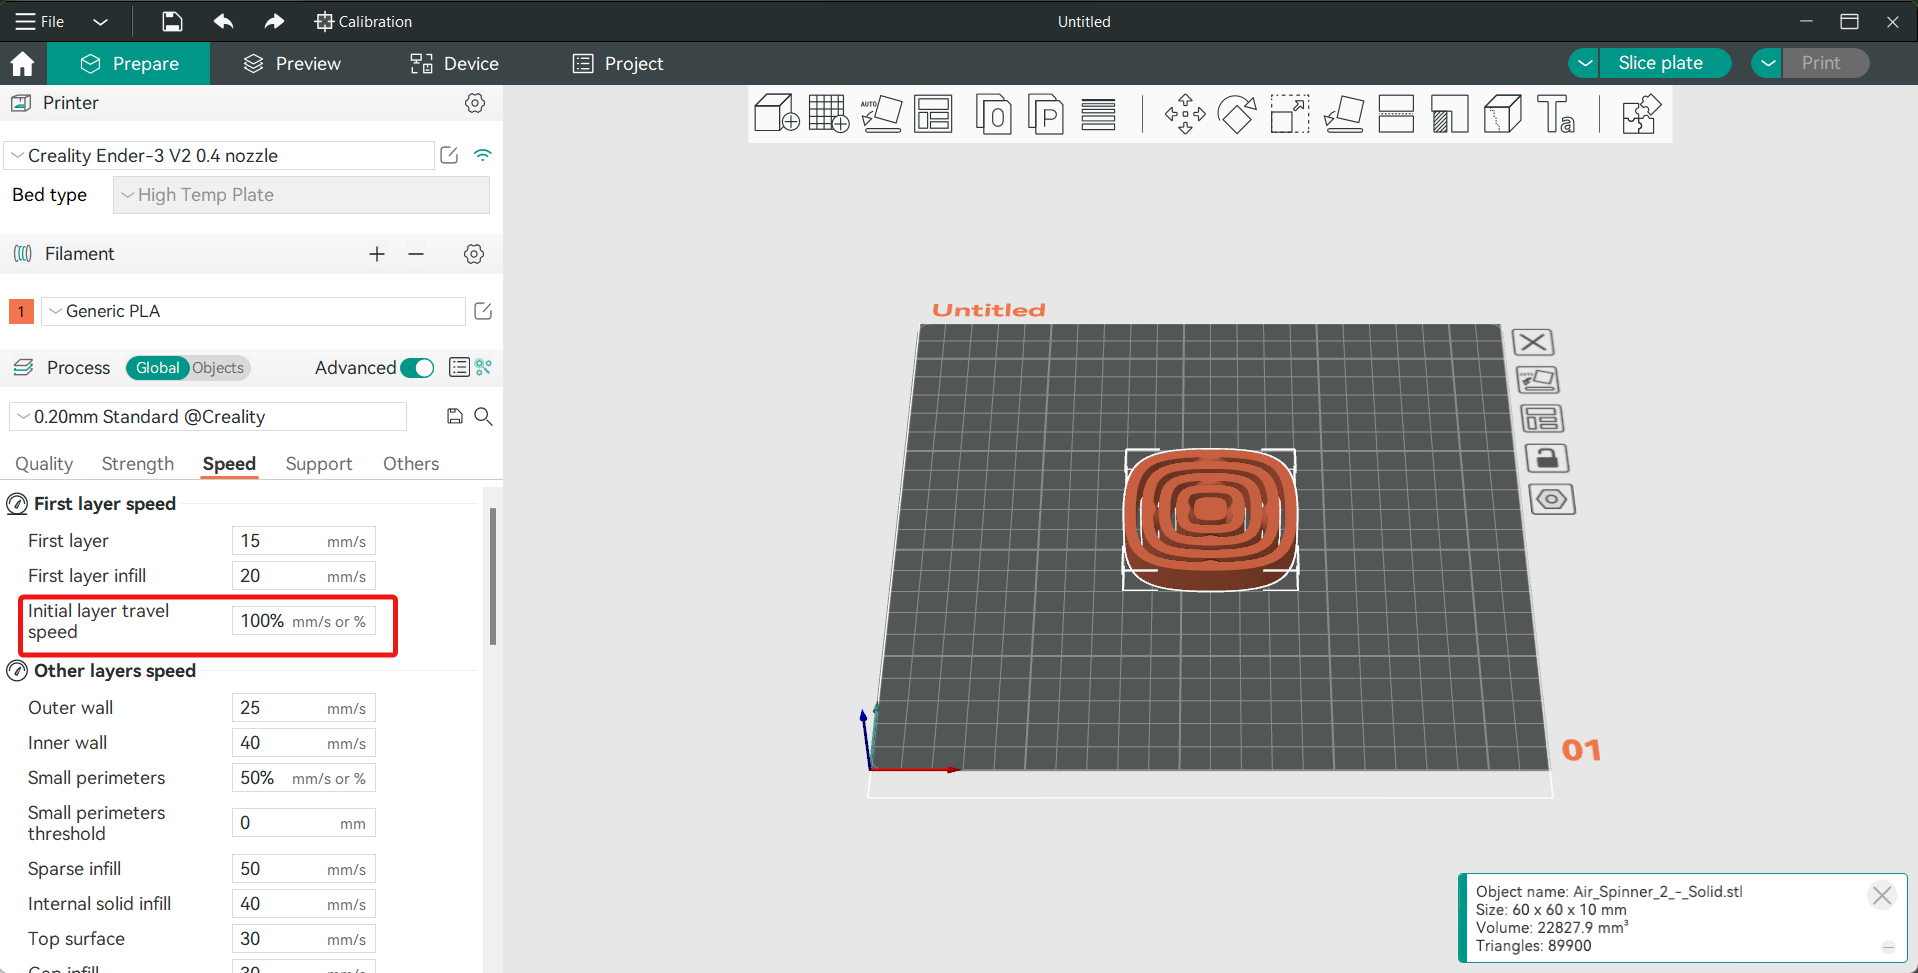
You only have one choice for Travel speed in Bambu Studio. In Orca Slicer, on the other hand, you can set the speed for the first layer.
By making the first layer move at a slower speed, the nozzle can avoid hitting and breaking any unwanted parts. It improves the chances of your first-layer success and is helpful during multi-part print jobs. Keep the speed between 50 and 70 mm/s, or 50% of how fast you usually move.
Setting Acceleration and Jerk
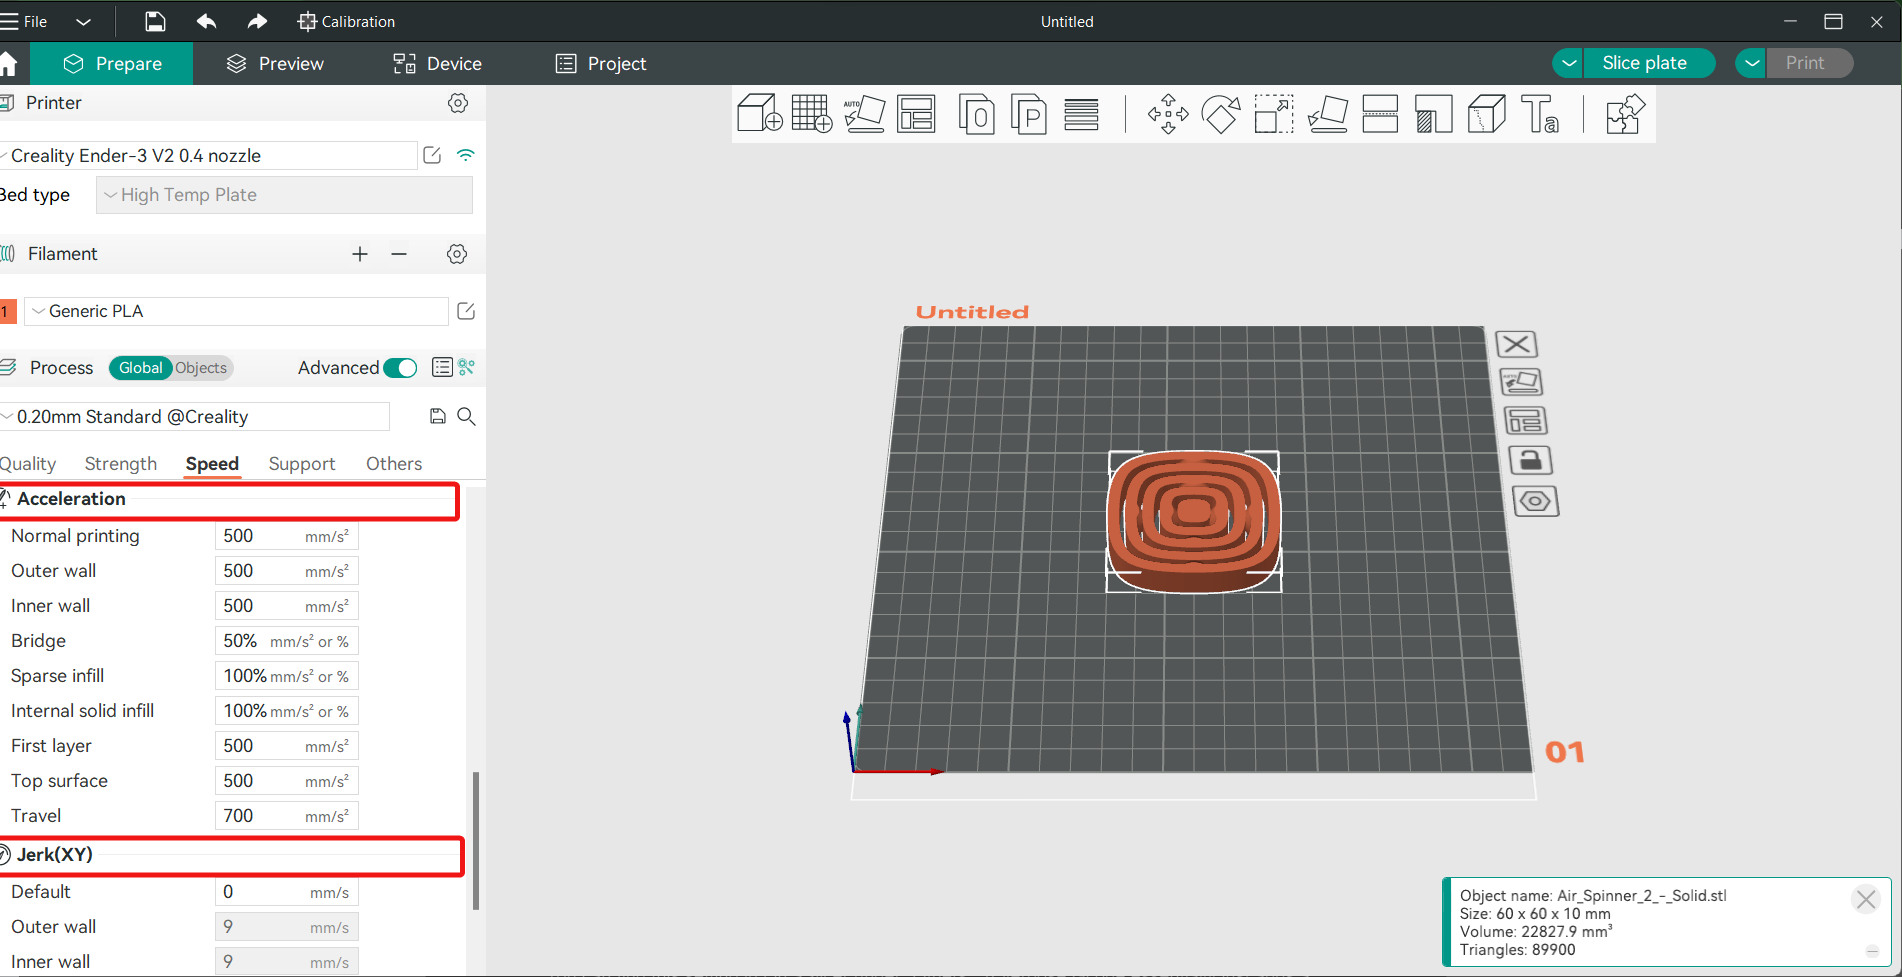
Bambu Studio has a few acceleration settings, but they’re very basic. You can change the speed of the infill, movement, inner wall, and bridge factors with Orca Slicer. You can also change these factors' Jerk levels right in the slicer.
With these extra choices, you can fine-tune how your print moves to get the best results. Depending on your printer, the numbers will be different, but it's good to know that you can change it to fit your needs.
Verbose Gcode
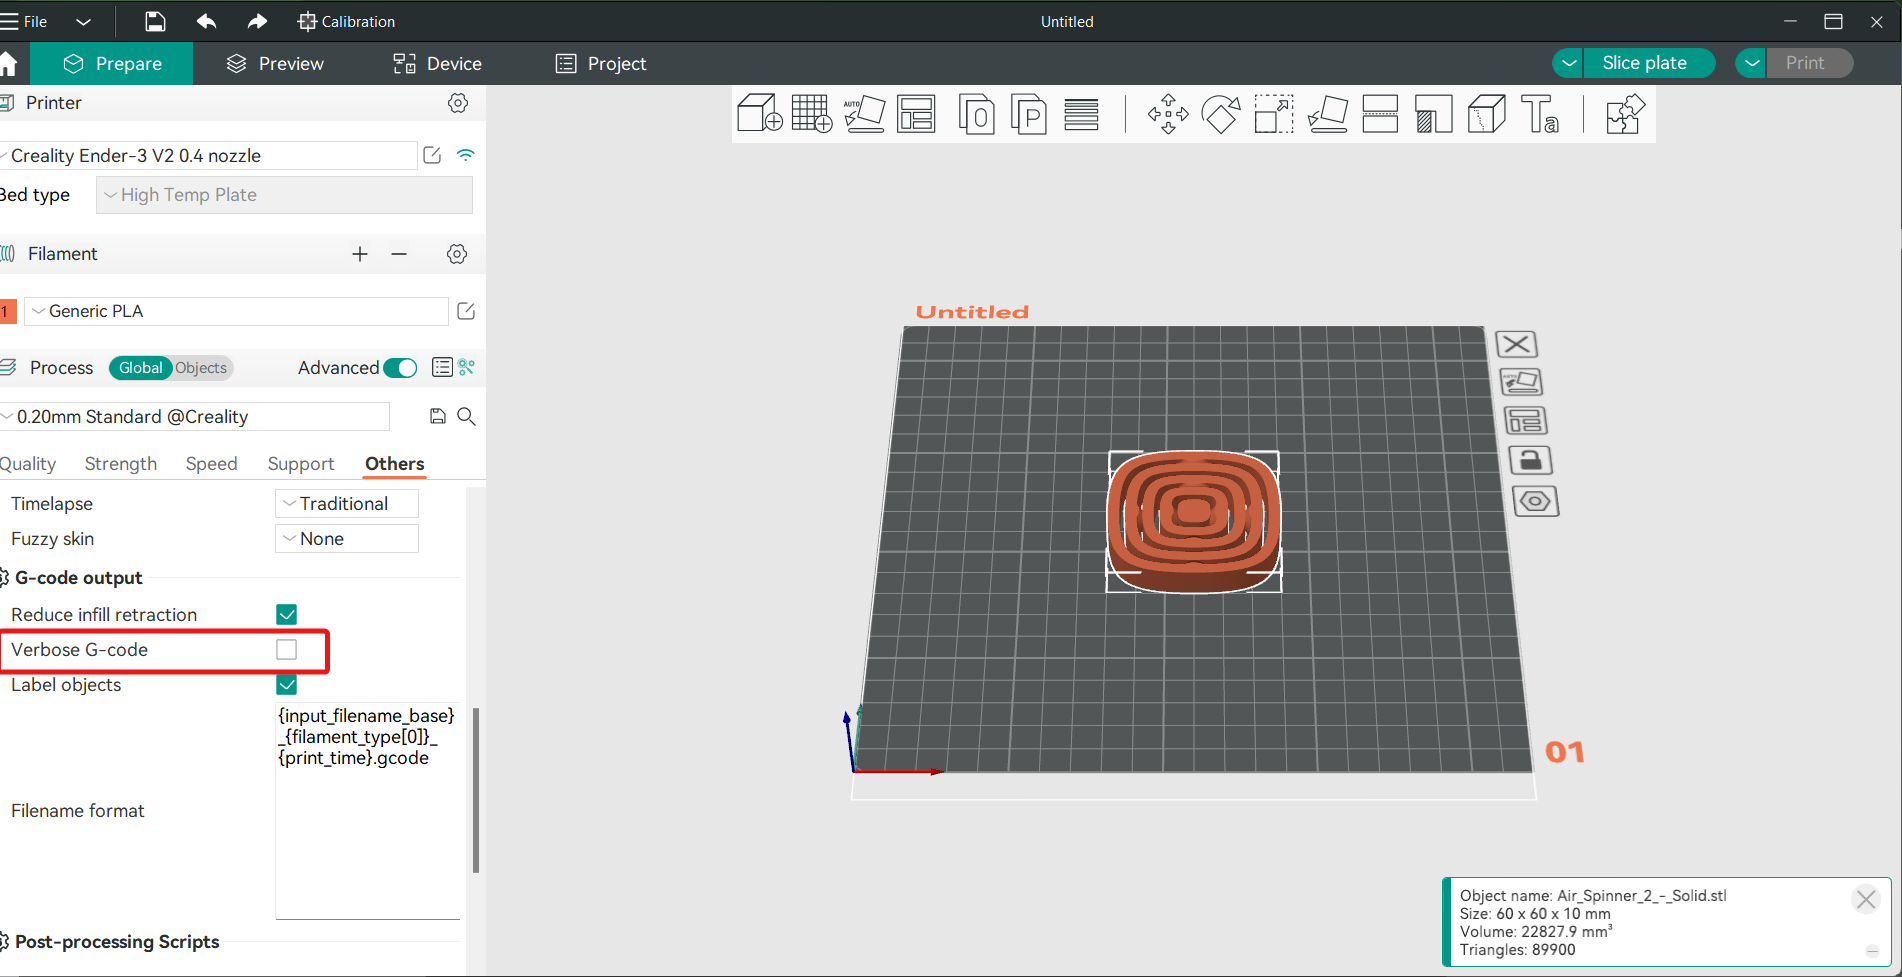
You can find this setting in OrcaSlicer under "Others." A verbose Gcode essentially just adds a comment to every line of your Gcode commands. It makes the gcode easier to understand and helps you figure out what each word does.
This is great for figuring out why a print job didn't work or why it failed, but it isn't very useful for basic users in other ways. You can skip this one if you want, and you won't be missing out on much.
Label Objects
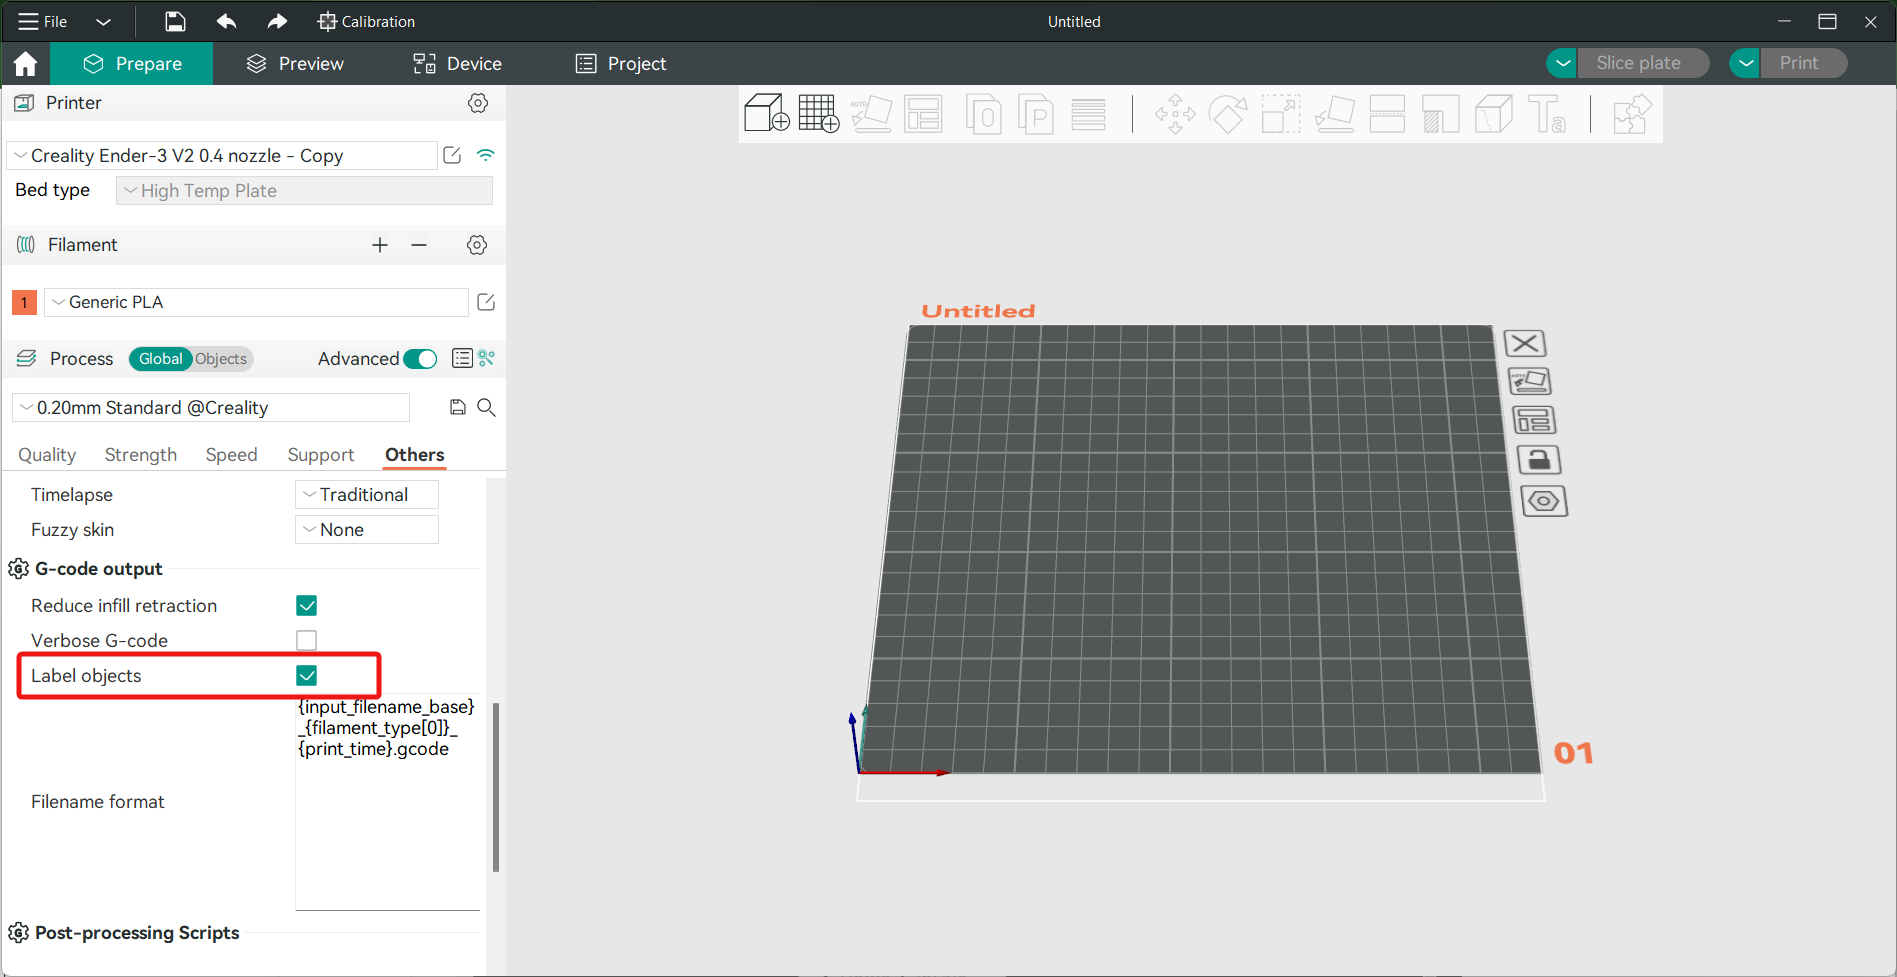
This tool is useful for printing with Klipper and Octoprint. You can label things and give each model on the build plate a name. If one of your prints fails, you can stop printing the failed model by using Klipper Exclude Objects feature.
It's a nice tool to have because it saves the rest of the models and helps you waste less time and materials. It would be good for you to keep it on.
Orca Slicer Calibration Menu and Features
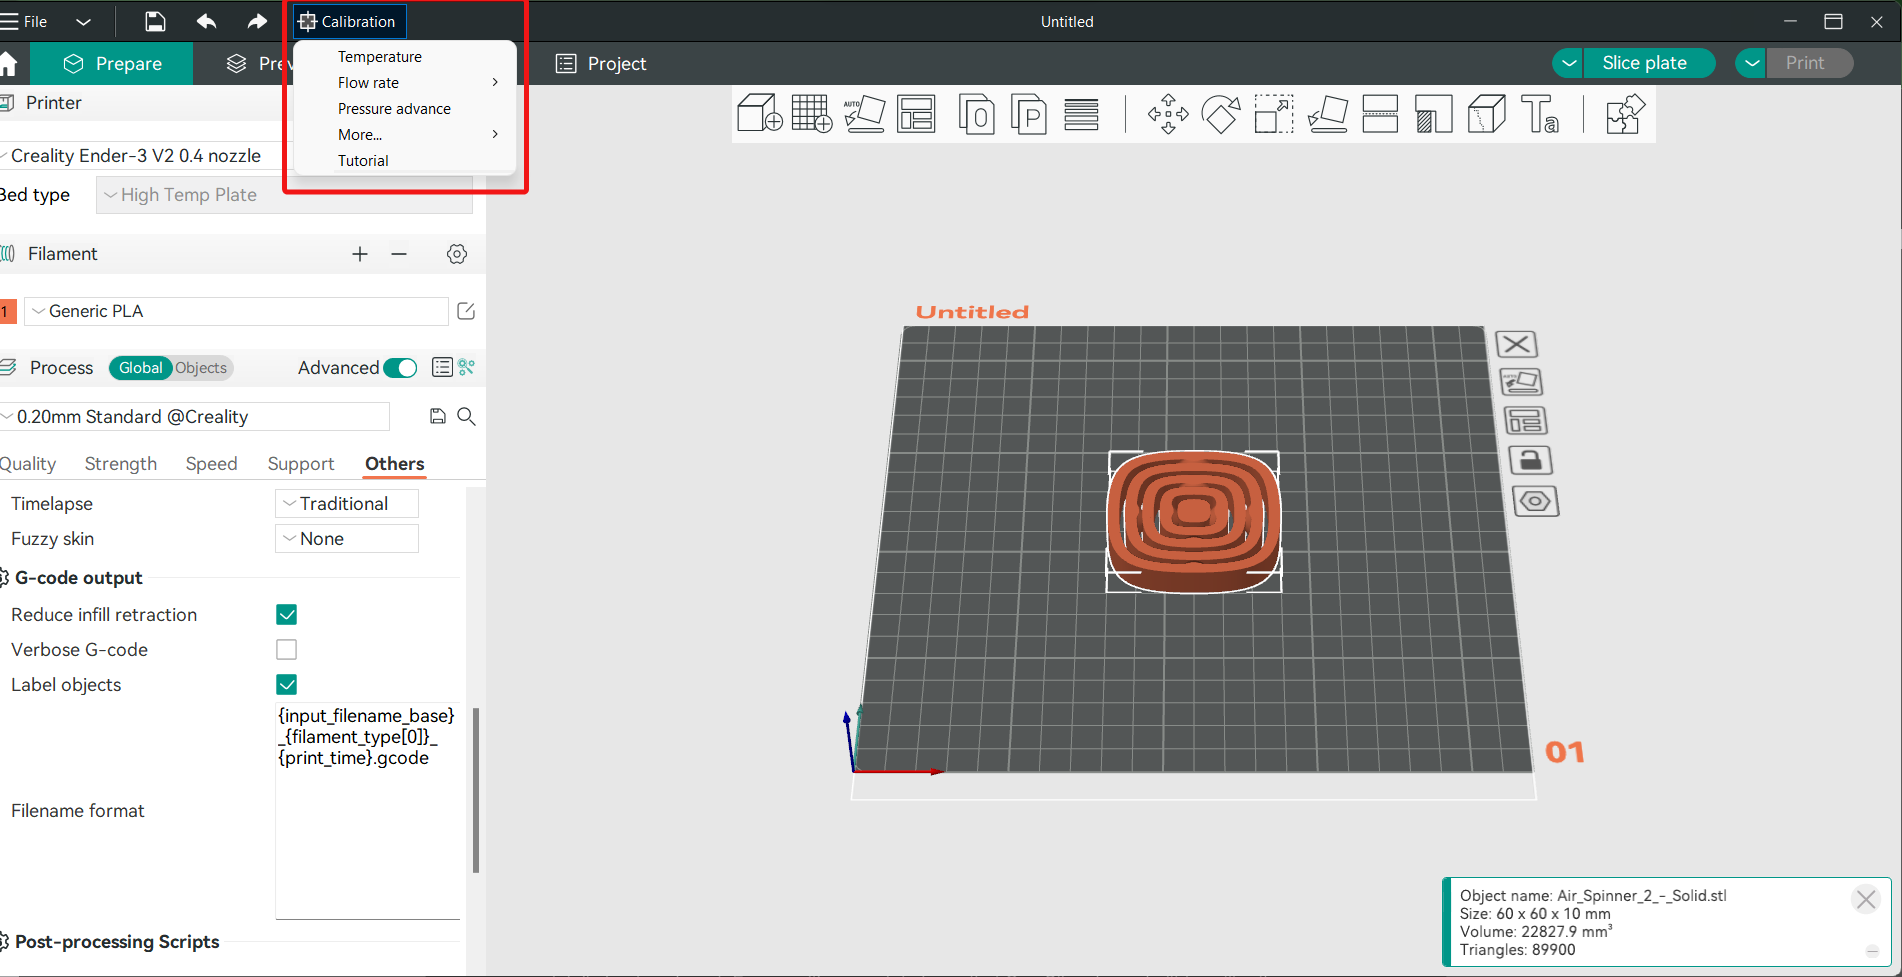
One of the most powerful aspects of Orca Slicer is its comprehensive calibration menu. Proper calibration is crucial for getting the best quality prints, and Orca Slicer provides several built-in tools to help you achieve this. With the V1.4.1 update, Orca Slicer introduced a calibration menu that is fairly similar to the one in SuperSlicer, and this has become a major differentiating factor. The calibration models help you fine-tune your print settings quickly and easily, all from one place.
From the Temperature Tower Test to Flow Rate Calibration and Pressure Advance Calibration, these tools enable precise adjustments to your 3D printer settings.
For an in-depth overview of all these calibration features at a glance in one article, be sure to check out the Orca Slicer Calibration Features .
And if you need more detailed guides for each calibration, we have you covered to:
Temperature Tower Test: This is a critical step in determining the optimal printing temperature for your filament. By printing a model at various temperatures, you can easily identify which temperature yields the best quality prints. Orca Slicer simplifies this process by automatically adjusting the temperature during the print. For a detailed guide on how to perform this test, see Temperature Tower Test in Orca Slicer.
Flow Rate Calibration: Ensuring that the correct amount of filament is extruded during printing is essential for achieving strong layer adhesion and a smooth surface finish. With OrcaSlicer, you can run multiple passes of this test to fine-tune your flow rate settings. For more information, visit Flow Rate Calibration in Orca Slicer .
Pressure Advance Calibration: This feature is designed to optimize the extrusion during changes in print speed, particularly around corners. Proper calibration of pressure advance results in sharper corners and reduces issues such as stringing and blobs. You can read more about this feature in Pressure Advance Calibration in Orca Slicer.
Tolerance Testing: For those interested in achieving precise fits in their 3D prints, the Tolerance Test in Orca Slicer is invaluable. It allows you to test your printer’s ability to reproduce dimensions accurately, which is crucial for parts that need to fit together perfectly. It will help you understand what clearance you should use in your designs. To learn how to run this test, check out Tolerance Test in OrcaSlicer.
Maximum Volumetric Speed Testing: Orca Slicer also offers a Maximum Volumetric Speed Test to push the limits of your printer. This test determines the maximum rate at which your printer can extrude filament without under-extrusion or other quality issues, helping you to optimize print speeds. Get detailed instructions in Maximum Volumetric Speed Test in Orca Slicer.
Vertical Fine Artifacts (VFA) Test: The Speed Test in Orca Slicer allows you to determine the maximum speed at which your printer can operate while maintaining high print quality. By testing at various speeds, you can pinpoint the ideal balance between speed and print precision. For a deeper dive, explore Speed Test in Orca Slicer (VFA).
Retraction Test: Stringing and oozing can be minimized by conducting a Retraction Test. Orca Slicer provides a simple way to adjust the retraction settings, ensuring clean prints with minimal artifacts between print sections. For step-by-step instructions, see Retraction Test in Orca Slicer.
Remote Printer Control
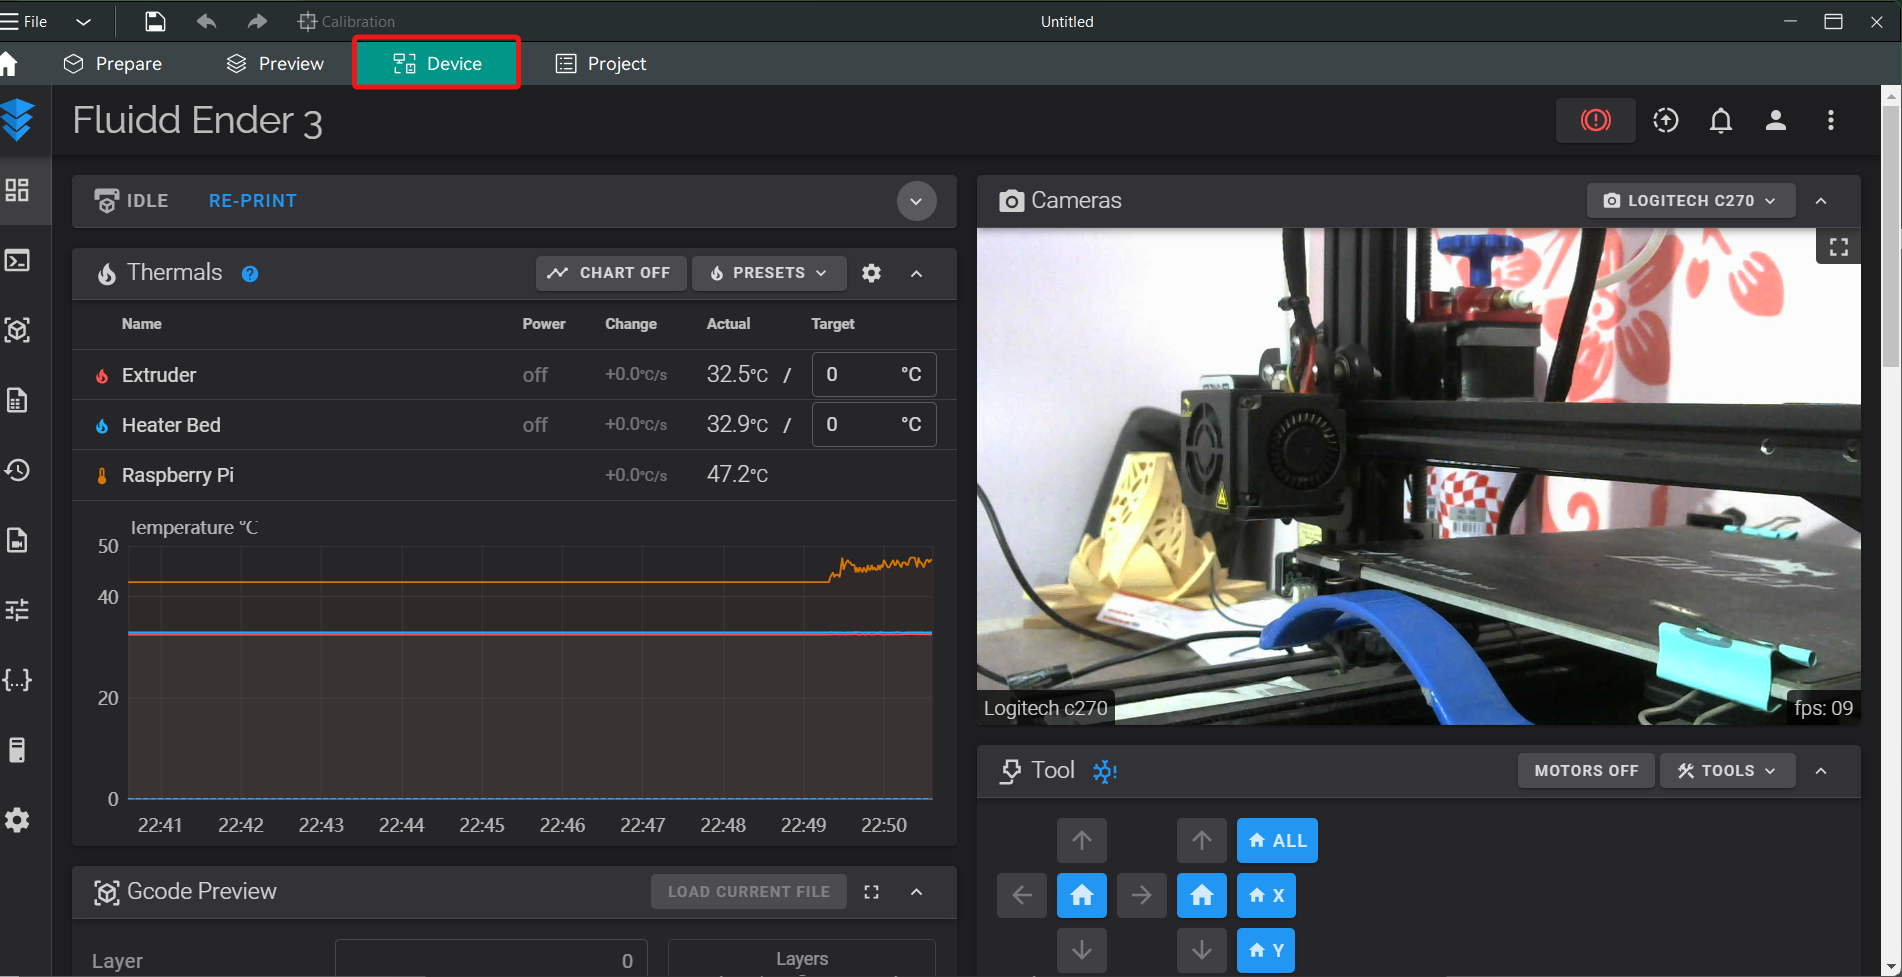
One other thing that we like about Orca Slicer is the Printer control feature which it retains from the BambuStudio. The printer control window lets you access your printer's interface from a laptop or computer. This means you can check on and use your printer from a distance.
For example, on our Klipper Ender 3 3D printer, we were able to open the Klipper interface right in the OrcaSlicer window. It's the same as our printer's Klipper interface, and we no longer have to open the browser to use it.
Once your Octoprint or Klipper 3D printer is connected to Orca Slicer, you can also use OrcaSlicer to access your printer. This tool just makes it easy for users to work with their machines. Even popular slicers like the PrusaSlicer, Cura, and SuperSlicer don't have this feature.
For a detailed guide on how to set up and use this Device tap feature, check out the Guide to the Orca Slicer Device Tab. This guide will walk you through the process of integrating Klipper, OctoPrint, and Obico into OrcaSlicer, allowing you to manage your 3D printers more effectively and efficiently.
Get more with Obico (The Spaghetti Detective)
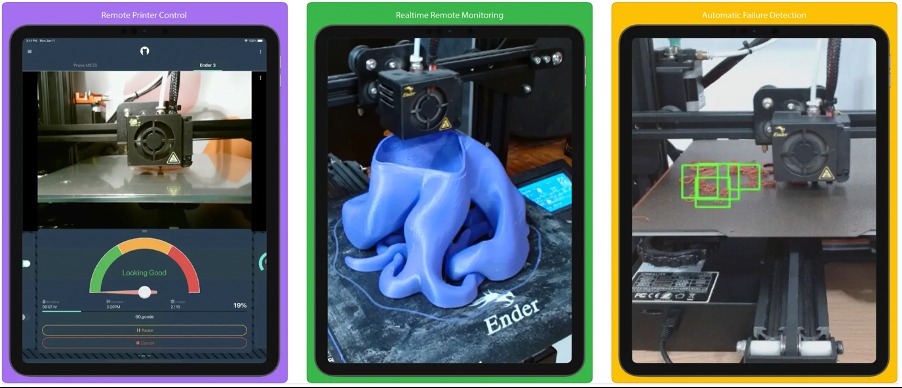
Even though Orca Slicer lets you manage your printer remotely, your reach is capped by the range of your Wi-Fi network. This implies that you can only operate the printer if it and your device are on the same network. When you leave the house, the link is broken.
Here comes Obico. You can use your 3D printer from anywhere in the world with Obico. From a single piece of software, you can track the progress of your print job, run the printer, and record a time-lapse movie of your prints.
There's a function called "tunneling," which lets you connect your Klipper or Octoprint interface to your mobile device via a secure feed. You can use it to view your Klipper interface on the go from your PC, phone, or tablet. It really lets you run the printer from places other than your home.
Obico is great at finding problems as well as being able to be controlled remotely. It uses machine learning to correctly find print failure and let you know right away. You can let Obico automatically pause the print or stop it yourself if the print fails completely.
The good news is that Obico has recently integrated with OrcaSlicer, which means you can access Obico through the same window in your Orca Slicer and get full control over your printer from anywhere, not only when connected to the same local network, this integration also allows for sending files directly from Orca Slicer to your machine to start printing.
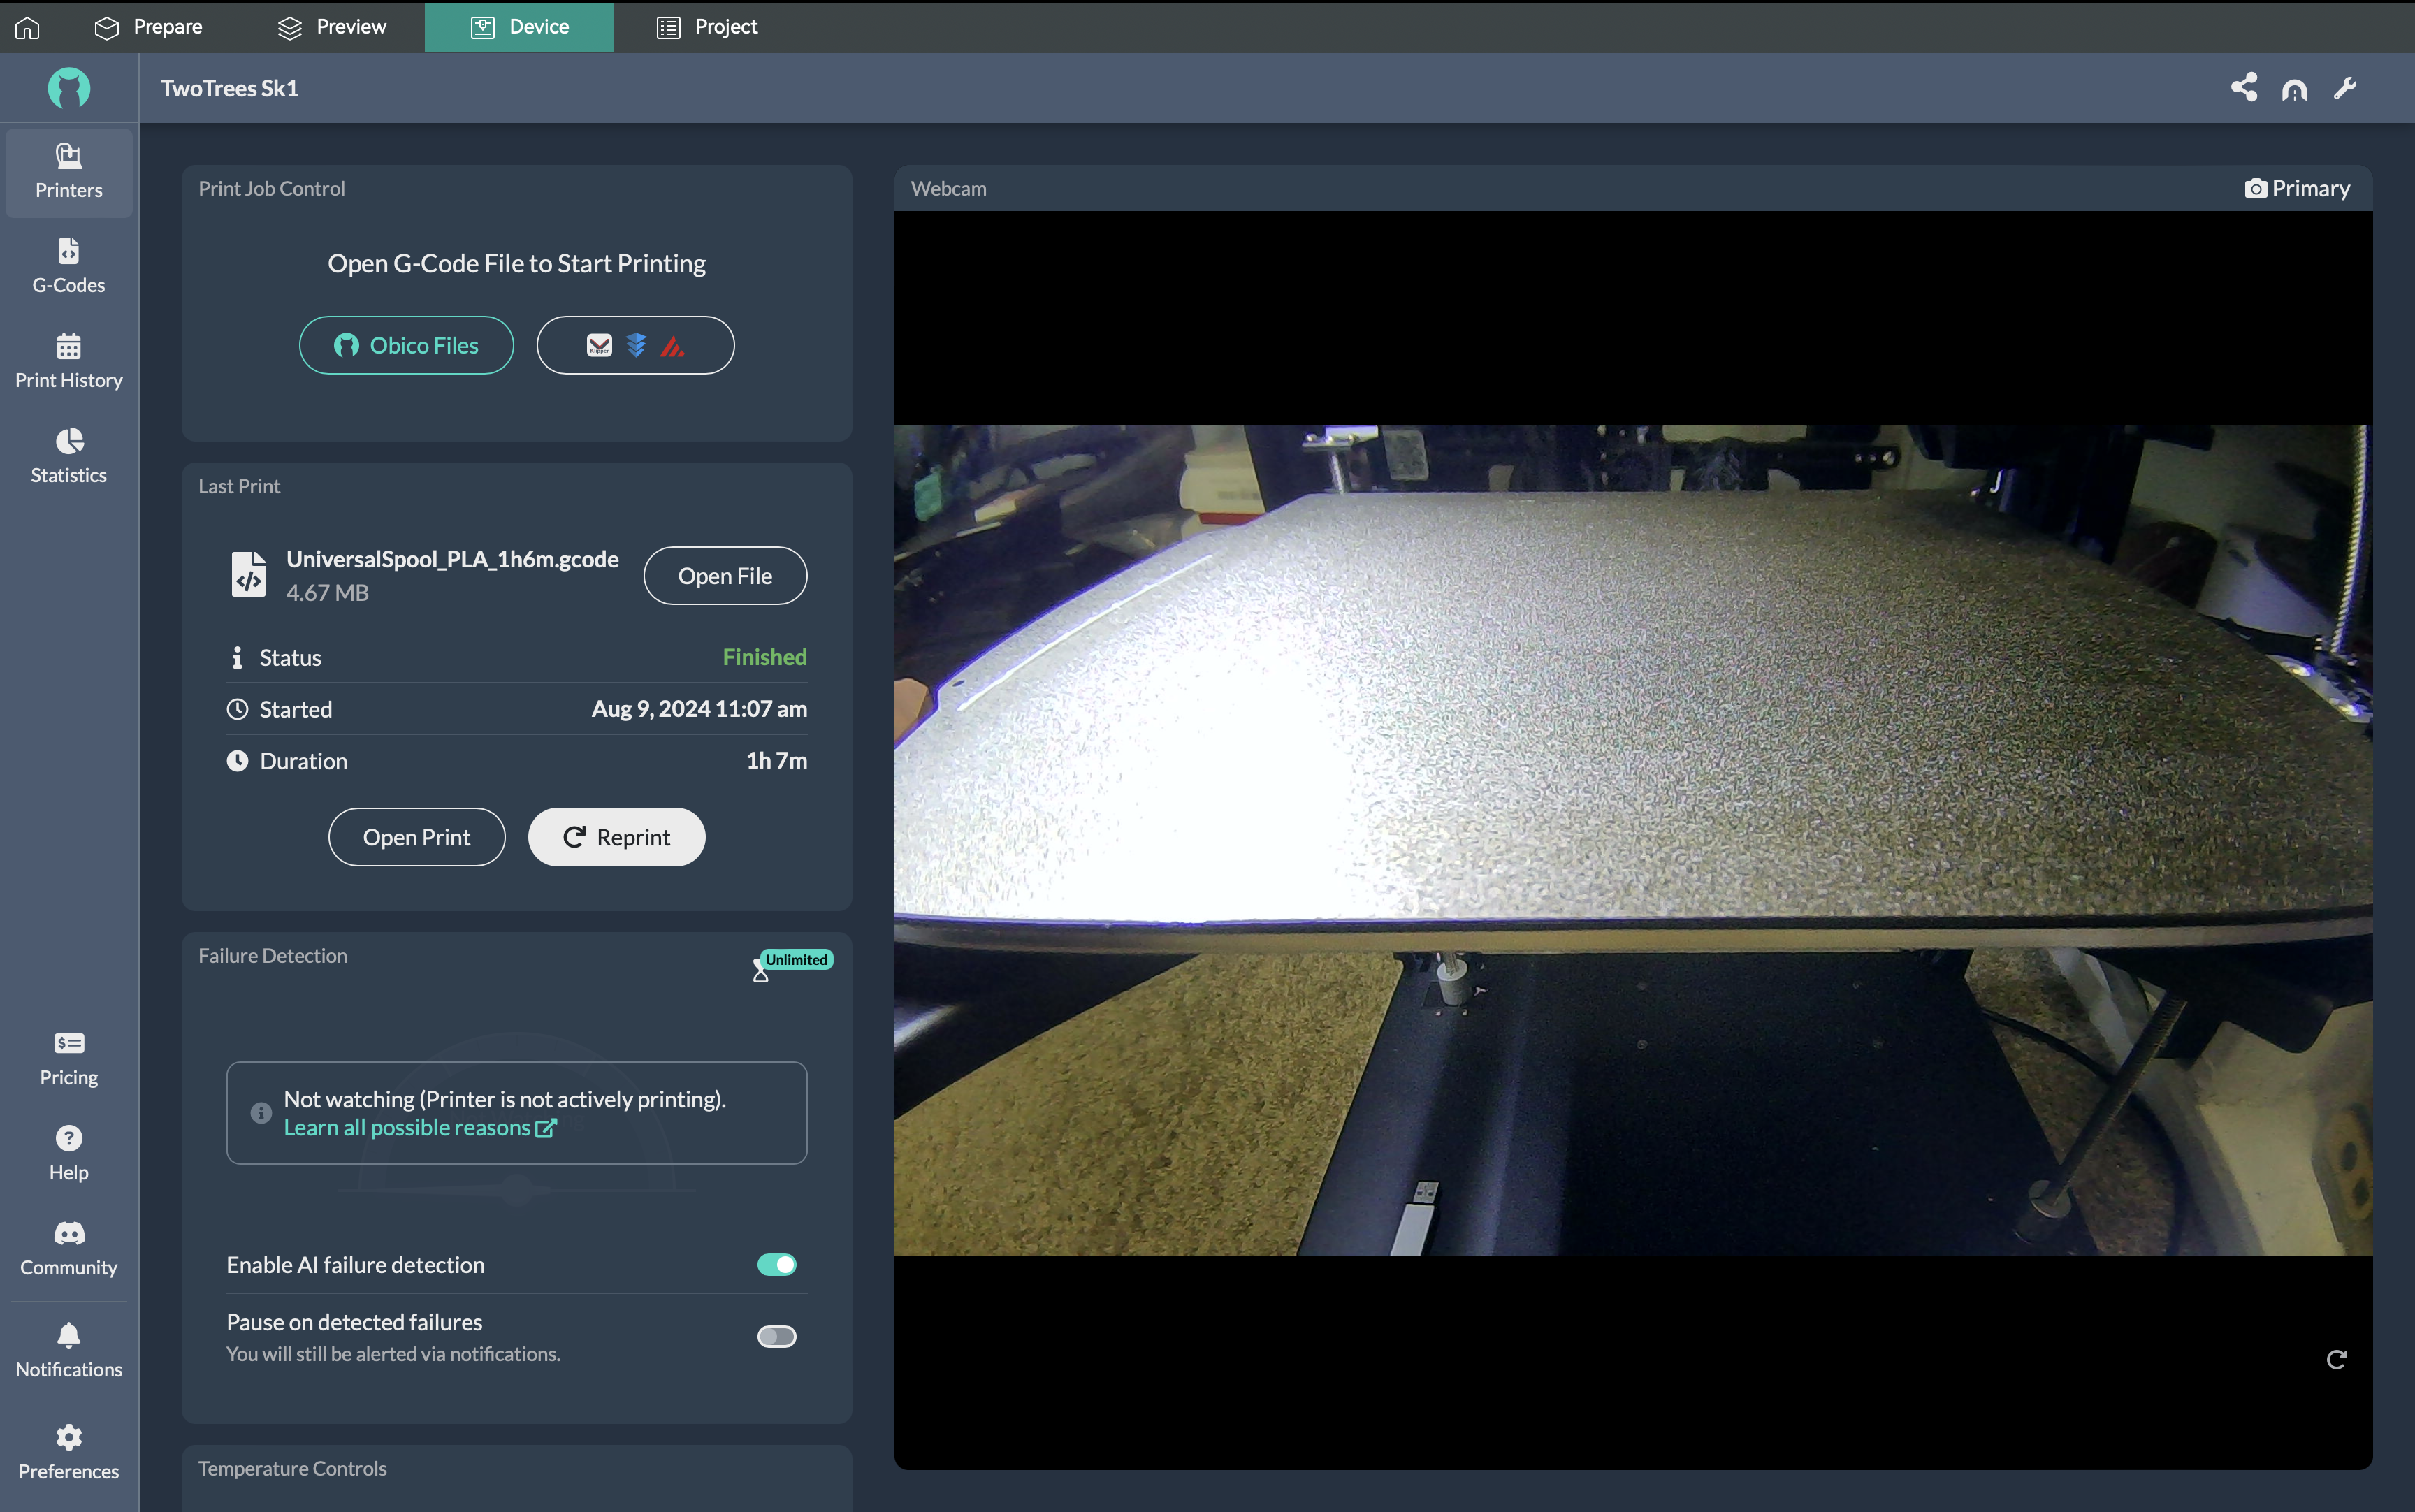
Additionally, Obico has launched an online slicer powered by Orca Slicer under-the-hood, allowing users to slice and print files from anywhere, even from a mobile phone.
To easily integrate and connect Orca Slicer with Obico, follow this guide on how to connect OrcaSlicer to Obico.
In essence, Obico is a remote helper for your 3D printing endeavors. It watches the printer for you and makes sure everything is running smoothly. It's a very useful piece of software that can save you a lot of time and money.
There is also the Obico Discord group, which is a one-stop shop for all your questions and ideas. Obico is on the PlayStore and the iOS app store, and you can help us out by giving us a Star on GitHub.
Related Links
Here are some helpful resources to deepen your understanding of Orca Slicer and enhance your 3D printing experience:
- OrcaSlicer: 3D Printer Calibration Features Deep Dive
- Temperature Tower Test in Orca Slicer: A Comprehensive Guide
- Flow Rate Calibration in OrcaSlicer: A Comprehensive Guide
- Pressure Advance Calibration in Orca Slicer: A Comprehensive Guide
- Tolerance Test in OrcaSlicer: A Comprehensive Guide
- Maximum Volumetric Speed Test in Orca Slicer: A Comprehensive Guide
- Speed Test in OrcaSlicer (VFA): A Comprehensive Guide
- Retraction Test in Orca Slicer: A Comprehensive Guide
- How to Connect OrcaSlicer to Obico
- Orca Slicer vs PrusaSlicer vs Cura: Comparing the Most Popular Slicers
- How to Setup a 3D Printer in OrcaSlicer
- Guide to the Orca Slicer Device Tab
- OrcaSlicer Seam Settings - How to Use It
FAQs
Q: What is OrcaSlicer, and why should I consider using it over other slicers?
Answer: OrcaSlicer is an advanced slicing software for 3D printers, developed as a fork of Bambu Studio, which itself is based on PrusaSlicer. It enhances the basic features of Bambu Studio by adding more printer presets, detailed print settings, and a range of advanced tools that improve the overall 3D printing experience. Unlike Bambu Studio, which has some limitations, OrcaSlicer provides greater customization options, including custom printer profiles, auto-calibrations, and native support for Klipper firmware. These features make it a compelling choice for users seeking more control and precision in their 3D printing process.
Q: How do I download and install OrcaSlicer?
Answer: To download OrcaSlicer, you can visit the OrcaSlicer Releases page on GitHub or the official OrcaSlicer website. After downloading the appropriate version for your operating system, unzip the file and run the orca-slicer.exe file to install the software. OrcaSlicer is compatible with Windows, Mac, and Linux.
Q: Is OrcaSlicer compatible with my 3D printer?
Answer: OrcaSlicer supports a wide range of 3D printers, including those using Klipper and Marlin firmware. It comes with pre-configured profiles for many popular printers. If your printer isn’t listed, you can easily create a custom printer profile by following the steps outlined in the printer setup guide.
Q: How do I set up my 3D printer in OrcaSlicer?
Answer: Setting up your 3D printer in OrcaSlicer involves selecting your printer model, configuring filament settings, and adjusting slicing parameters. The software offers a user-friendly setup wizard that guides you through the process. If you need more detailed instructions, the How to Setup a 3D Printer in OrcaSlicer guide provides comprehensive steps, including how to add custom printer profiles.
Q: What unique features does OrcaSlicer offer that Bambu Studio does not?
Answer: OrcaSlicer stands out with several unique features, including additional and custom printer profiles, auto-calibrations for various printers, the Sandwich mode (an improved version of the External Perimeters First mode), and advanced seam settings to reduce Z-seam visibility. The slicer also supports Klipper firmware natively. These features offer users greater flexibility and control over their 3D printing process. For an in-depth overview, check out the calibration features guide.
Q: Can OrcaSlicer help me manage and reduce Z-seams in my prints?
Answer: Yes, OrcaSlicer offers advanced seam management tools, including the Seam Gap setting and Wipe on Loops. The Seam Gap setting helps prevent excess material from being extruded at layer changes, reducing the visibility of Z-seams. Wipe on Loops, enabled by default, moves the nozzle slightly inward as the layer loop closes, further helping to hide seam lines. For detailed guidance, see the seam settings guide.
Q: How do I perform a Temperature Tower Test in OrcaSlicer, and why is it important?
Answer: The Temperature Tower Test in OrcaSlicer is essential for determining the optimal printing temperature for your filament. The software automates the process by adjusting the temperature at different levels of a single print, allowing you to see how temperature affects the print quality. Conducting this test helps you achieve better layer adhesion and reduces issues like stringing or warping. For a step-by-step guide, refer to the Temperature Tower Test article.
Q: How do I use OrcaSlicer’s Pressure Advance Calibration feature to improve print quality?
Answer: The Pressure Advance Calibration feature in OrcaSlicer helps optimize extrusion during speed changes, particularly around corners, which is crucial for achieving sharper edges. Proper calibration ensures that filament is extruded consistently, even when the print speed varies, resulting in cleaner prints. For detailed instructions, check the Pressure Advance Calibration guide.
Q: Can I control my 3D printer remotely with OrcaSlicer, and how do I set it up?
Answer: Yes, OrcaSlicer allows remote control of your 3D printer via its Printer Control feature, which supports integration with Klipper, Octoprint, and Obico. To set it up, connect your printer to OrcaSlicer using your network settings. Once configured, you can manage and monitor your prints remotely. For more information on setting up remote control, see the Device Tab guide.
Q: How do I conduct a Flow Rate Calibration in OrcaSlicer, and why is it important?
Answer: Flow Rate Calibration is crucial for ensuring that your printer extrudes the correct amount of filament during printing, which affects layer adhesion and surface finish. OrcaSlicer allows you to conduct multiple passes of this test to fine-tune your settings for optimal print quality. Accurate flow rate calibration helps avoid issues like under-extrusion, which can weaken prints, or over-extrusion, which can cause blobs and stringing. For a comprehensive guide, check out the Flow Rate Calibration article.
Q: How can I perform a Tolerance Test in OrcaSlicer to ensure precise fits in my prints?
Answer: The Tolerance Test in OrcaSlicer is designed to evaluate your printer’s ability to produce parts with precise dimensions. This is especially important for prints that need to fit together, such as mechanical parts. The test helps you understand the clearance needed in your designs to achieve the best fit. Detailed instructions for running a Tolerance Test can be found in the Tolerance Test guide.
Q: What is the Speed Test in OrcaSlicer, and how does it help optimize my printing process?
Answer: The Speed Test in OrcaSlicer allows you to determine the maximum speed at which your printer can operate while maintaining high print quality. By testing at various speeds, you can find the ideal balance between speed and precision, optimizing your printing process for faster production without sacrificing quality. For a detailed explanation and instructions, refer to the Speed Test guide.
Q: How do I conduct a Retraction Test in OrcaSlicer to minimize stringing?
Answer: The Retraction Test in OrcaSlicer helps you fine-tune retraction settings to minimize stringing and oozing between print sections. Adjusting these settings is essential for achieving clean prints, especially when printing with materials prone to stringing. OrcaSlicer provides a straightforward method to adjust retraction settings and see the results immediately. For detailed instructions, visit the Retraction Test guide.
Q: How does OrcaSlicer integrate with Obico for remote 3D printing management?
Answer: OrcaSlicer integrates seamlessly with Obico (formerly The Spaghetti Detective) for enhanced remote 3D printing management. This integration allows you to control and monitor your printer from anywhere, beyond the limitations of your local Wi-Fi network. Obico also provides advanced features like AI-driven print failure detection and remote access to your Klipper or Octoprint interface. You can manage your printer, track print progress, and even pause or stop prints if a failure is detected. For setup instructions, check out the guide on connecting OrcaSlicer to Obico.
Final Thoughts
OrcaSlicer is definitely a neat step up over the Bambu Studio. That doesn't mean the Bambu Slicer isn't great; it's just missing some useful tools. Orca Slicer is great for printing if you like to play around with your printer and need full control over the process. If you like to keep things straightforward, the Bambu Studio is a better choice. If you've used the OrcaSlicer before, feel free to tell us what you think about it and how it worked for you. In the meantime, you can try out our Obico program and tell us about your remote 3D printing experiences in the comments.
Also available in: Deutsch | Español | Français | Italiano | Nederlands | Polski | Português | Русский
