Maximum Volumetric Speed Test in OrcaSlicer: A Comprehensive Guide
Hello there! Welcome to our easy-to-understand guide on how to control the OrcaSlicer maximum volumetric speed test for 3D printing enthusiasts. If you’re looking forward to enhancing print quality and efficiency, then this is the best place for you. This tutorial will help you optimize your printer’s volumetric speed that determines at what speed you can print without compromising on quality.
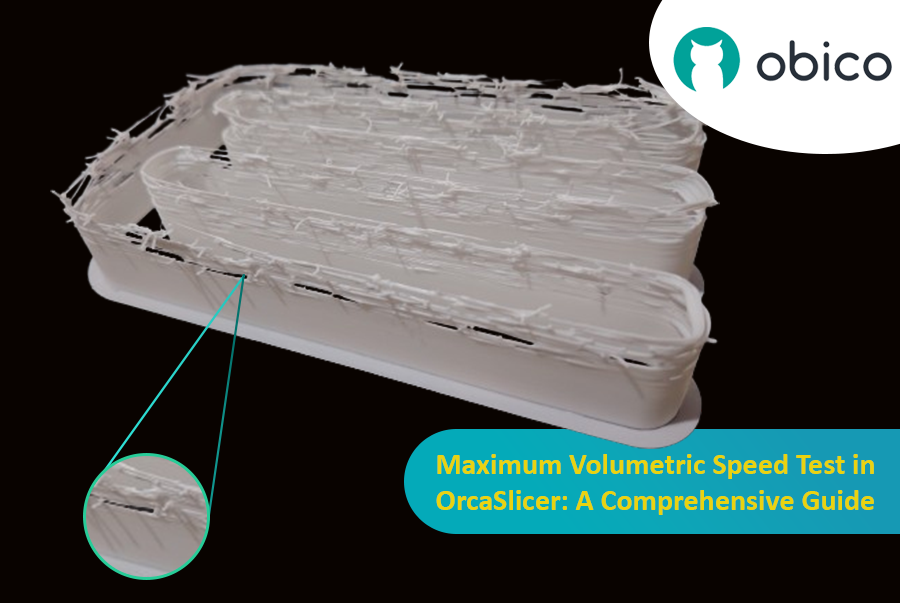
Volumetric speed knowledge is crucial in 3D printing because it enables one understand how fast a printer can produce objects with accuracy. If this speed is tested and adjusted, under extrusion among other common problems while printing can be avoided thus ensuring that all your prints are good-looking even at higher speeds.
We will be outlining what volumetric speed means, why it should be tested, things that affect it as well as those which are affected by it plus how to do this using OrcaSlicer in this article. Whether you are new or just want some improvement tips for your 3D printing skills then keep reading because we have got all these covered and more practical steps too…
So let us dive right in!
Overview of OrcaSlicer
In this article we will use OrcaSlicer for our Max Volumetric Speed test. What makes Orcaslicer special at this point is that it provides easy tests via the build in calibration tools.
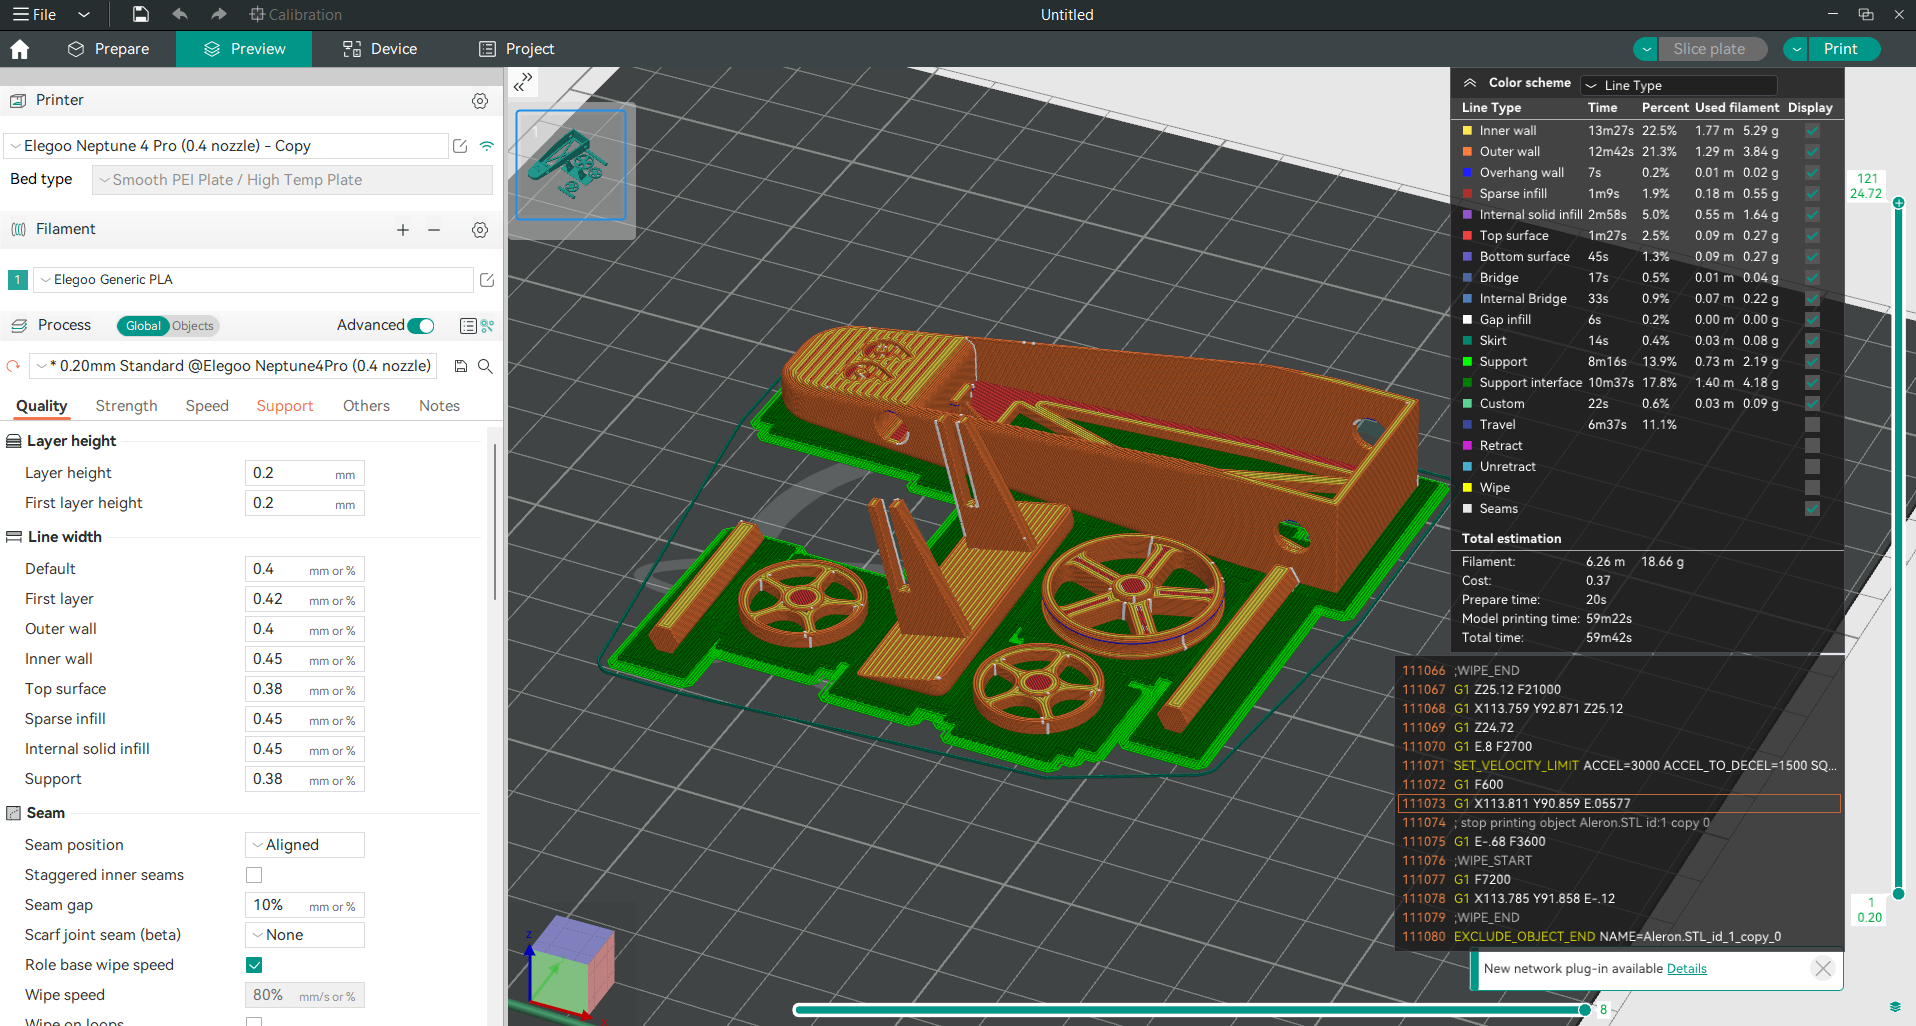
OrcaSlicer is an open-source 3D printing slicer software primarily designed for printers compatible with Marlin, Klipper, and Bambu Lab firmware. It supports various popular models from brands like Creality, Prusa, Elegoo, and even the open-source Voron. Here are some key features of OrcaSlicer:
- Modern, Clean Interface: OrcaSlicer boasts a well-organized and intuitive interface that is easy to navigate, even for beginners.
- Pre-made Printer Profiles: It comes with pre-made printer profiles for most popular 3D printers, allowing you to get started quickly without manual configuration.
- Firmware Integration: OrcaSlicer seamlessly integrates with popular 3D printing software and firmware, such as Klipper, OctoPrint, and Marlin.
- Built-in Calibration Tools: OrcaSlicer includes tools like Temperature Tower, flow rate calibration, and pressure advance calibration.
- Wide Filament Support: It works with a wide range of filaments, including PLA, ABS, PETG, TPU, and nylon from different brands.
- Regular Updates and Open-source: OrcaSlicer is constantly evolving, with new features and bug fixes being added regularly.
Now that we know what OrcaSlicer is and why it’s useful for our Max Volumetric Speed test, let’s cover some important details before we start the test.
What is the volumetric speed?
Volumetric speed in 3D printing is the rate at which the printer can extrude plastic in a given amount of time. Think of it like the speed at which your printer can "pour" melted plastic to create an object. This rate is measured in cubic millimeters per second (mm³/s). Properly controlling this speed is essential for maintaining the printer's efficiency and preventing problems such as gaps or weak spots in the printed object. Finding the optimal volumetric speed allows for faster printing while maintaining high quality and strength in the finished prints.
What is the importance of testing volumetric speed?
It is important to test the maximum volumetric speed of your 3D printer because it allows you to identify the fastest speed at which you can print without encountering issues such as under-extrusion, which occurs when insufficient material is extruded due to the volumetric speed limitation. It is essential to note that every material, extruder type, and nozzle has a specific volumetric speed limit that should not be exceeded.
This means you can make your prints as fast as possible without sacrificing quality. Knowing this helps you avoid wasting time and materials on prints that don't turn out right, making your whole printing process more efficient and reliable.
What are the factors that impact volumetric speed?
There are many factors that impact the volumetric speed and affect how a printer can extrude filament, determining the limited speed that you can print with.
Let’s discover some of these factors together!
Nozzle Size
The size of the nozzle is important in determining the speed of the filament. For example, larger nozzles allow for more filament flow, increasing the speed, while smaller nozzles restrict flow, reducing the speed.
Material Properties
Different materials have different properties that affect how they flow through the nozzle. This is due to the nature and properties of these materials, which affect the maximum speed that can be achieved with these materials. For example, the PLA has an approximately maximum volumetric speed of 15 mm³/s, while the ASA and ABS have an approximately maximum volumetric speed of 11 mm³/s and 8 mm³/s for PETG.
Hotend Capability
The design and capability of the hotend, which melts the filament, are crucial. Some hotends can reach higher temperatures and maintain consistent heat better with good cooling, allowing for faster and more reliable speeds.
Thermal Conductivity of the Nozzle
The materials used in the nozzle affect its thermal conductivity. Nozzles made from plated copper or tungsten carbide have higher thermal conductivity than those made from hardened steel, potentially allowing for better heat transfer and a higher flow rate.
Internal Geometry of the Nozzle
Certain nozzles, like the Bondtech CHT nozzles, have unique internal designs that enhance filament flow, enabling higher speeds without the risk of jams or under-extrusion.
Printer’s Mechanical Configuration
The physical setup and calibration of the printer can impact how smoothly and quickly filament is fed into the hotend, affecting the speed. Factors like the tension in the extruder drive gear and the condition of the filament path play a role.
Printing Temperature
Higher printing temperatures can reduce filament viscosity, making it easier to extrude at higher speeds. However, setting the temperature too high can lead to issues like oozing and stringing, while too low a temperature may prevent proper melting, both affecting the effective speed.
Environmental Conditions
External factors like the surrounding temperature and humidity can impact the characteristics of the filament, such as its flexibility and moisture level. These factors can also affect the melting and extrusion process.
What are the factors Volumetric speed affects?
Volumetric flow rate in 3D printing impacts various aspects of the printing process, particularly print speed and overall print quality. Here’s how volumetric flow affects these factors and how you can calculate print speed from the volumetric flow rate:
Factors Affected by Volumetric speed
Print Speed:
- Direct Impact The volumetric flow rate sets the upper limit for how fast your printer can operate without experiencing issues. If you increase the print speed beyond what the volumetric flow rate can support, it can lead to under-extrusion, where the printer fails to deposit enough filament.
Note: When using OrcaSlicer, the printing speed is limited by the volumetric speed. You can’t go faster than this limit. Sometimes, adjusting the high-speed setting in OrcaSlicer won’t work because it exceeds the volumetric speed value. To make sure your speed adjustments take effect, consider increasing the volumetric speed value in your slicer.
- Optimal Speed Calibration By knowing the highest volumetric flow rate of your printer, you can adjust the print speed to achieve maximum efficiency without sacrificing the quality of the final output.
Print Quality:
- Consistency and Accuracy A stable volumetric flow ensures that the filament is extruded consistently, which is critical for achieving accurate and reliable layer formation. This consistency helps avoid problems such as blobs, gaps, or uneven layers.
- Surface Finish The smoothness of the printed object’s surface is also influenced by volumetric flow, as uneven extrusion can lead to rough or irregular surfaces.
Calculating Print Speed from Volumetric Flow Rate
The relationship between volumetric flow rate and print speed can be calculated using a simple formula, which considers the cross-sectional area of the filament being extruded. The formula to find print speed is:
Print Speed (mm/s) = Volumetric Flow Rate (mm³/s) / (Layer Height (mm) × Line Width (mm))
Volumetric flow = Speed Line width Layer height
Where:
- Volumetric Flow Rate is measured in cubic millimeters per second (mm³/s).
- Layer Height is the height of each layer of filament laid down, measured in millimeters (mm).
- Line Width is the width of the extruded filament line, also in millimeters.
Example Calculation:
Suppose your printer’s hotend is capable of a volumetric flow rate of 24 mm³/s, and you are printing with a layer height of 0.2 mm and a line width of 0.4 mm. The maximum print speed would be calculated as follows:
Print Speed = 24 mm³/s / (0.2 mm × 0.4 mm) = 300 mm/s
This formula provides a theoretical maximum print speed, but in practice, you might want to operate at slightly lower speeds to ensure reliability and account for variables such as filament type and machine calibration.
What is the volumetric speed test in OrcaSlicer?
The volumetric speed test in OrcaSlicer is an advanced calibration tool aimed at determining the maximum flow rate your 3D printer can handle for a specific type of filament and printer setup, especially when dealing with generic or third-party filaments that may not have pre-set volumetric flow rates. This test is critical for fine-tuning your printer's settings to ensure optimal print quality and speed.
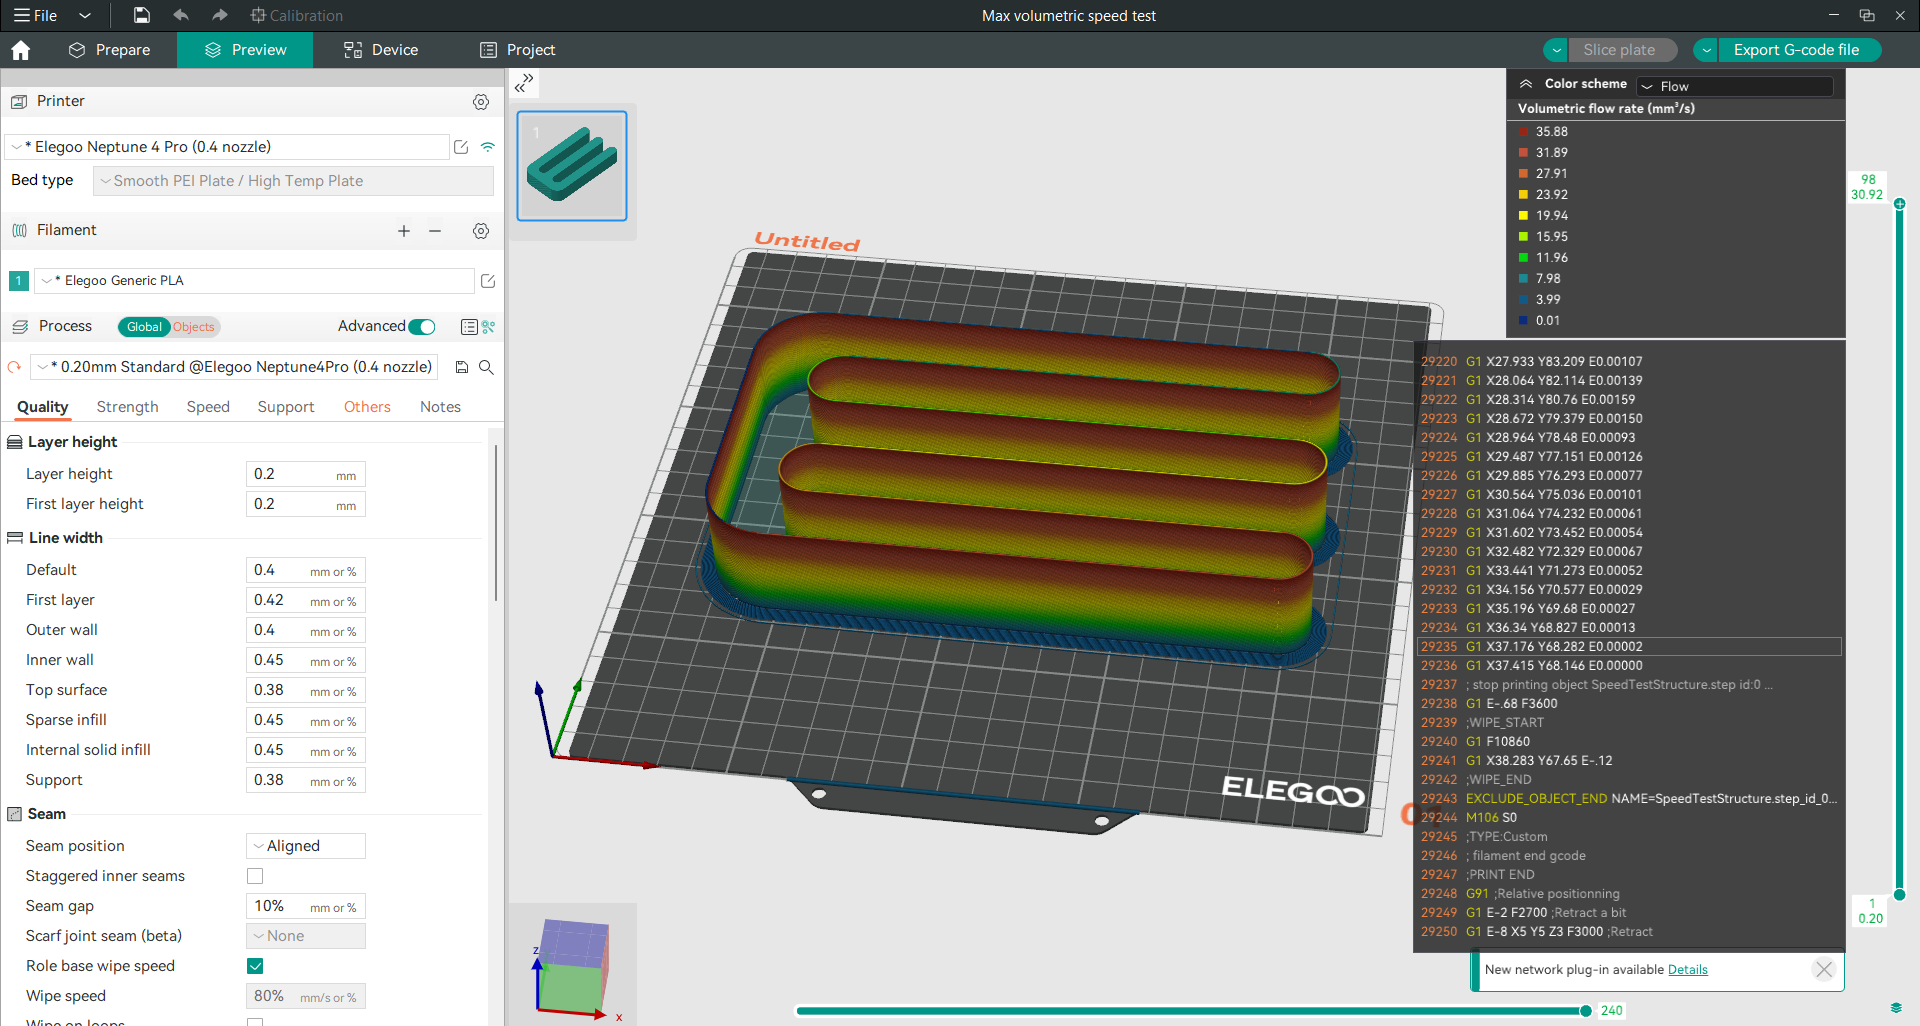
It is a model that consists of twisted walls, adjusted on a variable rate flow that starts at a specific value that you specify and ends at another maximum value with a specified step increment at every millimeter in height. By knowing these values and after printing and examining the model, you can determine the largest flow rate value that you can use and print at in a safe manner, and through it, you can also calculate the maximum speed at which you can print.
Now that we have understood what volumetric speed is, why it's important to test it, the factors that impact it, the factors it affects, and what the volumetric speed test is, let’s proceed with conducting the test using OrcaSlicer. 🚀
Step 1: Download and Install OrcaSlicer
You can download OrcaSlicer from its GitHub page: OrcaSlicer GitHub. Follow the instructions to install it on your computer.
Step 2: Choose Your Printer, Filament, and Process
Open OrcaSlicer and select the printer, filament, and process that you want to use for the test. You can use the default profiles that come with the software, or create your own custom profiles if you have different settings.
Step 3: Access the Max Volumetric Speed Test Feature
After creating a new project, go to the OrcaSlicer Calibration menu and click on more then click on the “Max flowrate” option. This will open a new window where you can adjust the Max flowrate test settings.
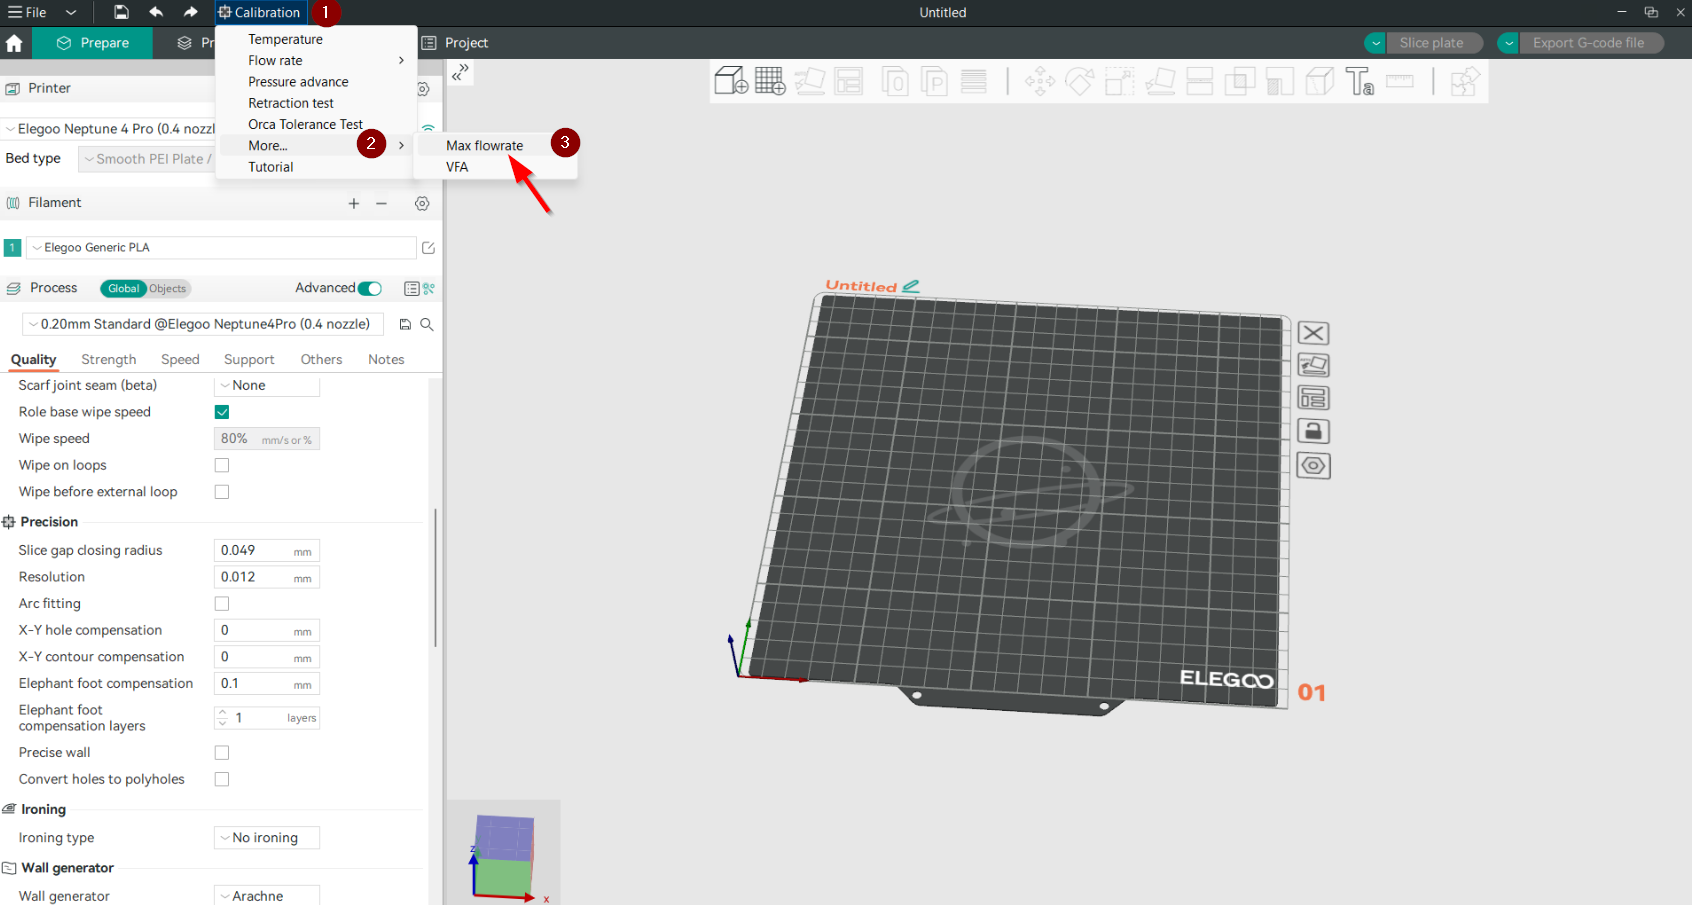
The Max flowrate test settings are:
- Start volumetric speed: This is the value of the volumetric speed for the first section of the tower. The default value is 5 mm³/s, which is a good starting point.
- End volumetric speed: This is the value of the volumetric speed for the last section of the tower. We will set this value to 35 mm³/s, which is suitable for our test where we will see whether the printer can reach it while maintaining good quality or not.
- Step: The default step value is 0.5 mm³/s for every mm until it reaches the end value. To make the tower shorter we will use a step of 1. A smaller step gives a more precise test, but also makes the test longer. We will leave it as default.
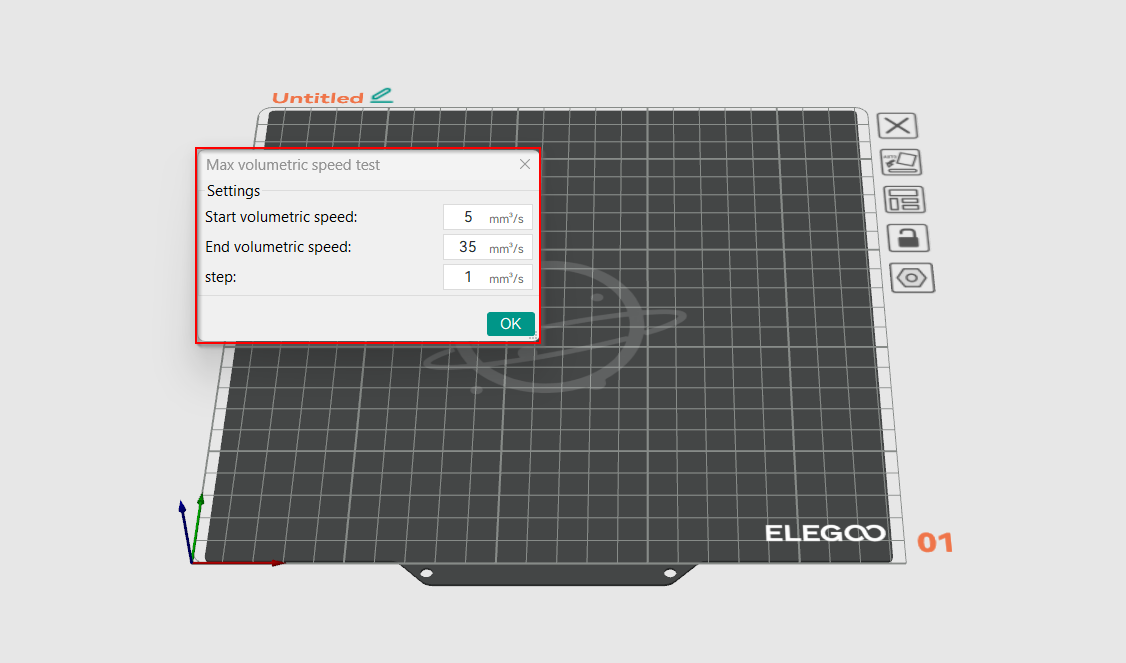
Note: For a successful test, always start with the lower start volumetric speed value.
Step 5: Slice and Print Max Volumetric Speed Test
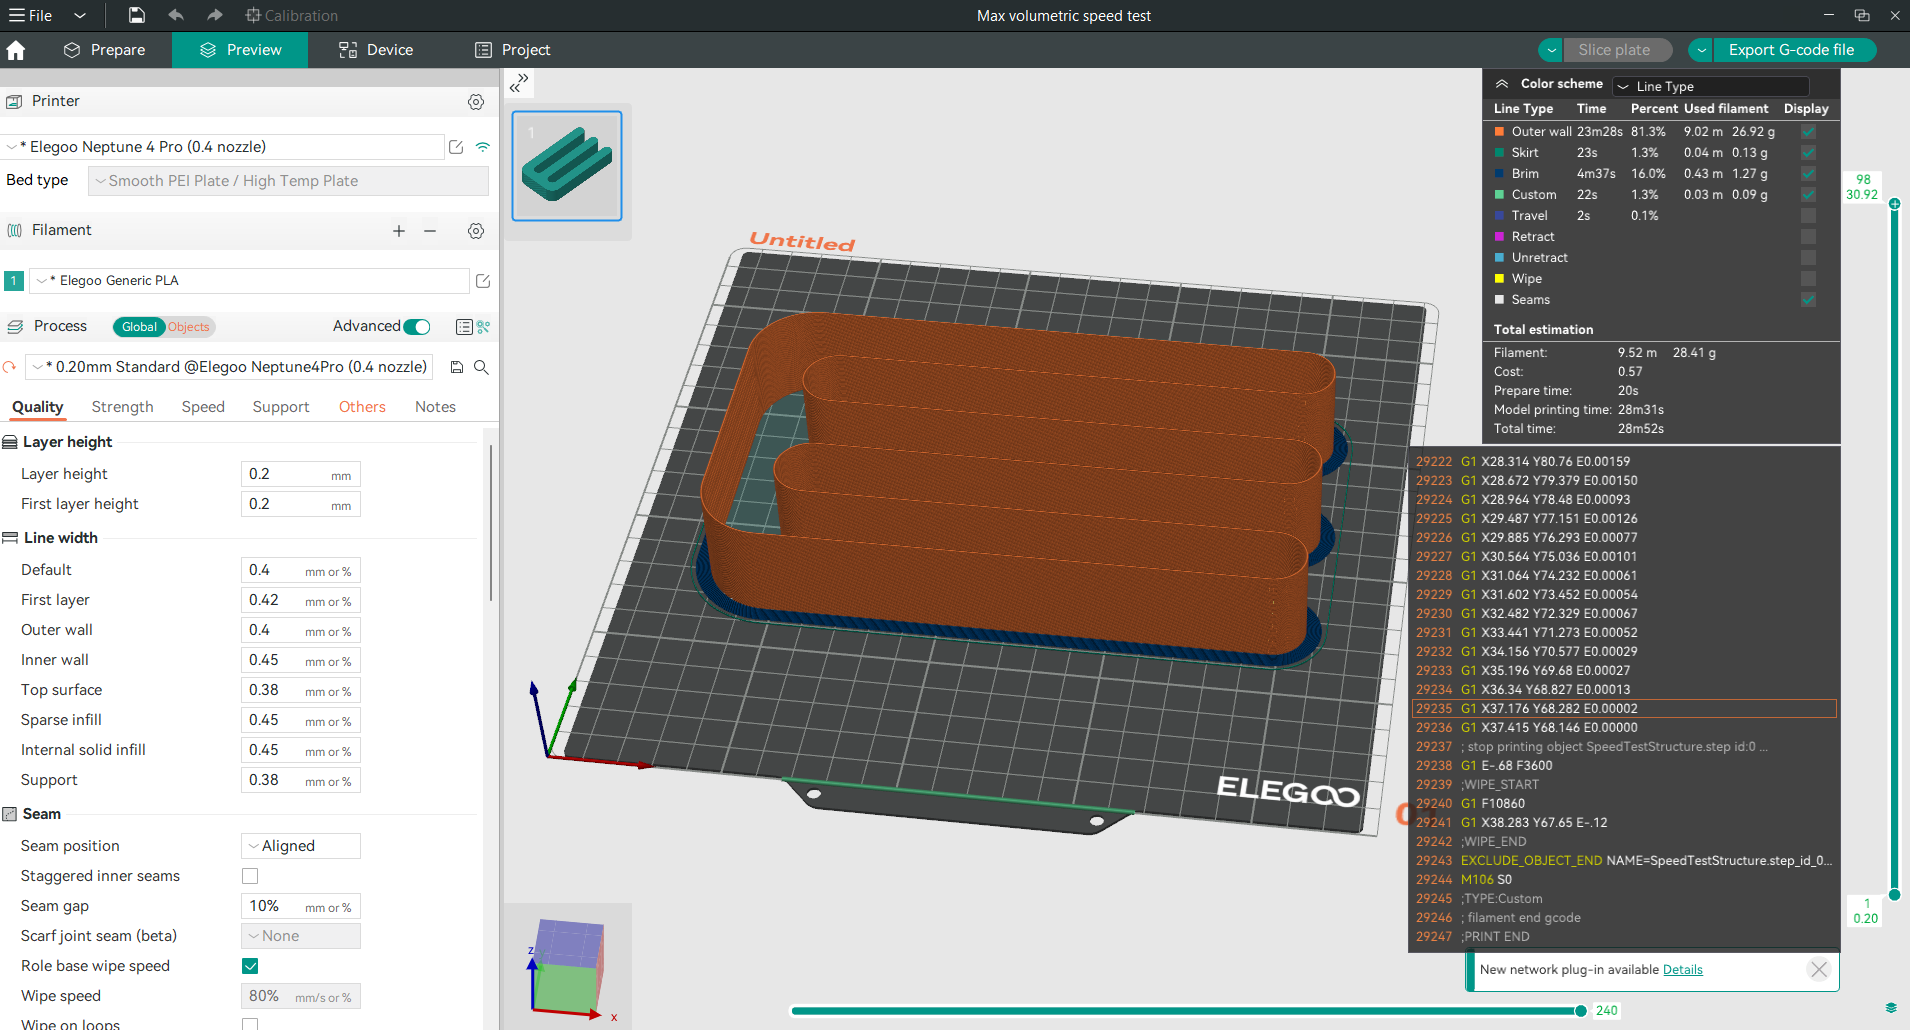
Once you have configured the Max volumetric speed test settings, a new project with the Max flowrate test will appear. You can slice the project and print it. The test has multiple flowrate values with an increment of 0.5 mm³/s (default) for every one millimeter in height. By looking at the test after printing, we can get the maximum value of flowrate that the printer can reach while maintaining good quality. From this value, we can also calculate the maximum safe printing speed that we can print with based on the equation that we have previously discussed.
Relax with Obico
Tip: Explore Obico for OctoPrint and Klipper!
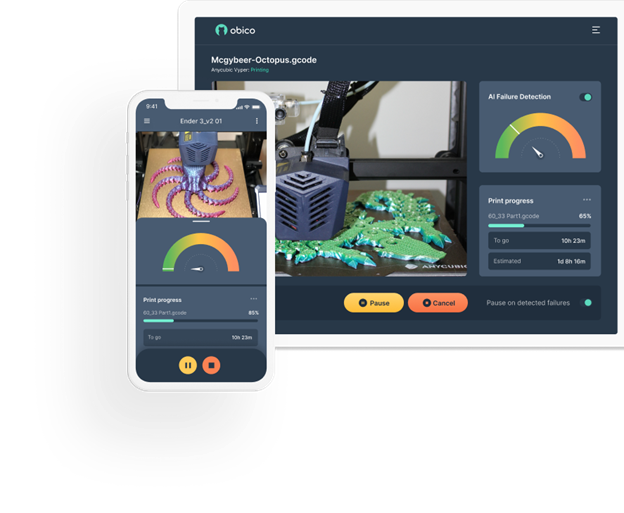
While your Max Volumetric Speed Test is printing, why not explore Obico, the ultimate Smart 3D printing software? With Obico, you can monitor and control your 3D printer from any device and anywhere. You can also relax with Obico's AI failure detection system that keeps an eye on your print and notifies you of any issues. Connect your printer to Obico for free and enjoy unlimited webcam streaming, 3D printer status notifications, 3D printer remote access, and more!

Obico also offers mobile apps for iOS and Android, so you can access and manage your 3D printer from any device and location. Join Obico for free and enjoy the ultimate 3D printing experience.
After completing the Max Volumetric Speed Test with OrcaSlicer, it's time to analyze the results to understand the maximum flow rate that your 3D printer can handle without sacrificing print quality. Here's how you can proceed:
Step 6: Analyze the Results
- Inspect the Print: Once the test print is complete, closely inspect the printed test for any signs of under-extrusion, or other quality issues.
- Measure Critical Points: Use calipers or a precise ruler to measure the height at which noticeable defects begin to occur. This height correlates directly with the volumetric speed setting at that specific layer due to the step increments set in the test.
- Calculate Maximum Volumetric Speed: Identify the last height where the print quality was acceptable. Use the formula provided in the test setup:
Volumetric Speed = Start Volumetric Speed + (Height in mm * Step).
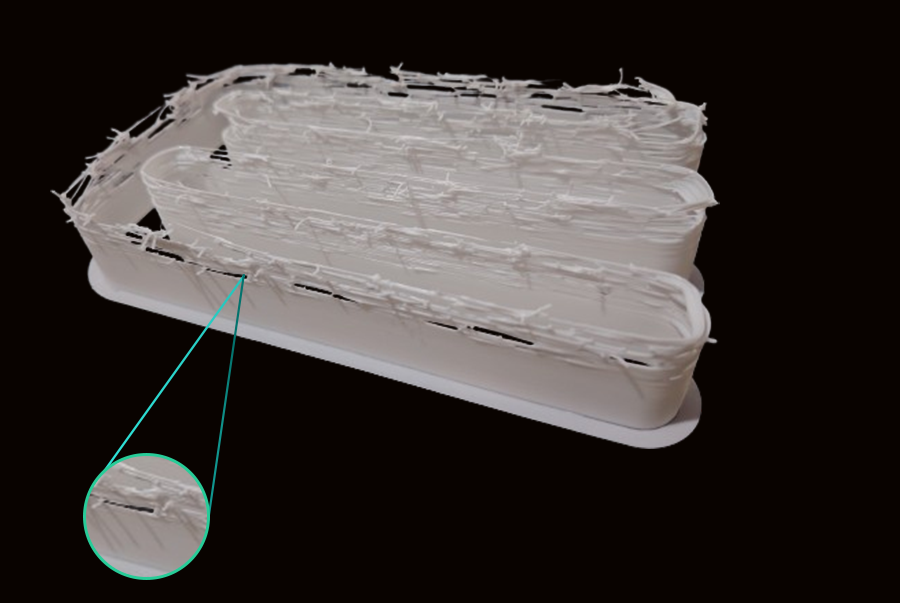
As we see in our test, the issues started at 18 mm from the base, and your starting speed was 5 mm³/s with a step of 2 mm³/s, so the calculation would be:
Volumetric Speed = 5 + (18 * 1) = 23 mm³/s.
And then we can use the previous equation to calculate the suitable speed that we can safely print with:
Print Speed (mm/s) = Volumetric Speed (mm³/s) / (Layer Height (mm) × Line Width (mm))
Print Speed = 23 mm³/s / (0.2 mm × 0.4 mm) = 287.5 mm/s
- Document Findings: Record these findings for future reference. Note the settings that led to the best balance of speed and quality, which will be crucial for optimizing future prints.
- Optional Safety Margin: Consider setting the volumetric speed slightly lower than the maximum found during testing (e.g., reducing it by 5-10%). This safety margin can help accommodate for variable factors like slight filament inconsistencies or environmental changes.
Next Steps:
- Apply Insights to Other Filaments: Repeat the volumetric speed test for other types of filaments you frequently use. Each material may behave differently, so individual testing is crucial.
- Continuous Improvement: As you gain experience, revisit the test if you make significant changes to your printer setup, such as upgrading the hotend, changing the nozzle, or if you notice a change in print quality over time.
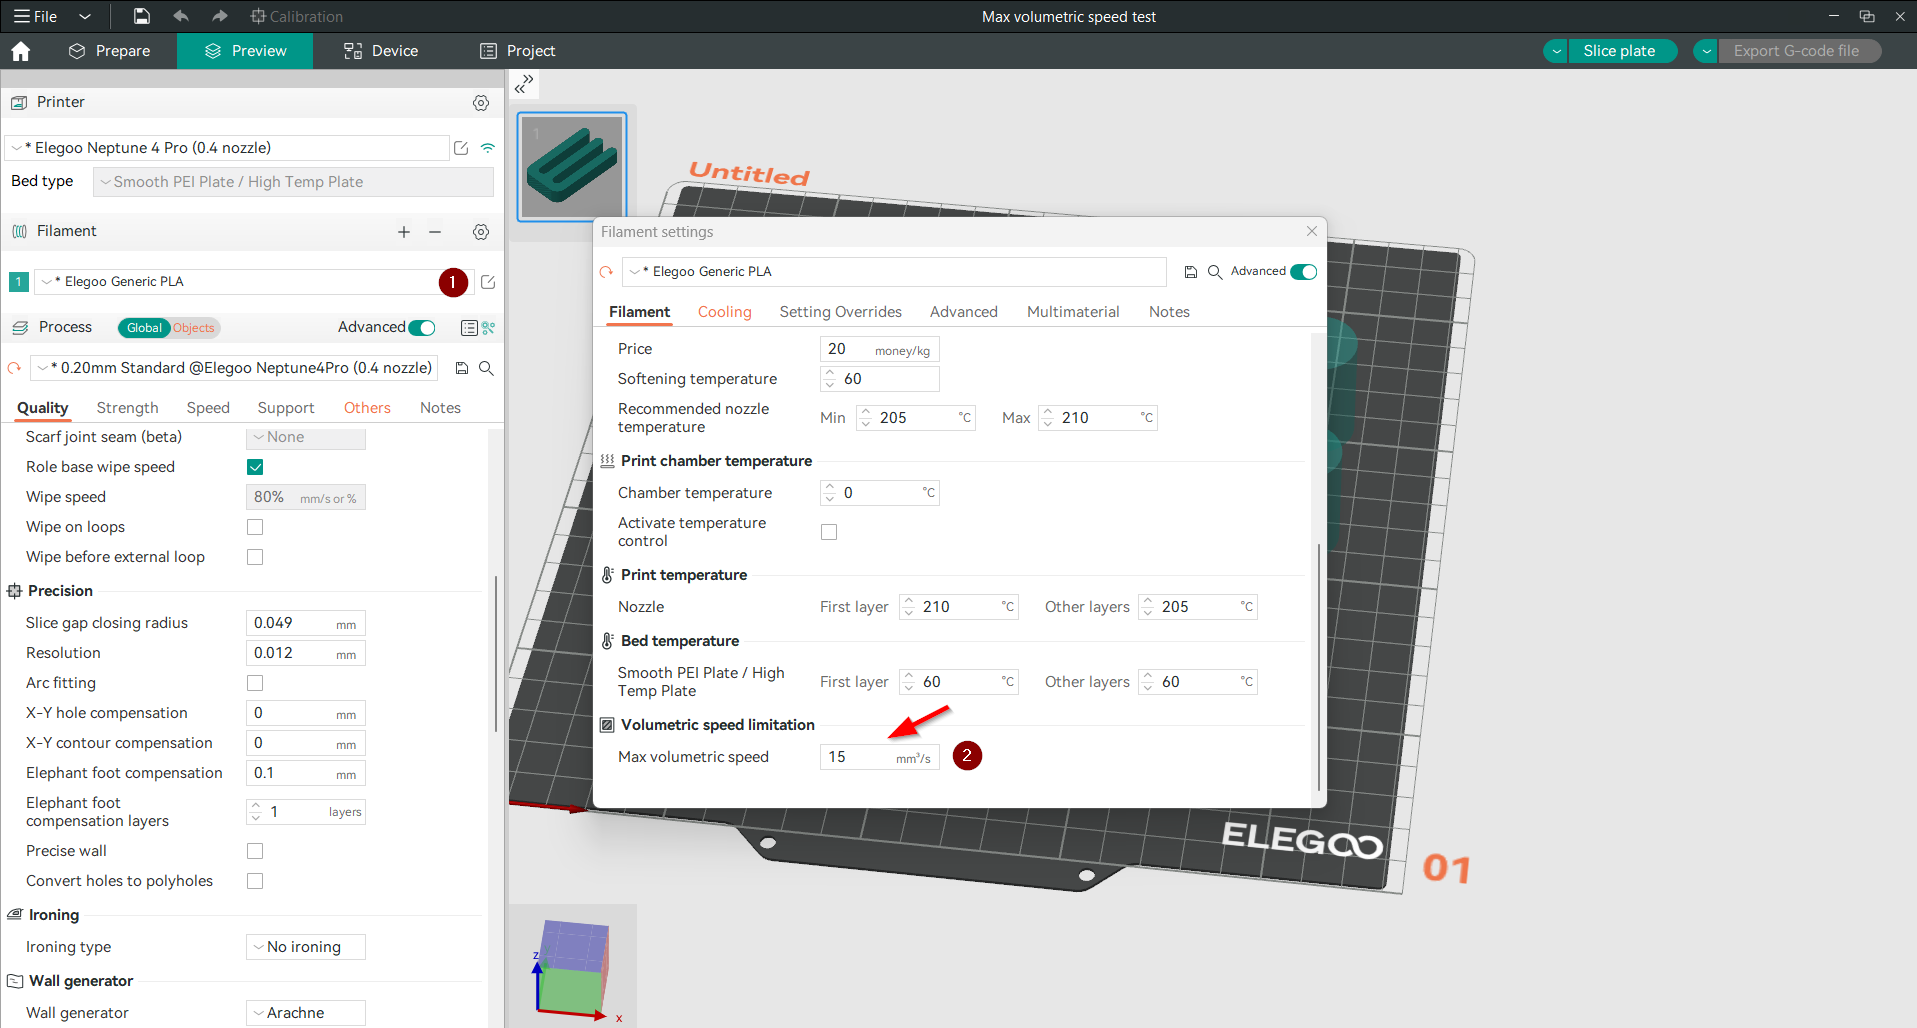
Step 7: Adjust Your Settings
After you have found the optimal maximum volumetric speed value that you can use while maintaining good quality, you can update your filament settings in OrcaSlicer to use this value. This will help you use high printing speed.
Note: You should customize this value for each filament type, as it varies from one to another. Here are the steps:
- Open filament settings by clicking in the setting small symbol.
- Scroll down until you reach volumetric speed limitation (the last option).
- Input your new Max volumetric speed value.
- Then click on the save icon to save the new updated value.
After successfully completing and analyzing the results from the Max Volumetric Speed Test using OrcaSlicer, you may wonder when it would be necessary to conduct this test again. Here are some scenarios where re-testing would be beneficial to maintain optimal printing performance:
When to Reapply the Max Volumetric Speed Test:
- After Changing Filaments: Different materials have unique properties that can affect the volumetric flow rate. If you switch to a new type of filament, especially one with different thermal properties or mechanical behavior (e.g., switching from PLA to ABS or TPU), it's crucial to reassess the maximum volumetric speed for the new material.
- After Hardware Upgrades or Modifications: Any changes to the printer’s hardware that affect the extrusion path, such as upgrading the hotend, changing the nozzle size, or modifying the extruder, can impact the printer's capability to extrude filament at different speeds. Re-testing can help recalibrate settings to match the new hardware configuration.
- Periodic Maintenance Checks: Over time, wear and tear on the printer can affect its performance. Periodic checks and recalibrations, including a volumetric speed test, can ensure the printer continues to operate at its best. This is especially important for high-use environments like print farms or for printers that frequently handle abrasive materials.
- Environmental Changes: Significant changes in the printing environment, such as temperature and humidity shifts, can affect filament behavior and extrusion characteristics. If your printing setup moves to a new location with different environmental conditions, re-testing the volumetric speed may be necessary.
- Noticing Consistent Print Quality Issues: If you begin to notice consistent issues with print quality that might relate to extrusion, such as under-extrusion, over-extrusion, or poor layer adhesion, it could indicate that the printer’s current volumetric speed settings are no longer optimal.
Step-by-Step Guide to Reapply the Test:
- Prepare Your Printer and Software: Ensure that OrcaSlicer is updated to the latest version and that all printer drivers and firmware are current. Clean and maintain your printer to remove any potential physical obstacles to accurate testing.
- Set Up the Test as Previously: Follow the same steps as your initial test setup in OrcaSlicer, adjusting the starting and ending volumetric speeds and the step increment based on previous results or new expectations from material or hardware changes.
- Conduct the Test and Analyze: Print the test model under the same conditions as before. Carefully observe and record where and when print quality issues occur. Measure the critical points as previously described.
- Adjust Settings: Based on your observations, recalibrate the volumetric speed settings in OrcaSlicer. If necessary, apply a safety margin as before to accommodate for uncertainties.
- Document Everything: Keep detailed records of each test, including the conditions, settings, and outcomes. This documentation can be invaluable for troubleshooting future issues or for further refining your printing process.
FAQs
What is volumetric speed in 3D printing?
Volumetric speed refers to how much plastic a 3D printer can extrude per second, measured in cubic millimeters per second (mm³/s). It's a crucial factor that determines the speed at which your printer can operate without compromising the quality of the prints.
Why is it important to test volumetric speed?
Testing volumetric speed ensures that you are not exceeding the printer's capacity, which can lead to common issues like under-extrusion. This testing helps set the highest possible speed for your printer that still maintains quality, optimizing both speed and efficiency.
How do I conduct a volumetric speed test in OrcaSlicer?
- Setup: Select your printer and filament type in OrcaSlicer.
- Access the test: Navigate to the calibration menu and select the "Max Flowrate" test.
- Configure the test: Input the start and end volumetric speeds and the step increment.
- Run the test: Print the test design provided by OrcaSlicer.
- Analyze results: Observe the print for quality issues and measure the height where problems start. Calculate the maximum volumetric speed using the height, starting volumetric speed and the step values.
What factors influence volumetric speed?
- Nozzle size: larger nozzles allow more filament to flow, increasing the potential speed.
- Material properties: Different materials have different flow characteristics, affecting how fast they can be extruded.
- Hotend capability: The ability of the hotend to melt filament quickly and consistently can limit or enhance volumetric speed.
- Printer mechanical configuration: The setup and condition of the printer's extrusion mechanism can affect how smoothly filament is fed and extruded.
- Environmental conditions: Temperature and humidity can impact filament behavior, affecting extrusion.
How does volumetric speed affect print quality?
A properly calibrated volumetric speed ensures consistent filament flow, which is essential for producing prints with smooth surfaces and accurate dimensions. If the volumetric speed is set too high, it can cause under-extrusion, leading to weak spots and gaps in the print. Conversely, too low a speed might slow down printing unnecessarily without enhancing quality.
When should I retest volumetric speed?
- After changing filament types, especially if they have significantly different properties.
- Following any upgrades or changes to your printer's hardware that could affect extrusion or heating.
- If you notice a drop in print quality, which could be due to changes in the printer's performance over time.
- When environmental conditions change significantly if your printing setup is sensitive to such changes.
Can I use one volumetric speed setting for all materials?
No, because different materials have varying properties like melting temperature and viscosity. Each material typically requires its unique volumetric speed setting to optimize both print speed and quality.
Conclusion
Mastering the Max Volumetric Speed Test in OrcaSlicer is an essential skill for any 3D printing enthusiast aiming to optimize their printing process for speed and quality. By understanding and properly adjusting the volumetric speed, you can significantly enhance the performance of your 3D printer, ensuring that it operates efficiently without compromising the integrity of your prints.
This guide has walked you through the importance of volumetric speed, the factors that impact it, and how it affects your printing outcomes. We’ve also detailed how to conduct the volumetric speed test using OrcaSlicer, a tool that provides robust support and calibration capabilities to make this process as straightforward as possible.
Remember, the key to successful 3D printing is continuous learning and adjustment. Regularly testing and recalibrating your printer’s settings can help you stay ahead of any potential issues and maintain a high standard of print quality. Whether you’re printing complex models for professional use or simple items for personal projects, understanding the dynamics of volumetric speed will provide a solid foundation for achieving excellent results.
We encourage you to utilize the insights gained from this guide to explore new materials, tweak your printer settings, and push the boundaries of what your 3D printer can achieve. Happy printing!
