KlipperScreen - Installation and Use

The Klipper firmware is one of the most impressive pieces of software in the 3D printing community right now. It lets you print at insanely fast speeds and makes using the 3D printer a seamless experience. You can interact, monitor and control your machine wirelessly from your workstation.
The limiting factor is that, unlike Marlin firmware, Klipper displays limited interface options when you use your 3D printer's LCD display. You still need a laptop or a personal computer to access the full features of Klipper firmware and interact with your 3D printer. Enter KlipperScreen!
This guide will dive deep into every aspect of the Klipper screen. We will detail how to install a Klipper screen on a 3D printer and also look at some of the valuable tips and tricks that can come in handy. The goal is to familiarize you with a helpful accessory that goes well with Klipper and better your 3D printing experience.
Continue reading to find out how to Klipp up your 3D printing.
What is KlipperScreen?
Out of the box, Klipper firmware supports only the old-style RepRap LCD screens as an interface option. The support, however, is dicey, and there's little assurance that you can use the small knob-control display to access the Klipper's function on your 3D printer.
Add to that, Klipper has no native support for touchscreen displays. So, suppose you're using the newest 3D printers like the Ender 3 S1 and the Ender 3 Neo printers. In that case, you're limited to laptops and desktops as your primary interface device.
While using a laptop might be beneficial in specific scenarios (updating configs, modding firmware, wireless access, etc.), it's not a substitute for something that sits right alongside your 3D printer.
With an interface device next to your machine, you can easily use the printer's features without having to carry your laptop around. This is precisely what Klipperscreen lets you do.
KlipperScreen is a Graphical User Interface with a touchscreen that links to the Klipper firmware and makes it easy to use your printer. The KlipperScreen was made by GitHub user jordanruthe, who was inspired by the Octoscreen interface.
You can control your printer, monitor the printing progress and execute various printing actions without any other device. With KlipperScreen, you can connect several printers to a single screen and handle all of them from the same spot. It acts as a central controller for you, making it easy to use multiple printers simultaneously.
The touchscreen interface makes accessing the printer's functions easy and improves your user experience. Since everything is open-source, you can change any part of the Klipperscreen to fit your needs. If you need an interface for your Klipper 3D printer, this is the best way to get one.
Also, the process of installing and setting up is easy and quick. If you already have Klipper loaded on your 3D printer, you can use KlipperScreen in just a few minutes. Let's get right to the steps for installing KlipperScreen and setting it up for your 3D printer.
How to Install KlipperScreen
In this part, we explain how to install KlipperScreen on a 3D printer in two different ways. The Automatic way is easy to set up and takes less time. The Manual way is also simple, but it takes a few more steps. Our favorite and recommended way would be the automatic one, but you can choose whichever one you want. Let's begin.
What You'll Need
- A TouchScreen LCD display compatible with Raspberry Pi
- Klipper Firmware installed
- KIUAH Klipper
Note: Before you can install KlipperScreen, you need to make sure that all the tools and the Raspberry Pi system are up to date. It will make installation easier and make it less likely that something will go wrong. You can change everything by using the Mainsail, Fluidd, or KIAUH tools.
Wiring the Raspberry Pi
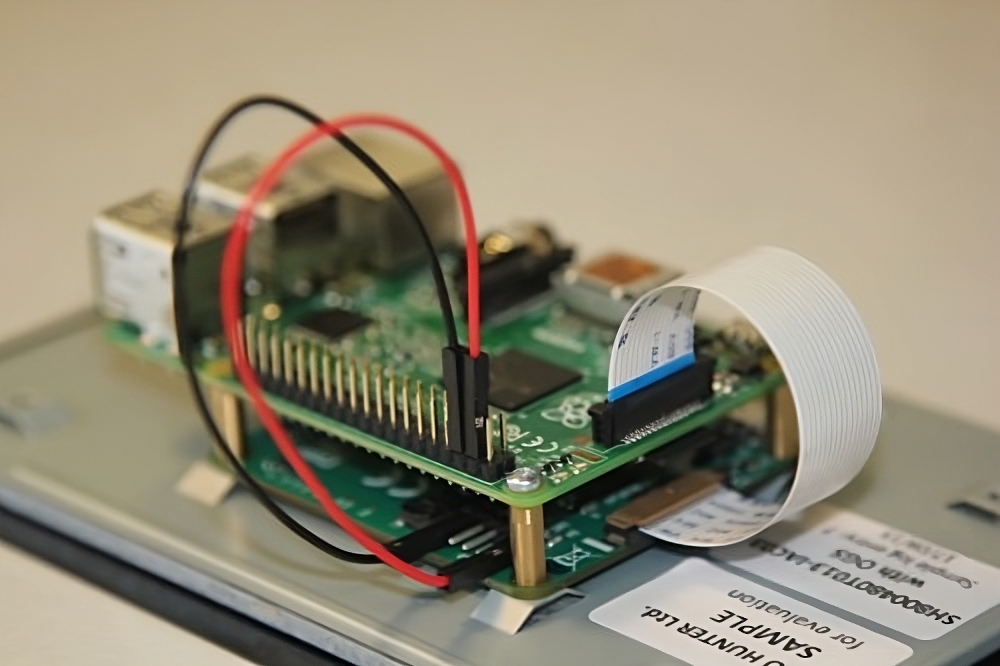
This guide uses the official Raspberry Pi Touch screen display and a Raspberry Pi 4. You're free to choose any combination, and the list of compatible displays is listed on the KlipperScreen website.
As for wiring the Pi display with the board, you'll need only two jumper cables and a display cable. Let's glance over the steps.
- Mount the Pi board onto the back of the LCD display.
- Connect the display cable to the display port on the LCD and the Pi's board. You'll need to slightly loosen the black hatch thingy to insert and lock the cable in place.
- Take a jumper cable (red) and connect it on the 5V pin on the LCD's board and the 5V pin of the Pi.
- Take another jumper cable (black) and connect it to the GND pins on the Pi and the LCD board. That's it. You're done with the wiring part.
KIUAH - Automatic Installation
KIUAH, or Klipper Installation and Update Helper, is a fantastic tool that automates the entire Klipper installation experience. In a few steps, you can install Fluidd, Mainsail, Obico, and other Klipper-compatible software for your 3D printer. We'll use this tool to install KlipperScreen as well.
-
Open PuTTY and SSH to your raspberry Pi. If you've installed Klipper, you should be familiar with this step. If not, use this Klipper Installation guide and refer to the step mentioned 'configure Klipper firmware.'
-
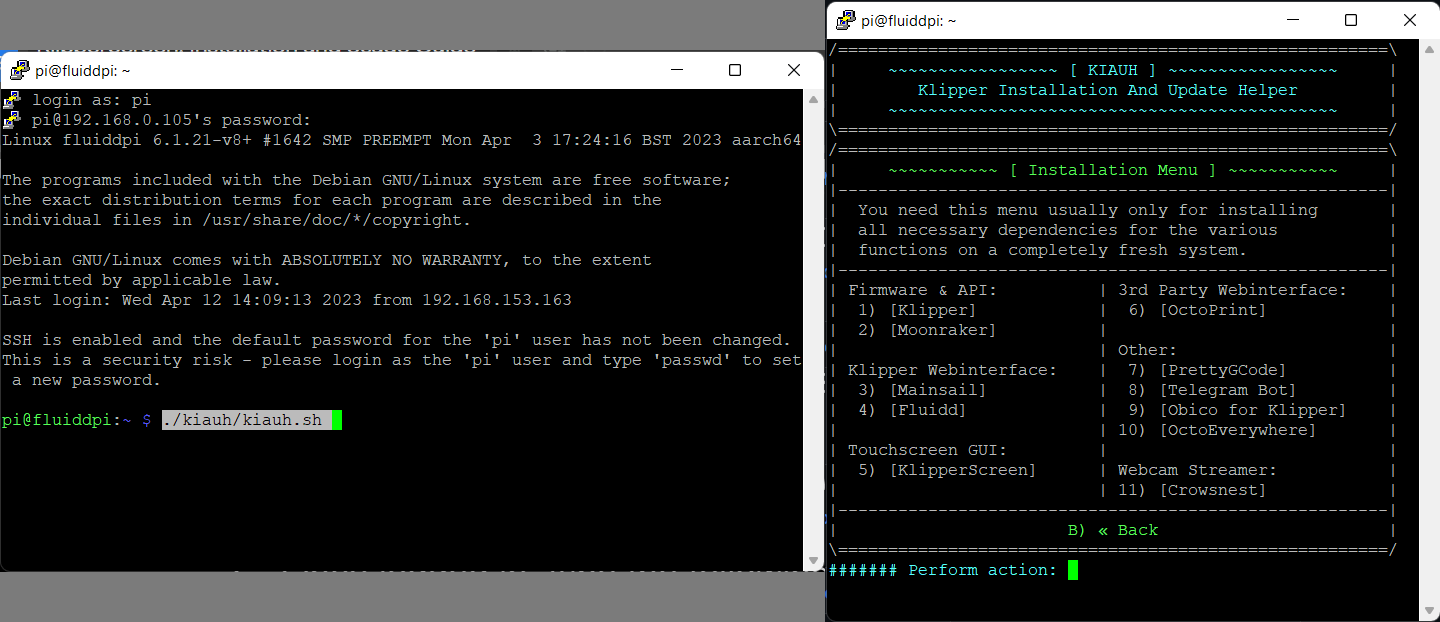
Once logged in, type the following command to open the KIUAH terminal.
./kiauh/kiauh.sh
-
On the main screen you'll see all the software currently on the system. Notice the KlipperScreen is highlighted in Red and reads as Not Installed.

-
Type 1 to Open the Install Menu. Type 5 to begin the process of installing KlipperScreen for your 3D printer. The tool will automatically run the commands. It will take a few minutes for the entire installation process to complete. At the end you'll get a Success message indicating a successful installation of the software.
 5. Exit the KIUAH tool and begin using the KlipperScreen with your 3D printer.
Manual KlipperScreen Installation
For some reason, if you decide to not use KIUAH for installing Klipper, there's a manual method too. It's relatively straightforward but requires manual input from you as a user. Let's look at these steps.
- Open PuTTY and SSH to your Raspberry Pi.
- Make sure you have git installed on your Pi by typing in
sudo apt-get install git -y
- Add only the IP address under the authorization section in you moonraker.conf file. It should look something like this -
[authorization]
Trusted\_clients:
127.0.0.1
- Open the KlipperScreen website for the commands.
- Open the file directory by executing the following command
cd ~/
- Clone the github directory of KlipperScreen by typing
git clone https://github.com/jordanruthe/KlipperScreen.git
- Enter the KlipperScreen directory on the Pi
cd ~/KlipperScreen
- Run the script to install KlipperScreen on your system -
./scripts/KlipperScreen-install.sh
Note: Enter each command after the previous one is executed. Otherwise even if one command is not executed properly, you might face issues with the entire installation process.
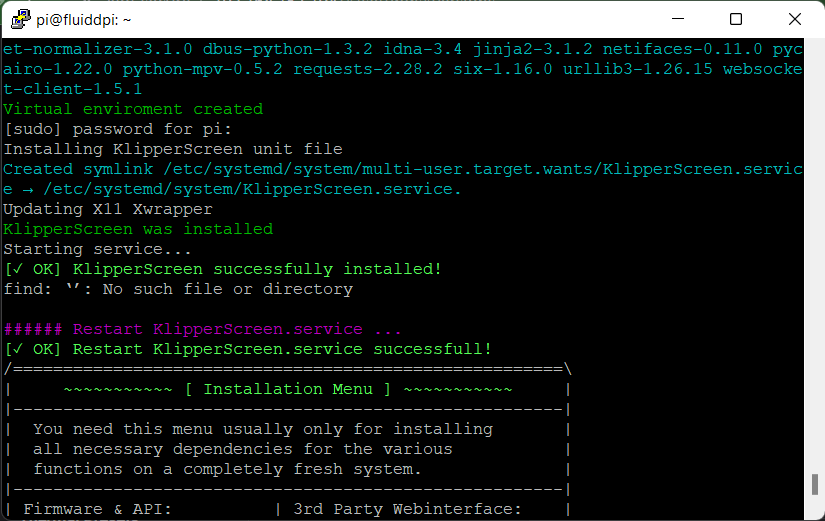
It'll take some time for KlipperScreen to completely install on your system. At the end, you'll see a Successful Installation message. Congrats!
Configuring Moonraker Update Manager
The Moonraker Update manager will let you quickly update the KlipperScreen in a single click. It's pretty handy and helps you keep the KlipperScreen interface updated. This step remains common regardless of the installation method you choose.
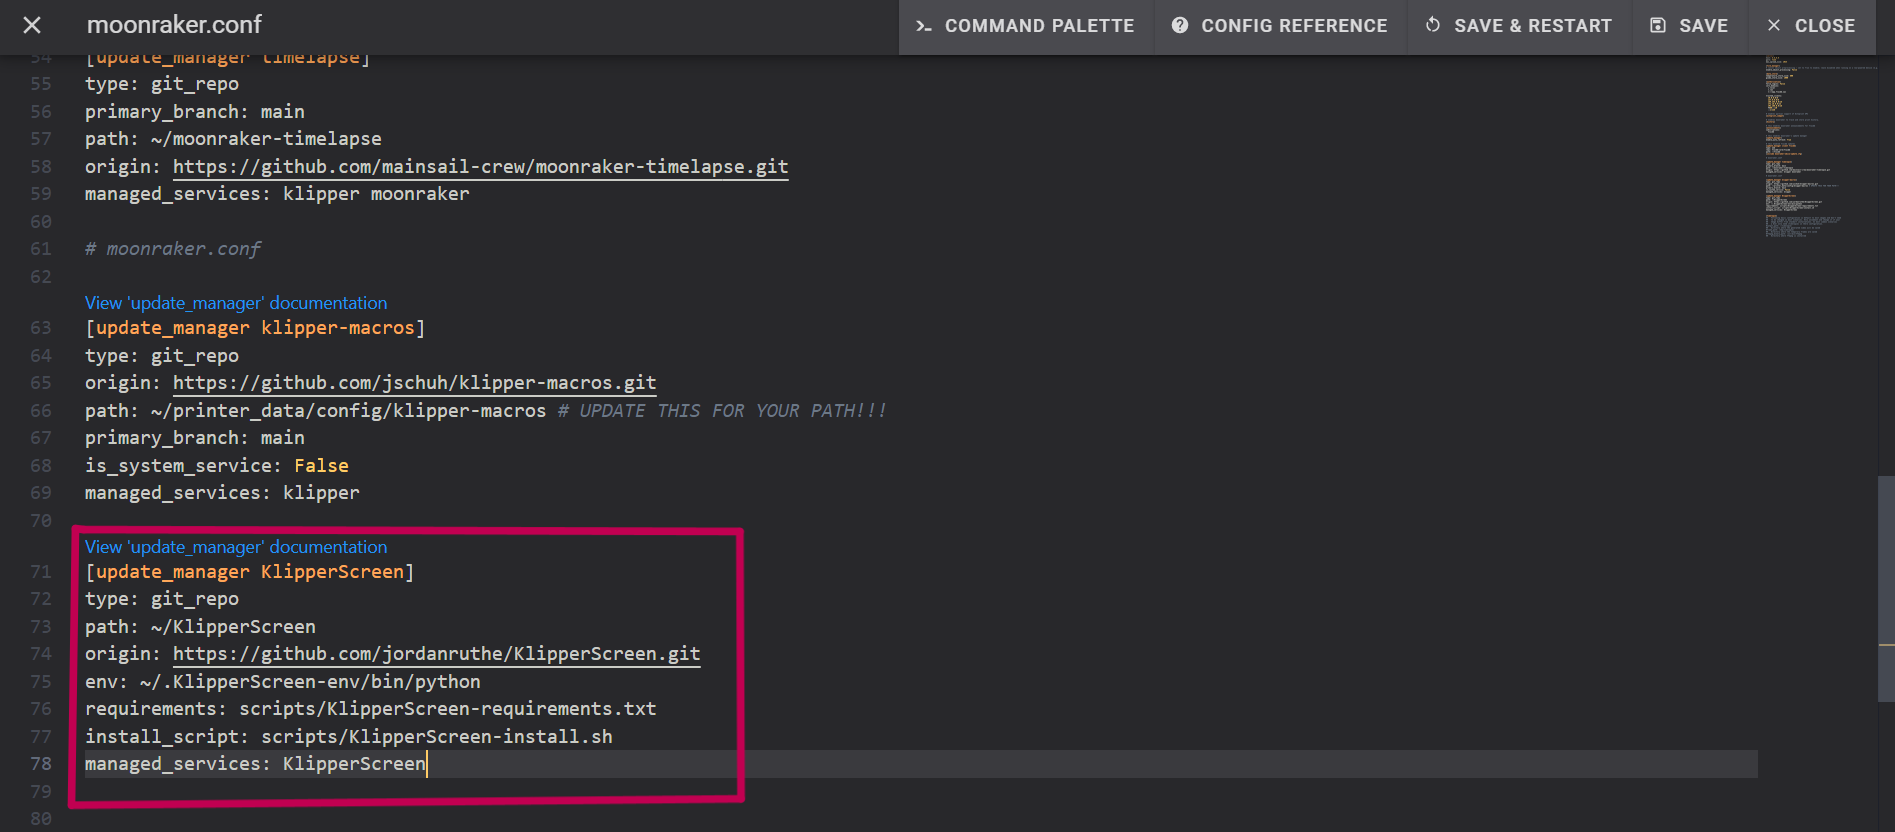
- Open the moonraker.conf file in the Configuration folder of Klipper
- Add in the following section
[update_manager KlipperScreen]
type: git_repo
path: ~/KlipperScreen
origin: https://github.com/jordanruthe/KlipperScreen.git
env: ~/.KlipperScreen-env/bin/python
requirements: scripts/KlipperScreen-requirements.txt
install_script: scripts/KlipperScreen-install.sh
managed_services: KlipperScreen
- Save and Restart the Klipper firmware.
At this point, you’re ready to use KlipperScreen as the primary user interface with your Klipper 3D printer. Get a Raspberry Pi display case or 3D print one compatible with your printer.
Now that you’ve configured KlipperScreen, it’s time to learn how to get the most out of it. The following sections include some useful tips to enhance your KlipperScreen experience.
KlipperScreen Features
Preview Thumbnails
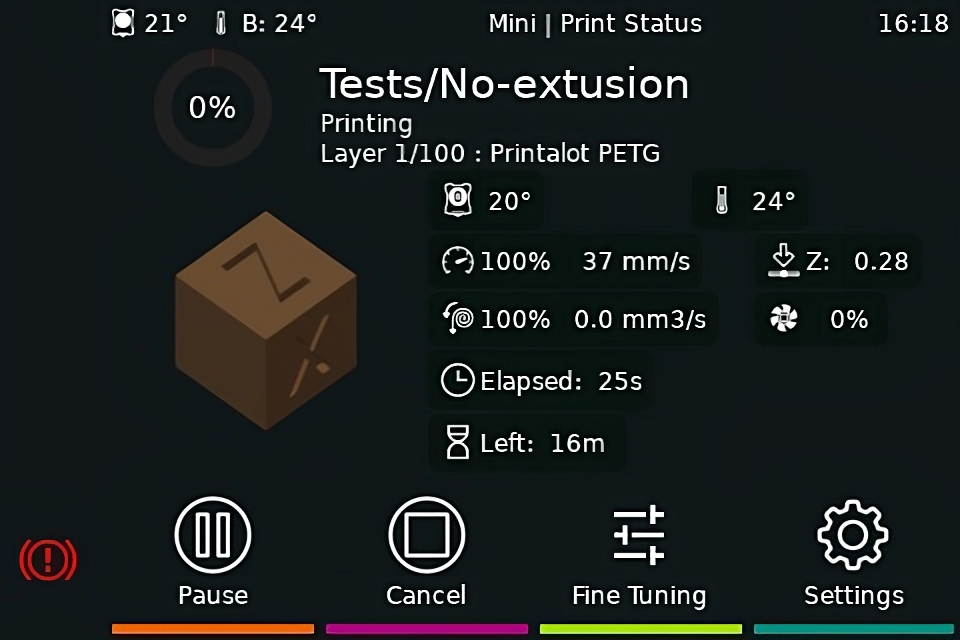
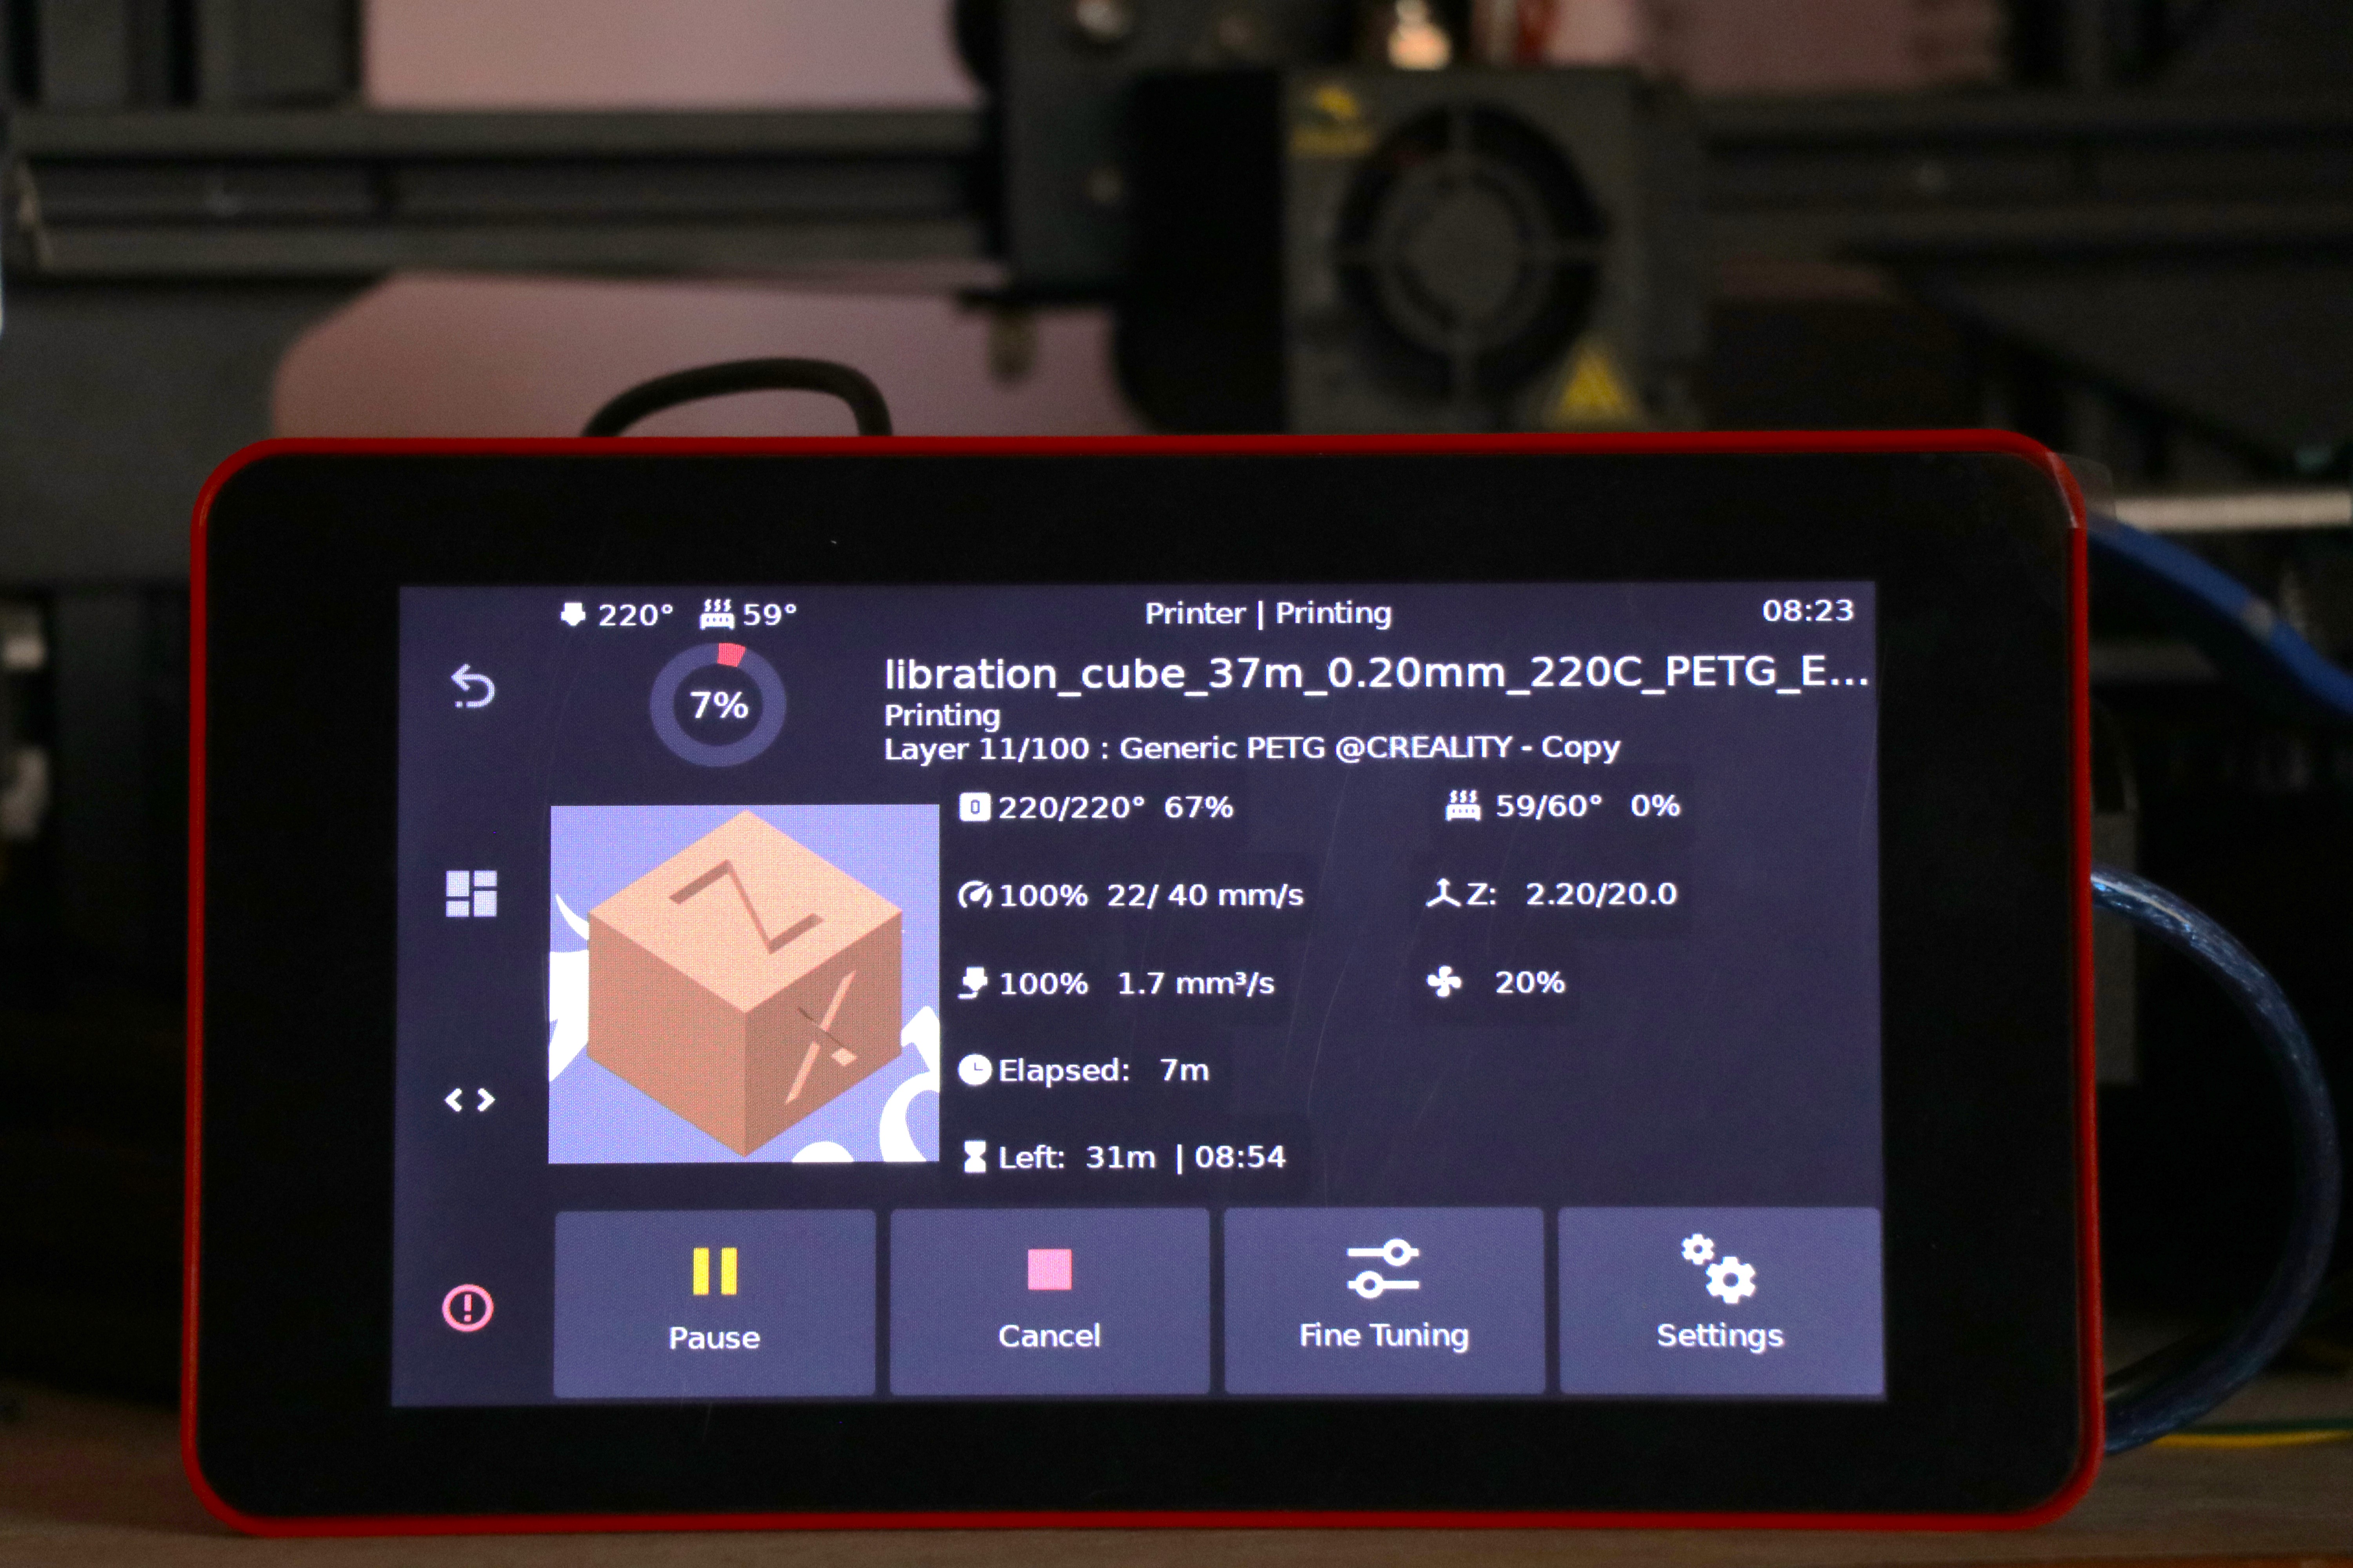
KlipperScreen lets you view the thumbnails of the sliced models on the printing screen. It’s a neat feature to preview the model and gives you visual feedback on the finished print.
The steps vary depending on the slicer you’re using. We’ve tested the thumbnail feature on PrusaSlicer, SuperSlicer, Cura, and ideaMaker.
For PrusaSlicer and SuperSlicer, you only need to enter the thumbnail sizes in a specific box. In Expert Mode, go to Printer Settings >> General-Firmware >> Gcode thumbnails. Enter two thumbnail sizes - 300 x 300 - For the larger previews and 32 x 32 - For the smaller thumbnails used in lists.
In Cura, you’ll need to add a post-processing script to view the thumbnails on your KlipperScreen. The steps are as follows.
- Open Extensions >> Post processing >> Modify Gcode.
- Add a Script and Choose Select Create Thumbnail
- Set Height and Width to 300
- Add another Script and again Select Create Thumbnail
- Set Height and Width to 32
- Click Close
The Steps for ideaMaker are similar to PrusaSlicer. Open the Advanced Tab in Printer settings and Enable "GCode Thumbnails for Octoprint and Mainsail." Set the Width and Height to 300, and you’re done.
View Layer Progress
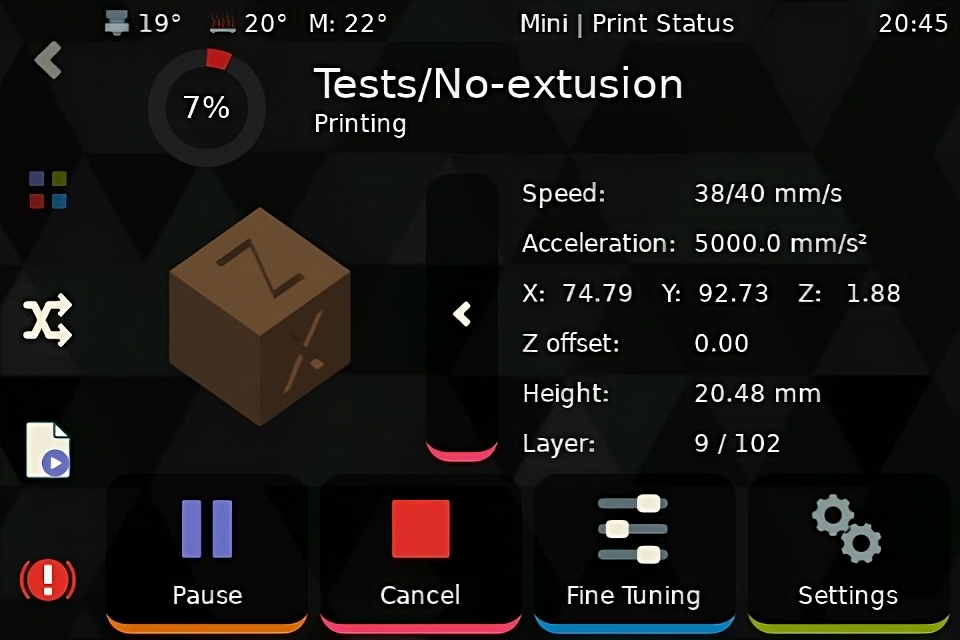
The Layer Progress bar and the column help you get an estimate of your printing progress and let you know the current layer number. It lets you quickly visualize the layer count is one of many ways to guess the print end times.
In PrusaSlicer and SuperSlicer, you must add a Script to view the layer progress for your current 3D print.
Go to Printer Settings >> Custom Gcode >> After layer change Gcode and add the command -
M117 Layer {layer_num+1}/[total_layer_count] : {filament_settings_id[0]}
For the Layer count, add the following commands in PrusaSlicer. Printer Settings > Custom Gcode > Start Gcode
SET_PRINT_STATS_INFO TOTAL_LAYER=[total_layer_count]
Printer Settings > Custom Gcode > After layer change Gcode
SET_PRINT_STATS_INFO CURRENT_LAYER={layer_num + 1}
You can now see the live layer progress of your model as it’s printing on the screen.
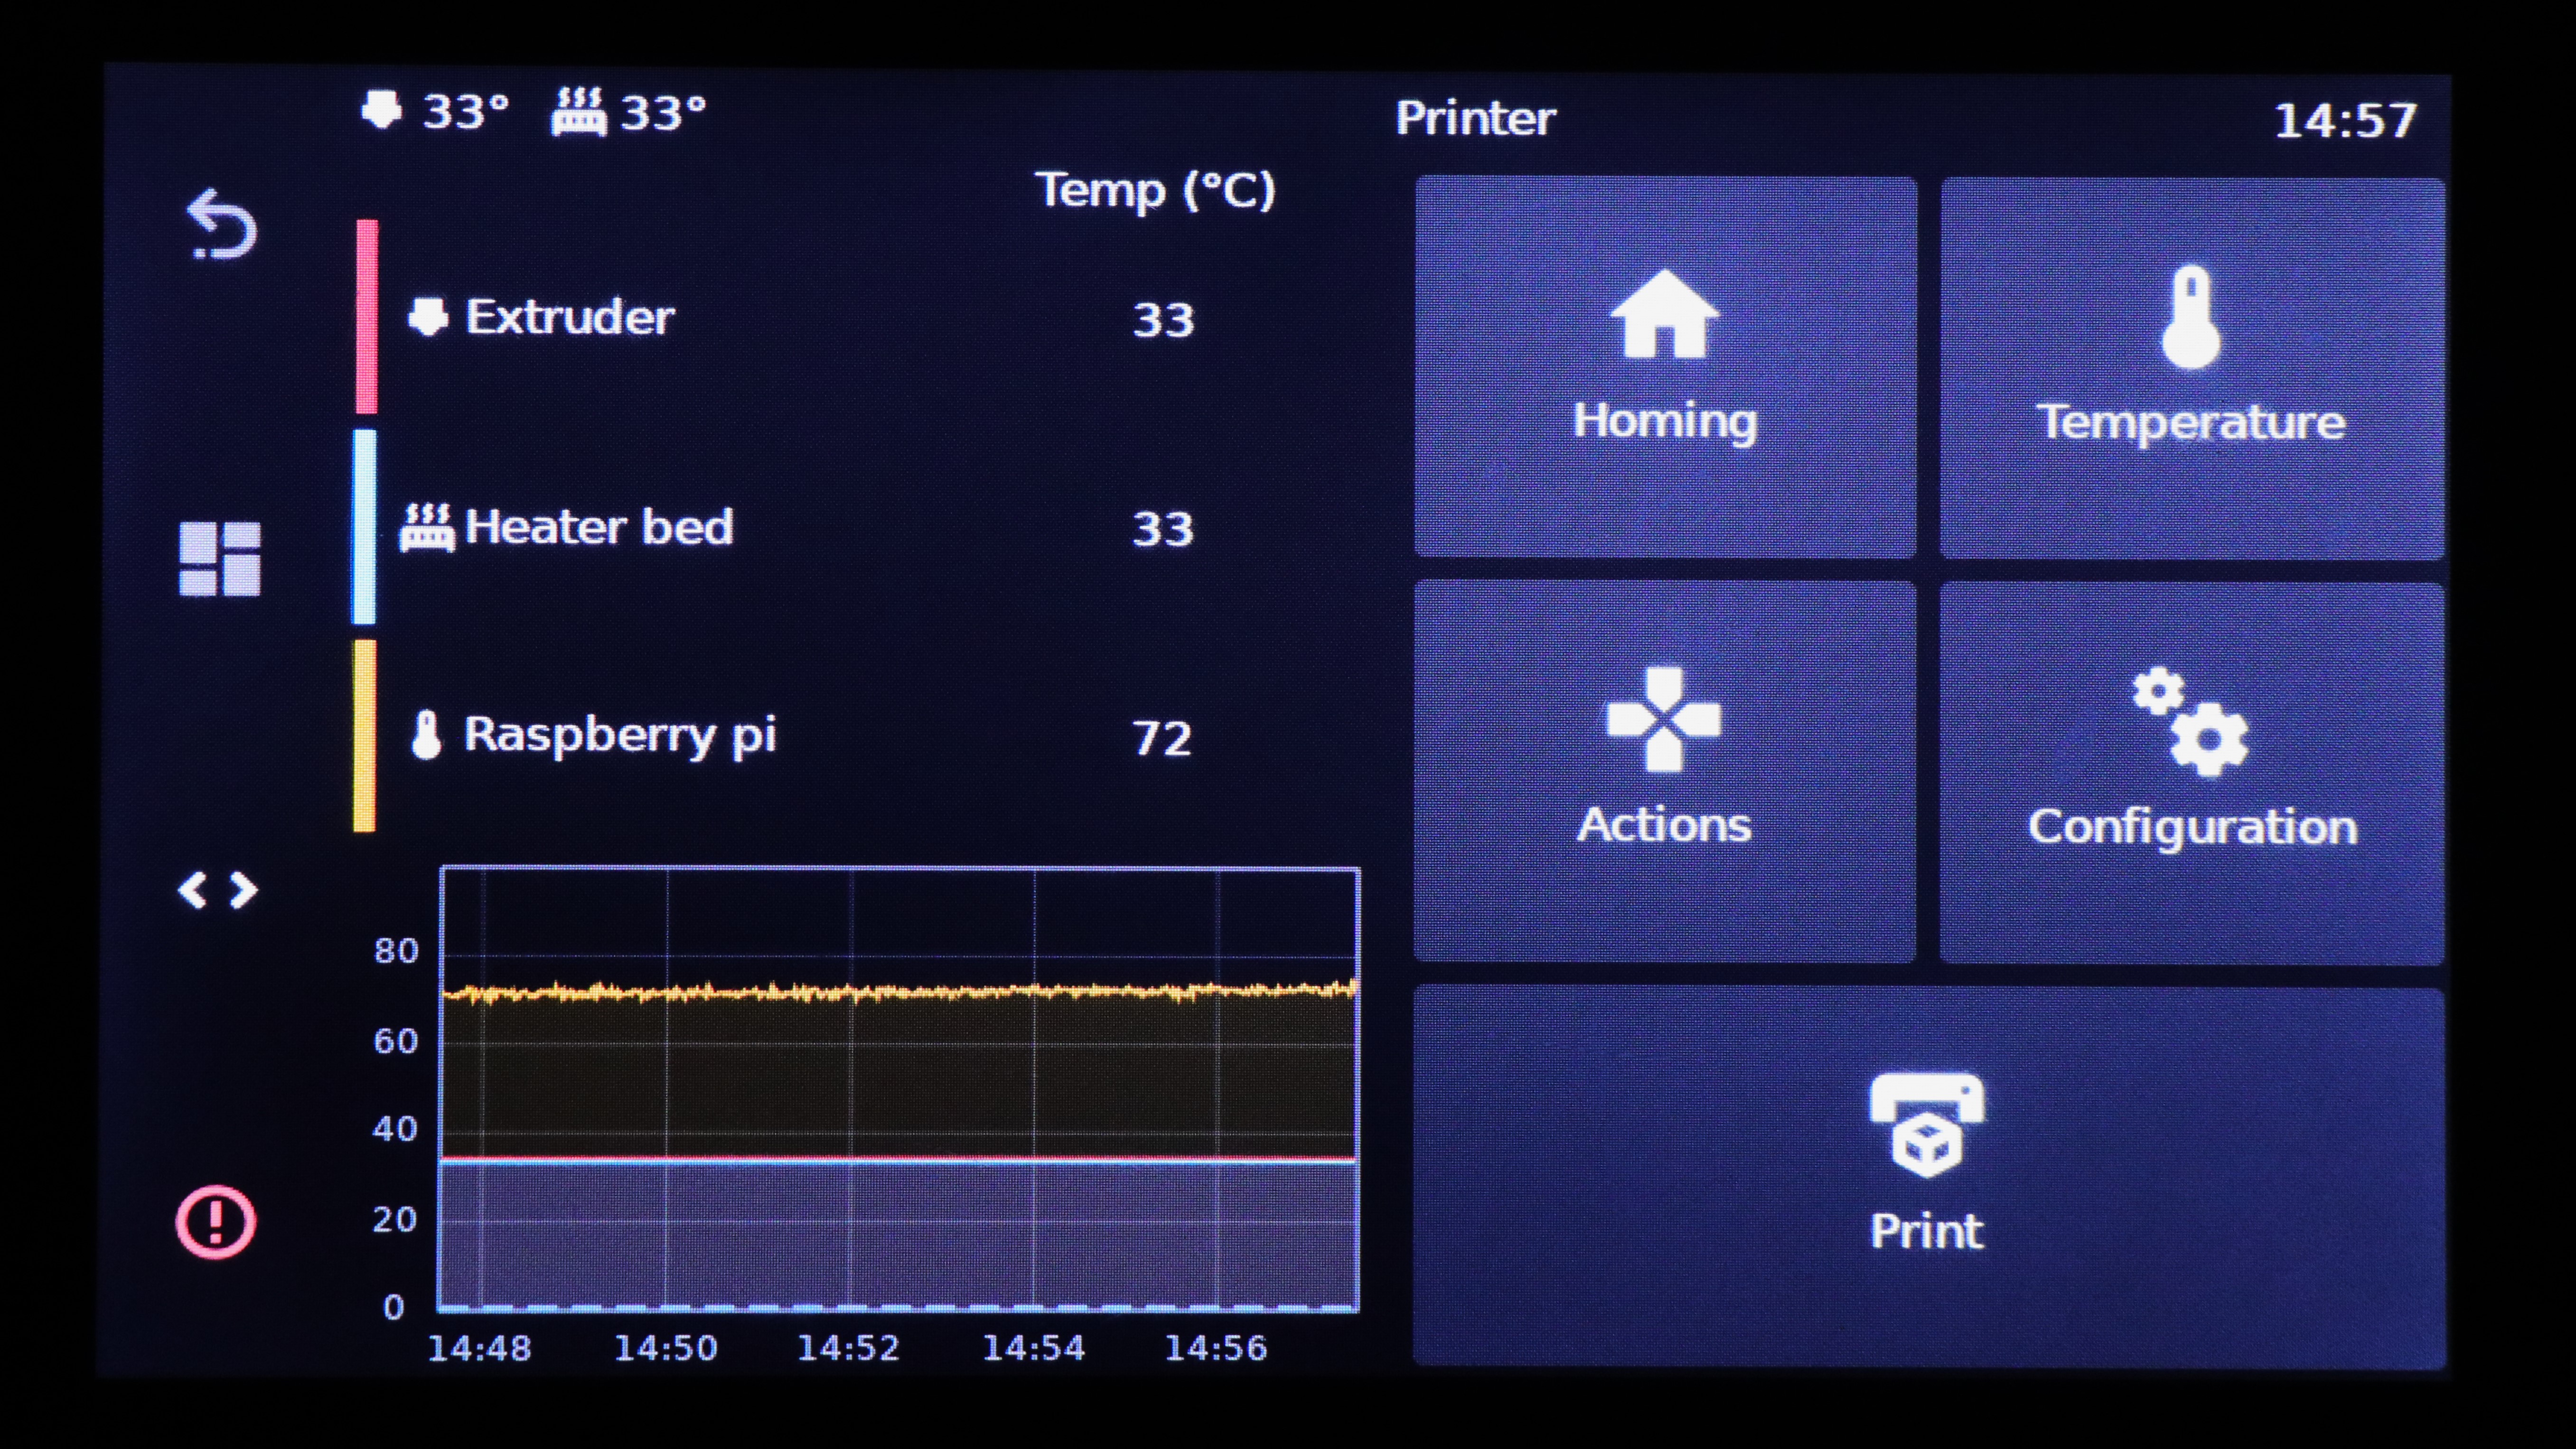
Set Custom Preheat Temperatures
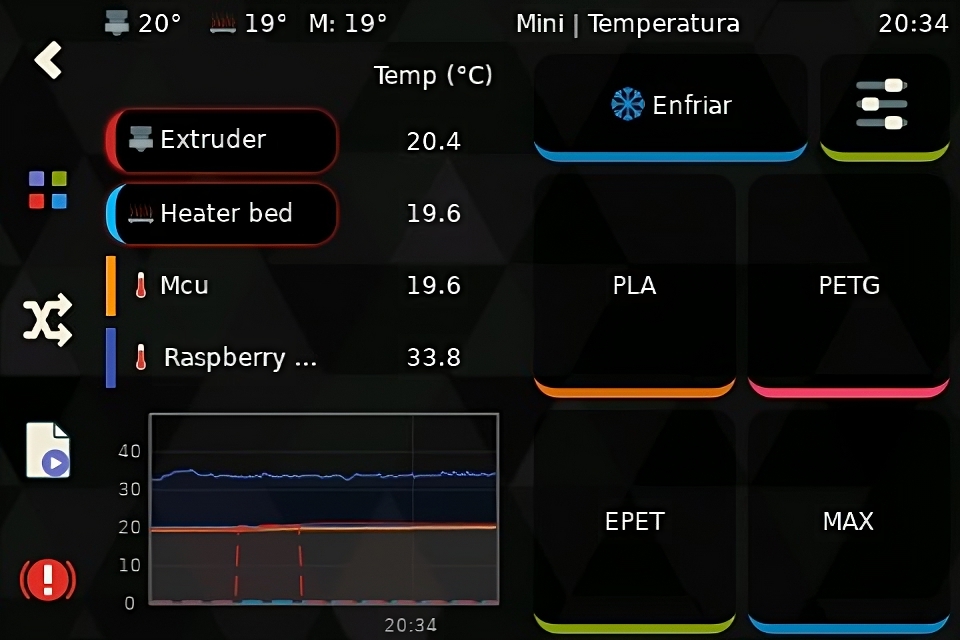
KlipperScreen has some default preheating temperatures built within the interface. But these are generic values and might not be what to need for your materials.
KlipperScreen makes it easy to preheat your printer in two clicks. You can heat up the hot end and the printer bed based on the material you are using. You can change how the preheating works so that only the hot end or the print area gets warm. Follow these steps to set up pre-heating temps in KlipperScreen:
- Open KlipperScreen.conf file from the Configurations folder.
- Add the following commands -
[preheat PLA]
extruder: 210
heater_bed: 60

[preheat ABS]
extruder: 220
heater_bed: 100
- Save the file and restart the firmware. You can now see the Preheat buttons under the Temperature options on your KlipperScreen.
- Depending on your preferences you can alter these values. You can exclude the bed, and select solely the hot end or vice versa; the choice is yours.
More detailed information is available on the KlipperScreen Preheating website.
Troubleshooting
In normal circumstances, there should be hardly any issues with KlipperScreen Installation. But, in the rare case that something occurs, it’s better to be equipped with the solution.
The KlipperScreen troubleshooting website highlights various problems that you might face. In our case, we encountered two particular issues and can confidently highlight their fixes.
These issues are the basics of operating the KlipperScreen, and many users might come across them. Let’s take a look at them.
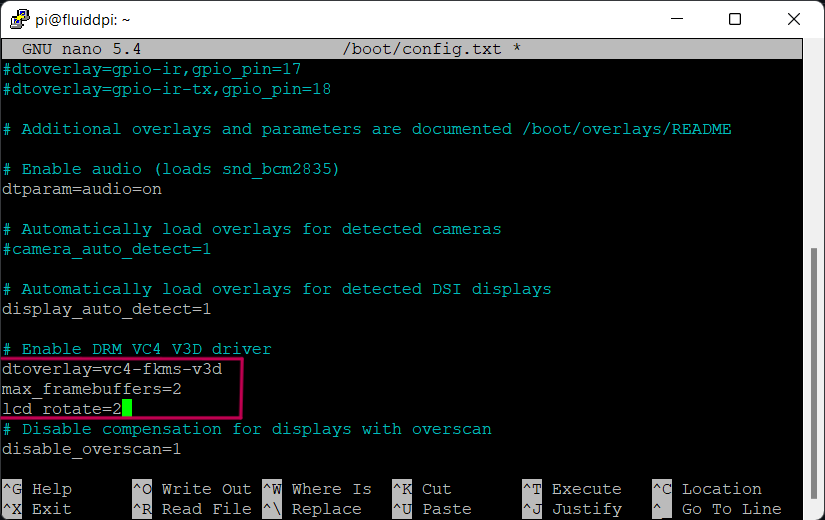
KlipperScreen Touch Not Working and Rotate Screen
With some screens, the touch functionality does not work after installing KlipperScreen software. You might also need the screen to rotate 180 degrees to suit your preferences. These are some known issues and have a simple fix.
- Open PuTTY and SSH to your Pi.
- Open the config.txt folder by inputting the following command
sudo nano /boot/config.txt
- Edit the line -
dtoverlay=vc4-kms-v3d
to:
dtoverlay=vc4-fkms-v3d
- Just below it, add another line as
lcd_rotate=2
- Exit the menu by pressing CTRL+X.
- Save the changes by choosing Yes, as Y.
- Press Enter to finalize the changes to the config file.
- Reboot the Pi by entering the command
sudo reboot
That’s it. The touch should work fine, and the screen should rotate 180 degrees.
We didn’t try vertical screen rotation as it wasn’t our requirement. If you wish to try it out, there are a few extra steps. On a Reddit post, user mr_milo seems to have done it right. You can refer to their instructions to set up a vertical KlipperScreen for your configuration.
Using Obico with KlipperScreen
Heard of The Spaghetti Detective? Ever used it for failure detection? Well, Obico is the all-encompassing evolution of the Spaghetti Detective.
Obico goes beyond failure detection and gives you a full suite of useful features to control your 3D printer from anywhere in the world. You can monitor the prints, access the files, and even stop and start your prints remotely without ever needing to use your laptop.
There’s a specific folder named Obico_Upload, that you’ll find under the Print tab in KlipperScreen. Here, you can access all your Gcode files in one place and start them right from the KlipperScreen.
If you’re using a laptop, tablet, personal computer or even your smartphone, you can directly upload a single file of up to 500MB in one instance and store 50GB of Gcode files on the Obico server. That’s a lot of 3D prints!
In addition to all of this, you still get the best AI detection failure capabilities that you’d come to expect from Spaghetti Detective. In fact, the failure recognition algorithm is now even better, with millions of hours of footage to detect print failures in real-time.
Obico is free to set up, and the installation process is relatively straightforward. You can use our detailed Obico Setup guide for Klipper and Octoprint to get it running for your 3D printer.
There’s also a great Discord Community for anything related to Obico. You can ask queries, suggest improvements, and interact with the community to learn a thing or two about 3D printing.
You can help us by giving Obico a star on GitHub and writing a review on the iOS App Store or Google Play if you've used our mobile app.
That’s it for the KlipperScreen guide. If you found it helpful, let us know in the comments below. If you have any further suggestions, we’ll be glad to hear them out. Happy Printing!