Pular para o conteúdo principal

How to Use Prusa Slicer with Klipper 3D Printer Firmware

· Leitura de 5 minutos

Klipper as a 3D printer firmware and PrusaSlicer as a 3D printing slicer have become widely popular in the past few years. They’re both completely free to use and loaded with features, and you get the benefits of open-source development with either of these programs.

It makes sense to use them together to streamline your 3D printing workflow and make the most out of these two pieces of software. In this guide, we’ll go over the process of setting up Prusaslicer with your Klipper 3D printer. It’s simple and quick and can help save you from the hassle of manually uploading your print files.

We’ll begin with understanding the benefits of using these two software together and then look at the detailed setup process. Let’s begin!

Ajuste Klipper PID - Guia prático

· Leitura de 7 minutos

O firmware Klipper tem recebido muitos elogios ultimamente devido à sua vasta gama de recursos e desempenho de alta qualidade. Ele também oferece diversas opções de configuração para calibrar sua impressora e produzir impressões 3D de alta qualidade.

Um parâmetro crucial que configuraremos hoje é o ajuste PID da sua impressora 3D. Definir as configurações PID corretas garante que o bico extrusor e a mesa de impressão sejam aquecidos no menor tempo possível e mantenham a temperatura definida com grande precisão.

Este artigo irá guiá-lo pelo processo de calibração PID da sua impressora 3D usando o Klipper. Ele ajudará você a entender melhor essas configurações PID e a solucionar quaisquer problemas de aquecimento com a sua máquina.

Vamos começar a ajustar essas camas e extremidades quentes!

Klipper Pressure Advance Tuning - How to Guide

· Leitura de 7 minutos

Introduction

Pressure Advance in Klipper is designed to compensate for the side effects of instant speed changes that occur during fast print speeds. It reduces stringing, gives your prints sharp corners, and delivers a high print quality even at speeds above 100 mm/s.

But tuning pressure advance in Klipper and understanding its functioning can be puzzling to new Klipper users. So, in this article, we’ve gathered all the information you need to know about Pressure advance and set it up in Klipper. It’ll help you understand the benefits of this feature and how you can use it to sharpen up your 3D prints.

Let’s Advance!

Klipper Exclude Object Feature - Setup and Configuration

· Leitura de 6 minutos

Klipper firmware has been around since 2016 in the 3D printing community. It’s free, open-source, and has steadily become a mainstream 3D printing firmware, second only to Marlin.

Yet, Klipper’s earlier versions missed key features like the Octolapse, Exclude objects, and plug-in integration found on Octoprint and Marlin combo. This lack of certain valuable features restricted users from using Klipper as their primary 3D printing firmware.

However, since the recent updates, some of these features are slowly making their way into the Klipper firmware. For example, you can now shoot Octolapse-like videos on your 3D printer using the Klipper timelapse.

Likewise, Klipper now also supports the Exclude objects functionality to rescue you from failed prints. But, it needs some initial setup and configuration, which might be puzzling to new Klipper users.

So, this article will take you through the entire process of setting up Exclude objects for your Klipper 3D printer. We’ll look at this feature in detail and understand how you can use it in your 3D printing workflow.

Let’s exclude the failed prints.

3D Printer Failure Detection - All You Need to Know

· Leitura de 9 minutos

3D Printer Failures/Courtesy: Fabbaloo

If you are new to 3D printing, we are sure you have encountered numerous print failures. Thankfully, this is not something new or unique. It happens to even the most seasoned users. But obviously everyone wishes to improve their 3D printing skills and so knowledge of 3D printer failure detection becomes essential, and this is exactly what we will cover in this article.

3D printing and failures

Because 3D printing is rapidly becoming popular in a variety of industries, it is critical that every student, as well as manufacturing and design professionals, understand the technology. Though you may not need to understand its complexities, having a working knowledge will help you in your career.

3D printing is a manufacturing process that converts a digital CAD file into a three-dimensional physical model by layering thin layers of material one on top of the other. This is also known as additive manufacturing because material is added rather than removed, as is the case with most conventional technologies.

However, 3D printing is still in its early stages and thus prone to failure. DIY and desktop 3D printing, in particular, frequently fails, and users must use a trial-and-error approach to eliminate or reduce failed prints.

Ender 3 Camera Mounts - Installing a Camera on Your Ender 3

· Leitura de 9 minutos

Camera mount for Creality 3D printer/Courtesy: Thingiverse

Creality's Ender 3 3D printer is one of its best-selling models, and it's popular among students, enthusiasts, and hobbyists. As a result, it is safe to say that Ender 3 users are mostly hustlers looking for ways to get the most out of their 3D printer. Many users do not see the need to connect a camera to their 3D printers, but it can greatly improve your 3D printing experience. Many feel that installing. Camera is a tedious task but it is not so. In fact, it is quite easy. All you need is a good camera and a camera mount. This article discusses the various Ender 3 camera mounts that can be installed on your 3D printer.

OctoPrint Bed Level Visualizer - All You Need to Know

· Leitura de 6 minutos

What is OctoPrint and why would you want it?

OctoPrint Bed Level Visualizer plugin display screen/Courtesy: OctoPrint

We are all aware of how critical, yet difficult, it is to level a 3D printer bed. All of your prints will fail if you don't have a level bed, wasting your time, materials, and money. Even having an auto-bed leveling feature is not always sufficient, and your prints may still fail. To solve this issue, OctoPrint's Bed Level Visualizer plugin is the only tool you need to easily level your print bed.

To help you understand this useful OctoPrint plugin, we've written a complete guide on the Bed Level Visualizer to help you set it up quickly and eliminate your bed leveling issues.

What is the OctoPrint Bed Level Visualizer Plugin?

Bed level visualizer is a useful OctoPrint plugin that converts the bed topography report into a comprehensive 3D map to show the varying elevation (height) across a 3D printer bed, assisting users in leveling the same. This plugin also assists you in determining whether your bed is warped or simply tilted. Thus, the bed is leveled by carefully tightening or loosening the leveling screws at peaks and valleys respectively, to make it as flat as possible for a successful print.

The Bed level visualizer plugin was created by jneilliii (GitHub page). This plugin was installed on at least 35.84k instances in the previous month (August 2022), with at least 759 new installations in the previous week (at the time of writing this article).

3D Modeling Software for 3D Printing - Getting Started

· Leitura de 14 minutos

The core of 3D printing is a 3D model. 3D modeling for 3D printing is important as all 3D prints start with a digital CAD model that is "sliced" in a slicing software which the 3D printer prints. Being an integral part of 3D printing, having a working knowledge of 3D modeling and the various tools becomes crucial.

In this article, we'll go over the fundamentals of 3D modeling for 3D printing, as well as the distinction between inorganic and organic 3D models, and the popular software for each type.

We've included 3D modeling software for beginners for those on a low budget, as well as a few high-end options for professionals.

But first, to make sure we're all on the same page, let's go through the fundamentals of 3D printing.

How does 3D Printing work?

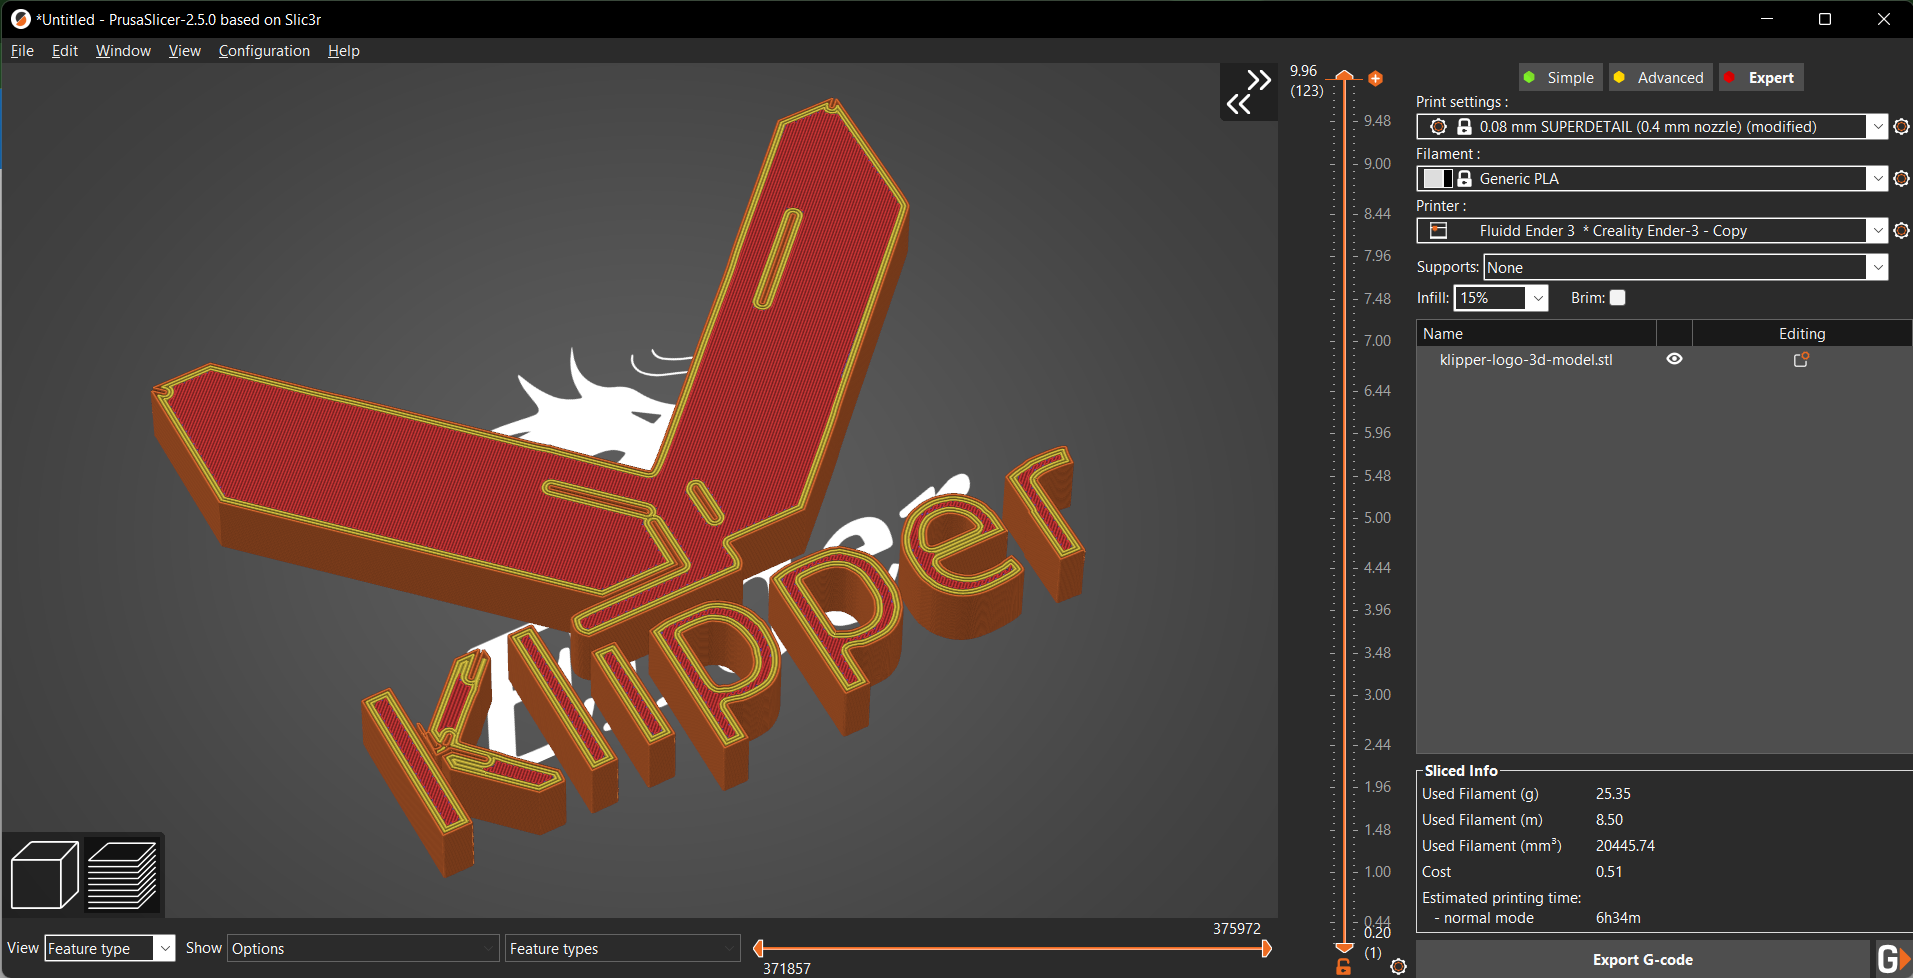
A CAD design (left screen), slicing software (right), and the finished print / Courtesy: Ultimaker

3D printing, also known as additive manufacturing, is a method of creating three-dimensional objects layer by layer using a computer-aided design, or CAD. 3D printing builds objects by layering materials such as polymers, composites, or biomaterials that vary in shape and size, as well as rigidity and color.

Even though 3D printing isn't new, there are some who will benefit from our guide to the most common 3D printing terms for beginners.

Regardless of the 3D printing technology being used, it all starts with a 3D CAD model. In this article, we will go through the fundamentals of 3D modeling and its different types, with a focus on 3D printing.

To further help you in selecting the best CAD software for your 3D models, we will also list out a number of 3D modeling software suitable for both beginner and advanced users.

So let's jump in!

Câmera Klipper - Instalando e configurando uma câmera com o Klipper

· Leitura de 10 minutos

O Klipper é um dos poucos firmwares para impressão 3D que oferece suporte nativo a uma câmera externa para monitorar sua impressora 3D. A interface web do Klipper facilita a conexão de uma câmera ao Raspberry Pi e o acompanhamento do progresso da impressão.

Mas o Klipper é um firmware relativamente novo, com recursos e guias limitados que detalham suas diversas funcionalidades. Como usuário iniciante, é fácil se confundir com a instalação e configuração de uma câmera em sua impressora 3D Klipper.

Este artigo tem como objetivo facilitar esse processo e ajudar você a configurar uma câmera na sua impressora 3D conectada ao Klipper. Continue lendo para aprender em detalhes sobre o procedimento de configuração da câmera no Klipper e como uma câmera pode beneficiar seu fluxo de trabalho de impressão 3D.

Timelapse do Klipper com Fluidd ou Mainsail - Tudo o que você precisa saber

· Leitura de 9 minutos

Introdução

Usando o recurso de timelapse do Klipper, você pode gravar todo o seu processo de impressão 3D e compartilhar trechos dele em suas redes sociais. Esses vídeos também são uma ótima ferramenta para analisar falhas de impressão e identificar as causas por trás de um problema.

Apesar de sua utilidade, configurar vídeos em time-lapse no Klipper pode ser um desafio para muitos usuários. E embora a configuração inicial seja relativamente simples, pode confundir usuários iniciantes do Klipper.

Neste artigo, vamos simplificar esse processo para você. Abordaremos todo o procedimento passo a passo e configuraremos a funcionalidade de timelapse para sua instância do Klipper. Ao final deste guia, você poderá gravar vídeos em timelapse perfeitos de suas impressões 3D e compartilhá-los com seus amigos e familiares.

Vamos começar a filmar.