Klipper Camera - Installing and Configuring a Camera with Klipper


Klipper is one of the few 3D printing firmware that natively supports an external camera for monitoring your 3D printer. Klipper’s web interface makes it easy to attach a camera to the Raspberry Pi and monitor your printing progress.
But Klipper is a relatively new firmware with limited resources and guides detailing its various features. As a new user or beginner, it’s easy to get confused about the installation and configuration of a camera on your Klipper 3D printer.
This article aims to make this process easy for you and help you set up a camera on your Klipper-connected 3D printer. Read on to learn in-depth about Klipper’s camera setup procedure and how a camera can benefit your 3D printing workflow.
Why Should You Add A Camera With Klipper?
Remote Monitoring
A camera can remotely monitor and supervise your 3D prints from anywhere. With Klipper’s web browser interface, you can control and monitor your 3D prints on any device as long as you’re on the same wireless connection. You can use your laptop, tablet, or smartphone to monitor your printing progress.
Detecting Print Failures
You can extend your remote monitoring capabilities to virtually anywhere in the world with tools like Obico. Using the Obico setup on Klipper, you can control and keep a watch on your 3D printer without any restrictions. Obico also uses your camera to automatically detect print failures using its AI technology which helps reduce your filament wastage.
Shoot Time Lapse Videos
Besides print monitoring, you can configure your camera to shoot timelapse videos on Klipper firmware. These timelapse videos can be a great way to keep a record of your 3D prints and share them with your friends. You can also use these videos to analyze your print failures and look for any defects in the print quality.
Which camera to choose for your 3D printer?
Typically, a USB webcam or Raspberry Pi camera are the ideal camera choices for your 3D printer. You can also go overboard and attach a DSLR camera to your machine. But, a DSLR can be needless for remote monitoring considering its price and extensive setup process.
So, we’ll look at USB webcams and Raspberry Pi cameras in this section and understand their differences.
USB Webcam
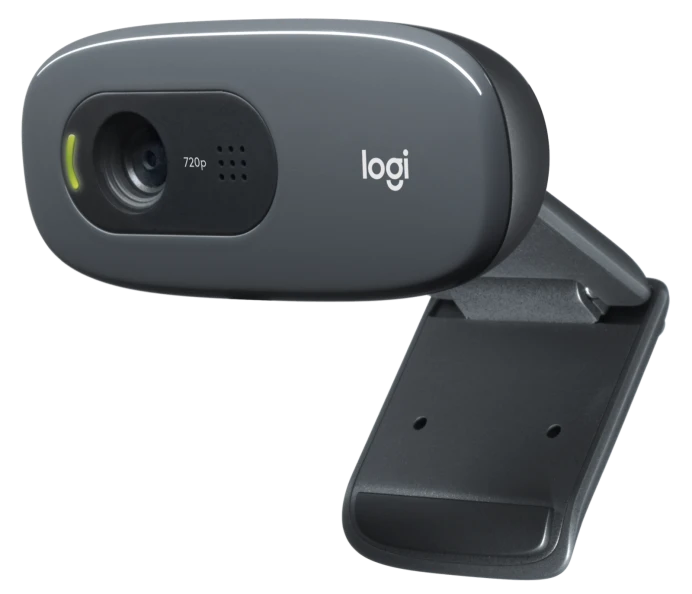
USB webcams are easy to configure, and you can choose from various camera options for your 3D printer. Most webcams offer a plug-n-play setup with the Raspberry Pi and require minimal setup. Additionally, a USB webcam offers flexible mounting options, and you can find several 3D-printed mounts for some popular webcams like the Logitech C270.
We recommend getting a webcam with at least a 720p resolution. It provides decent picture quality at relatively affordable prices. Some webcams offer an auto-focus option which can ease the process of setting up the camera for your printing. You can also check for webcams with lighting and settings adjustments if you need more control over your recording process.
You can refer to this camera guide that lists the compatible webcams for Raspberry Pi. It’s a comprehensive list covering various webcams you can use with your Klipper 3D printer.
Benefits
- Easy to set up and configure.
- Wide variety of options.
- Easy availability.
- Affordable price points.
- Multi-purpose functionality.
Drawbacks:
- Limited compatibility.
- Less community support for unpopular webcams.
Popular Options
- Logitech C270
- Logitech HD Pro C920
- Microsoft Lifecam HD-3000
- Wyze V2
Raspberry Pi Cameras

The Raspberry Pi cameras are explicitly developed to run with the Pi boards. They’re small, budget-friendly, and easy to set up for your 3D printer.
The basic Raspberry Pi camera V2 ranges somewhere around $30. You can shoot high-quality images on it, along with 1080p videos at 30fps. These specifications are adequate for basic 3D printer monitoring purposes and for recording high-quality videos of your 3D prints.
Likewise, the Raspberry Pi HQ camera gives you more flexibility and features for shooting high-quality images and videos with your 3D printer. It features a 12MP sensor, and you can switch between various camera lenses to get the best possible results.
You need to consider that mounting and positioning a Raspberry Pi camera on your 3D printer can be a challenging task. It can also be difficult to source compatible lenses for the HQ camera, further restricting your configuration options.
However, considering the price to performance factor, a Raspberry Pi camera can be an excellent option for beginners on a budget. They have great community support, which can come in handy during the initial setup process.
Benefits:
- Easy setup process.
- Widely compatible with the Pi boards.
- Good video quality.
- Excellent community support.
- Budget-friendly pricing.
Drawbacks:
- It can be difficult to procure.
- Short ribbon length.
- Challenging to position.
Popular options:
- Raspberry Pi V2
- Raspberry Pi HQ
How To Install and Configure A Camera With Your Klipper 3D Printer?
It’s assumed that you’ve already installed Klipper on your 3D printer; otherwise you can refer to our Klipper installation guide using Fluidd and Mainsail OS. Both interfaces natively support webcams without any need for external configuration files. We’ll look at configuring USB webcams for FluiddPi and Mainsail OS images.
FluiddPi
USB webcam Installation
- Plug the USB webcam into your Raspberry Pi and log in to your Fluidd instance.
- Open settings and Go to the camera option.
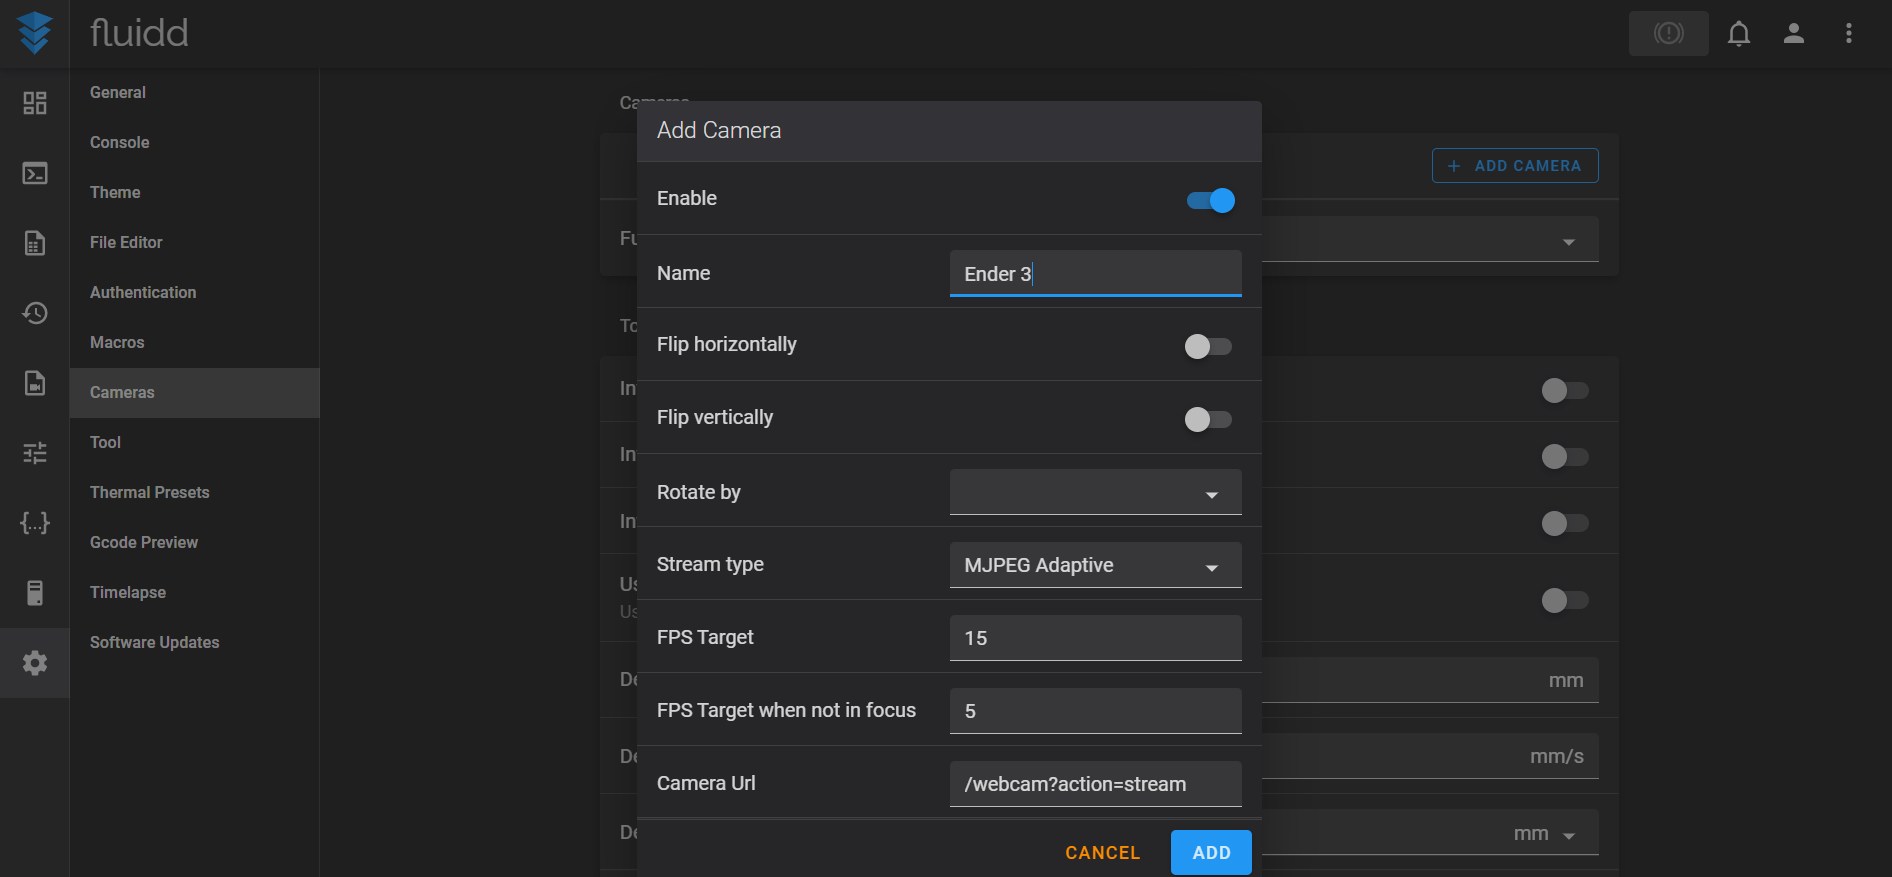
- Add a camera and name it.
- You should now be able to view the camera feed in the main Fluidd dashboard.
**Webcam Configuration
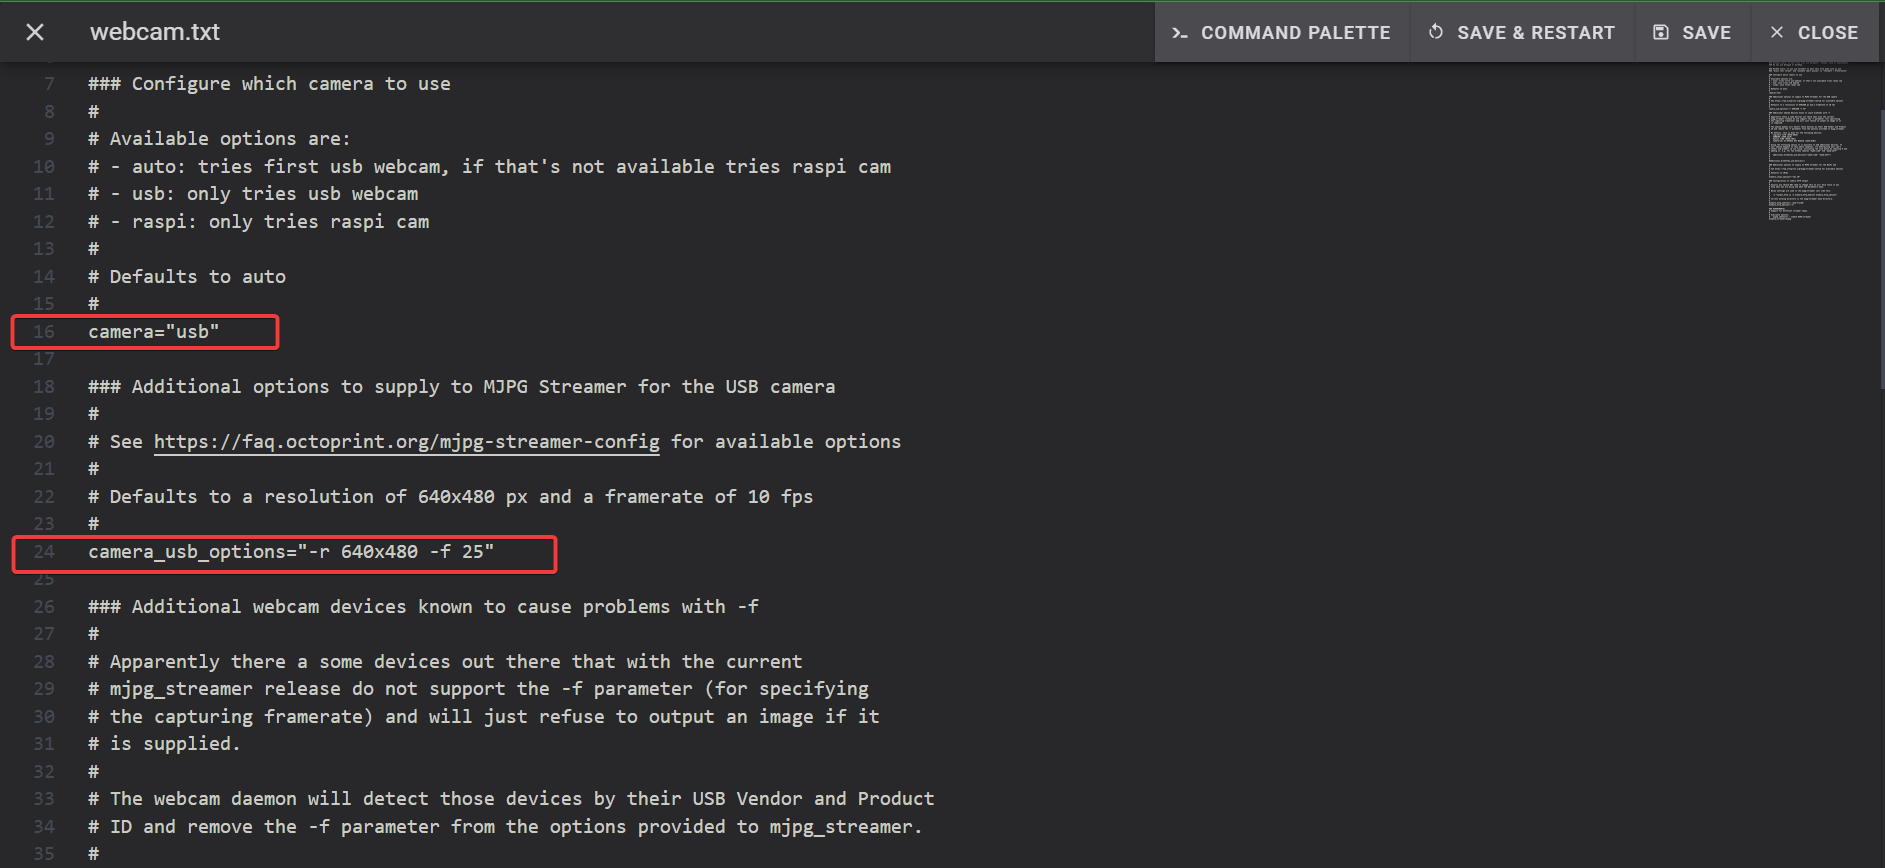
- Go to the configuration section and open the webcam.txt file.
- For the USB webcam, uncomment the line camera=usb by removing the # symbol.
- You can further change the resolution and FPS option by uncommenting line 24. In this case, we’ve set the resolution to 640x480 at 10FPS for a smooth video stream.
- Save and Restart your Fluidd instance.
The procedure is the same for Raspberry Pi cameras. You can find the configuration for it at the bottom of the file.
Mainsail OS
Webcam Installation
- Plug the USB webcam into your Raspberry Pi and log in to your Mainsail OS instance.
- Open settings and navigate to the webcams section.
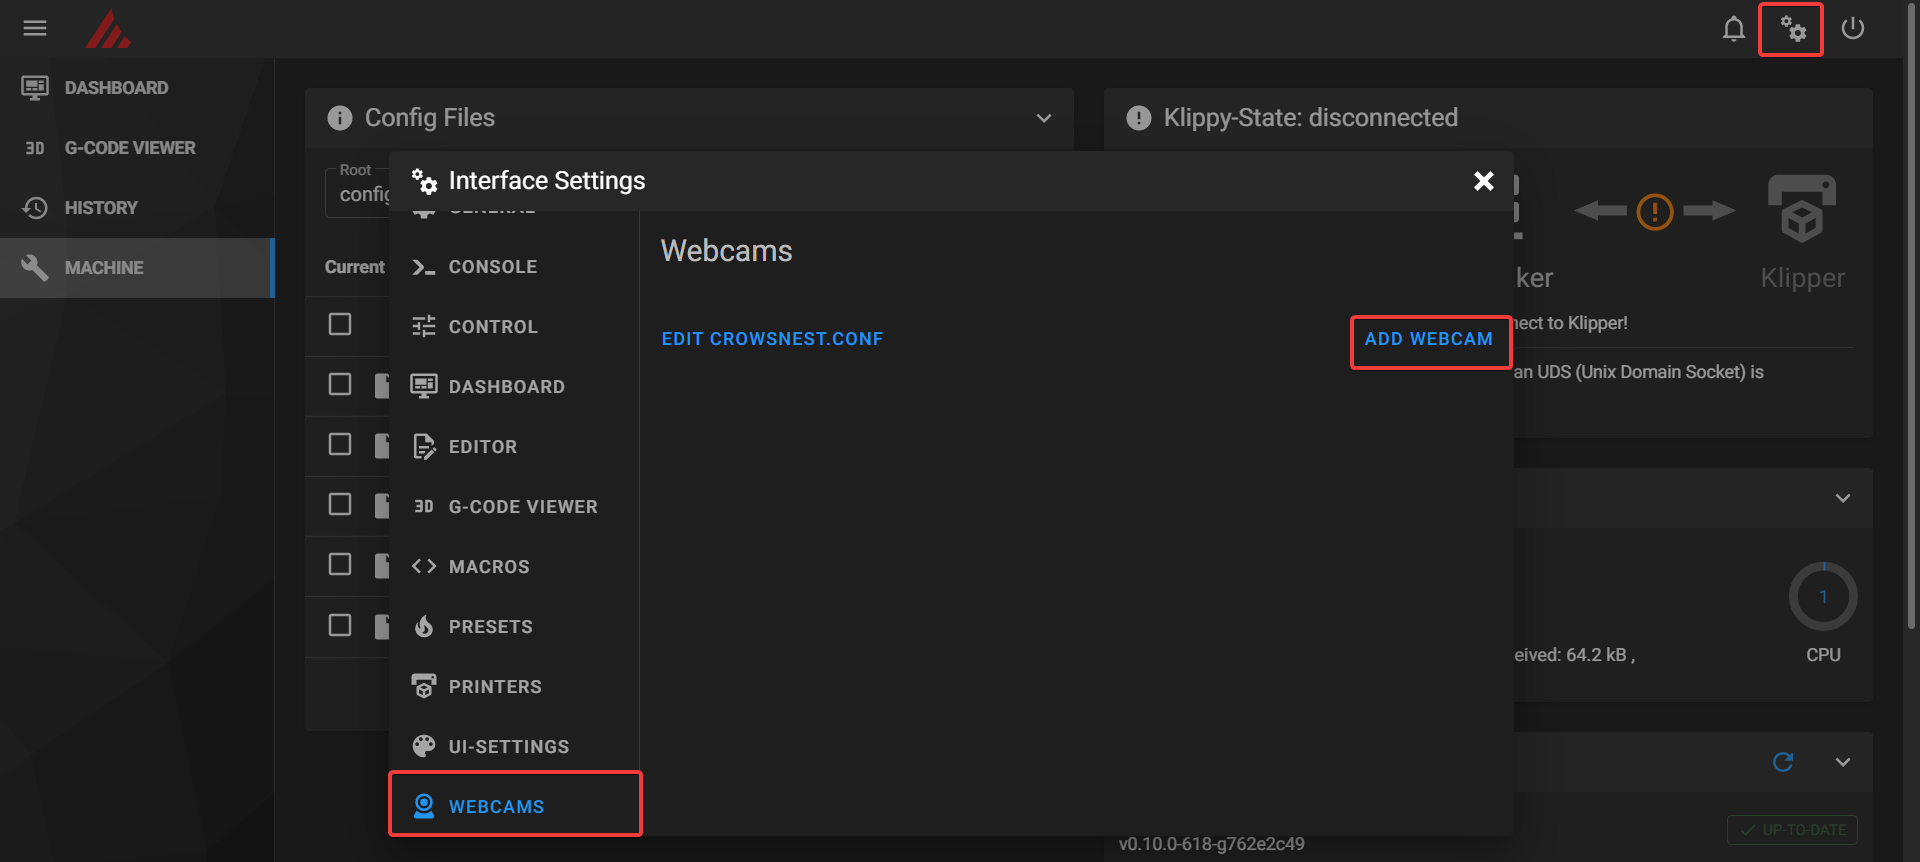
- Add a webcam and name it. Save and exit the window.
- You should now see a video feed on the main dashboard.
**Webcam configuration!
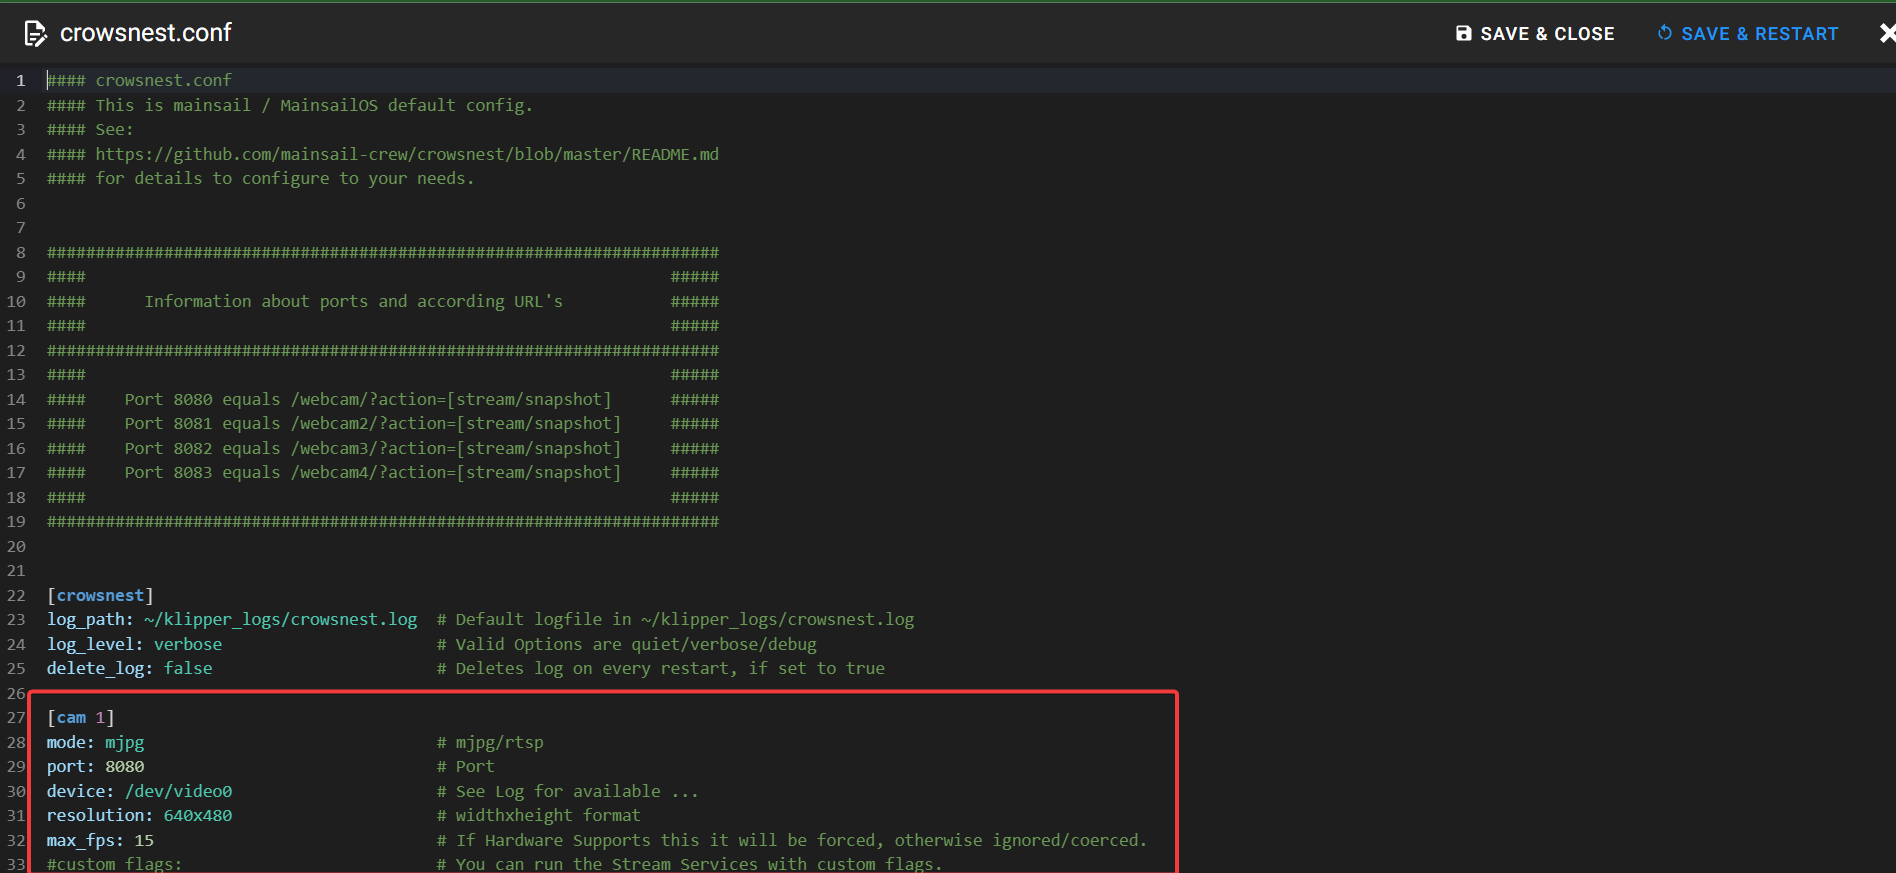
- Go to the Machine section and open the crowsnest.conf file.
- You can see the [cam 1] section at the bottom of the file.
- You can adjust the resolution and fps per your requirements under their respective lines.
- Save and Restart the firmware.
There’s no specific configuration for the Raspberry Pi camera, and you should be able to configure it similarly to a USB webcam. You can refer to this crowsnest guide for detailed information on all aspects of the configuration file.
How to set up Multiple cameras with Klipper?
A multi-camera setup can help you shoot with two or more cameras, each dedicated to a specific purpose.
For example, you can use a low-quality webcam to monitor your prints and a separate webcam to record timelapse videos on Klipper. With multiple cameras, you can monitor several printers from a single Raspberry Pi without installing Klipper for each 3D printer.
However, setting up multiple cameras can be a tricky process, and it can be specifically confusing for beginners. Let’s go over the process for FluiddPi and Mainsail OS.
FluiddPi
- Open the configuration section and make a copy of the webcam.txt file. Rename it to webcam2.txt, or webcam3.txt, depending on the cameras you’re setting up.
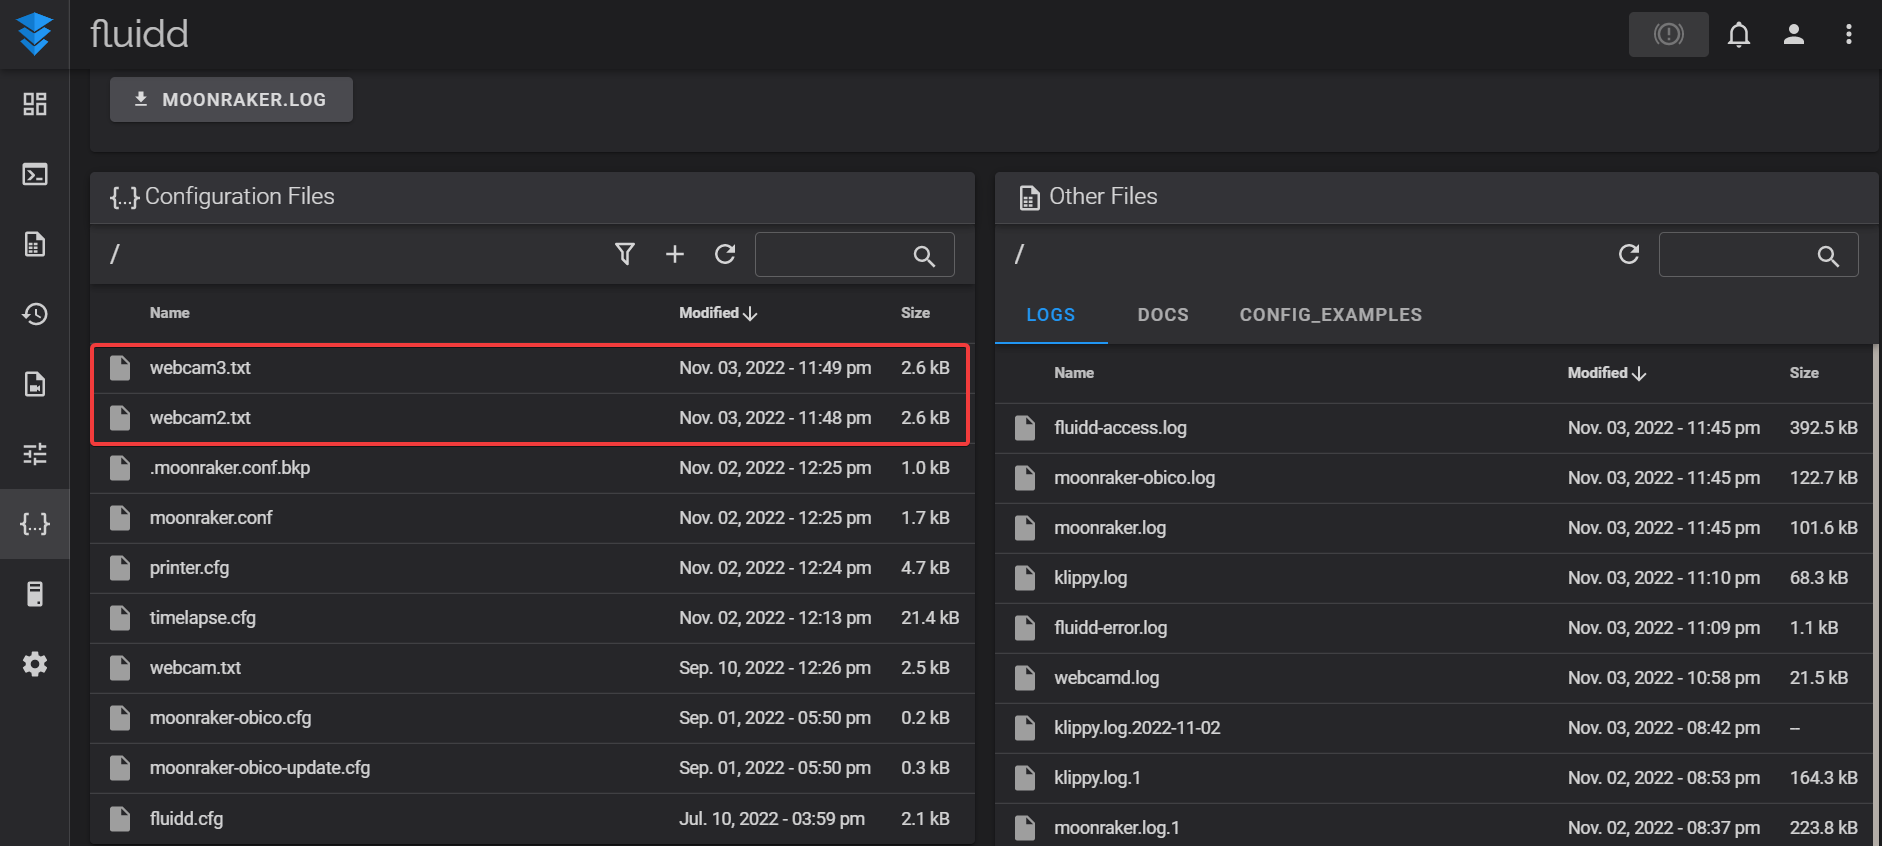
- Open the webcam2.txt file and ensure that the camera configuration differs from your primary camera. For example, if your primary webcam has camera="USB", change the configuration for your second webcam to camera="auto".
- Like earlier, you can alter the resolution and fps settings for the second camera depending on its specifications.
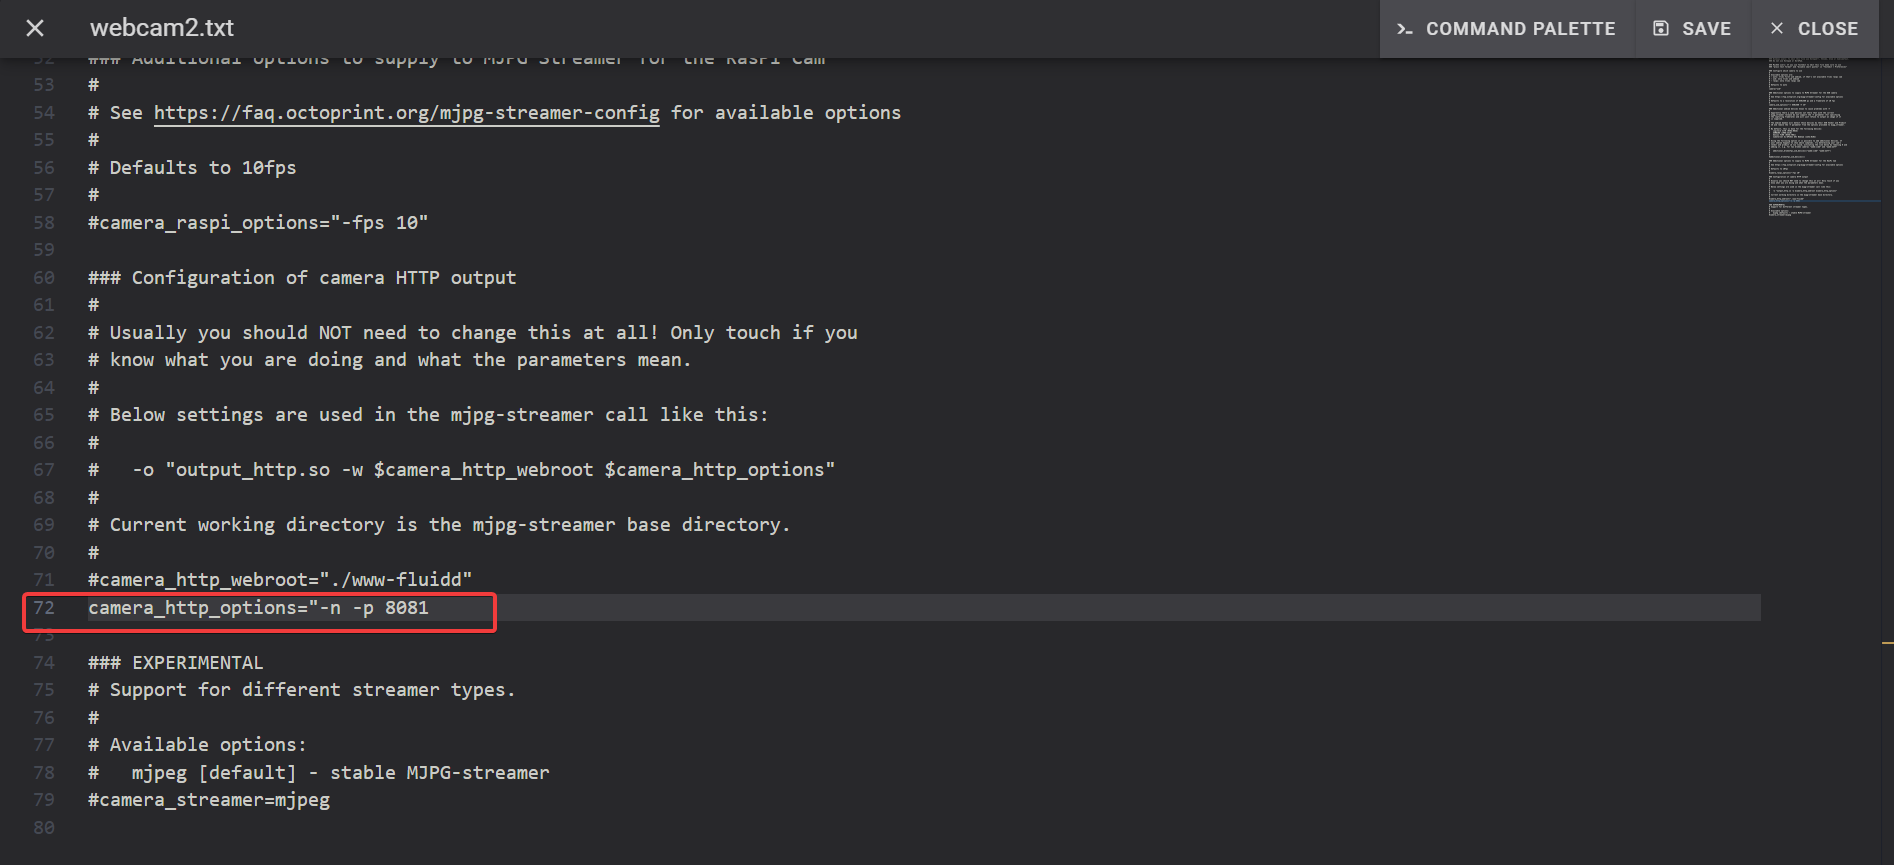
- Every camera needs to have a separate port ID. Uncomment line 72 that indicates the camera options.
- Edit the camera_http_options to camera_http_options="-n -p 8081 for your second camera. Similarly, if you want to set up a third and fourth camera, edit the port IDs to 8082 and 8083, respectively.
- Install a new camera in the Fluidd interface and change the camera URL to webcam1/?action=stream for port ID 8081.
- Likewise, for the third and fourth webcams with port ID 8082 and 8083, change the URL to webcam2 and webcam3, respectively.
- Check that the cameras work by entering http://you're-ip/webcam2/ in your web browser.
Mainsail OS
- Open the crowsnest.conf file from configurations.
- Copy and paste the [cam1] file and edit it to [cam 2].
- Change the port ID to 8081. Edit any camera settings if you need to.
- Install a new camera in the Mainsail interface and change the camera URL to webcam1/?action=stream for port ID 8081.
- Likewise, for the third and fourth webcams with port ID 8082 and 8083, change the URL to webcam2 and webcam3, respectively.
- Check that the cameras work by entering http://you're-ip/webcam2/ in your web browser.
That’s it. You’ve now set up multiple cameras with Fluidd and Mainsail OS for your Klipper 3D printer. Remember, Klipper supports up to four separate cameras with its native nginx configuration.
Next Steps
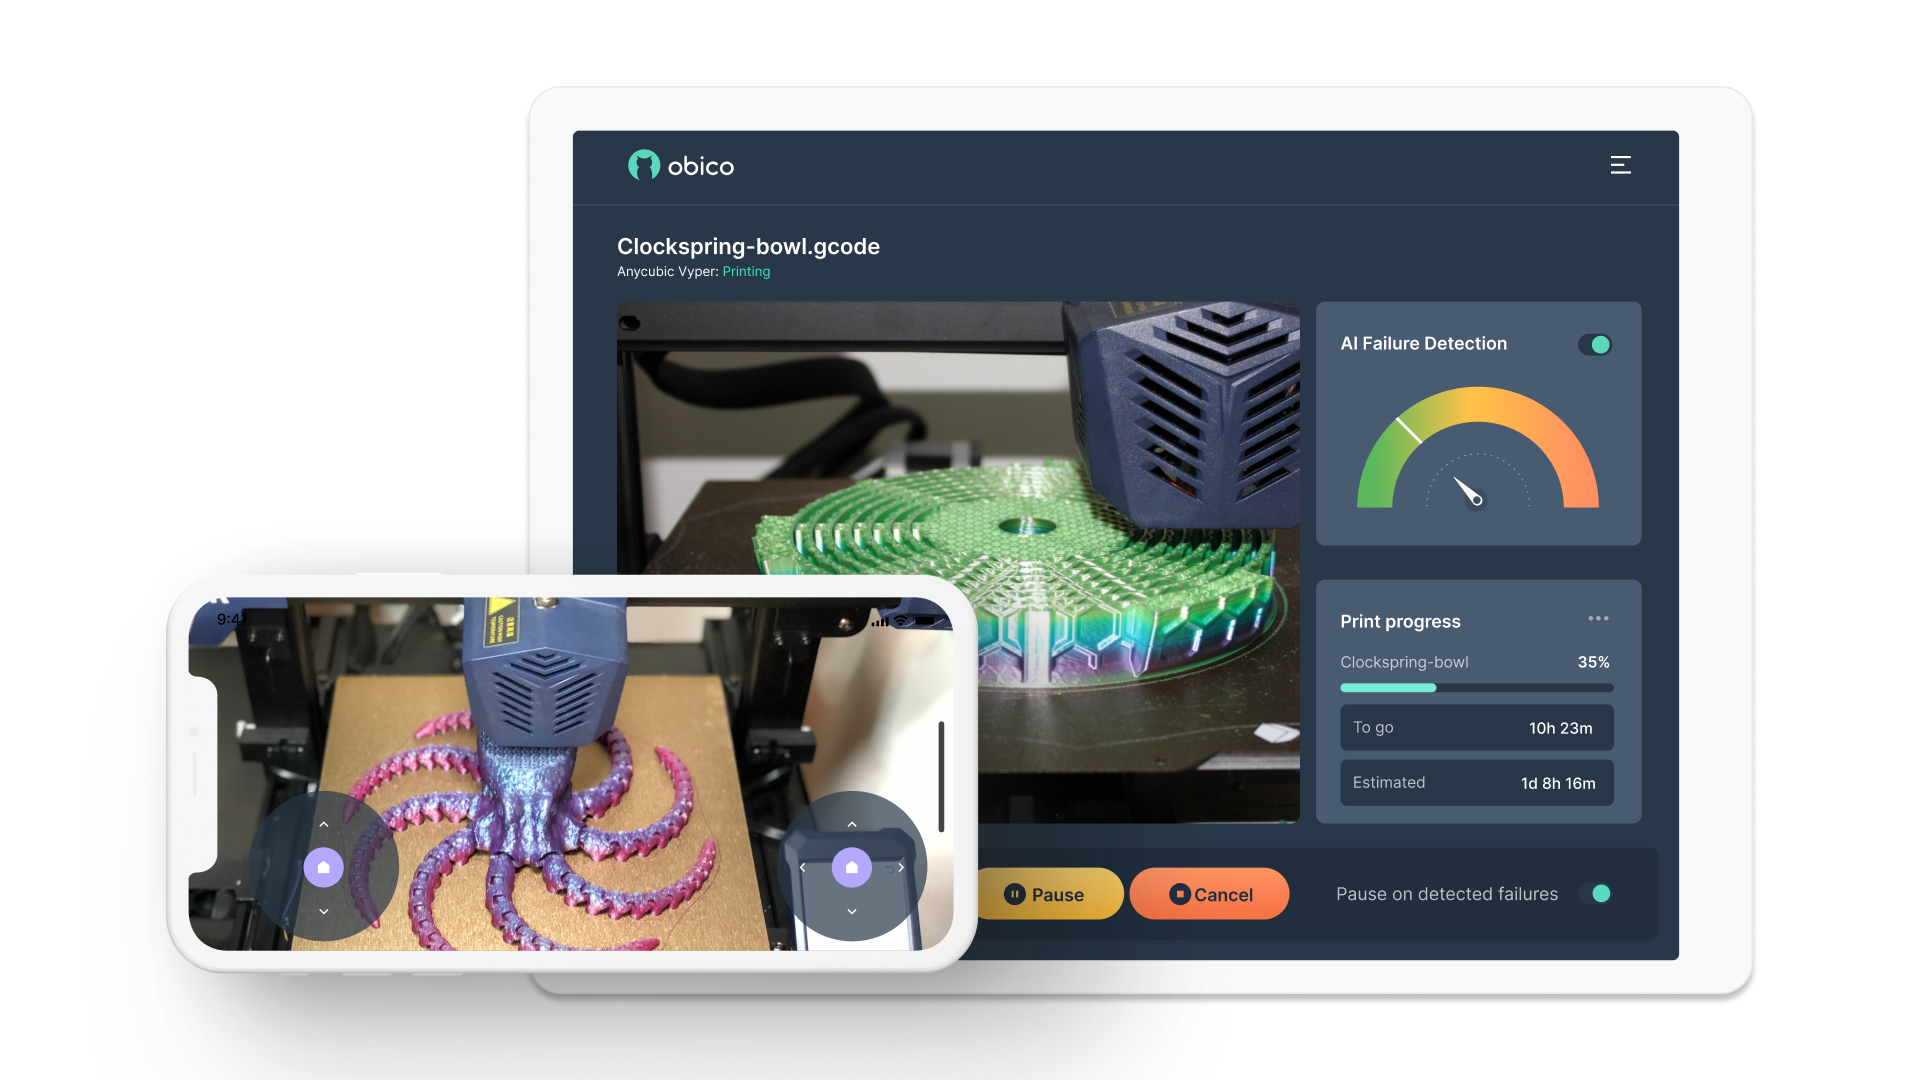
You can now play around with your camera settings and remotely monitor your 3D printer(s) on your home network. Or you can go a step further and try out the Obico with Klipper and monitor your 3D prints from anywhere in the world.
Obico runs in your web browser and provides a live stream of your ongoing 3D prints. You can also install it on your mobile device as an application and access your 3D printers remotely from anywhere.
With a camera connected to your 3D printer, Obico can help you detect print failures in real time. It uses AI failure detection technology and continuously analyzes your video stream for any signs of print failures. If Obico detects a potential print failure, it instantly notifies you and stops the current 3D print.
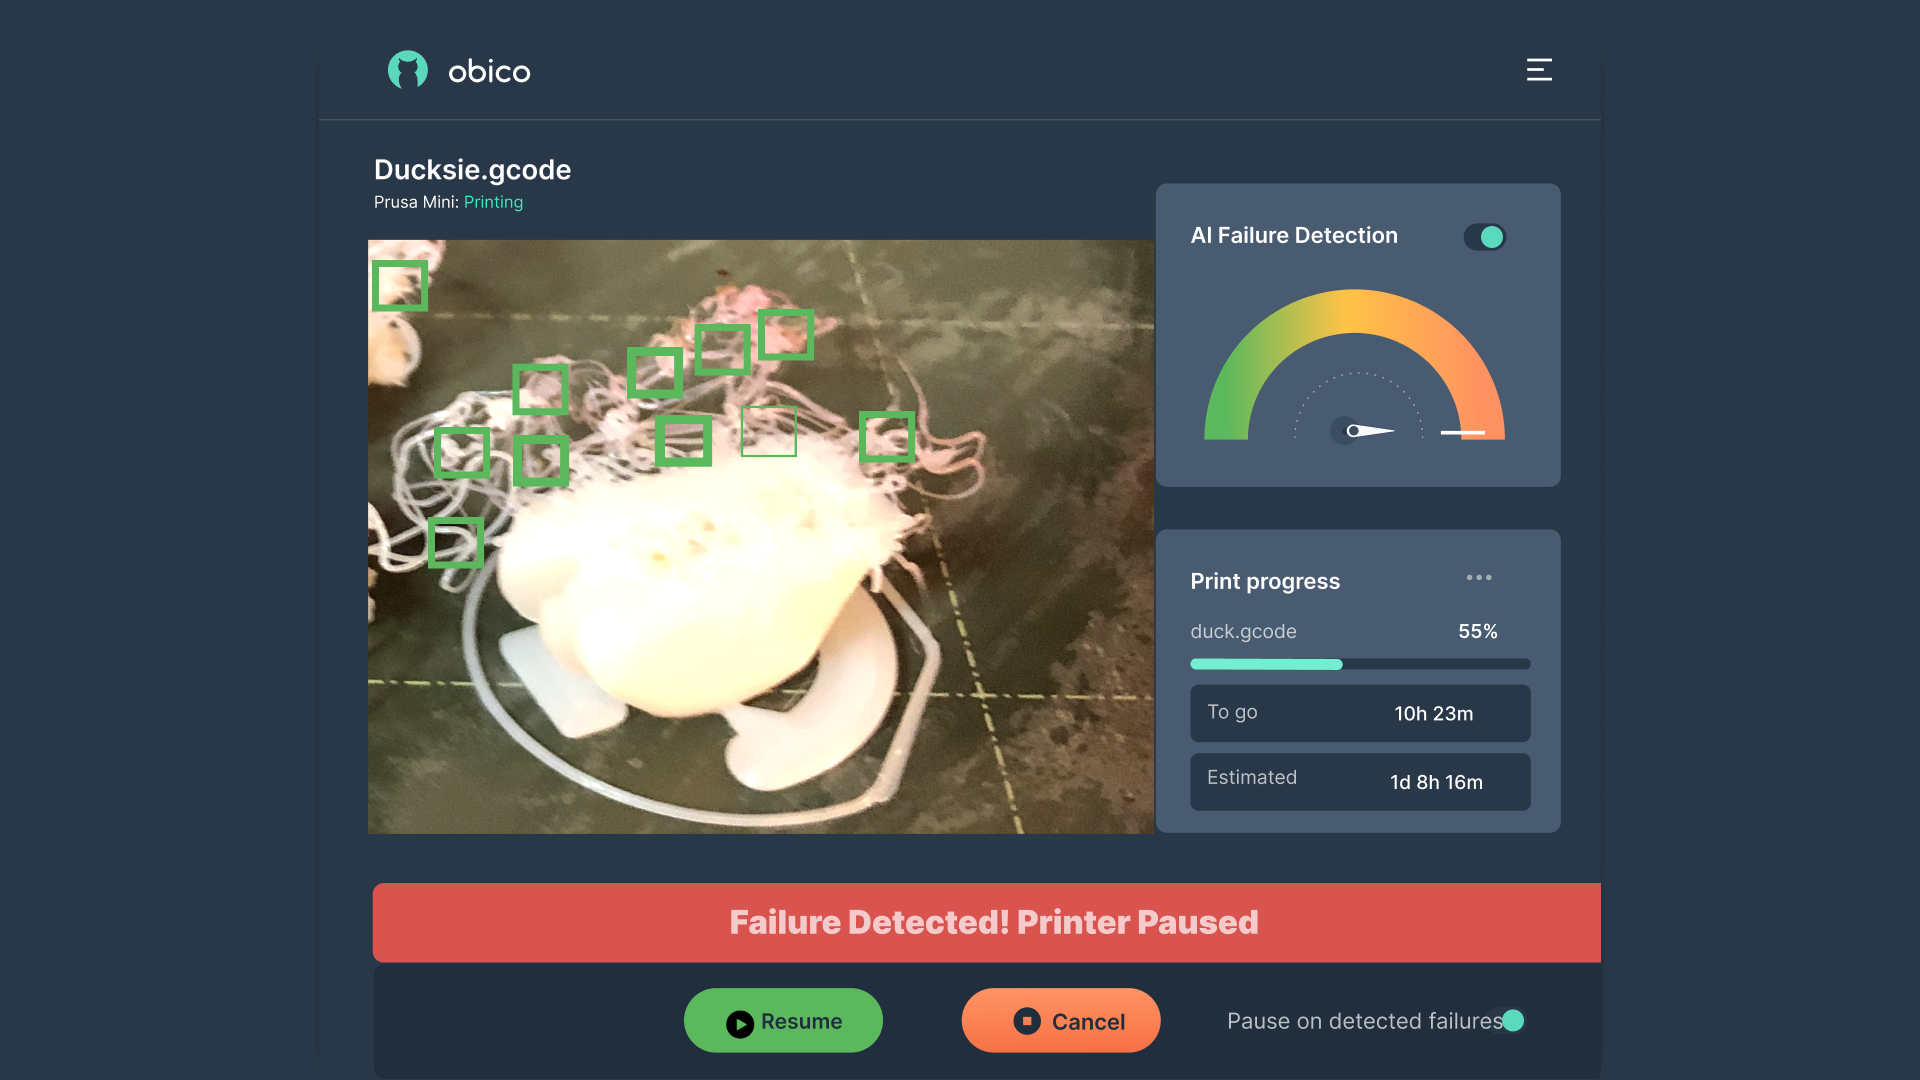
This AI print failure detection comes in handy when operating multiple printers or printing extended-duration models. It can save you from unnecessary failed printing hours and wastage of filament material if a failed print goes unnoticed for a while.
In the end, with Obico, you can take full benefits of your Klipper camera setup and use it to enhance your 3D printing experience.