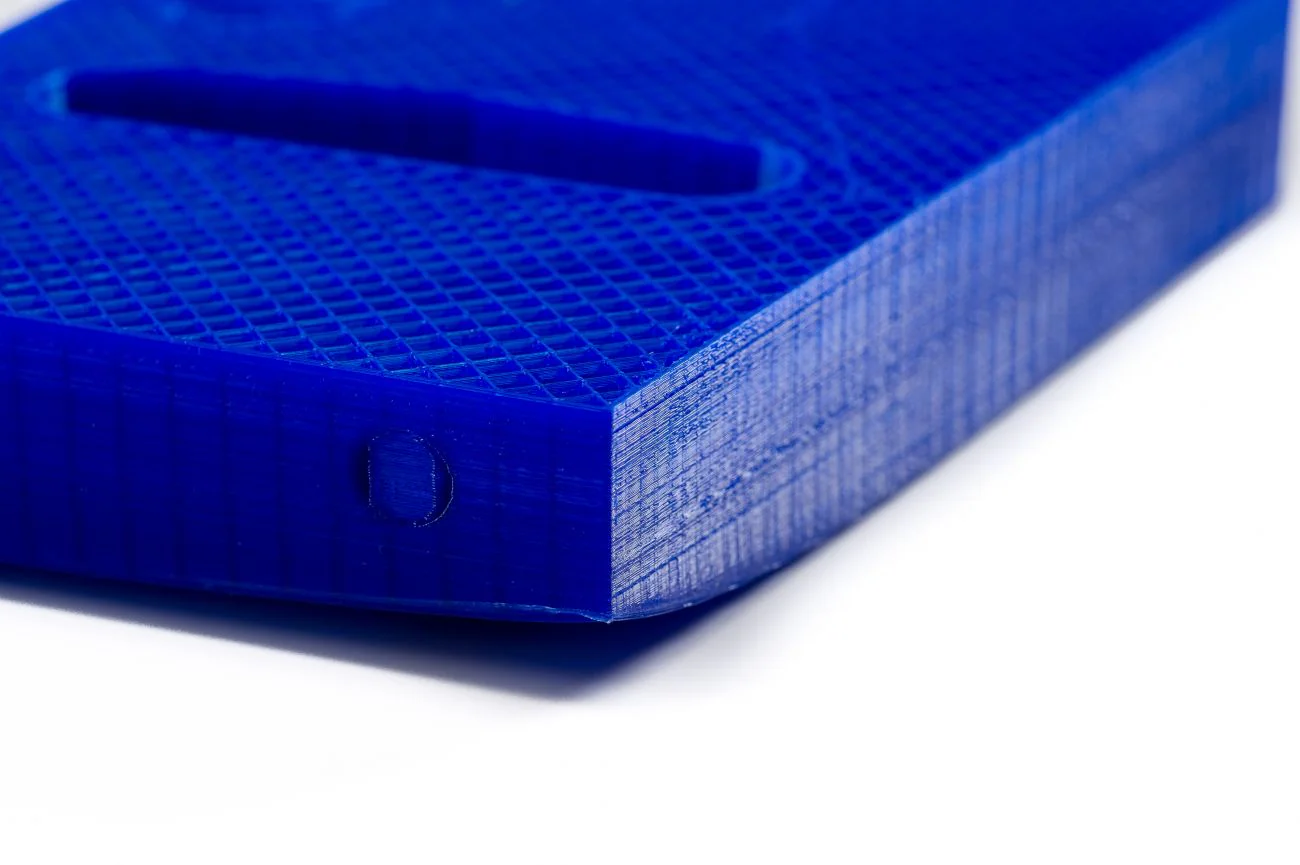
Osiągnięcie wysokiej jakości wydruków 3D w dużej mierze zależy od precyzyjnej kalibracji drukarki. Bez niej napotkasz typowe problemy, takie jak nitkowanie, słaba przyczepność do podłoża i niedokładne wymiary. Kalibracja jest podstawą spójnych, niezawodnych i doskonałych wyników drukowania.
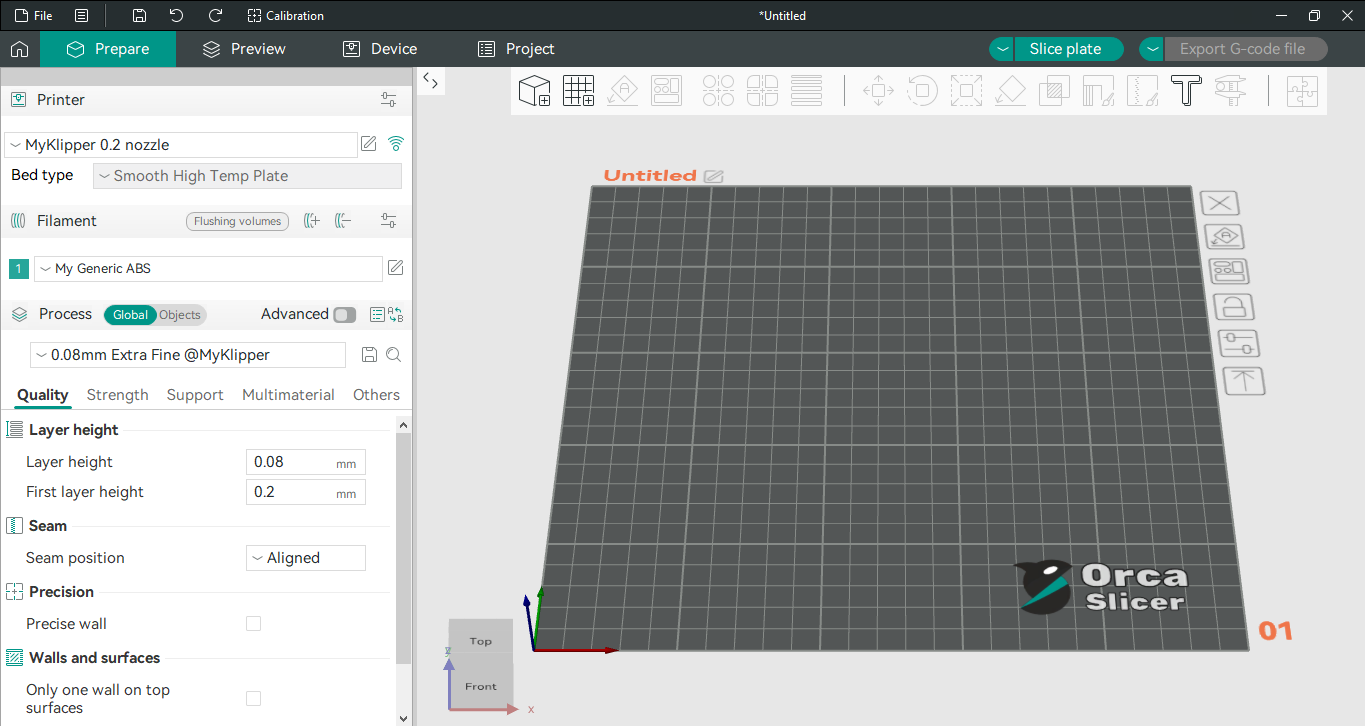
OrcaSlicer to zaawansowane oprogramowanie do krojenia z otwartym kodem źródłowym i potężnymi wbudowanymi narzędziami kalibracji. Ten przewodnik pomoże Ci korzystać z najnowszych stabilnych wersji OrcaSlicer (zwykle wersji 2.3.0 lub najnowszych nocnych kompilacji 2.3.1), aby dostroić drukarkę. Omówimy kalibracje temperatury, natężenia przepływu, ciśnienia, cofania, tolerancji, maksymalnej prędkości objętościowej i pionowych drobnych artefaktów (VFA). Testy te są zaprojektowane tak, aby były wykonywane w określonej kolejności, stopniowo poprawiając jakość wydruku.
OrcaSlicer oferuje zaawansowane funkcje, takie jak precyzyjna kontrola ścian, "tryb kanapkowy" dla lepszego wykończenia powierzchni, "konwersja polyholes" dla złożonych geometrii i bezproblemowa integracja z Klipper, OctoPrint i PrusaLink. Zapewnia szczegółową kontrolę, pozostając jednocześnie przyjaznym dla użytkownika dzięki projektowaniu metodą "przeciągnij i upuść" oraz wstępnie utworzonym profilom drukarki.
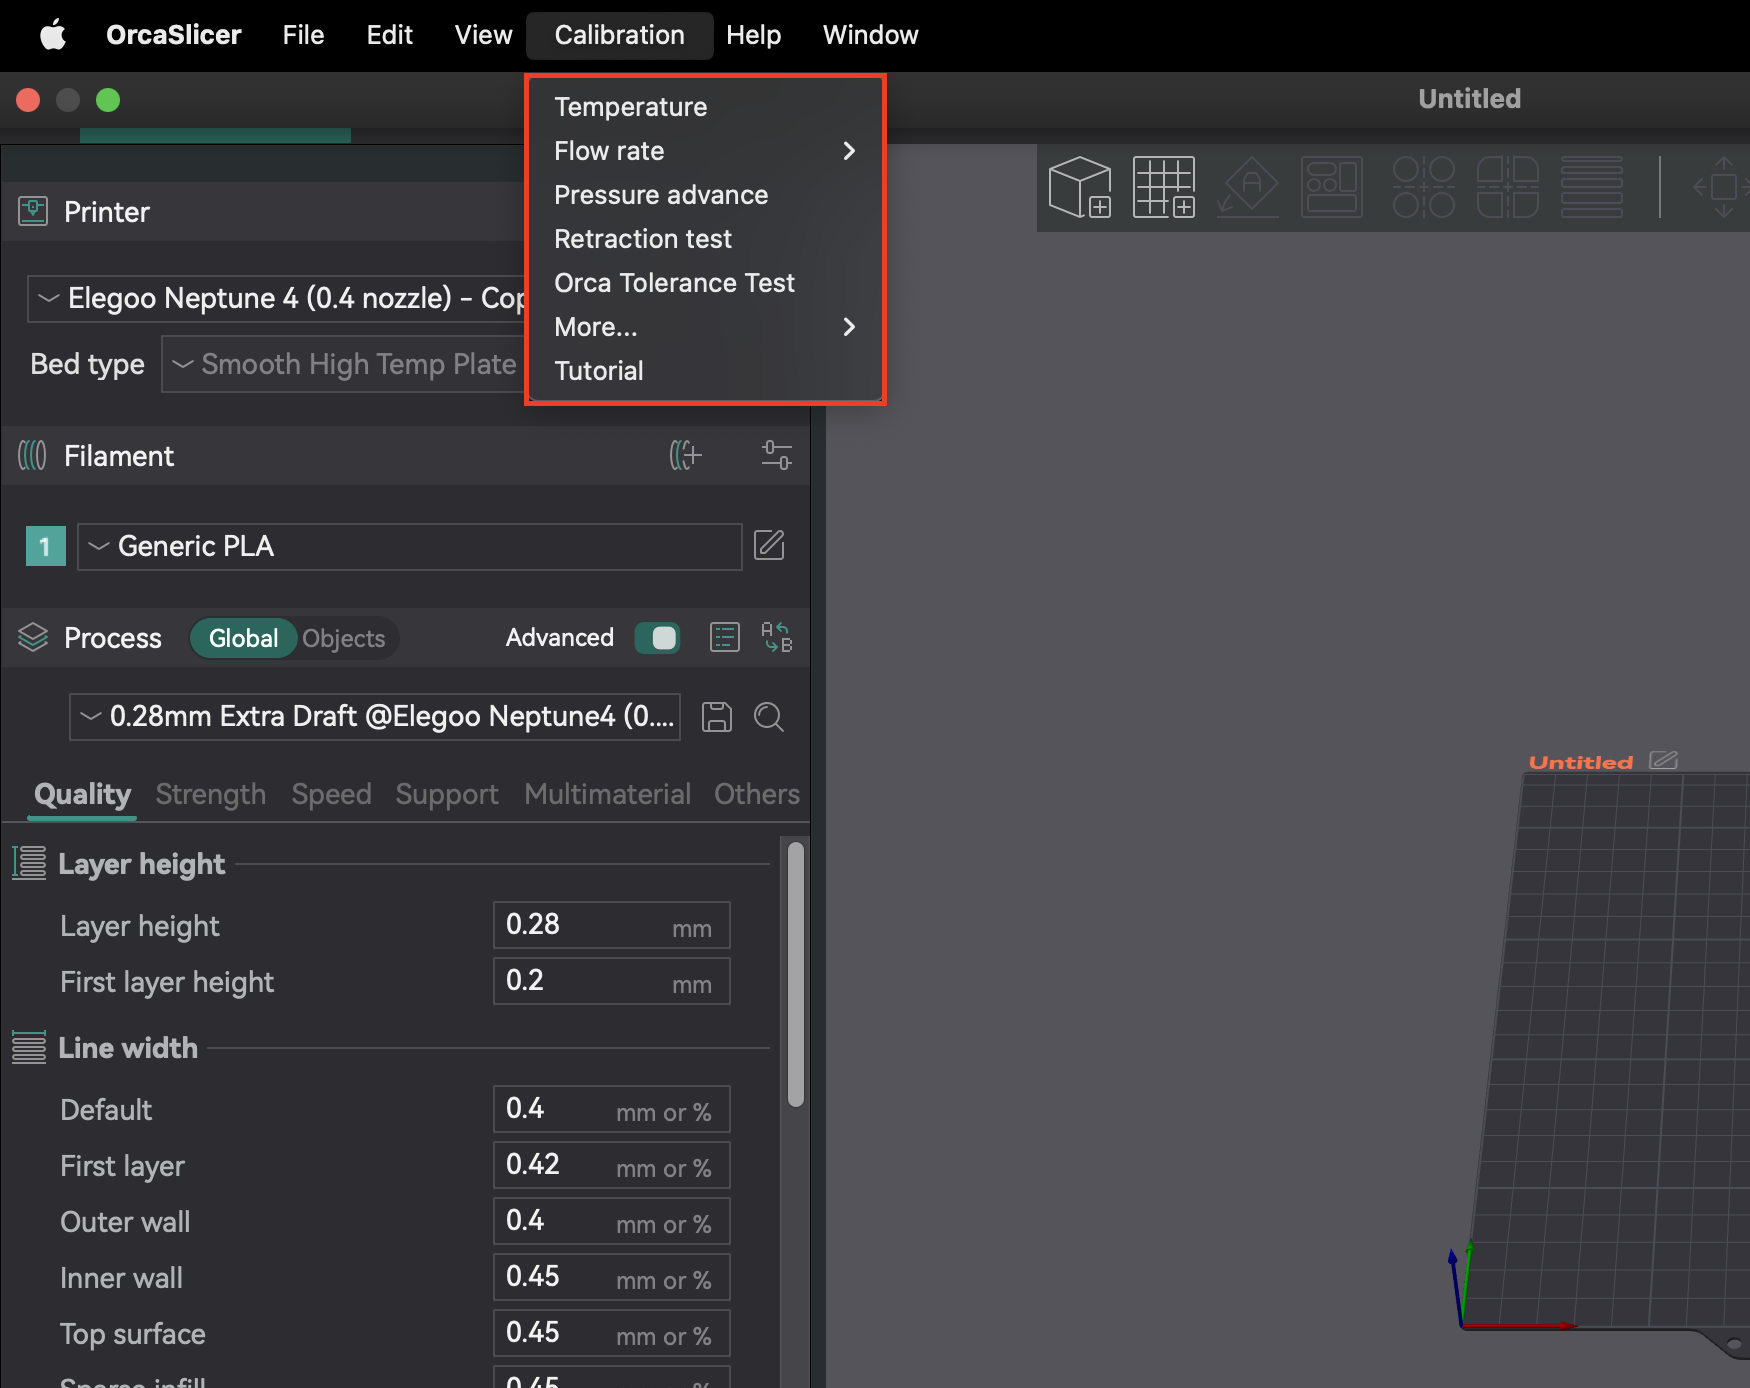
Większość funkcji kalibracji znajduje się w menu "Kalibracja". Po zakończeniu testu kalibracji zawsze twórz nowy projekt. Dzięki temu OrcaSlicer wyjdzie z trybu kalibracji i zresetuje parametry dla następnych wydruków.
Przestrzeganie określonej kolejności kalibracji jest kluczowe, ponieważ wiele ustawień jest od siebie zależnych. Rozpoczęcie od podstawowych parametrów zapewnia dokładne wyniki dla późniejszych, bardziej niuansowych regulacji. To systematyczne podejście minimalizuje rozwiązywanie problemów i pomaga w efektywnym osiąganiu lepszej jakości druku.
| Krok kalibracji | Cel | Kluczowa obserwacja/cel | Zależność/warunek wstępny |
|---|
| Temperatura | Optymalizacja topienia i wiązania filamentu | Najmniejsze nitkowanie, najlepsza przyczepność warstw | Brak (zakłada się dobrą konfigurację mechaniczną) |
| Przepływ | Zapewnienie prawidłowej ilości ekstruzji filamentu | Najgładsza górna powierzchnia, bez szczelin lub plam | Temperatura, Dokładne kroki E/odległość obrotowa |
| Przesunięcie ciśnienia | Zmniejszenie artefaktów spowodowanych wahaniami ciśnienia dyszy | Najostrzejsze narożniki, spójna ekstruzja | Przepływ, temperatura |
| Cofanie | Minimalizacja nitkowania i wyciekania | Najkrótsza długość przy minimalnym nitkowaniu | Przepływ, Przesunięcie ciśnienia |
| Tolerancja | Dokładne odtworzenie wymiarów modelu | Optymalne dopasowanie między drukowanymi częściami | Wszystkie poprzednie kalibracje ekstruzji/wymiarów |
| Maksymalna prędkość objętościowa | Określ maksymalną szybkość przepływu filamentu bez problemów | Najwyższa prędkość przed niedostatecznym wytłaczaniem | Temperatura, szybkość przepływu |
| Skręcanie/szarpnięcie/odchylenie połączeń | Zmniejszenie artefaktów z ostrych narożników | Gładsze narożniki, zmniejszone dzwonienie | Szybkość przepływu, wyprzedzanie ciśnienia |
| Kształtowanie wejścia | Zmniejszenie dzwonienia i poprawa jakości wydruku | Gładsze powierzchnie, zmniejszone zjawy | Szybkość przepływu, wyprzedzanie ciśnienia |
Tabela 1: Zalecana kolejność kalibracji urządzenia OrcaSlicer
Przed użyciem zaawansowanych narzędzi OrcaSlicer upewnij się, że podstawowe systemy mechaniczne i termiczne drukarki są skonfigurowane. Te kroki są często wykonywane bezpośrednio w oprogramowaniu sprzętowym drukarki lub poprzez fizyczne regulacje, a nie w OrcaSlicer. Pominięcie ich może powodować trwałe problemy z jakością druku.
Z-offset definiuje dokładną odległość między dyszą a platformą drukującą dla pierwszej warstwy. Jest to krytyczne dla przyczepności platformy. Jeśli dysza jest zbyt wysoko, filament nie będzie się przyklejał; jeśli jest zbyt nisko, może ocierać platformę, powodować "stopę słonia" lub klikanie ekstrudera.
To przede wszystkim oprogramowanie układowe drukarki lub fizyczna regulacja. Podczas gdy OrcaSlicer ma pole Z-offset (w Printer presets > zakładka General), dowiedz się, jak oprogramowanie układowe drukarki sobie z nim radzi. Większość drukarek polega na oprogramowaniu układowym lub fizycznych regulacjach. Zawsze najpierw wykonuj kalibrację Z-offset w drukarce. Ustawień OrcaSlicer używaj tylko do drobnych poprawek, jeśli drukarka zezwala na zdefiniowane przez slicer Z-offset.
Poziome podłoże zapewnia równomierną przyczepność pierwszej warstwy na całej powierzchni. Nierówne podłoże powoduje, że obszary dobrze się przyklejają, a inne się unoszą. OrcaSlicer oferuje "Adaptive Bed Mesh", aby zrekompensować drobne niedoskonałości poprzez mapowanie podłoża.
Adaptive Bed Mesh OrcaSlicer to narzędzie programowe, a nie substytut mechanicznie solidnego i początkowo wypoziomowanego stołu. Poleganie wyłącznie na oprogramowaniu bez początkowego ręcznego lub wspomaganego poziomowania (np. metodą papierową) może maskować problemy mechaniczne. Jeśli stół jest znacznie wypaczony, siatka może mieć problemy. Najpierw wypoziomuj mechanicznie stół, następnie ustaw przesunięcie Z, a na końcu pozwól, aby automatyczne poziomowanie drukarki lub adaptacyjna siatka stołu OrcaSlicer dostroiły się.
Przed dostosowaniem szybkości przepływu w slicerze upewnij się, że E-steps (Marlin) lub odległość obrotowa (Klipper) ekstrudera są skalibrowane. Informuje to drukarkę, ile filamentu należy wypchnąć. W przeciwnym razie drukarka wytłoczy niewłaściwą ilość, co spowoduje niedokładną kalibrację przepływu w slicerze. Jest to kalibracja oprogramowania sprzętowego drukarki, a nie ustawienie OrcaSlicer.
Po skonfigurowaniu podstawowych ustawień drukarki należy skorzystać z wbudowanych testów kalibracji OrcaSlicer w celu zoptymalizowania jakości wydruku.
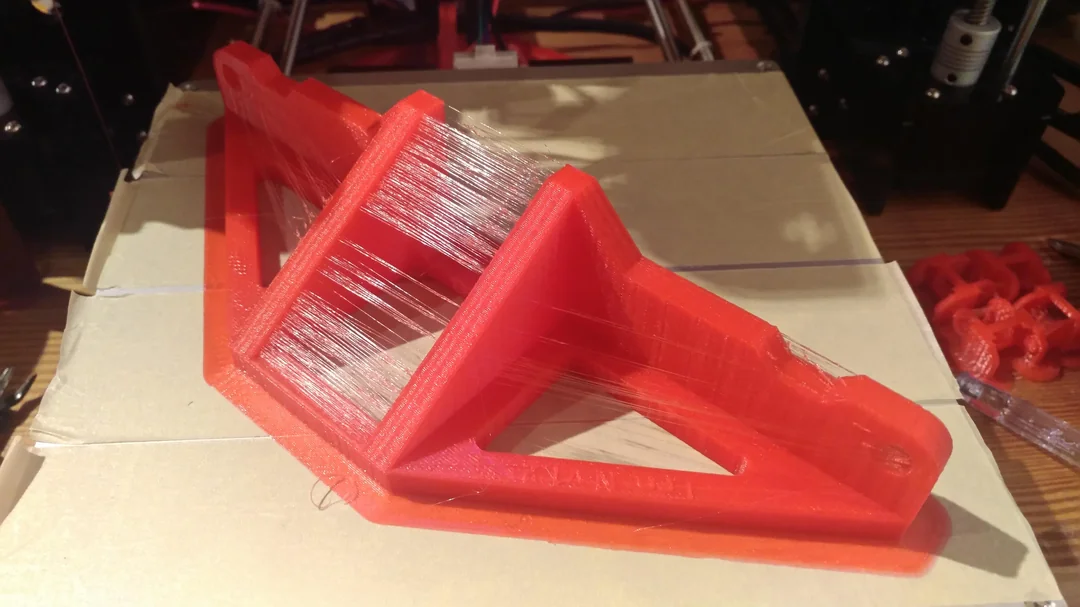
Temperatura wpływa na to, jak filament się topi, płynie i wiąże. Zbyt niska temperatura powoduje niedostateczne wytłaczanie, słabą przyczepność i słabe części. Zbyt wysoka temperatura powoduje wyciekanie, nitkowanie, wypaczanie i plamy.
Dokładna kalibracja temperatury zależy od wcześniejszego przesunięcia Z, poziomowania stołu i strojenia PID. Jeśli są one wyłączone, wyniki wieży temperaturowej mogą być mylące. Przed przeprowadzeniem testów temperatury upewnij się, że drukarka jest mechanicznie sprawna i dostrojona do PID, aby uzyskać dokładne wyniki.
- Przygotowanie: W OrcaSlicer wybierz materiał (PLA, PETG itp.). Spowoduje to ustawienie domyślnych zakresów temperatur stołu i dyszy. Przejdź do "Kalibracja" > "Temperatura". Ustaw niestandardowe temperatury początkowe/końcowe (przyrost jest stały i wynosi 5°C).
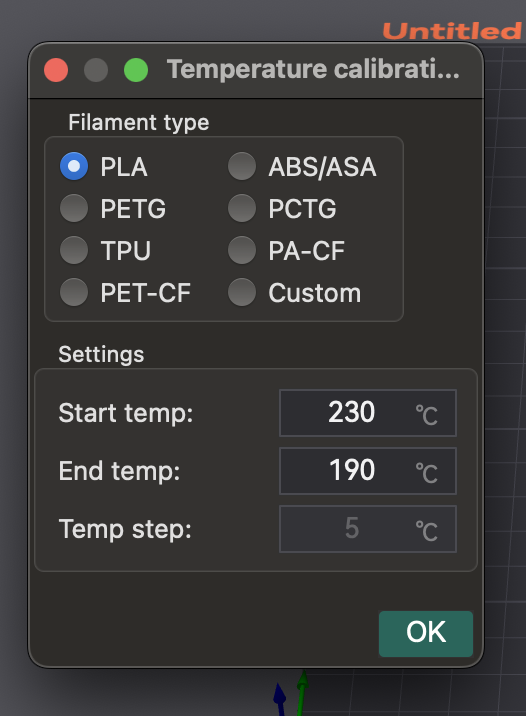
- Drukowanie wieży: OrcaSlicer generuje wieżę temperaturową. Pokrój ją i wydrukuj.
- Analizowanie wyników: Po wydrukowaniu sprawdź każdą warstwę pod kątem sznurowania, przyczepności warstw, odkształceń i wydajności nawisu/mostkowania. Znajdź blok temperaturowy o najlepszej ogólnej jakości wydruku i najmniejszej liczbie defektów.
- Stosowanie ustawień: Zaktualizuj optymalną temperaturę dyszy w ustawieniach profilu filamentu w OrcaSlicer. Zapisz profil i utwórz nowy projekt.
Temperatura jest specyficzna dla filamentu. Różne marki lub kolory tego samego typu filamentu mogą mieć różne optymalne zakresy. Wykonaj ten test dla każdego nowego filamentu, aby zbudować bibliotekę precyzyjnie dostrojonych profili.
- Nurkowanie/Wyciekanie: Często oznacza, że temperatura jest zbyt wysoka lub ustawienia retrakcji są wyłączone.
- Słaba przyczepność warstwy/niedostateczne wytłaczanie: Temperatura dyszy jest często zbyt niska.
- Deformacja: Może być spowodowana nieprawidłową temperaturą stołu/dyszy lub niewystarczającym chłodzeniem.
| Typ/marka filamentu | Zakres testowanych temperatur | Optymalna temperatura | Kluczowe obserwacje przy optymalnej temperaturze |
|---|
| PLA (ogólny) | 190-230°C | 205°C | Minimalne nitkowanie, silna przyczepność warstw, dobre wystające elementy |
| PETG (prusament) | 230-250°C | 240°C | G�ładka powierzchnia, brak odkształceń, dobre mostkowanie |
| ABS (Hatchbox) | 230-260°C | 245°C | Zmniejszone pękanie, dobre wiązanie międzywarstwowe |
Tabela 2: Ustawienia i obserwacje wieży temperaturowej
Przepływ (mnożnik wytłaczania) kontroluje ilość wytłaczanego filamentu. Jest on kluczowy dla gładkich powierzchni i dokładności wymiarowej. Zbyt wysoki powoduje nadmierne wytłaczanie: plamy, nitkowanie, słabą dokładność. Zbyt niski powoduje niedostateczne wytłaczanie: przerwy, słabą przyczepność, słabe wykończenie.
Kalibracja natężenia przepływu zależy w dużej mierze od temperatury i kroków E/odległości obrotowej. Jeśli ekstruder nie jest skalibrowany, regulacje natężenia przepływu w slicerze będą niedokładne. Najpierw upewnij się, że kroki E są prawidłowe, a temperatura jest optymalna.
Wysokość warstwy i prędkość drukowania mogą również wpływać na optymalną szybkość przepływu. Jeśli limity prędkości drukowania ulegną zmianie, ponownie uruchom kalibrację.
- Tworzenie projektu testowego: W OrcaSlicer wybierz ustawienia drukarki, filamentu i procesu. Przejdź do "Kalibracja" > "Przejście 1". Spowoduje to wygenerowanie dziewięciu bloków, każdy z innym modyfikatorem szybkości przepływu.
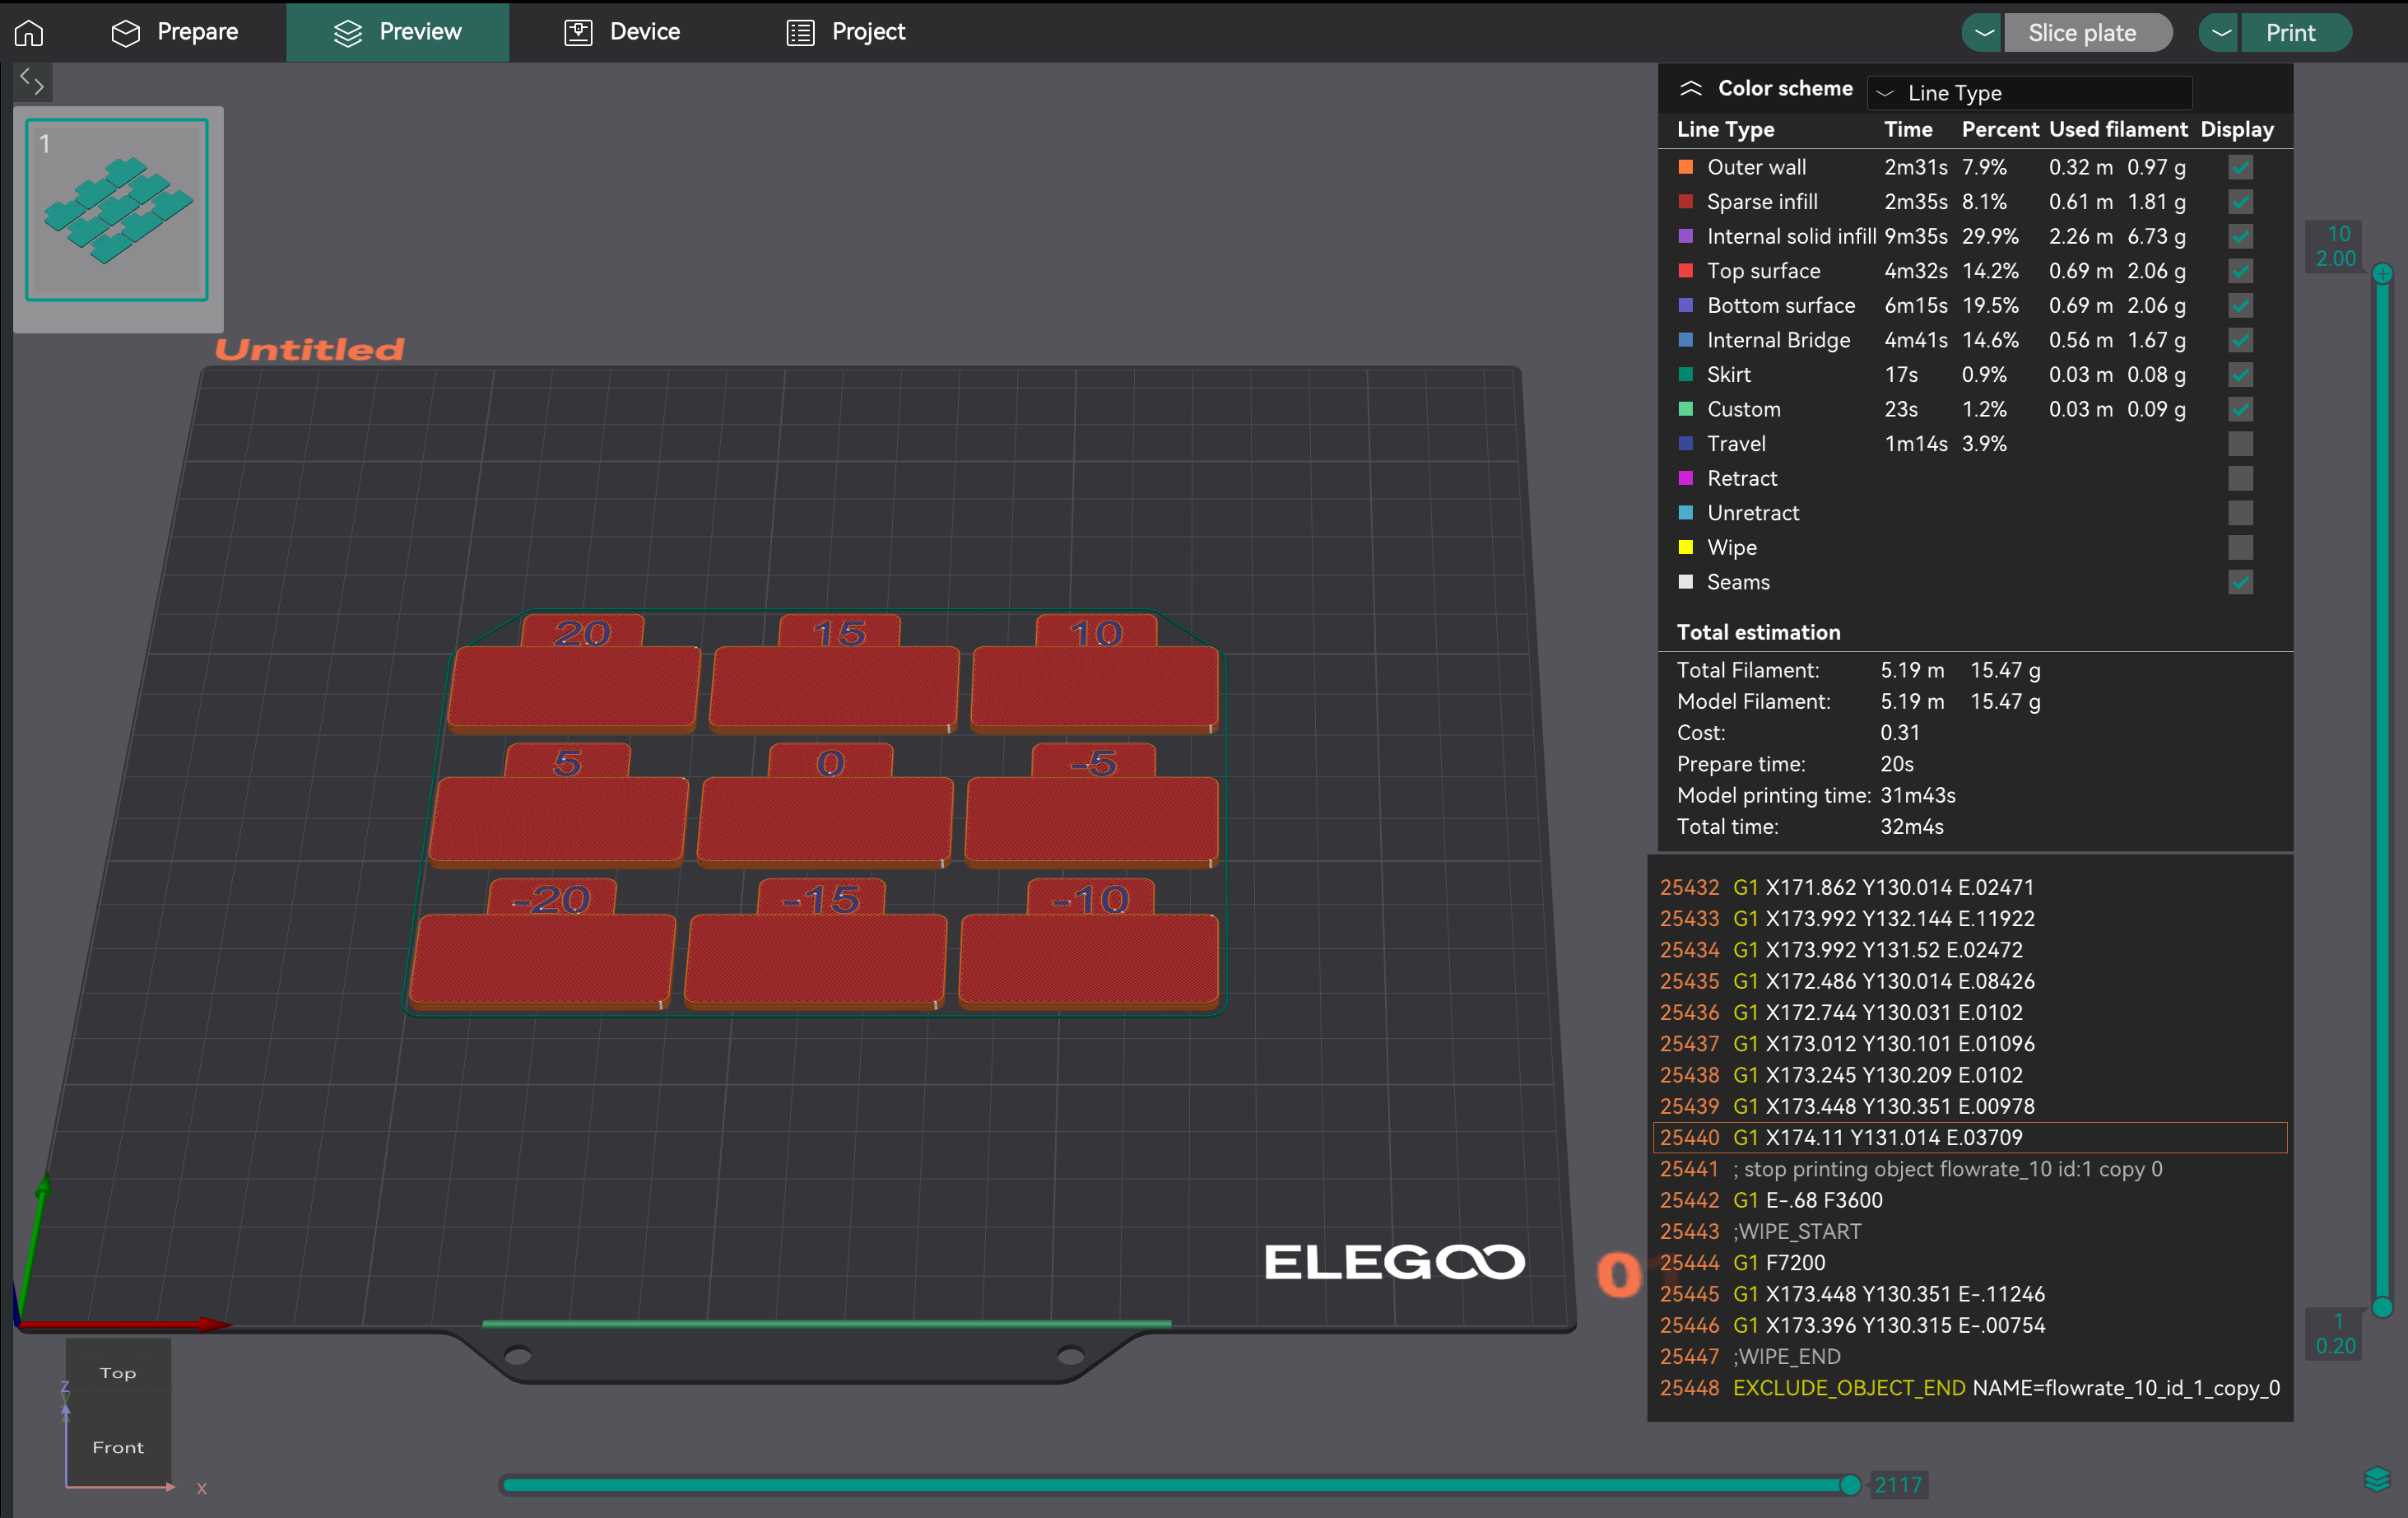
- Analiza najgładszej powierzchni: Wydrukuj projekt. Zbadaj górne powierzchnie. Znajdź blok o najgładszej powierzchni, wolny od nadmiernego wytłaczania (grzbiety, plamy) lub niedostatecznego wytłaczania (szczeliny). Jeśli dwa są podobne, wybierz ten o wyższym współczynniku przepływu.
- Obliczanie współczynnika przepływu: Oblicz FlowRatio_new = FlowRatio_old * (100 + modyfikator) / 100. Przykład: 0,98 * (100 + 5) / 100 = 1,029.
- Generowanie projektu dostrajania: Utwórz nowy projekt. Przejdź do "Kalibracja" > "Przejście 2". Spowoduje to wygenerowanie dziesięciu bloków z modyfikatorami od -9 do 0 w celu precyzyjnych regulacji.
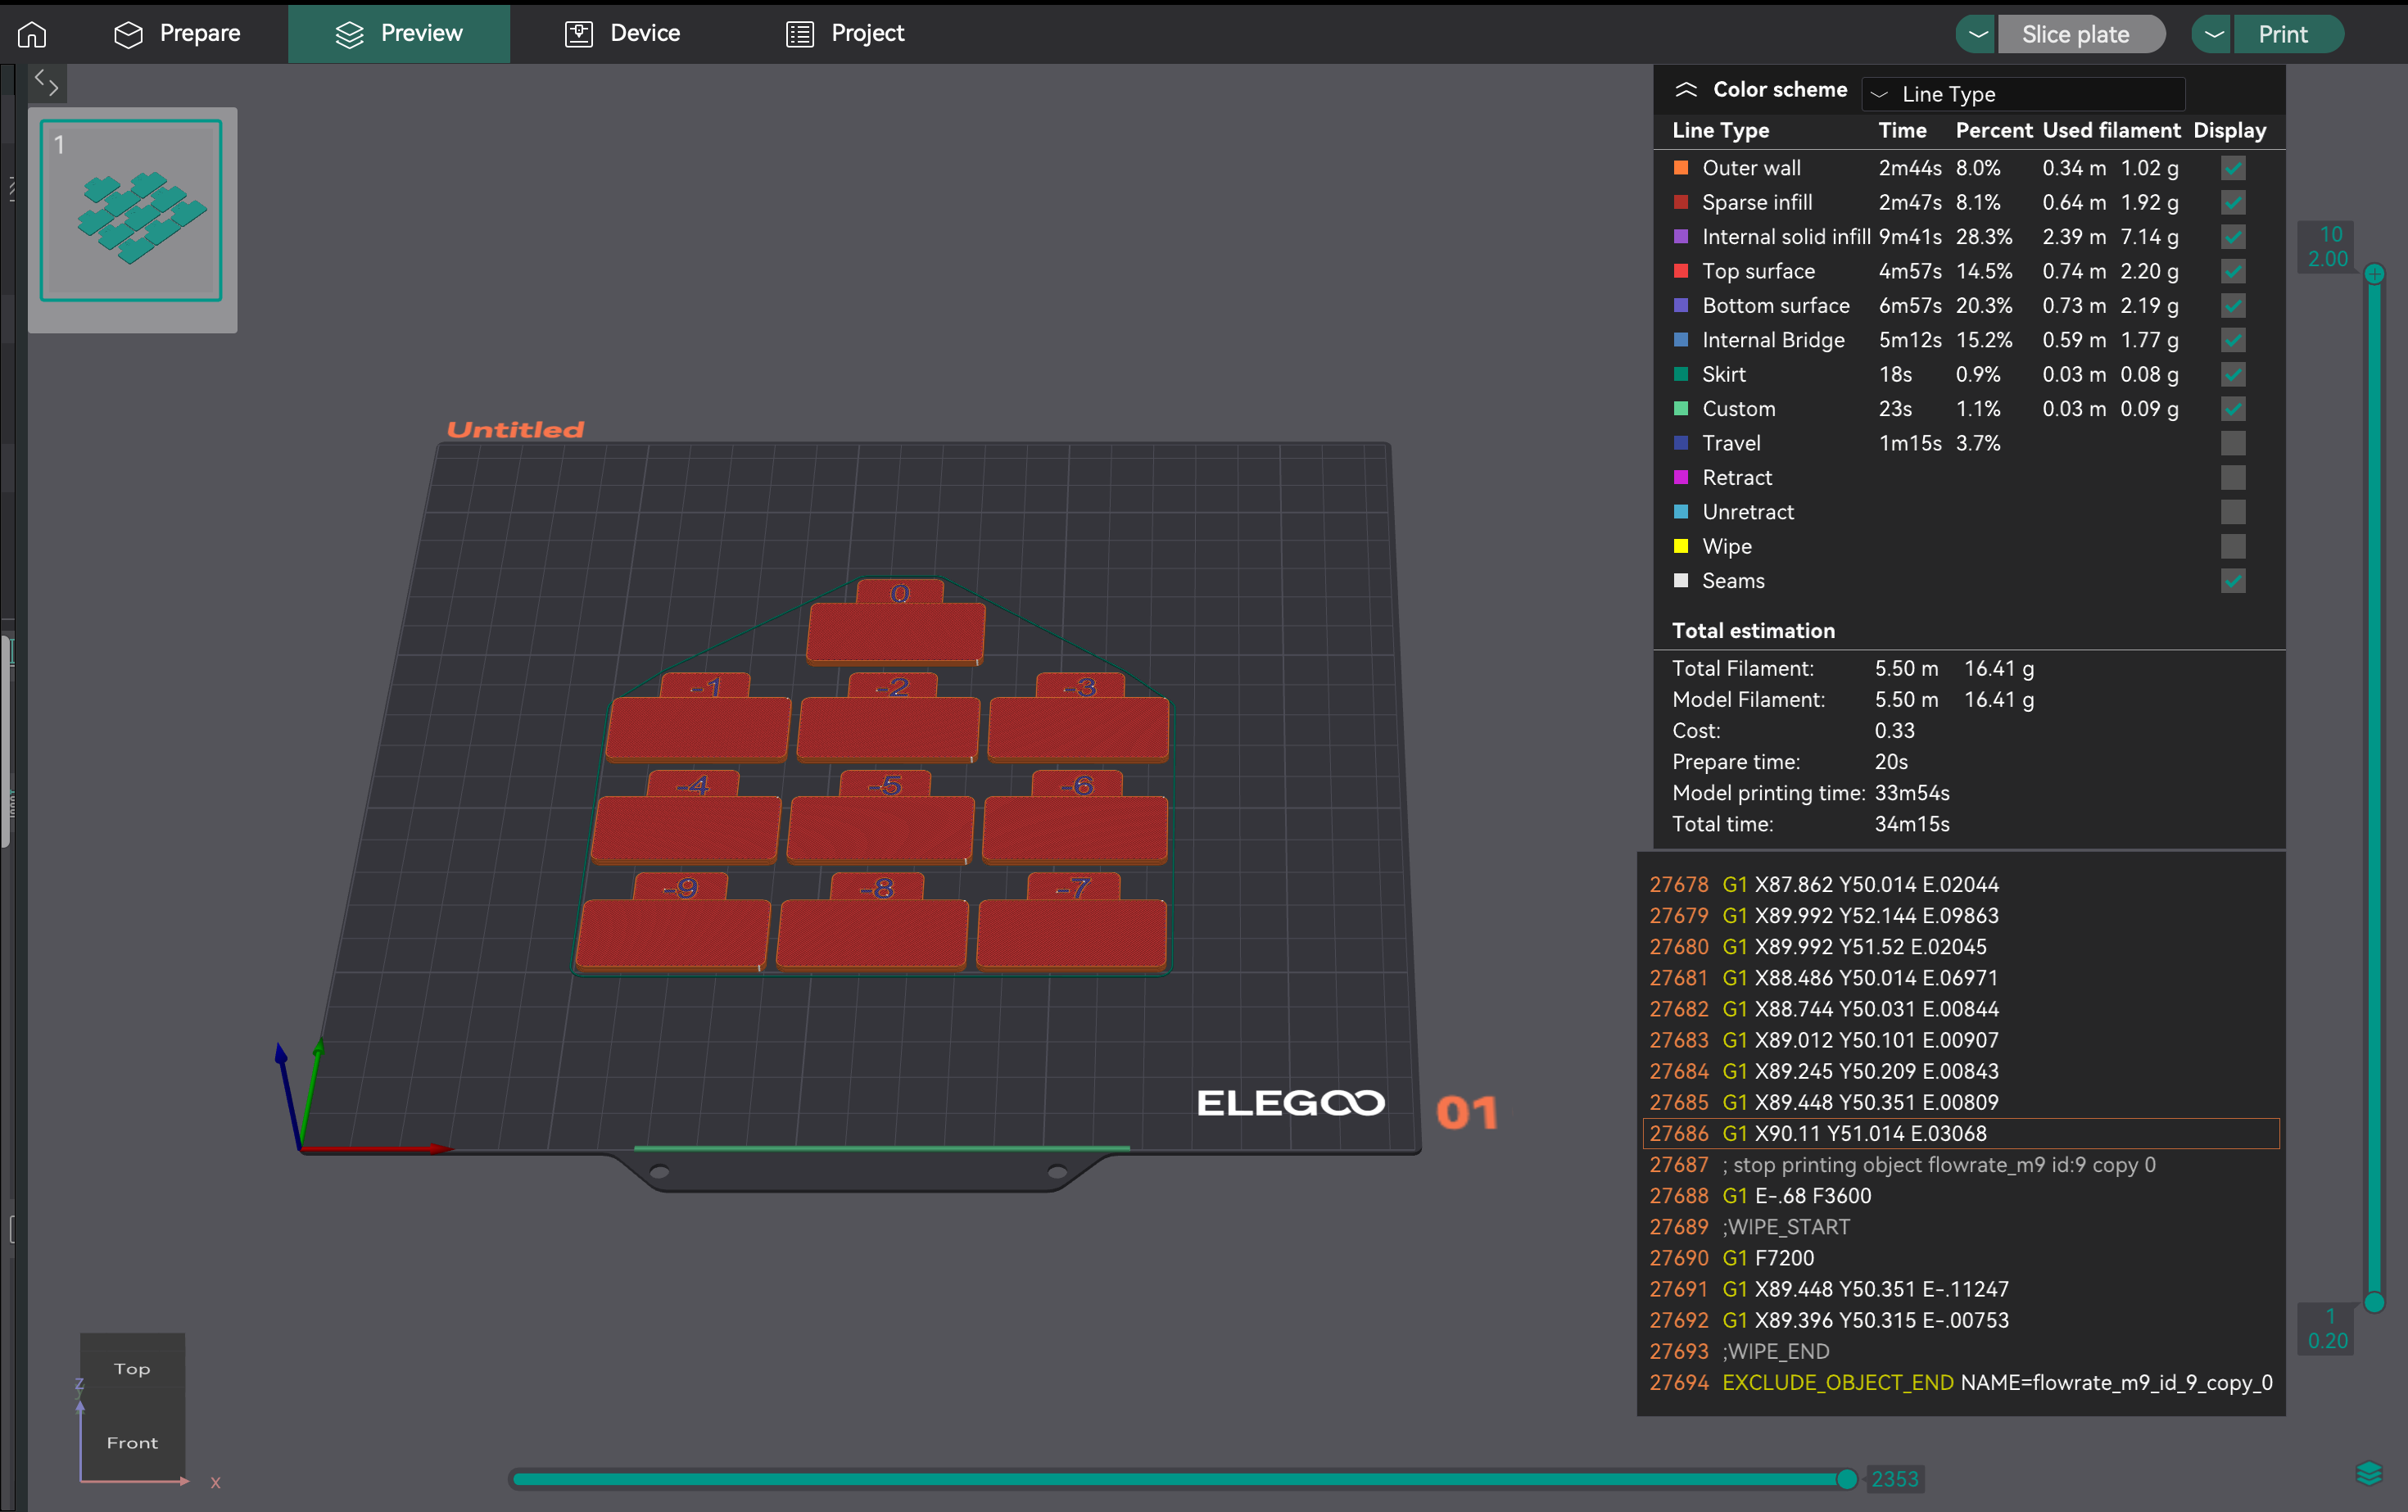
- Ocenianie spójności: Przejście drukowania 2. Zbadaj górne powierzchnie pod kątem najlepszej jakości, przyczepności warstw i spójności. Oblicz zaktualizowany współczynnik przepływu, używając tego samego wzoru. Przykład: 1,029 * (100 - 6) / 100 = 0,96726.
- Stosowanie ustawień: Zapisz ostateczny optymalny współczynnik przepływu w ustawieniach profilu filamentu w OrcaSlicer.
Wbudowane wyniki kalibracji przepływu w OrcaSlicer mogą wydawać się "straszne" i wymagać ręcznej interwencji. Wskazuje to na potrzebę wskazówek dotyczących "metakalibracji": jak rozwiązywać problemy z samym procesem kalibracji.
- Początkowe nadmierne wytłaczanie/przeciąganie: Może to oznaczać, że temperatura drukowania jest zbyt wysoka lub kroki E/odległość obrotowa nie są skalibrowane. Przed ponownym uruchomieniem kalibracji przepływu sprawdź ponownie kroki E.
- Klikanie ekstrudera: Często oznacza, że temperatura jest zbyt niska dla pożądanego przepływu, powodując pomijanie silnika ekstrudera. Nieznacznie zwiększ temperaturę dyszy lub obniż maksymalną prędkość objętościową (omówioną później) przed ponowną próbą kalibracji przepływu.
- Niespójność testu/niejednoznaczne wyniki: Jeśli wydruki kalibracyjne wyglądają źle, ale inne wydruki są w porządku, rozważ:
- Prędkość drukowania testu: Domyślna prędkość może być zbyt duża. Spróbuj zwolnić wydruki kalibracyjne.
- Ustawienia szerokości linii: Jeśli szerokość linii (w ustawieniach procesu) jest zbyt duża dla dyszy, może to spowodować nadmierne wytłaczanie. Upewnij się, że szerokości są odpowiednie (np. 0,45 mm dla dyszy 0,4 mm).
- Subiektywność testu wizualnego: Ocena wizualna może być subiektywna. Aby uzyskać bardziej obiektywne wyniki, wydrukuj kostkę o pojedynczej ściance:
- Wydrukuj kostkę o pojedynczej ściance (np. 20x20x20 mm, 0% wypełnienia, 1 obwód).
- Zmierz grubość ścianki za pomocą suwmiarki.
- Oblicz pożądaną grubość ścianki (np. 0,4 mm dla dyszy 0,4 mm).
- Dostosuj współczynnik przepływu: Nowy współczynnik przepływu = Aktualny współczynnik przepływu * (Pożądana grubość ścianki / Zmierzona grubość ścianki).
- Utrzymywanie się problemów: Jeśli kalibracja przepływu stale się nie udaje, poprzednia kalibracja (temperatura, kroki E/odległość obrotowa lub problemy mechaniczne) prawdopodobnie nadal jest nieprawidłowa. Nie przechodź do zwiększania lub zmniejszania ciśnienia, dopóki przepływ nie zostanie prawidłowo ustawiony.
| Pass | Zakres modyfikatora | Liczba bloków | Wzór obliczeniowy | Cel |
|---|
| Pass 1 | +5 do -5 | 9 | FlowRatio_new = FlowRatio_old * (100 + modyfikator) / 100 | Początkowa kalibracja w celu znalezienia przybliżonego optymalnego zakresu |
| Pass 2 | -9 do 0 | 10 | FlowRatio_new = FlowRatio_old * (100 + modyfikator) / 100 | Dokładne dostrojenie w celu uzyskania precyzyjnego optymalnego współczynnika przepływu |
Tabela 3: Podsumowanie przebiegu kalibracji natężenia przepływu 1 i 2
Pressure Advance (PA) kompensuje zmiany ciśnienia w dyszy podczas wahań prędkości (przyspieszanie/zwalnianie). Zapobiega zaokrąglonym narożnikom, plamom i "pryszczom" poprzez wstępną regulację wytłaczania w celu utrzymania równomiernego przepływu.
Zawsze wykonuj kalibrację Pressure Advance po kalibracji Flow Rate. Jeśli natężenie przepływu jest nieprawidłowe, PA będzie kompensować niedokładnie. Stabilne natężenie przepływu jest niezbędne do skutecznego PA. Jeśli testy PA wyglądają nieporządnie, najpierw sprawdź ponownie kalibrację Flow Rate i Temperature.
Wartości PA różnią się znacząco w zależności od typu wytłaczarki (Direct Drive vs. Bowden), typu/marki filamentu, rozmiaru dyszy, temperatury hotendu i modyfikacji sprzętu. Różne materiały mają unikalny przepływ stopu, a zmiany długości ścieżki wpływają na PA. Oznacza to, że PA często wymaga ponownej kalibracji dla różnych konfiguracji lub materiałów.
OrcaSlicer prosi o wybranie typu ekstrudera (Direct Drive lub Bowden). Wartości PA różnią się znacznie ze względu na długość ścieżki filamentu. Konfiguracje Bowden zazwyczaj wymagają wyższych wartości PA.
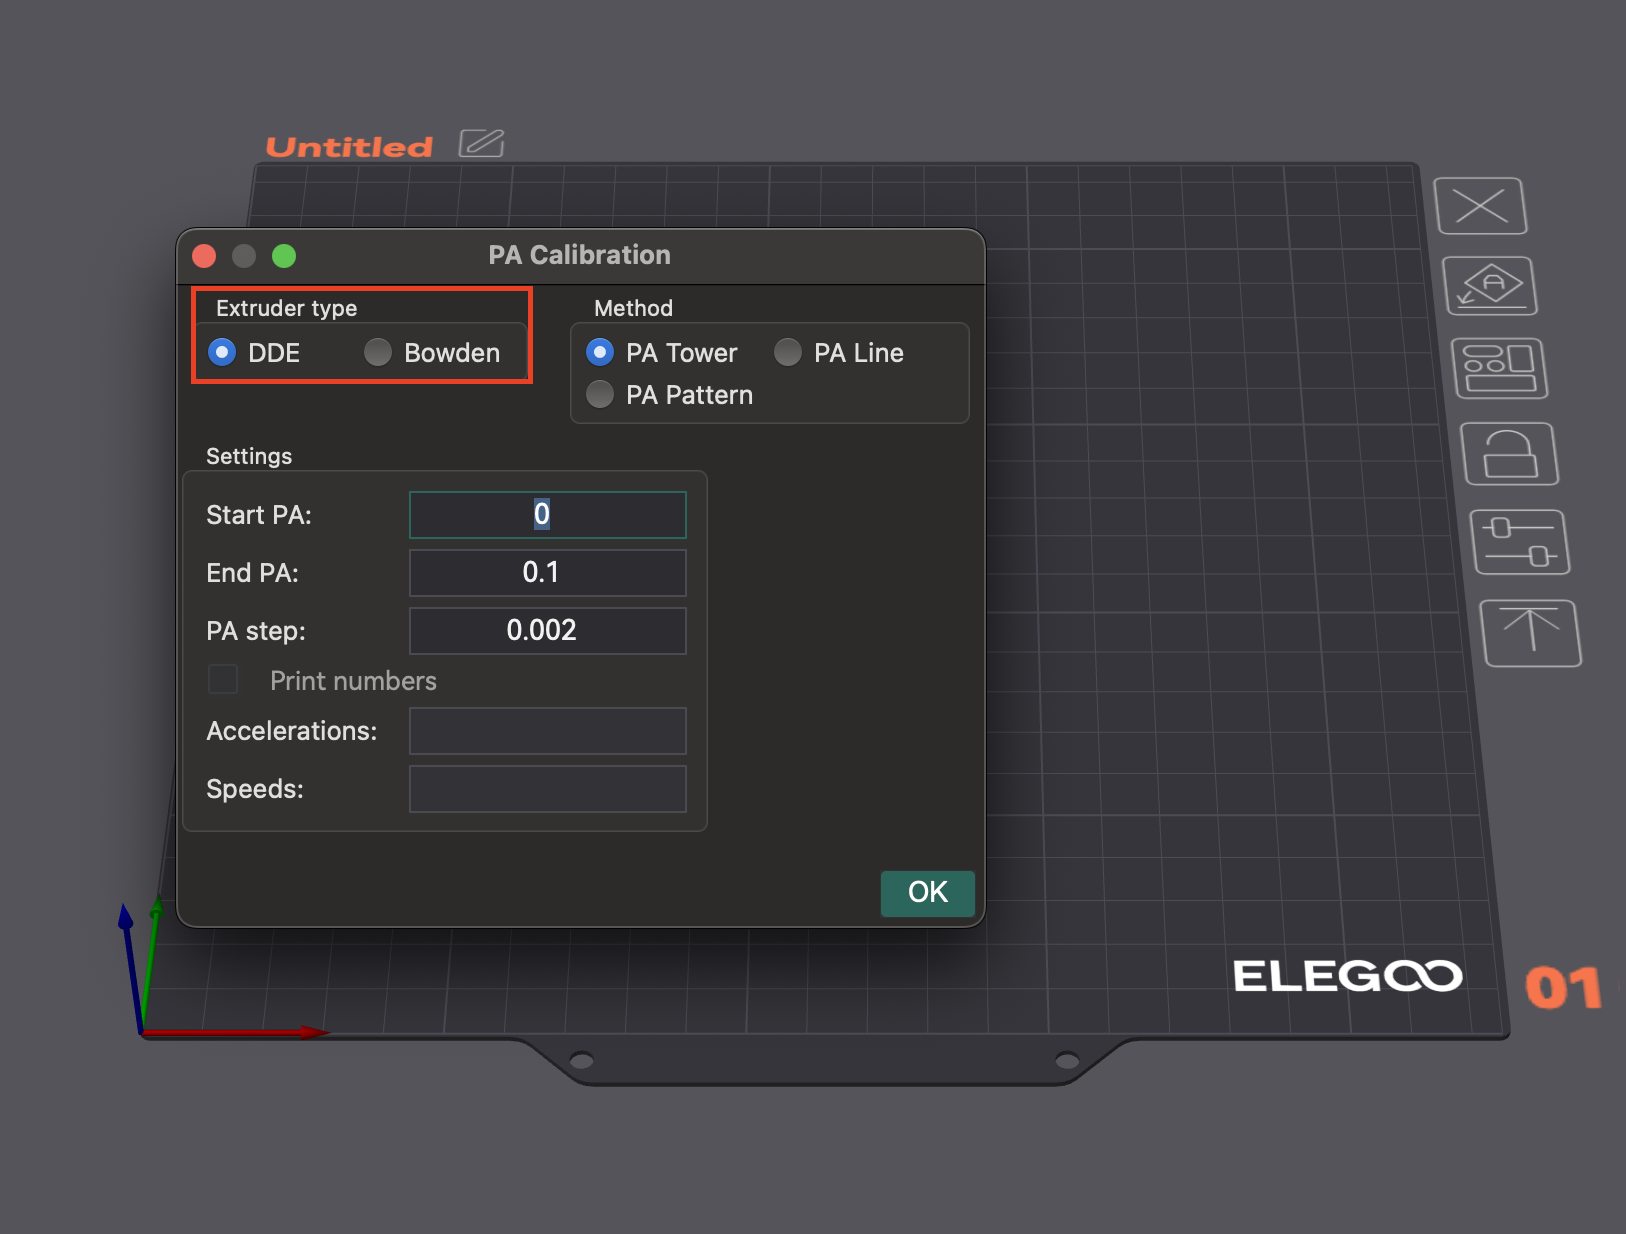
OrcaSlicer oferuje wiele metod kalibracji Pressure Advance:
- Metoda liniowa: Ta metoda pomaga szybko zidentyfikować optymalną wartość Pressure Advance.
- Dostęp: Przejdź do "Kalibracja" > "Pressure Advance" > "Linia PA".
- Test: OrcaSlicer generuje serię linii, z których każda jest drukowana z stopniowo różną wartością PA. Celem jest zaobserwowanie, gdzie początek i koniec każdej linii wyglądają "najczyściej", a przejście do i z linii jest najostrzejsze, co wskazuje na najbardziej spójną ekstruzję.
- Zależność: Ta metoda jest wrażliwa na jakość pierwszej warstwy. Przed wykonaniem tego testu upewnij się, że Twoje łóżko jest prawidłowo wypoziomowane.
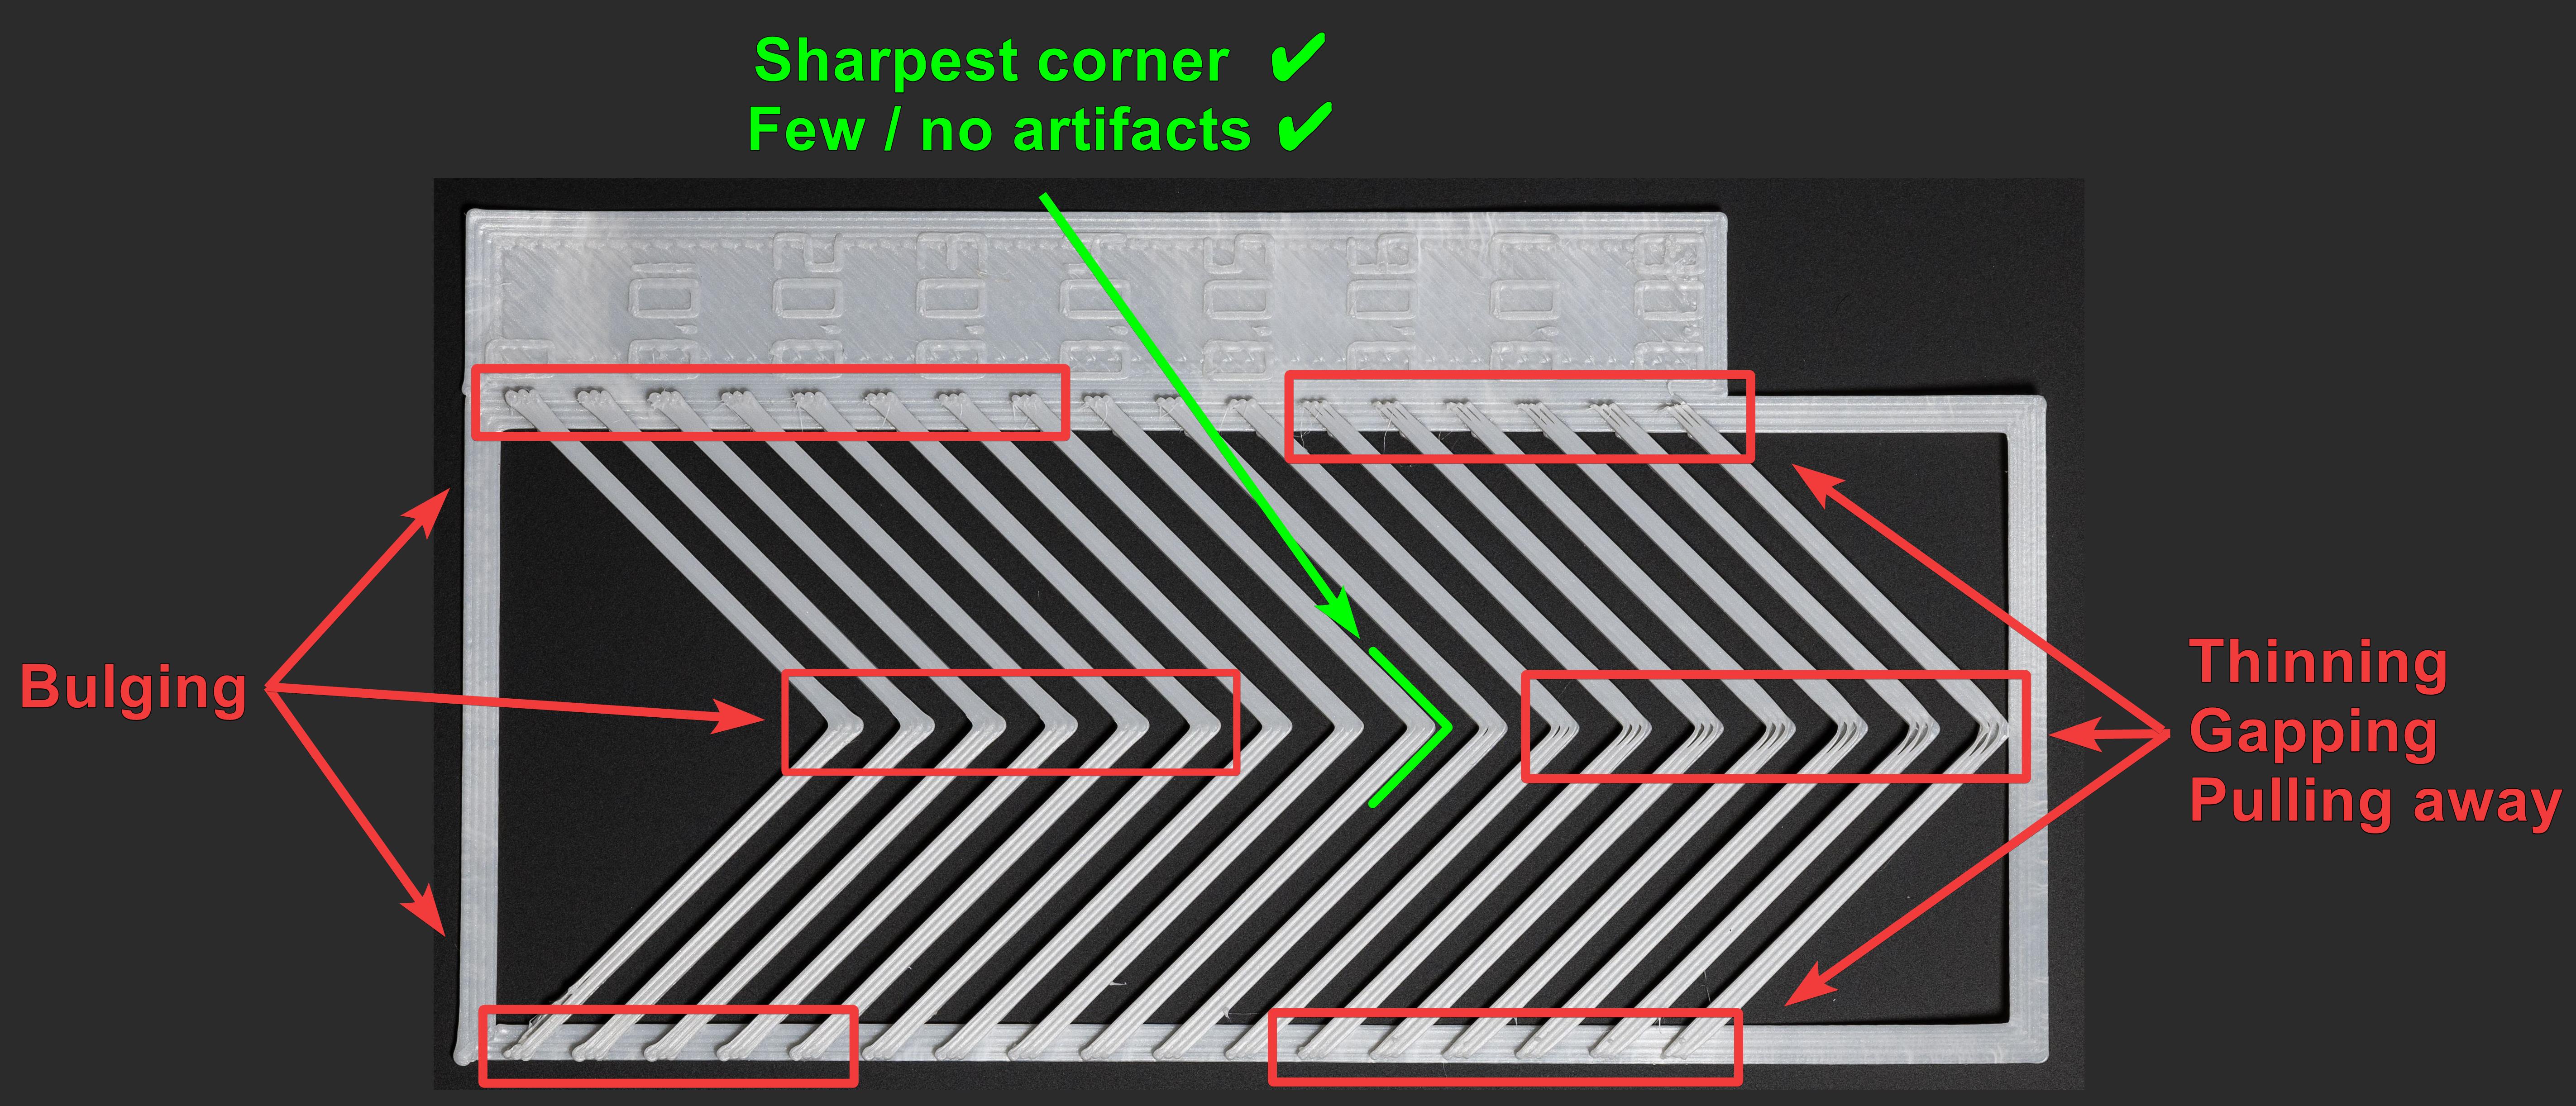
- Metoda wzoru: Wizualna ocena narożników.
- Dostęp: Z menu "Kalibracja" wybierz "Pressure Advance", a następnie wybierz "Metodę wzoru".
- Test: OrcaSlicer generuje wzór przypominający pryzmat. Sprawdź spójną jakość wytłaczania i zidentyfikuj najostrzejsze rogi z najmniejszą liczbą artefaktów (takich jak szczeliny, wybrzuszenia lub wgłębienia).
Źródło: obico.io
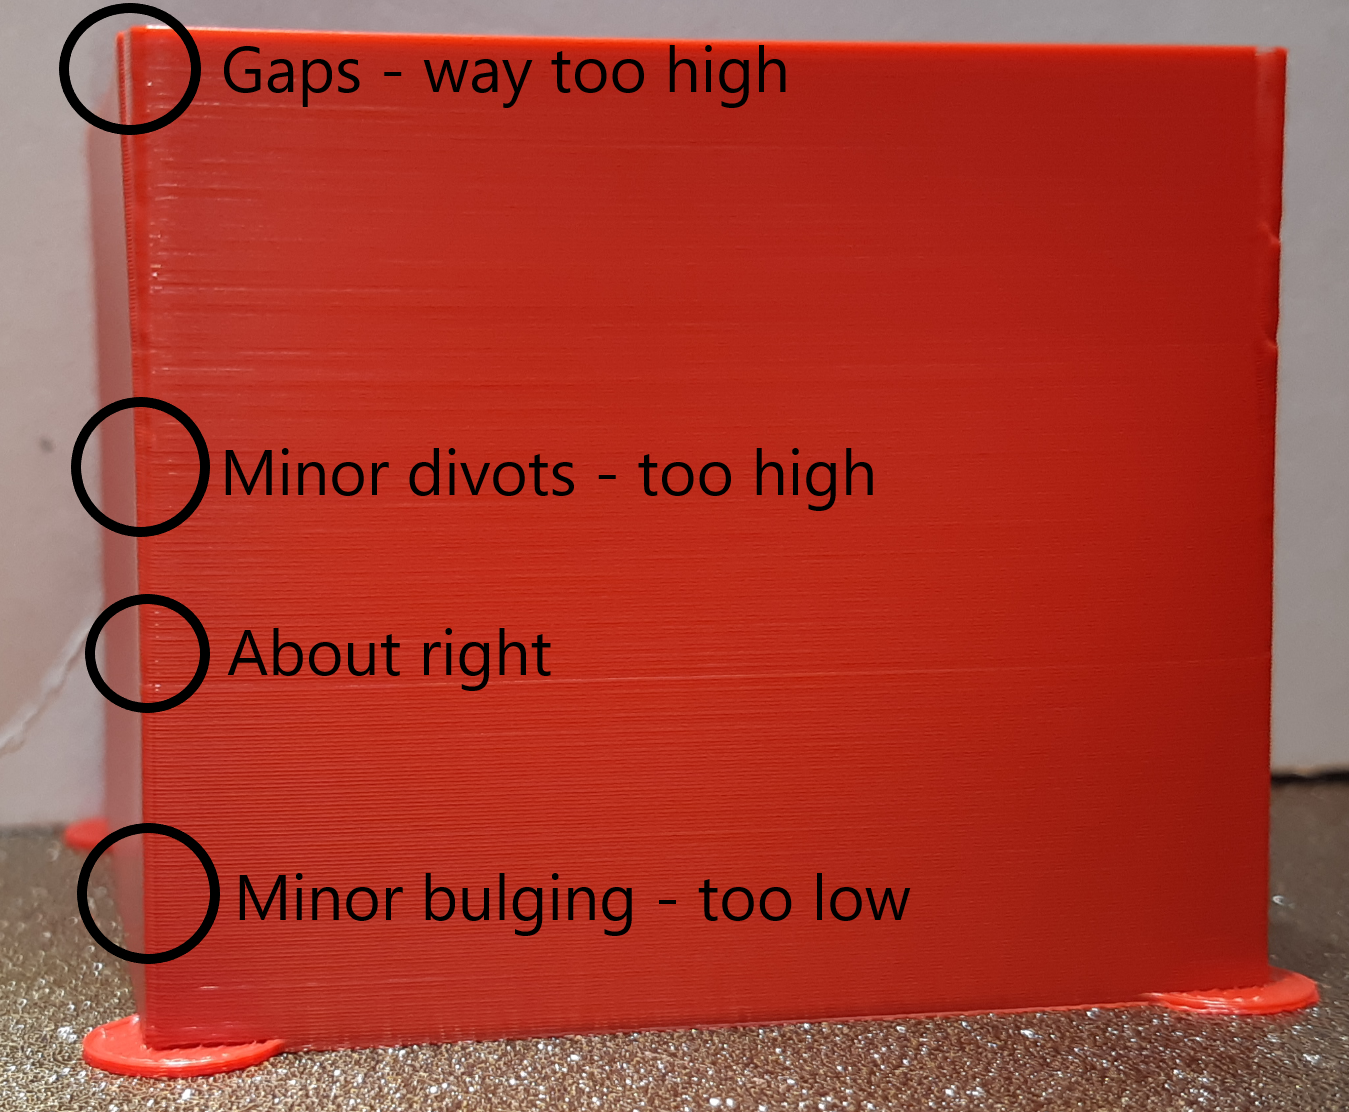
3. Metoda wieży: Mniej wrażliwa na jakość pierwszej warstwy, ale trwa dłużej.
- Dostęp: W menu "Kalibracja" wybierz "Nacisk postępu", a następnie wybierz "Wieża PA".
- Test: Oprogramowanie generuje wieżę, w której PA zwiększa się wraz z wysokością (zwykle 0,002 na mm dla napędu bezpośredniego, 0,02 dla Bowden). Sprawdź każdy róg, aby znaleźć wysokość z wyraźnymi, czystymi rogami.
- Zalecenie: Drukuj z większą prędkością (powyżej 120 mm/s), aby zobaczyć wpływ PA w typowych warunkach drukowania.
Źródło: ellis3dp.com
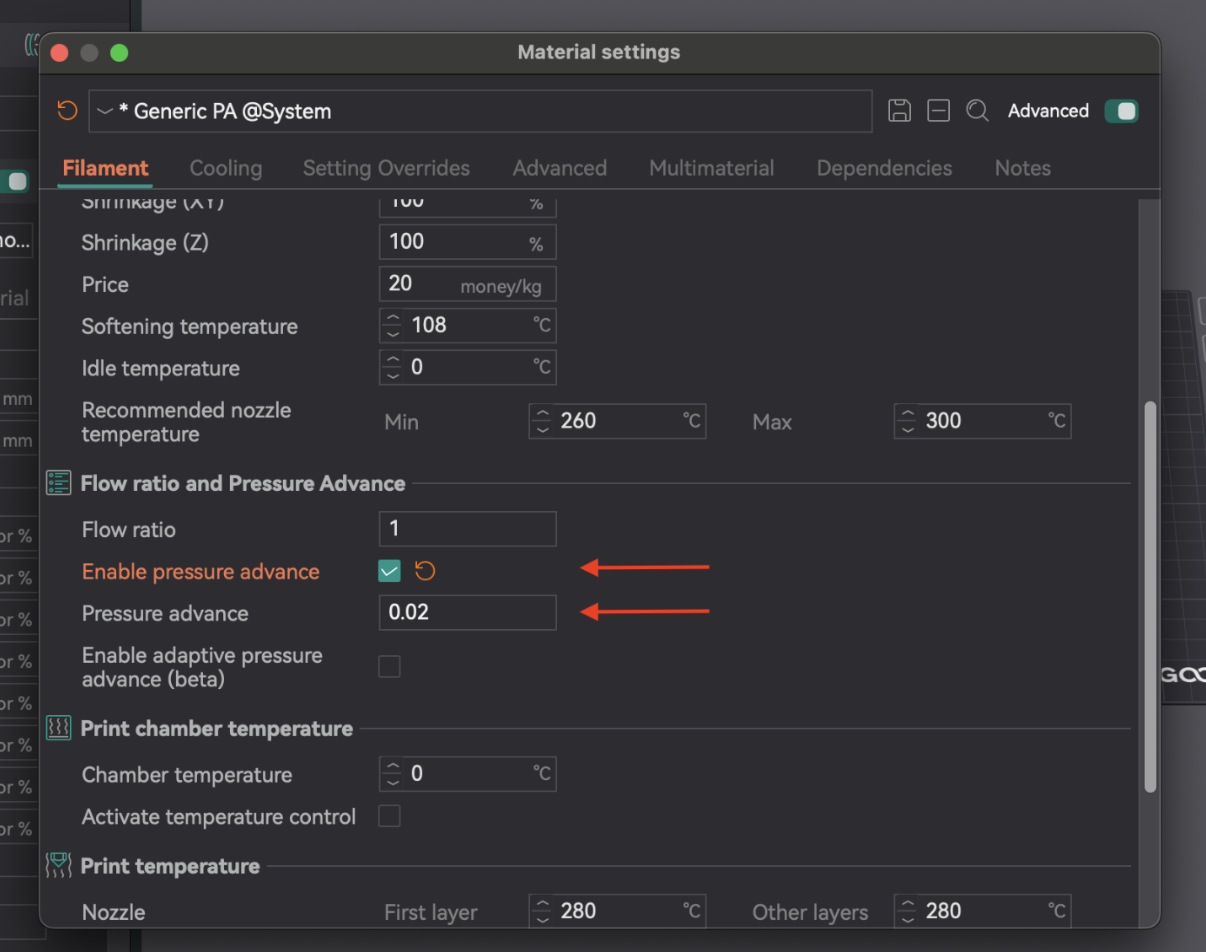
Po określeniu optymalnej wartości PA otwórz ustawienia filamentu (ikona edycji obok profilu). Włącz "Włącz wyprzedzenie ciśnienia" i wprowadź wartość. Zapisz profil filamentu.
| Metoda | Typ wytłaczarki | Zalety | Wady | Kluczowa obserwacja |
|---|
| Linia | Oba | Szybkie, proste do przetestowania | Bardzo zależne od jakości pierwszej warstwy | Najczystsze końce linii, najostrzejszy punkt |
| Wzór | Oba | Wizualna ocena narożników, bardziej zaawansowana | Nadal w pewnym stopniu zależne od pierwszej warstwy | Najbardziej spójne wytłaczanie, najostrzejszy narożnik z najmniejszą liczbą artefaktów |
| Wieża | Oba | Mniej wrażliwe na jakość pierwszej warstwy, dobre przy dużych prędkościach | Zajmuje więcej czasu i materiału | Najlepsza ogólna jakość narożników na określonej wysokości |
Tabela 4: Porównanie metod wyprzedzania ciśnienia
Retrakcja cofa filament przed ruchami jezdnymi, tworząc ujemne ciśnienie, aby zapobiec wyciekaniu, sznurkom lub plamom. Kluczowymi parametrami są długość retrakcji, prędkość i Z-hop.
Cofanie współdziała z Pressure Advance. Optymalne cofanie pomaga zarządzać fizycznym cofaniem, podczas gdy PA radzi sobie z ciśnieniem w hotendzie. Jeśli PA nie jest skalibrowane, cofanie może mieć problemy. Celem jest najkrótsza długość, która minimalizuje zaciąganie się, nie powodując zatorów ani "dziur".
Jeśli po testach cofania nadal występuje nitkowanie, najpierw ponownie oceń ustawienia temperatury i natężenia przepływu, a następnie wyprzedzenia ciśnienia. Te podstawowe ustawienia muszą być prawidłowe, aby cofanie było skuteczne.
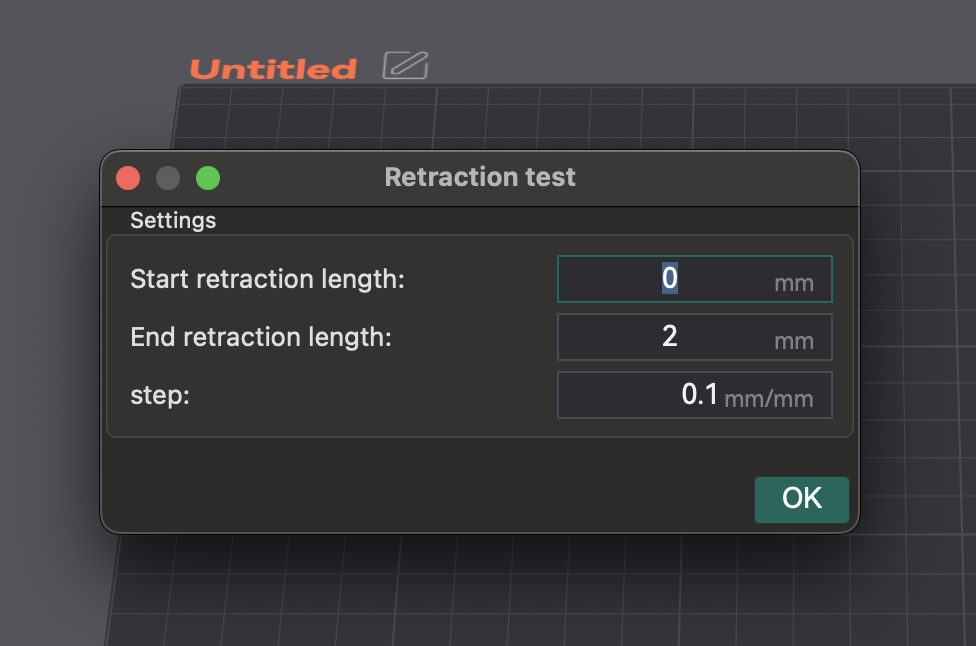
- Dostęp i konfiguracja: Utwórz nowy projekt. Przejdź do "Kalibracja" > "Test cofania". Skonfiguruj "Długość początkowego cofania", "Długość końcowego cofania" i "Krok" (domyślne wartości to zwykle 0 mm, 2 mm, 0,1 mm). Ekstrudery Bowdena zazwyczaj wymagają większych długości (1-6 mm) niż napęd bezpośredni (0-2 mm).
- Cięcie i drukowanie: Cięcie i drukowanie wieży cofania. Upewnij się, że wybrano opcję "Normalny" Z-hop. Możesz malować szwy na wewnętrznych bokach wieży w podglądzie, aby uzyskać wyraźniejszą obserwację naciągania.
Źródło: obico.io
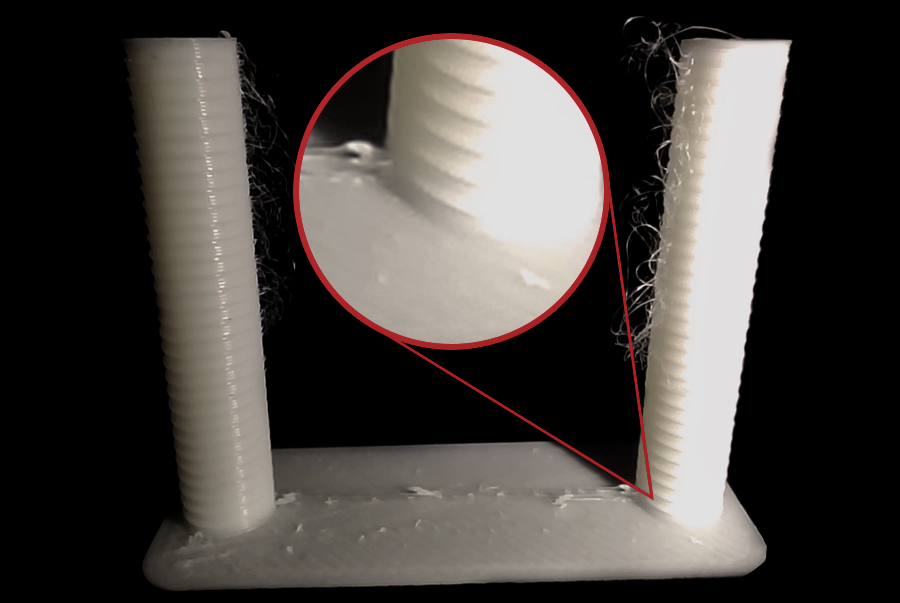
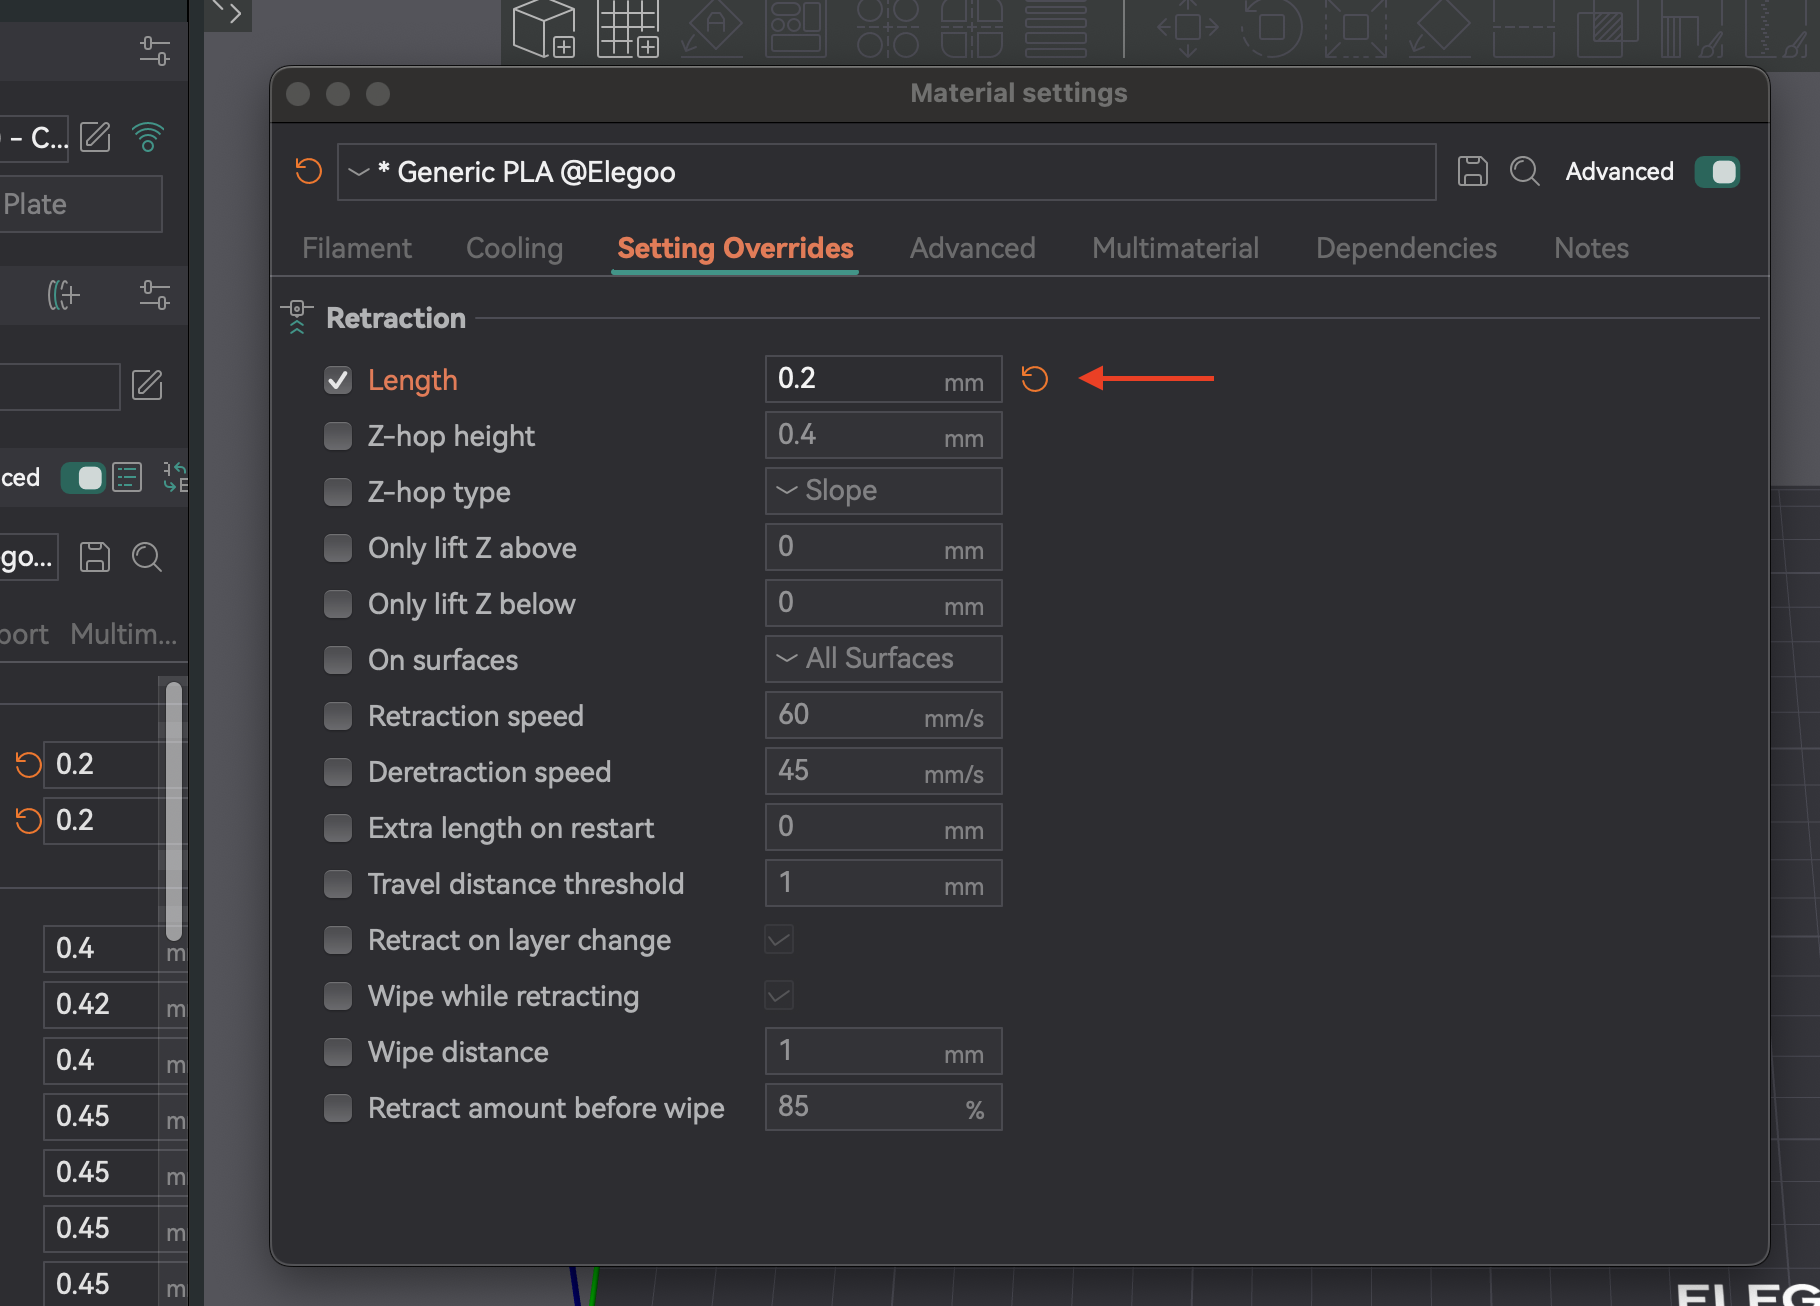
3. Analiza wyników i regulacja: Sprawdź każde nacięcie. Znajdź najkrótszą długość, która minimalizuje naciąganie i wyciekanie bez innych problemów. Przykład: jeśli najlepsza jakość to jedno nacięcie od podstawy z krokiem 0,1 mm, optymalna długość to 0,2 mm. Otwórz ustawienia filamentu, zakładkę "Nadpisania ustawień", zaznacz "długość" w obszarze cofania, wprowadź nową wartość i zapisz.
- Typ filamentu: Różne materiały sączą się w różny sposób. PLA/ABS zazwyczaj wymagają niższego cofania (0,2-0,4 mm) niż elastyczne lub higroskopijne filamenty.
- Suszenie filamentu: Wilgoć jest częstą przyczyną naciągania. Jeśli naciąganie utrzymuje się, osusz filament. Często jest to pierwsza rzecz, którą należy sprawdzić.
- Instalacja dyszy: Luźna lub częściowo zatkana dysza może powodować naciąganie. Regularnie sprawdzaj instalację i usuwaj przeszkody.
- Wycieraj podczas naciągania: To ustawienie powoduje, że dysza porusza się podczas naciągania, czyszcząc dyszę i zmniejszając naciąganie/wyciekanie.
- Prędkość cofania: Kontroluje prędkość przeładowania po naciągnięciu. Ustawienie na 0 powoduje użycie prędkości cofania.
- Próg odległości przesuwu: Cofa się tylko wtedy, gdy przesuw przekracza limit, zapobiegając niepotrzebnym cofaniom i zmniejszając naciąganie w małych odstępach.
| Ustawienia | Opis | Częsty problem | Rozwiązanie/wskazówka |
|---|
| Długość cofania | Ilość cofniętego filamentu. | Nawlekanie, sączenie, zatory (jeśli za wysokie) | Zwiększ w przypadku nawlekania, zmniejsz w przypadku zatorów/dziur. |
| Prędkość cofania | Prędkość cofania filamentu. | Nawlekanie, plamy, mielenie filamentu | Zwiększ, aby uzyskać szybszą reakcję, unikaj mielenia. |
| Z-Hop | Podnosi dyszę podczas ruchu. | Dysza drapie, plamy na powierzchni | Włącz dla złożonych wydruków, dostosuj wysokość. |
| Prędkość cofania | Prędkość ponownego ładowania filamentu. | Niedostateczne wytłaczanie na początku nowej linii | Ustaw na 0 (używa prędkości cofania) lub nieco niżej. |
| Próg odległości podróży | Minimalny ruch cofania. | Nawlekanie w małych odstępach | Dostosuj, aby aktywować dla odpowiedniego ruchu. |
| Wycieraj podczas chowania | Dysza przesuwa się wzdłuż ścieżki podczas chowania. | Widoczność szwu Z, wyciekanie | Włącz, aby poprawić zewnętrzne szwy ścian i zmniejszyć wyciekanie. |
Tabela 5: Ustawienia cofania i rozwiązywanie problemów
Tolerancja to precyzja, z jaką drukarka odtwarza wymiary. Jest ona kluczowa dla części, które do siebie pasują (zespoły, elementy blokujące). Różnice wymiarowe wynikają z kurczenia się filamentu i mechaniki drukarki. Test tolerancji pomaga zrozumieć zachowanie drukarki, aby dostosować projekty do idealnego dopasowania.
Tolerancja jest cechą połączenia filamentu i drukarki. To nie jest jednorazowa konfiguracja. Różne filamenty kurczą się inaczej, a nawet marki/kolory mogą się różnić. Przeprowadź ponowny test przy zmianie typów filamentów, marek lub przy wprowadzaniu znaczących modyfikacji sprzętowych. Utrzymuj profile dla każdego filamentu, aby uzyskać stałą dokładność.
- Dostęp: Przejdź do "Kalibracja" > "Test tolerancji Orca". Spowoduje to otwarcie nowego projektu z modelem testowym.
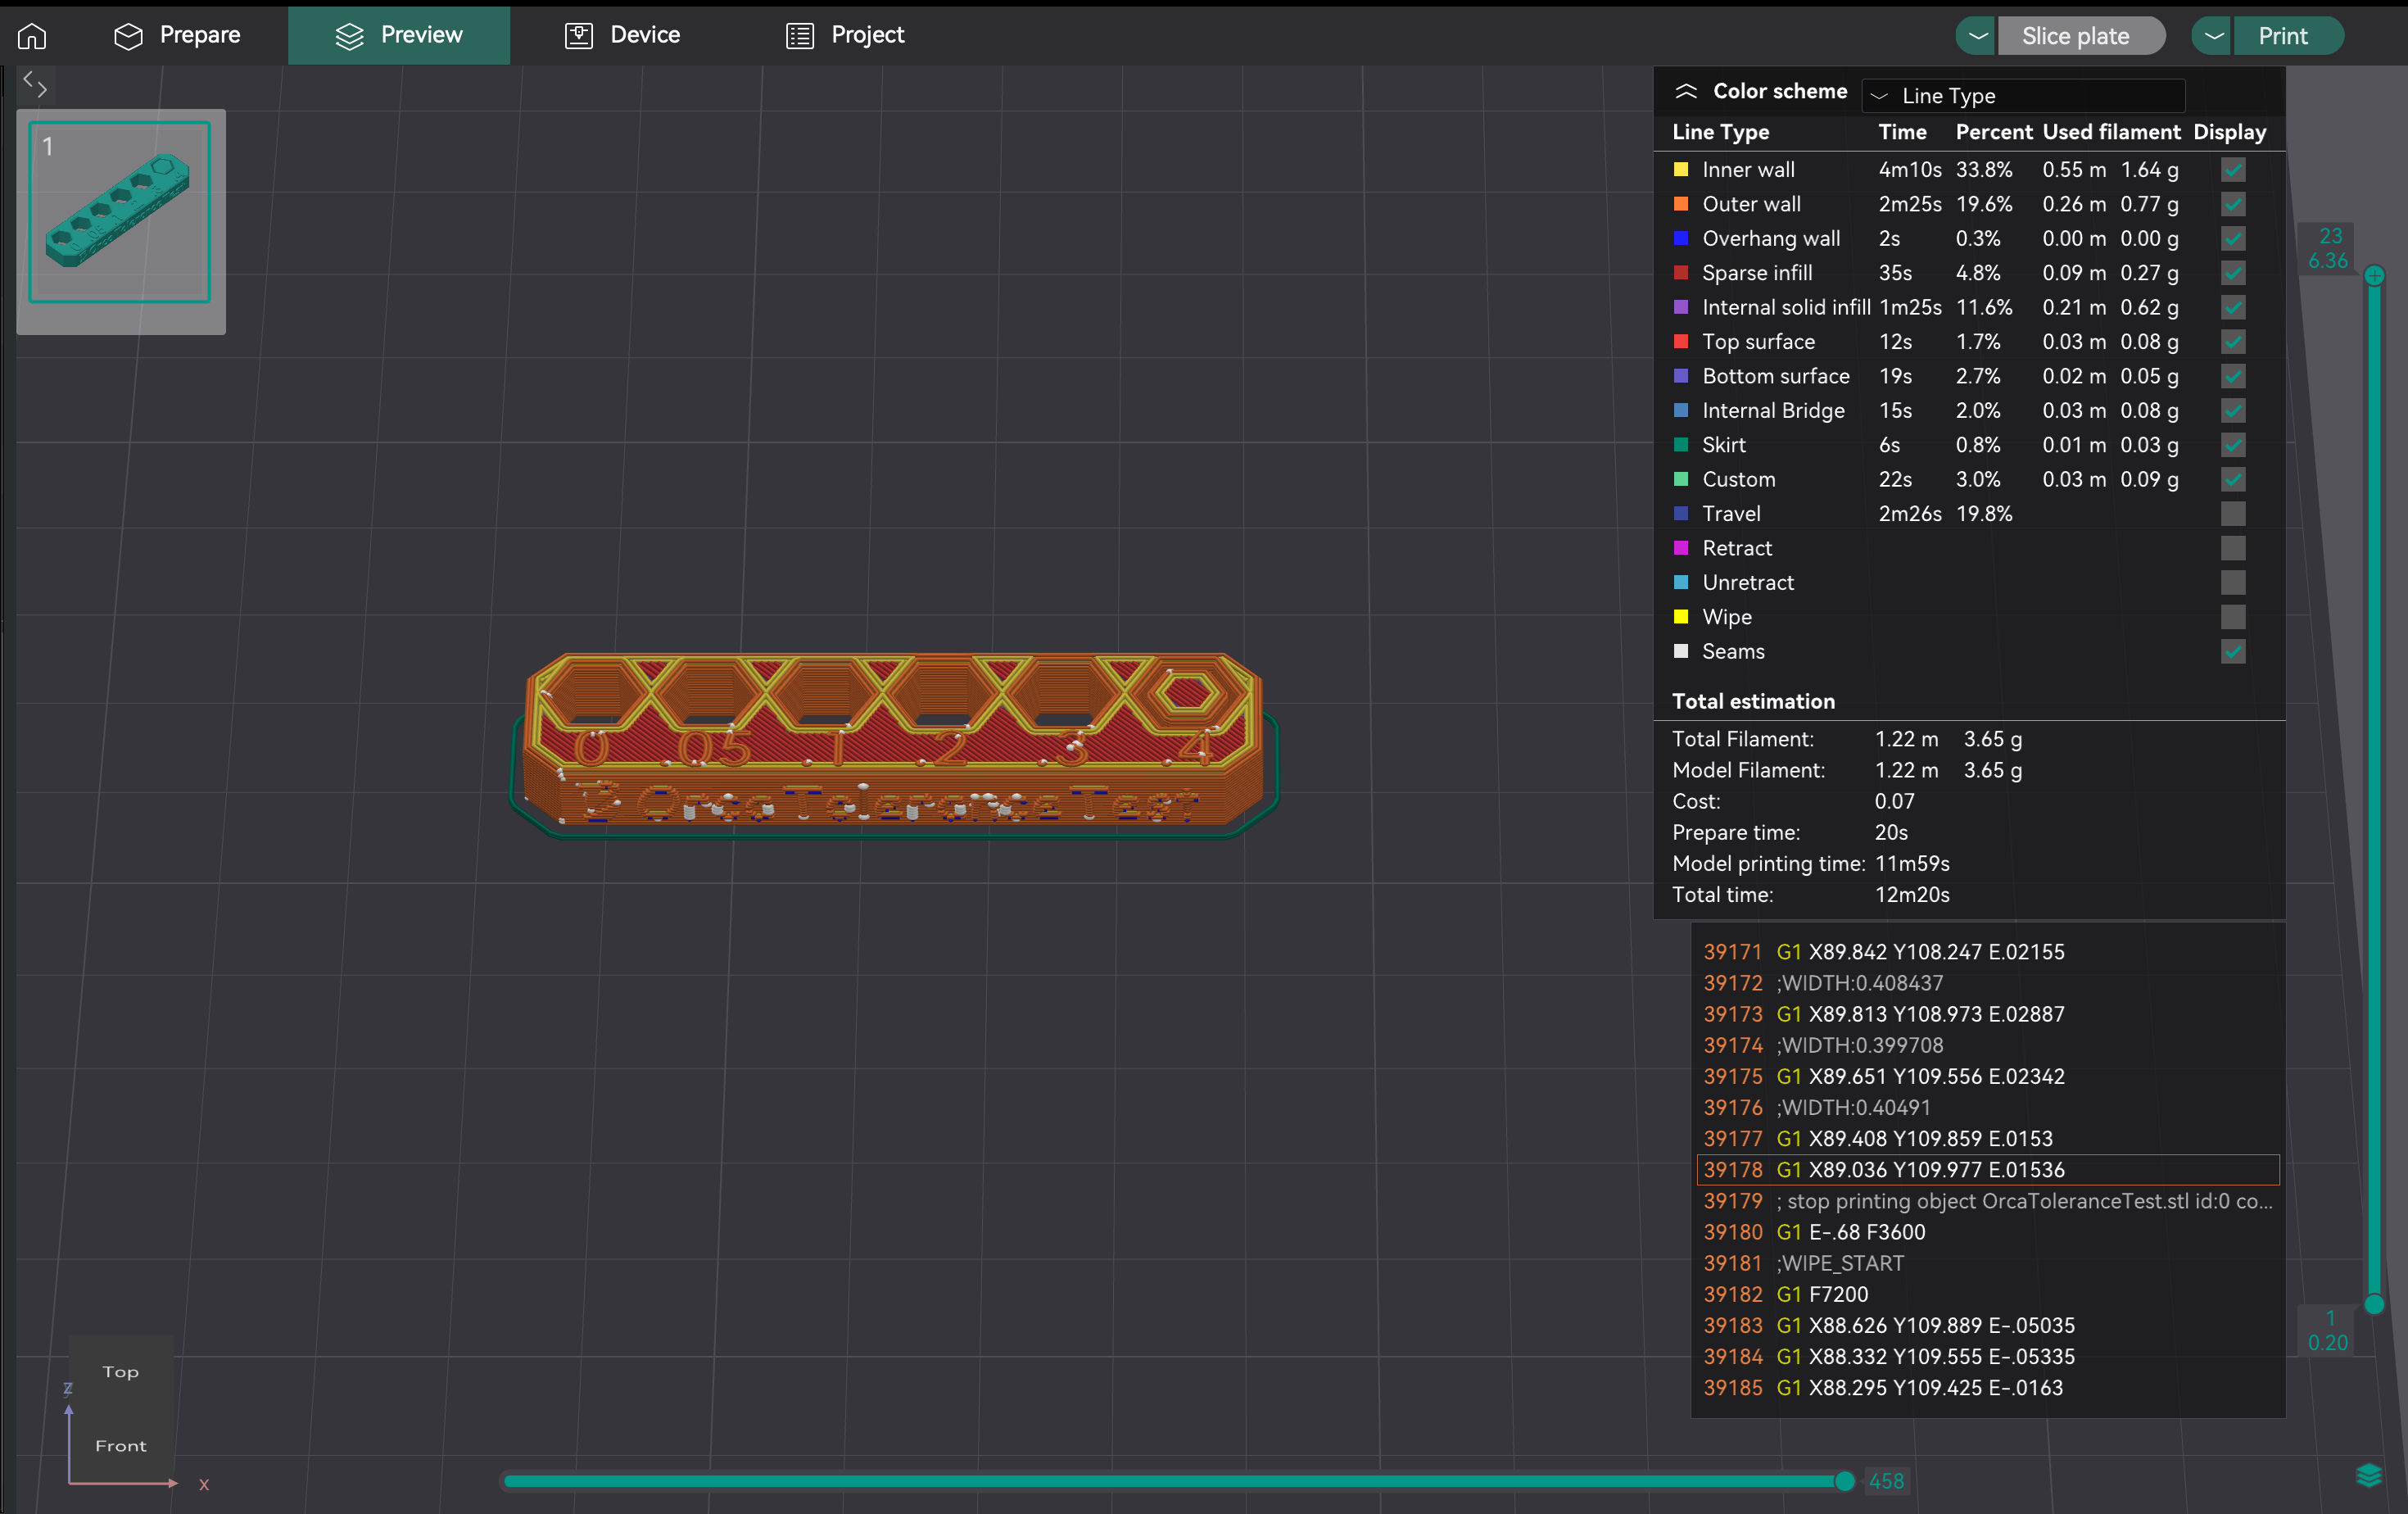
- Opis modelu: Model ma podstawę z sześcioma otworami sześciokątnymi (tolerancja 0,0 mm, 0,05 mm, 0,1 mm, 0,2 mm, 0,3 mm, 0,4 mm) i tester sześciokątny.
- Drukowanie: Wybierz ustawienia drukarki, filamentu i procesu. Pokrój i wydrukuj.
- Ważne: Unikaj stosowania kompensacji otworów X-Y i kompensacji konturu X-Y (ustawionej na 0 mm) podczas tego testu, ponieważ mogą one przechylić wyniki.
Po zakończeniu drukowania użyj klucza imbusowego M6 lub dołączonego testera sześciokątnego. Twoim celem jest znalezienie najmniejszego otworu na wydruku testowym, w który tester może wsunąć się z minimalną siłą lub bez niej, bez zauważalnego chwiania się lub poślizgu. Ten konkretny otwór reprezentuje rzeczywistą wydajność drukarki dla "ścisłego" lub "gładkiego" dopasowania do tego filamentu.
Oto jak obiektywnie określić to "właściwe" dopasowanie:
- Zacznij od najmniejszych otworów: Zacznij od próby włożenia testera do otworów 0,0 mm, 0,05 mm i 0,1 mm.
- Oceń dopasowanie dla każdego:
- Za ciasno: Jeśli musisz wcisnąć tester na siłę lub po prostu nie da się go włożyć, ten otwór jest za ciasny, aby uzyskać "w sam raz" dopasowanie.
- Za luźno/chwiejnie: Jeśli tester wchodzi bardzo łatwo i ma zauważalny luz lub się chwieje, ten otwór jest za luźny, aby uzyskać "w sam raz" dopasowanie.
- W sam raz: To najciaśniejszy otwór, w którym tester wchodzi płynnie, wymagając niewielkiego, ale stałego nacisku i ma niewielki lub żaden zauważalny luz po włożeniu.
- Oznaczony rozmiar tego "w sam raz" otworu (np. 0,1 mm, 0,2 mm lub 0,3 mm) informuje o wrodzonej dokładności wymiarowej drukarki dla otworów z tym konkretnym filamentem. Ta zaobserwowana wartość jest kluczowa dla określenia sposobu zastosowania kompensacji w celu uzyskania pożądanego dopasowania w przyszłych projektach.

Źródło: hta3d.com
Po zidentyfikowaniu "właściwego" dopasowania na wydruku testu tolerancji (np. otwór o średnicy 0,2 mm idealnie pasuje do testu), użyjesz tej obserwacji, aby dostosować kompensację otworu X-Y w OrcaSlicer. To ustawienie zostanie następnie zastosowane do wszystkich otworów w Twoich przyszłych projektach, aby zapewnić, że zostaną wydrukowane z pożądanym dopasowaniem.
- Scenariusz 1: Wydrukowane otwory stale wychodzą mniejsze niż zaprojektowano (zbyt ciasne).
- Przykład: Projektujesz część z otworem o prześwicie 0,2 mm, oczekując "w sam raz" dopasowania. Na wydruku testu tolerancji otwór 0,2 mm jest zbyt ciasny, a tester pasuje płynnie tylko do otworu 0,3 mm. Oznacza to, że drukarka wykonuje otwory o około 0,1 mm mniejsze niż zaprojektowano.
- Działanie: Musisz zwiększyć kompensację otworu X-Y o wartość dodatnią. W tym przykładzie ustawienie kompensacji otworu X-Y na +0,1 mm spowoduje, że wszystkie otwory w przyszłych wydrukach będą drukowane o 0,1 mm większe, dzięki czemu zaprojektowane otwory o prześwicie 0,2 mm będą bardziej zbliżone do "w sam raz" dopasowania.
- Scenariusz 2: Wydrukowane otwory stale wychodzą większe niż zaprojektowano (zbyt luźne).
- Przykład: Projektujesz część z otworem o prześwicie 0,2 mm, oczekując "w sam raz" dopasowania. Na wydruku testu tolerancji otwór o prześwicie 0,2 mm jest zbyt luźny, a tester pasuje płynnie tylko do otworu o 0,1 mm. Oznacza to, że drukarka wykonuje otwory o około 0,1 mm większe niż zaprojektowano.
- Działanie: Musisz zmniejszyć kompensację otworu X-Y o wartość ujemną. W tym przykładzie ustawienie kompensacji otworu X-Y na -0,1 mm spowoduje, że wszystkie otwory w przyszłych wydrukach będą drukowane o 0,1 mm mniejsze, dzięki czemu zaprojektowane otwory o prześwicie 0,2 mm będą bliższe "w sam raz" dopasowaniu.
Pamiętaj, kompensacja otworu X-Y jest przeznaczona specjalnie do cech wewnętrznych, takich jak otwory. Kompensacja konturu X-Y jest używana do dostosowywania ogólnych wymiarów zewnętrznych części i zazwyczaj nie jest dostosowywana na podstawie wyników tego konkretnego testu tolerancji otworu.
Maksymalna prędkość objętościowa (lub maksymalny przepływ) to najwyższa objętość filamentu (mm³/s), jaką Twój hotend może stale topić i wytłaczać bez problemów. Dzięki temu drukarka może obsługiwać kontrolowany przepływ, szczególnie przy dużych prędkościach, bez niedostatecznego wytłaczania (hotend nie może stopić się wystarczająco szybko) lub nadmiernego wytłaczania (nadmierne ciśnienie). Określenie tego limitu optymalizuje prędkość drukowania bez poświęcania jakości.
Maksymalna prędkość objętościowa to limit hotendu i filamentu. Różne filamenty mają unikalne szybkości przepływu stopu. PLA, PETG i ABS będą miały różne maksima. Musisz przetestować każdy typ filamentu, który planujesz drukować z dużą prędkością, aby ustawić określone ustawienia prędkości objętościowej w każdym profilu filamentu.
- Dostęp: Przejdź do "Kalibracja" > "Maksymalna prędkość objętościowa".
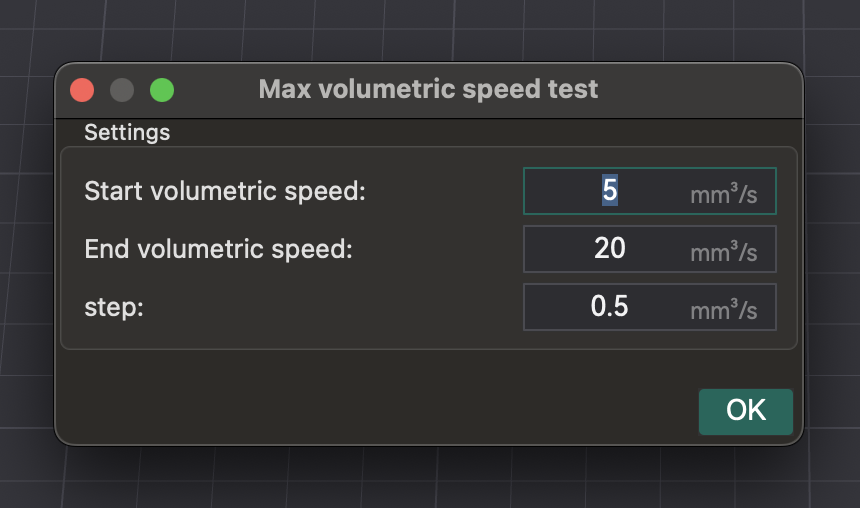
- Test: OrcaSlicer generuje model. Wydrukuj go i obserwuj jakość wraz ze wzrostem prędkości (i przepływu objętościowego). Zidentyfikuj, gdzie jakość wydruku ulega pogorszeniu (niedostateczne wytłaczanie, przerwy, szorstka powierzchnia).
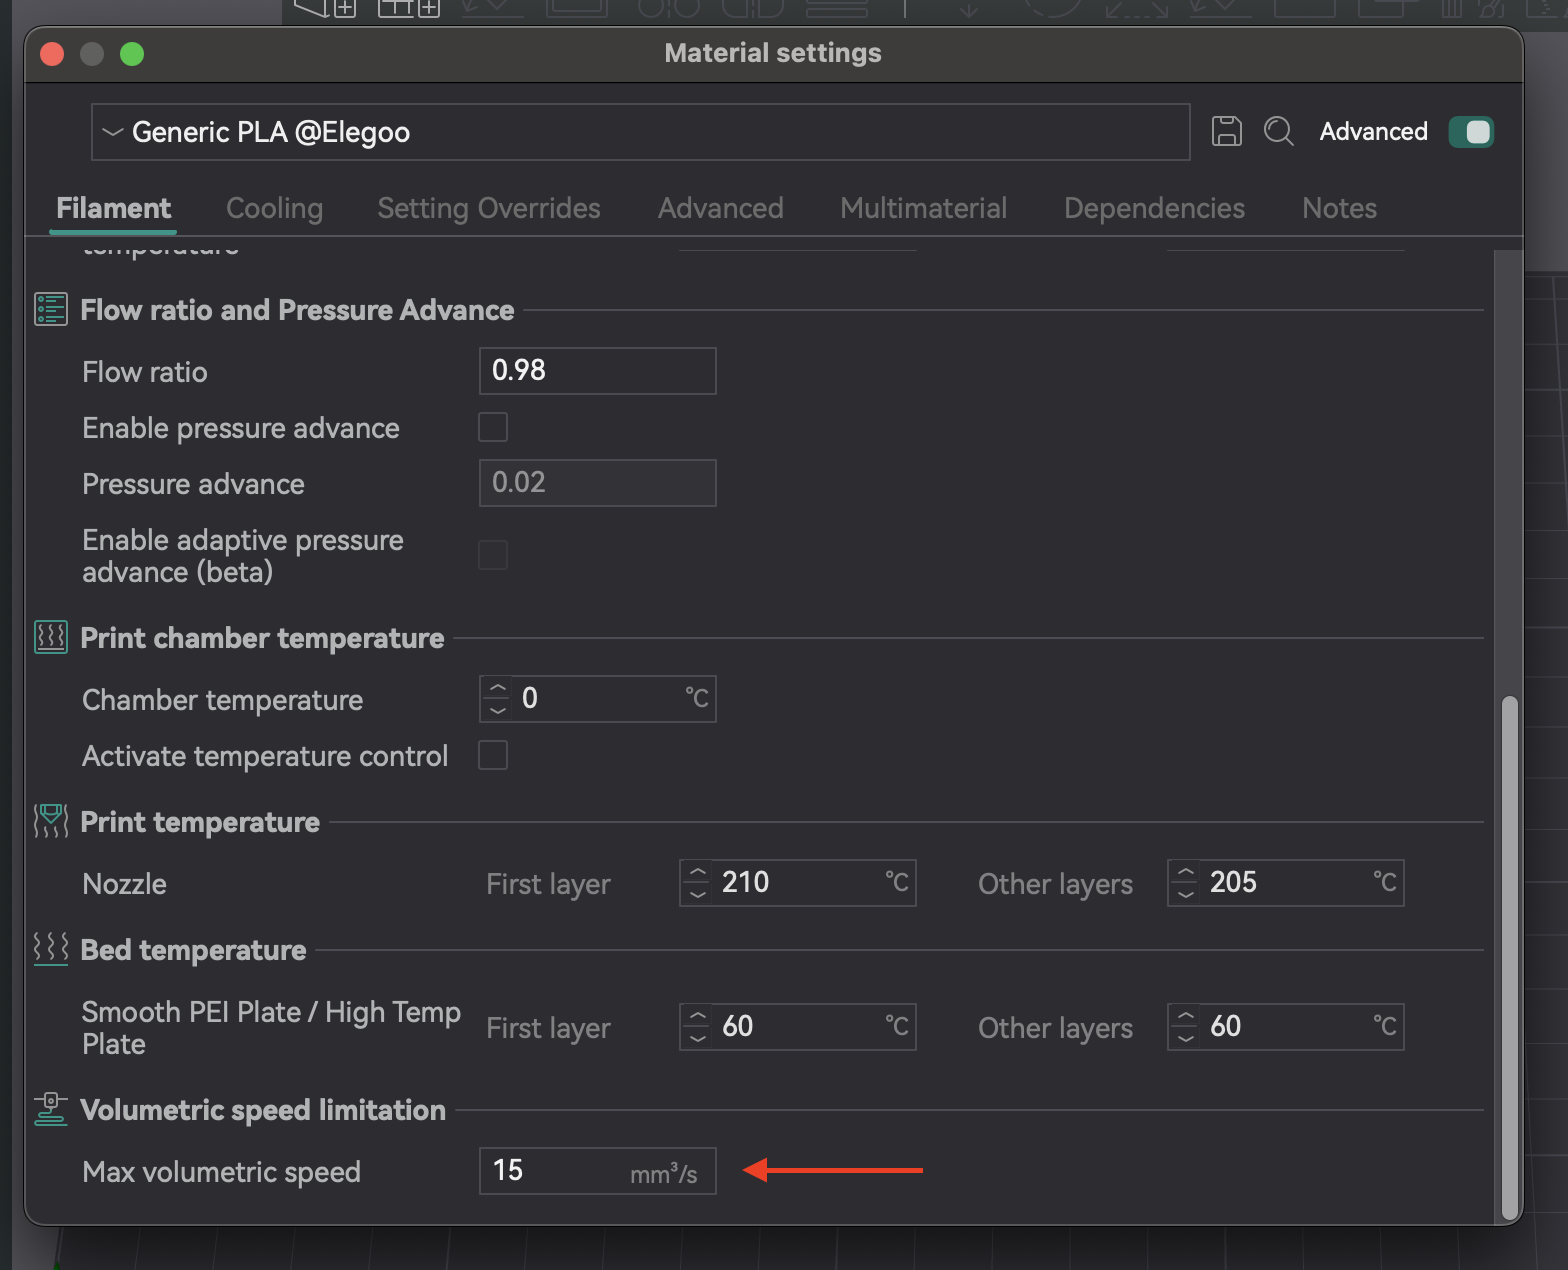
- Identyfikacja maksymalnej bezpiecznej prędkości: Zanotuj prędkość objętościową tuż przed degradacją. Jest to maksymalna bezpieczna prędkość objętościowa dla tej głowicy i filamentu.
- Stosowanie ustawień: Wprowadź tę wartość do ustawień filamentu w OrcaSlicer. Zapobiega to ustawianiu przez slicer prędkości przekraczających możliwości głowicy.
| Typ/marka filamentu | Optymalna maksymalna prędkość objętościowa (mm³/s) | Obserwacje |
|---|
| PLA (ogólny) | 16,75 | Niedostateczne wytłaczanie i przerwy między warstwami poza tym punktem |
| PETG (prusament) | 14,5 | Degradacja jakości powierzchni przy wyższych prędkościach |
| ABS (Hatchbox) | 18,0 | Spójne wytłaczanie do tego limitu |
Tabela 6: Wyniki maksymalnej prędkości objętościowej
Pionowe drobne artefakty (VFA) to subtelne, rytmiczne wzory lub linie na wydrukach, często w pobliżu narożników lub zmian kierunku. Są one spowodowane przez drgania mechaniczne lub rezonans w układzie ruchu przy dużej prędkości.
Kalibracja VFA określa praktyczny limit prędkości dla jakości, odmienny od maksymalnej prędkości objętościowej. Podczas gdy prędkość objętościowa dotyczy pojemności hotendu, VFA zajmuje się ograniczeniami systemu ruchu. Twoja drukarka może wytłaczać wystarczającą ilość filamentu, ale jej rama, paski lub silniki mogą wprowadzać wibracje jako VFA. Test VFA zapewnia "rzeczywistą" maksymalną prędkość drukowania, przy której jakość jest zachowana, sprawdzając stabilność systemu ruchu po ustawieniu prędkości objętościowej.
- Dostęp: Przejdź do "Kalibracja" > "więcej" > "VFA".
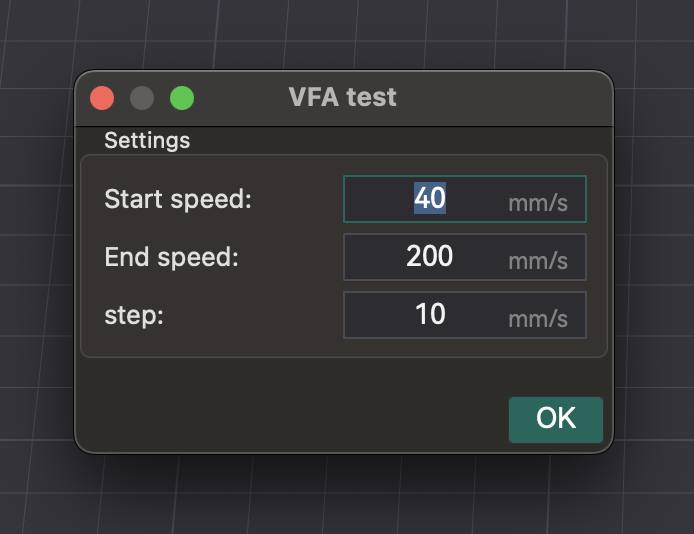
- Ustawianie parametrów: Pojawia się okno umożliwiające skonfigurowanie "Prędkości początkowej", "Prędkości końcowej" i "Przyrostów kroków". Przykład: 160 mm/s na początku, 500 mm/s na końcu, przyrosty 20 mm/s.
- Analiza defektów: Pokrój i wydrukuj wieżę prędkości VFA. Wizualnie sprawdź, czy nie ma naciągu, niedostatecznego wytłaczania, przesunięć warstw i wykończenia powierzchni. Zidentyfikuj najwyższą prędkość o dobrej jakości przed degradacją. Model ma oznaczenia odpowiadające prędkościom. Przykład: jeśli niedostateczne wytłaczanie zaczyna się od wycięcia 11 (160 mm/s na początku, przyrosty 20 mm/s), optymalna prędkość wynosi 360 mm/s (160 + (20 * 10)).
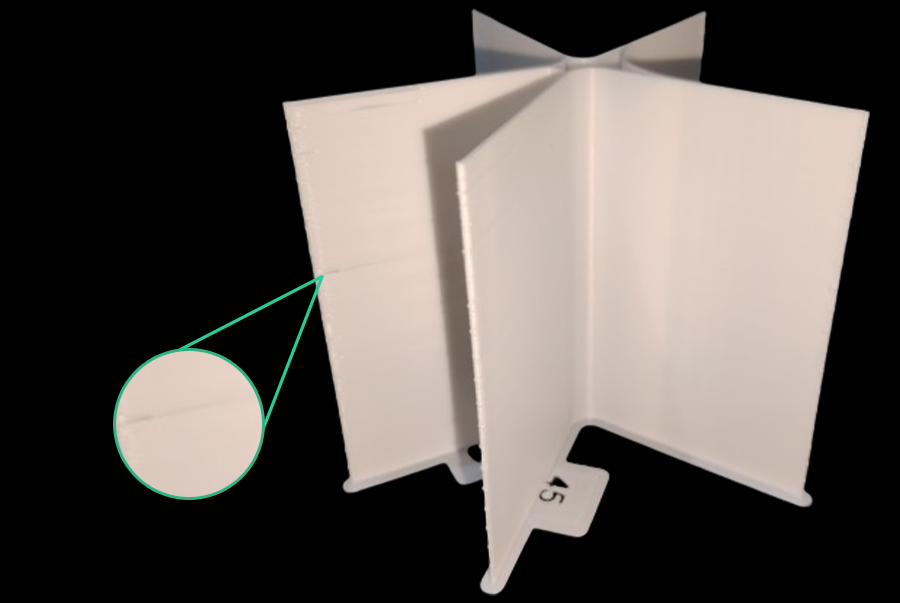
Źródło: obico.io
Optymalna jakość druku 3D wymaga czegoś więcej niż tylko testów kalibracji. Wymaga konserwacji drukarki, zarządzania filamentem i kontroli środowiska.
Regularna konserwacja jest kluczowa: sprawdź dyszę pod kątem zużycia/zapchania, upewnij się, że wytłaczarka działa prawidłowo, wyczyść łóżko, sprawdź naciąg paska. Rutynowe czyszczenie, poziomowanie łóżka i strojenie PID utrzymują drukarkę w optymalnej formie.
Jakość filamentu wpływa na wydruki. Wilgoć w higroskopijnych filamentach (PETG, nylon, TPU) powoduje powstawanie pęcherzyków, syczenie, nitkowanie i osłabianie części. Zawsze używaj świeżego, suchego filamentu. Przechowuj w zamkniętych workach/pojemnikach z pochłaniaczem wilgoci. Wilgotny filament susz w suszarce lub piekarniku.
Stabilne środowisko jest kluczowe. Wahania temperatury, wilgotności lub przepływu powietrza powodują odkształcenia i niespójności. Jeśli to możliwe, użyj obudowy. Monitoruj za pomocą termometru i higrometru, aby zapobiec problemom.
Kalibracja jest ciągła, nie jest to "ustaw i zapomnij". Ustawienia są dynamiczne i zmieniają się.
- Nowy filament: Ponowna kalibracja dla nowych typów, marek, a nawet kolorów.
- Zmiany sprzętowe: Nowe hotendy, ekstrudery lub zmiany długości rurki Bowdena wymagają ponownej kalibracji parametrów, których to dotyczy.
- Pogorszenie jakości druku: Jeśli jakość niespodziewanie spada, ponowna kalibracja jest często pierwszym krokiem w celu zdiagnozowania przyczyny.
Wiele problemów z jakością druku wynika z problemów z kalibracją. Użyj systematycznego podejścia, aby je zdiagnozować i rozwiązać, zapobiegając przypadkowym modyfikacjom. Problemy podczas kalibracji przepływu (klikanie, szorstkie wydruki) często wskazują na problemy z wstępną kalibracją lub zależności, takie jak temperatura lub E-steps. Zacznij od podstawowych kontroli przed konkretnymi kalibracjami slicera.
| Problem | Możliwa przyczyna kalibracji | Pierwsze kroki do sprawdzenia |
|---|
| Słaba przyczepność pierwszej warstwy | Przesunięcie Z, poziomowanie stołu, temperatura | Wypoziomuj stół (ręcznie/automatycznie), wyreguluj przesunięcie Z, sprawdź temperaturę stołu. |
| Nurkowanie/Wyciekanie | Cofanie, temperatura, szybkość przepływu | Wysusz filament, ponownie uruchom test cofania, sprawdź temperaturę dyszy. |
| Nierówne/Zaokrąglone rogi | Przesuwanie ciśnienia, prędkość drukowania | Ponownie uruchom test PA (rozważ metodę wieżową), zmniejsz prędkość drukowania. |
| Niedostateczne wytłaczanie/Szczeliny | Szybkość przepływu, temperatura, maksymalna prędkość objętościowa | Ponownie uruchom kalibrację przepływu, zwiększ temperaturę dyszy, sprawdź, czy nie ma zatorów. |
| Nadmierne wytłaczanie/Chropowate powierzchnie | Szybkość przepływu, temperatura | Ponownie uruchom kalibrację przepływu, zmniejsz temperaturę dyszy. |
| Niedokładność wymiarowa | Tolerancja, natężenie przepływu | Ponownie uruchom test tolerancji, sprawdź kompensację X-Y. |
| Pionowe drobne artefakty (VFA) | Kalibracja VFA, kształtowanie danych wejściowych, problemy mechaniczne | Ponownie uruchom test VFA, sprawdź pasy/ramę, rozważ kształtowanie danych wejściowych. |
| Przesunięcia warstw | Problemy mechaniczne (paski, silniki), przyspieszenie | Sprawdź naciąg pasa, sprawdź ramę, zmniejsz przyspieszenie. |
Tabela 7: Schemat blokowy rozwiązywania problemów z jakością druku (koncepcyjny)
Kompleksowa kalibracja z OrcaSlicer to niezbędna praktyka dla każdego entuzjasty druku 3D lub profesjonalisty. Poprzez staranne dostrojenie parametrów, takich jak temperatura, natężenie przepływu, nacisk, wycofanie, tolerancja, maksymalna prędkość objętościowa i VFA, odblokowujesz pełny potencjał swojej drukarki. Ta precyzja prowadzi do wyższej jakości, niezawodności i dokładności wydruków, zmniejszając marnotrawstwo filamentu i poprawiając wskaźniki sukcesu.
Kalibracja to proces ciągły. Gdy wprowadzasz nowe filamenty, modyfikujesz sprzęt lub doświadczasz zmian środowiskowych, ponownie oceniaj i dostrajaj swoje ustawienia. Ta ciągła optymalizacja zapewnia, że Twoja drukarka będzie stale działać z maksymalną wydajnością. Udanego drukowania!
Also available in: Deutsch | English | Español | Français | Italiano | Nederlands | Português | Русский


