First Layer AI Slicer Configuration for Layer Scan (For Klipper Users)
Slicer configuration is only needed for Klipper. If you are running OctoPrint, you do not need to make any slicer changes.
Configure Layer Scanning:
In addition to colllecting images while the first layer prints, you can use a layer scan macro to have Obico's first layer Ai scan the print after the first layer finishes to get a better analysis of the first layer as a whole.
Follow these steps to configure your setup for first layer scanning. After configuring it, layer scanning can be easily enabled or disabled in the Obico web app:
Update the moonraker-obico plugin to version 2.0 if you haven't already
First, update the Obico plugin to the latest version. When you update the moonraker-obico plugin, we will automatically make two adjustments to your klipper setup:
- Add
moonraker_obico_macros.cfgto your Config Files. This file contains the layer scan macro. - Add
[include moonraker_obico_macros.cfg]to yourprinter.cfgfile.
Choose your slicer below and make the changes detailed in the section for your slicer
- PrusaSlicer
- SuperSlicer
- OrcaSlicer
- Cura
-
Open PrusaSlicer
-
Go to the Print Settings tab.
-
Click Custom G-Code
-
Add the following line to the "Before layer Change" section:
_OBICO_LAYER_CHANGE CURRENT_LAYER={layer_num + 1} MINX=[first_layer_print_min_0] MINY=[first_layer_print_min_1] MAXX=[first_layer_print_max_0] MAXY=[first_layer_print_max_1]
-
Open SuperSlicer
-
Go to the Print Settings tab.
-
Click Custom G-Code
-
Add the following line to the "Before layer Change" section:
_OBICO_LAYER_CHANGE CURRENT_LAYER={layer_num + 1} MINX=[first_layer_print_min_0] MINY=[first_layer_print_min_1] MAXX=[first_layer_print_max_0] MAXY=[first_layer_print_max_1]
-
Open OrcaSlicer
-
Click the edit printer button. It's the button next to the wifi symbol.
-
Click Machine G-Code
-
Add the following line to the "Before layer Change" section:
_OBICO_LAYER_CHANGE CURRENT_LAYER={layer_num + 1} MINX=[first_layer_print_min_0] MINY=[first_layer_print_min_1] MAXX=[first_layer_print_max_0] MAXY=[first_layer_print_max_1]
At this time, we do not support first layer scanning in Cura. It's custom g-code is not as robust as other slicers so we didn't have a straightforward solution, but we let us know if you use Cura, and we will try to come up with a solution if enough users are using Cura. Instead of configuring cura for the first layer scan, you'll need to configure it to output the current layer so Obico knows when the first layer finishes. *Thanks to Pedro Llamas for his Klipper Pre-processor script and detailed instructions. *
-
Open Cura
-
Open the "Help" menu and click Show Configuration Folder
-
On the file list, open the Scripts folder
-
Download
KlipperPreprocessor.pyto the "scripts" folder -
Close the file list
-
Close Cura
-
(optional) Download
preprocess_cancellationto a folder of your choice -
(optional) Download
klipper_estimatorto a folder of your choice -
Open Cura
-
Open the Extensions menu, then Post Processing, and click on Modify G-Code
-
Click on Add a script and select Klipper Preprocessor
-
Set options according to your needs (hover any option to view the description)
-
Click Close when finished
Layer scanning is currently not supported for Cura. It may be added in the future.
Layer Scanning Configuration Options
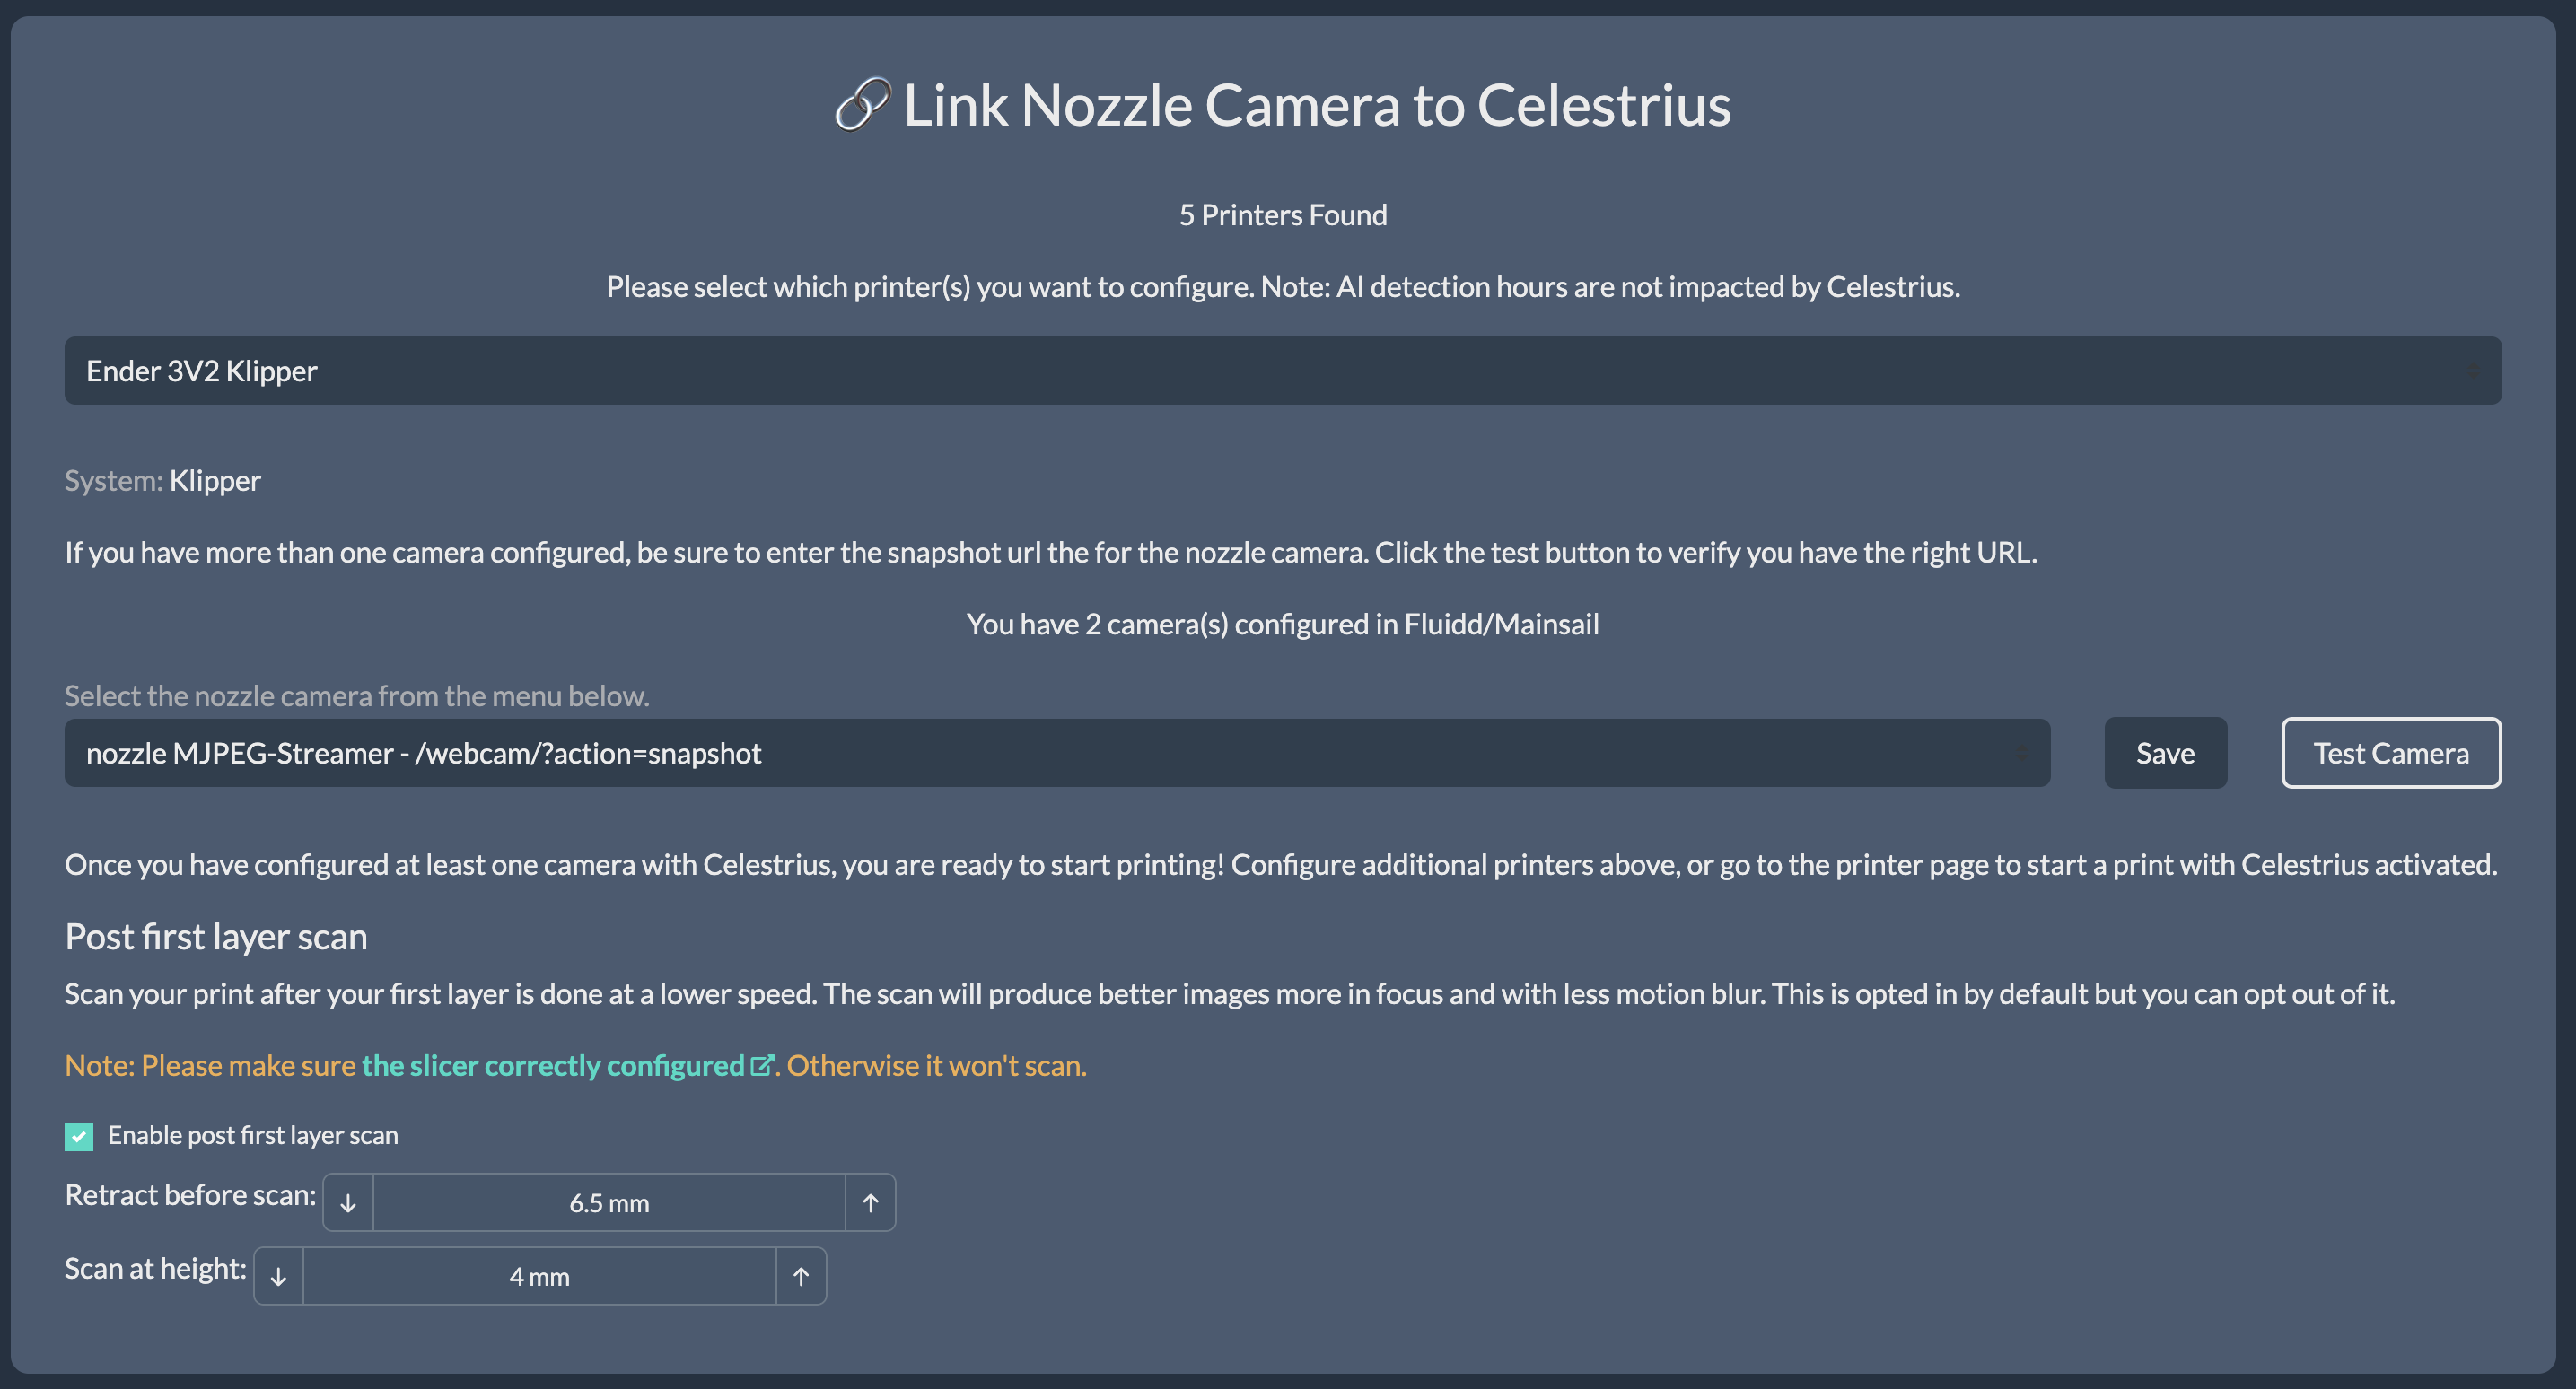
The following options are available to be configured in the Celestrius Alpha Enrollment page.:
- Enable or Disable: Enable or disable the first layer scan by clicking the checkbox (Scanning is enabled by default). If you turn off scanning, first layer AI will still work, but it may be more accurate with scanning enabled.
- Retraction Value: This is the amount that your filament will retract after the first layer finishes printing. This helps prevent filanent ooze during the scan. The default is 6.5mm.
- Scan Height: The Z-height that the scan will run at. The default value is 4mm. If your camera is out of focus while doing the first layer scan, adjust the height so your camera is in focus.
- Cooldown temperature: Cools down the hotend to this temperature before performing the first layer scan. Cooling down the hotend helps reduce filament oozing during the first layer scan.
Configuring Retraction value
When your first layer finishes, Obico will pause the print and retract the value that is set. This will ensure that the filament is not leaking out of the nozzle as the first layer is scanned. Depending on your setup, you may find that the default value is not sufficient.
If the filament is leaking out of your nozzle during the scan, increase the value so the filament will retract more before the scan starts.
If you run into any issues with your nozzle clogging after the first layer is scanned, reduce the retraction value so that the filament is pulled back a shorter distance.
Configuring Scan Height
The first layer scan will happen at Z=4mm by default, but if this height doesn't produce a clear focused image, you can adjust the scan height so the images are more in focus. To find the optimal scan height, do the following:
- Print this stl file. It is a simple box of 1 layer tall (0.2mm layer height). Leave the model on the build plate when it is finished printing.
- Move the Z-axis to Z=4mm.
- Move your print head to the center of the build plate.
- move the Z-height up or down until you achieve the best focus. The printed model should be as clearly in focus as possible.
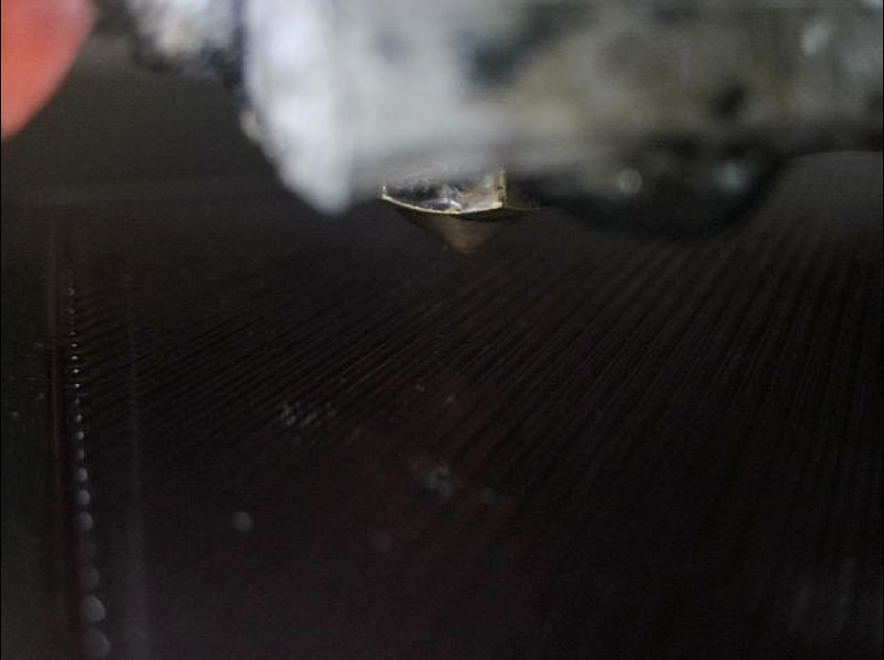
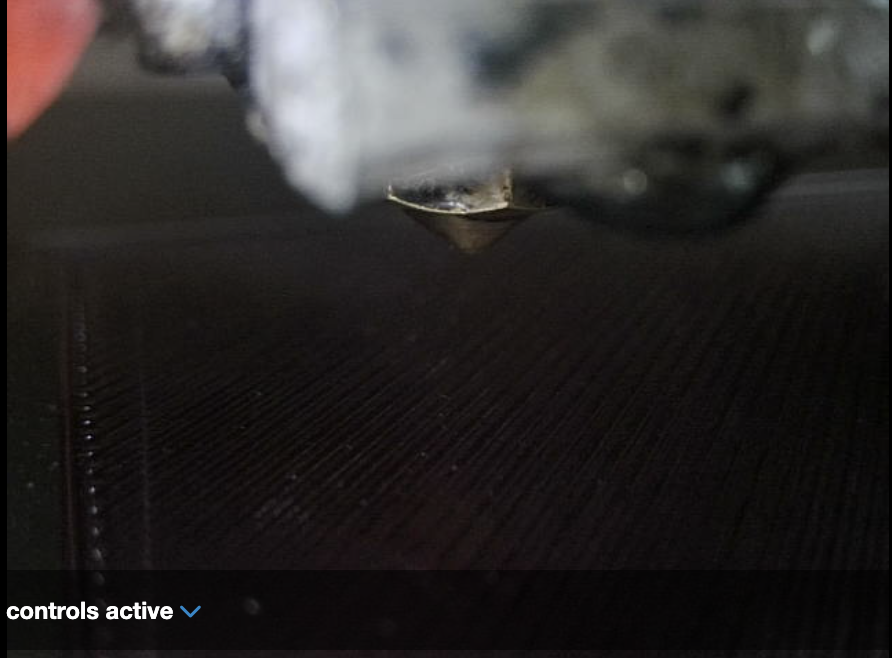
In the example below, you can see that the z-height of 4mm is clearly more focused than 2mm. At 2mm, the space in between the nozzle and the camera is more out of focus, while it is more focused at 4mm.
Z-height = 2mm
Z-height = 4mm
Configuring Cooldown Extruder Temperature
The cooldown extrudeer temperature is the temperature that will be set for the first layer scan. After the first layer, the temperature will be lowered to avoid filament oozing out of the nozzle during the scan.
The default cooldown temperature is 170 degrees celsius which is typically enough to stop filament from oozing out of the nozzle.
Increasing this value will decrease the time for the first layer scan to complete, but it may increase chances of oozing.
Decreasing this value will increase the time for the first layer scan to complete, but it will decrease the chance of oozing.