Obico’s Online Slicer for 3D Printing: A Comprehensive Guide
When you first get into 3D printing, the process of turning a digital model into a physical object can be both exhilarating and overwhelming. Every project starts with an idea, which is then turned into a digital 3D model that needs to go through the process of "slicing." Slicing is a crucial part of 3D printing, as it breaks down a 3D model into layers and converts them into instructions that a 3D printer can follow. But for this to be as smooth as possible, you need a good slicing tool, and that’s where Obico online slicer comes in.
Obico offers an online slicing solution that’s easy, powerful and accessible from anywhere. This makes it perfect for both beginners and advanced users who want flexibility, control, and ease of use.
In this article, we’ll go into detail about Obico’s online slicer, from its features to a step-by-step guide on how to use it. Whether you want to print functional objects or creative sculptures, we’ll take you through the entire slicing process with Obico so you can get from model to print in no time.
Let’s get started!
What is Slicing and Why Obico’s Online Slicer is Different
Slicing is the process of preparing a 3D model for printing by turning it into "layers,” which are essentially the instructions a 3D printer needs to follow to create the object. Most slicers today require software that you install on a computer, and while they offer control, they often lack accessibility and are difficult to use for beginners. This is where Obico’s online slicer changes the game.
Obico’s slicer is cloud-based and fully online, so you can access it from any device, including your phone or a web browser. No more being tied to a specific computer or needing to download software updates. It’s all right there in the cloud, ready for you to use whenever and wherever. With a clean and user-friendly interface and many of customization options, Obico’s slicer makes it easy to adjust settings to your specific project needs. And because Obico’s slicer is built on the powerful Orca Slicer engine, it has a wide range of settings and profiles for fine grain control over print quality, strength, and more.
Getting Started with Obico’s Online Slicer
To get started, simply sign up for an Obico account and connect your 3D printer to Obico for remote control. Follow these step-by-step guides (If it is first time to connect your 3D printer with Obico):
Once you’re in, you’ll have access to a huge library of STL models—these are the 3D designs you can slice and prepare for printing. Obico’s database has thousands of STL files across various categories, from functional parts to decorative pieces, and each one is ready to slice.
You can slice these models online and send them to print remotely, while you can monitor and see the progress from anywhere using any device, even your smart phone.
Here’s a step-by-step guide on how to begin slicing your model:
1. Navigate to the Model Library
When you log into the Obico app, you’ll see a slider on the right side of the app. Click on the “3D models” icon, and it will open up the entire library of STL files.
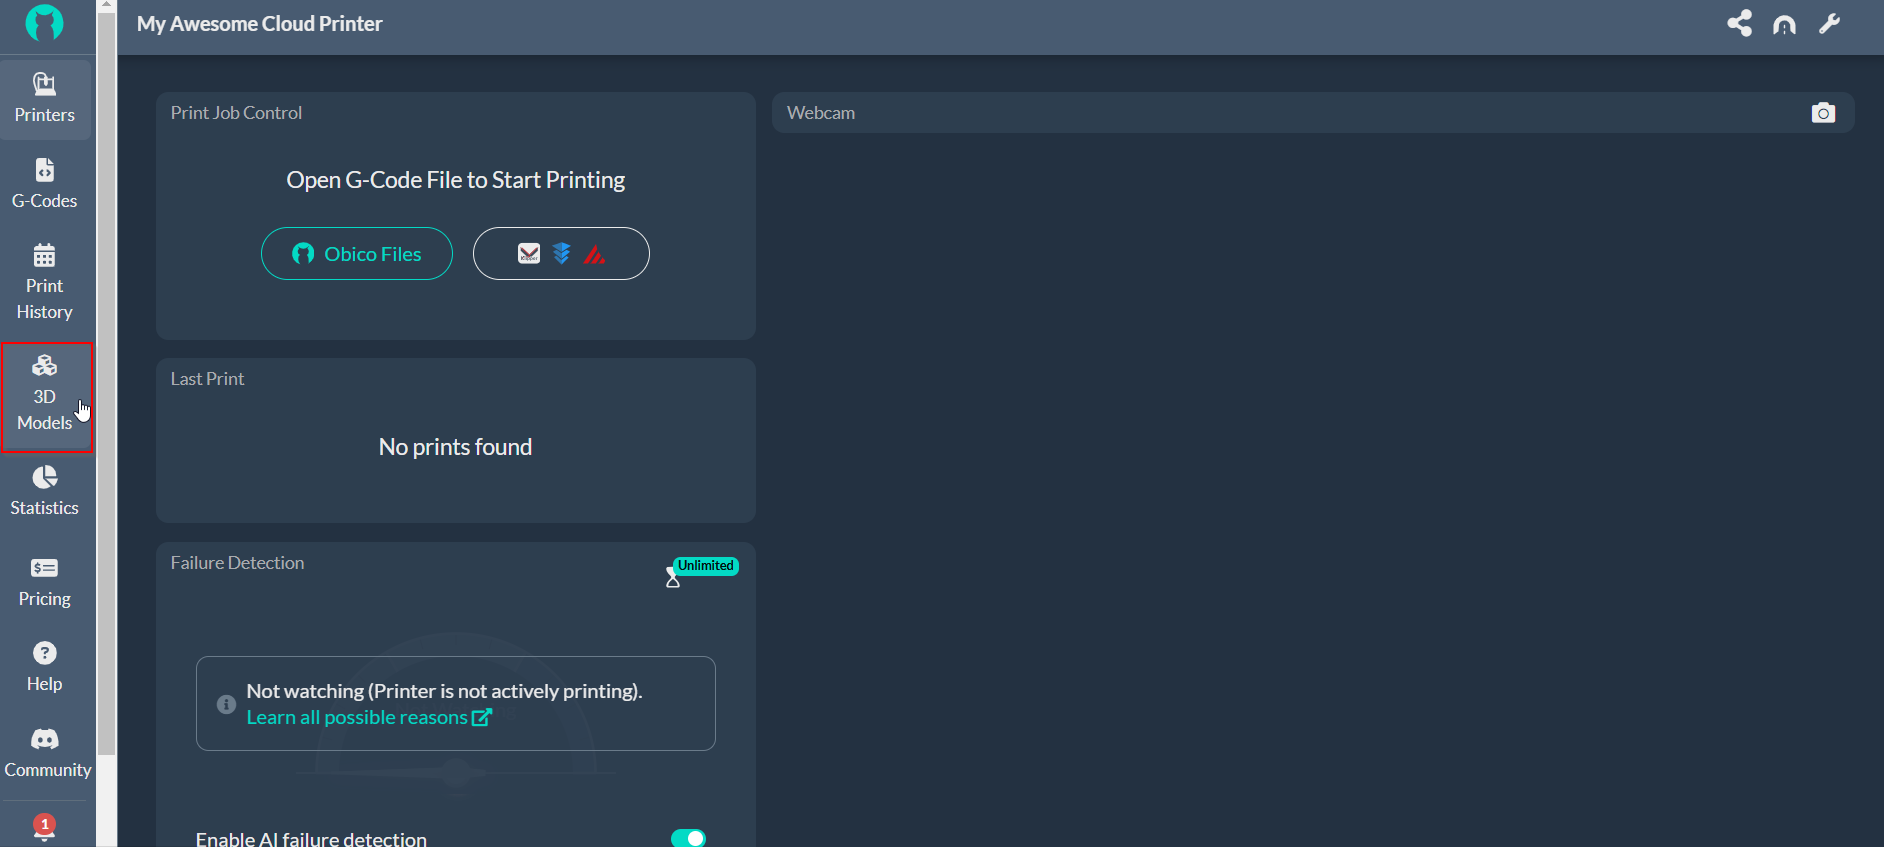
You can search for specific models using the search bar on top.
2. Select a Model to Slice
Once you find a model you like, click on it to preview the design. When you’re ready to proceed, click the “Slice” button. This will open up the list of STL files associated with that design, so you can select the exact file you want to slice.
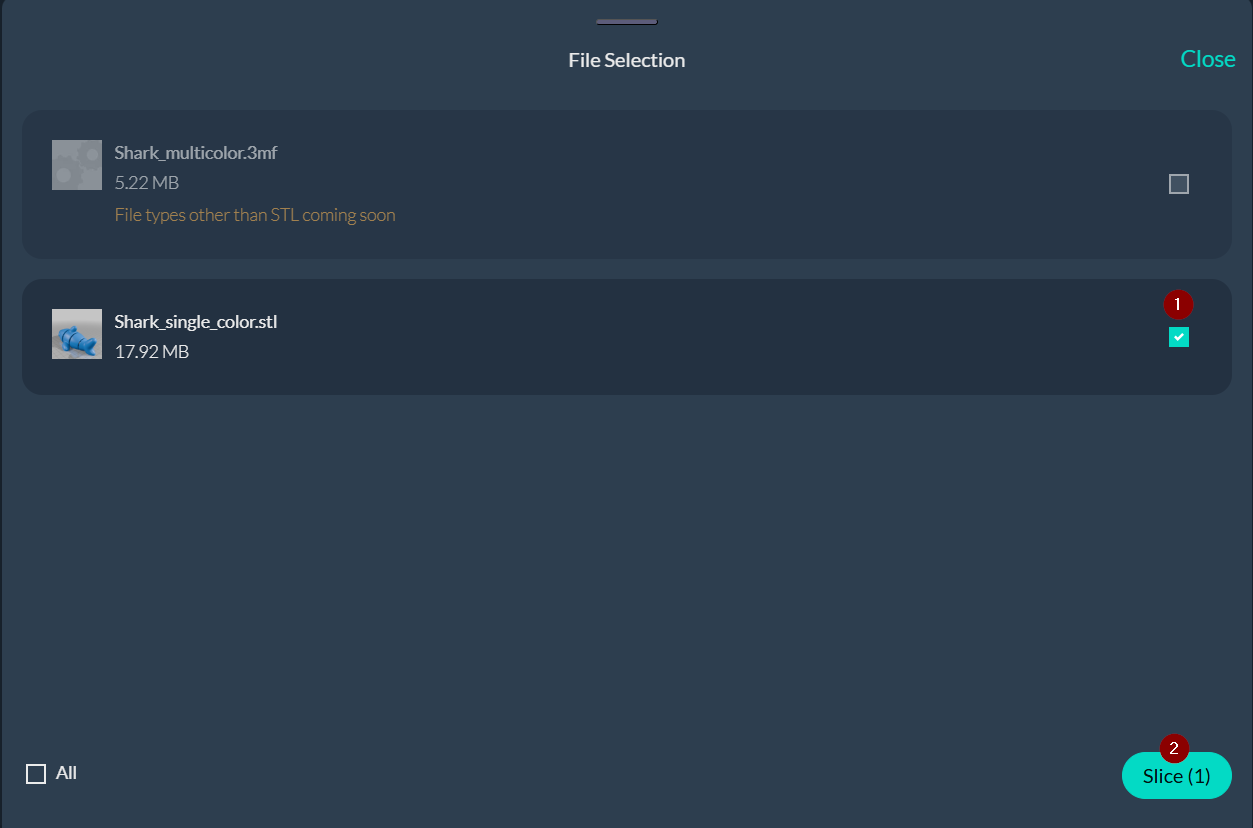
At the moment, Obico’s online slicer supports only STL files; you can’t slice OBJ or 3MF files.
3. Customize Your Model’s Position
Once you selected the files to slice, click on “Slice” to open the online slicer interface. Here your chosen model will appear on a virtual print bed, so you can see how it will be positioned during printing.
In this interface, you can reposition your model to find the best placement. By clicking on the “Move” icon, you can move your print by entering specific X and Y axis values, so you have full control over the position on the print bed.
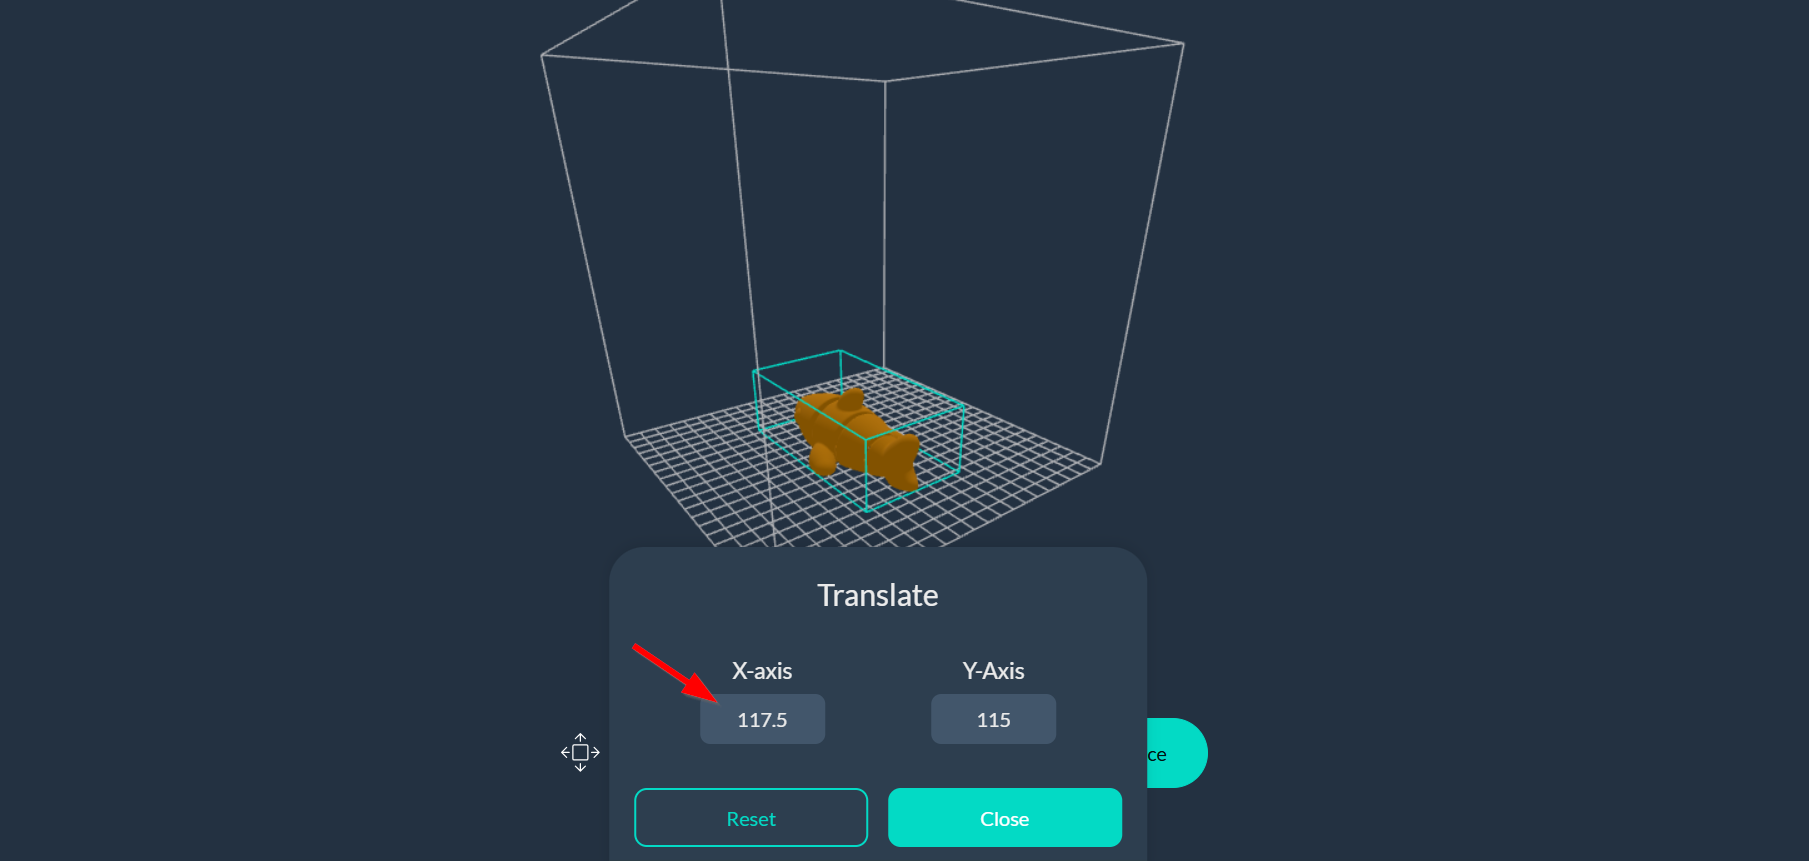
You’ll also find the “Settings” icon that opens up all the customizable print settings. We’ll get into those in the following part of this article.
Exploring Key Features of Obico’s Online Slicer
Obico’s online slicer has all the features you need to control every aspect of your 3D prints. With quality, strength, support, and advanced options, you can customize prints to your needs.
Once you’ve connected your printer to Obico, the slicer will automatically select the correct printer profile for you. This saves you time and ensures all slicing settings are matched to your hardware. But if the printer selection is incorrect or you need to switch to another model, you can do so manually. There are many popular printers supported by Obico, so whether you’re using a standard model from Creality and Elegoo or a custom setup, the slicer will adapt. You also have full control to change the material and print process.
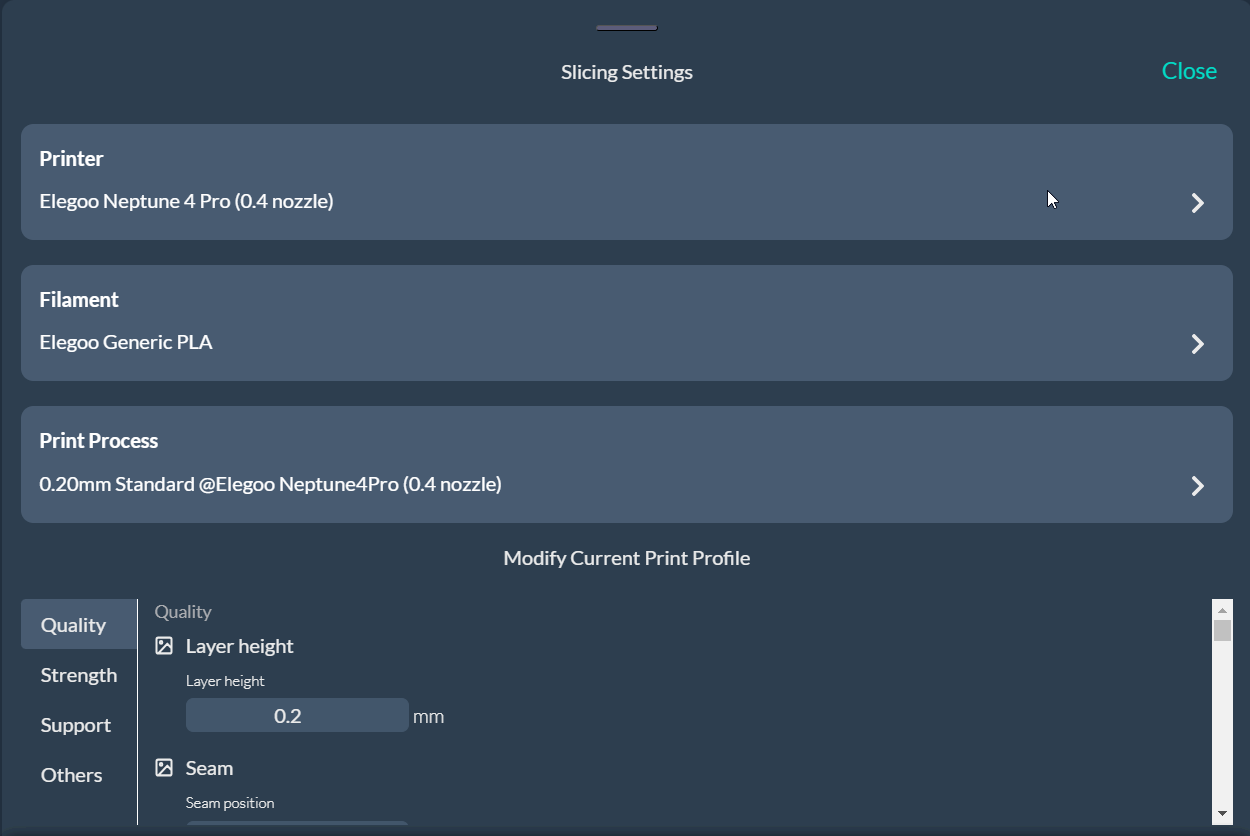
Let’s get into each of these settings to see how to get the best out of your 3D printer.
1. Quality Settings
Quality settings are key to getting smooth surfaces in your prints. Obico’s quality settings let you fine-tune the layer height and seam position to get both appearance and precision.

Layer Height
This setting controls the thickness of each layer, the more detail and smoothness of the print. Lower layer heights (0.1 mm) get more detail and smoother surfaces but take longer to print; higher layer heights (0.3 mm) print faster at the expense of detail.
For detailed models, 0.1 mm layer height is ideal; for simpler models, you can use thicker layers to print faster.
Seam Position
The seam, where each new layer begins and ends, can affect the final appearance of your 3D print. Obico’s slicer, based on OrcaSlicer, has multiple seam positioning options to help you manage the seam visibility based on the model’s design.
Here’s a breakdown of each seam setting and when to use it for best results:
- Aligned: Starts each new layer at the same point, creating a straight, continuous seam. Best for models with flat surfaces where the seam can blend into the design but may be too visible on curved or detailed objects.
- Nearest: Starts each layer at the closest edge to the previous end point; hides seams on sharp corners. Best for angular models but less effective on smooth surfaces.
- Back: Places the seam on the back of the model relative to the print bed. Good for display pieces as you can control the exact location by rotating the model.
- Random: Randomizes the start point of each layer, scatters the seam to reduce visibility. Good for textured or organic shapes but may create a rougher surface with minor imperfections.
Walls and Surface
The Walls and Surfaces setting in Obico’s slicer has an option called “Only one wall on top surfaces." When enabled, this will limit the top surfaces of the model to a single wall, which saves filament and print time. This is useful for decorative or lightweight prints where top surface strength isn’t critical.
2. Strength Settings
If your model needs to withstand stress or weight, you need to adjust the strength settings. Obico’s slicer has options to increase the durability of your prints by modifying wall loops, shell layers, and infill density.

Wall Loops
Increasing the number of wall loops makes the outer walls of your print thicker and stronger. This is important for parts that will be under stress or handled frequently, such as mechanical parts or enclosures.
Top and Bottom Shells
The Top and Bottom Shells setting allows you to adjust the strength, thickness, and appearance of the top and bottom surfaces of your 3D print. Here’s what each option does:
- Top Surface Pattern: Choose patterns like Concentric or Rectilinear for the top layers. Concentric patterns provide a visually appealing finish, while rectilinear patterns offer a strong, stable surface. The pattern you select can enhance both aesthetics and structural integrity.
- Top Shell Layers: This controls the number of layers on the top surface. More layers = more durability, especially for parts that will be under pressure or handled frequently. It’s good for a solid top on functional prints.
- Top Shell Thickness: This defines the overall thickness of the top shell by combining the number of layers and layer height. Adjusting this setting can provide added rigidity to the top surface.
- Bottom Surface Pattern: Similar to the top surface, you can select a pattern for the bottom layers, such as Concentric or Rectilinear, to enhance strength and ensure a clean look where the model meets the print bed.
- Bottom Shell Layers: This setting determines the number of layers on the bottom surface. Increasing bottom layers improves adhesion to the print bed, adds stability, and helps prevent warping, especially on larger prints.
- Bottom Shell Thickness: Defines the thickness of the bottom shell based on the chosen number of layers. This setting is important for parts that need a strong foundation or greater bed adhesion.
Infill Density and Pattern
The Infill settings in Obico’s slicer allow you to adjust the internal structure of your print, strength, weight, and material usage. Here’s what each option does:
-
Sparse Infill Density: This percentage controls the internal fill of your model. Higher values (50% or more) make the model more solid and stronger, good for load bearing or functional parts. Lower values (10-20%) uses less material and prints faster, good for lightweight or decorative prints.
-
Sparse Infill Pattern: This setting defines the pattern used for the sparse (internal) infill. Obico offers options like Grid, Honeycomb, Gyroid, and Cross Hatch. Each pattern has unique benefits:
- Cross Hatch provides strong structural support in multiple directions.
- Honeycomb is lightweight and distributes stress evenly, making it ideal for functional parts.
- Grid is simple and quick to print, suitable for general-purpose models.
- Gyroid offers excellent strength and flexibility, ideal for complex or load-bearing parts.
-
Internal Solid Infill Pattern: This pattern is used for areas that require a solid internal fill. It’s particularly useful in models that need added support or strength in specific regions, such as joints or load-bearing sections.
3. Support settings
For models with overhangs or tricky bits, support is crucial to prevent sagging or misalignment during print. Obico’s slicer has several support options to help you print complex models:

-
Enable Support: Toggle to turn support on or off. Supports are recommended for models with protrusions, overhangs, or delicate bits that need stabilizing.
-
Support Type: Obico offers four support types to suit different model needs:
- Normal (auto): Automatically places standard supports under overhangs. Ideal for general use.
- Tree (auto): Automatically generates tree-like supports that branch out, ideal for organic shapes and complex models with minimal contact points.
- Normal (manual): Allows for manual placement of standard supports.
- Tree (manual): Enables manual placement of tree-style supports, giving you control over where branches form.
-
Threshold Angle: This setting determines the angle at which supports are generated. For example, a threshold angle of 30 will add supports only for sections with overhangs greater than 30 degrees, reducing support and saving material.
-
On Build Plate Only: When checked, supports are limited to the print bed; no internal supports within the model. This reduces cleanup and makes support removal easier, especially for models where internal support is not needed.
4. Special Modes
Obico’s slicer also has special modes for specific projects; you can add unique textures and styles to your prints. These options, like Spiral Vase Mode and Fuzzy Skin, are good for both function and form.
- Spiral Vase Mode: This mode is perfect for thin-walled, hollow objects like vases or containers. In this mode, the printer prints in a continuous spiral upwards with no layer seams and a smooth surface. Spiral Vase Mode is efficient in material and time, great for decorative pieces.
- Fuzzy Skin: Fuzzy Skin gives your model a textured surface. This can be decorative or functional; add grip to handles or make containers look unique. The fuzzy skin is applied to the outer layer, so the inside of the model is not affected.
Fine-Tuning with Temperature and Additional Settings
Obico’s slicer also allows you to fine-tune temperature for both the nozzle and print bed, depending on the filament and print you are using. Extra options like skirt, brim, and print sequence give you more control over the print.
- Nozzle Temperature: The nozzle temperature determines how well the filament melts and bonds. Different filaments require different temperatures (e.g., PLA prints at 200–220°C, ABS at 230°C). Obico allows you to adjust the nozzle temperature and even set a specific temperature for the first layer to improve adhesion.
- Bed Temperature: The print bed temperature affects adhesion and warping. For example, PLA only needs a bed temperature of 50–60 °C, while ABS needs a bed temperature of 100–110 °C. You can set different temperatures for the first layer and the rest of the layers to get better results.
- Skirt: A skirt is a single layer printed around your model that primes the nozzle and ensures smooth filament flow before the print starts. You can adjust skirt loops and height to fit your model’s needs to avoid gaps or inconsistencies.
- Brim: Adding a brim creates a thin, wide base around your model and improves bed adhesion for models with small bases or narrow points of contact. You can specify brim width and type to adjust adhesion based on the model’s surface.
Slicing and Sending the Print Job Remotely
Now that you have all your slicing parameters set, you’re ready to slice your file. This process takes your 3D model and breaks it down into thin 2D layers that your printer reads and prints one at a time. Once sliced, the model is prepared as G-code, a file format that contains all the instructions for your 3D printer.
With Obico’s online slicer, you don’t need to be physically present at the printer to start the job. You can send the sliced G-code to your printer directly from your phone or web browser using the Obico app. This remote feature is perfect for users who want to manage prints on the go or monitor longer prints.
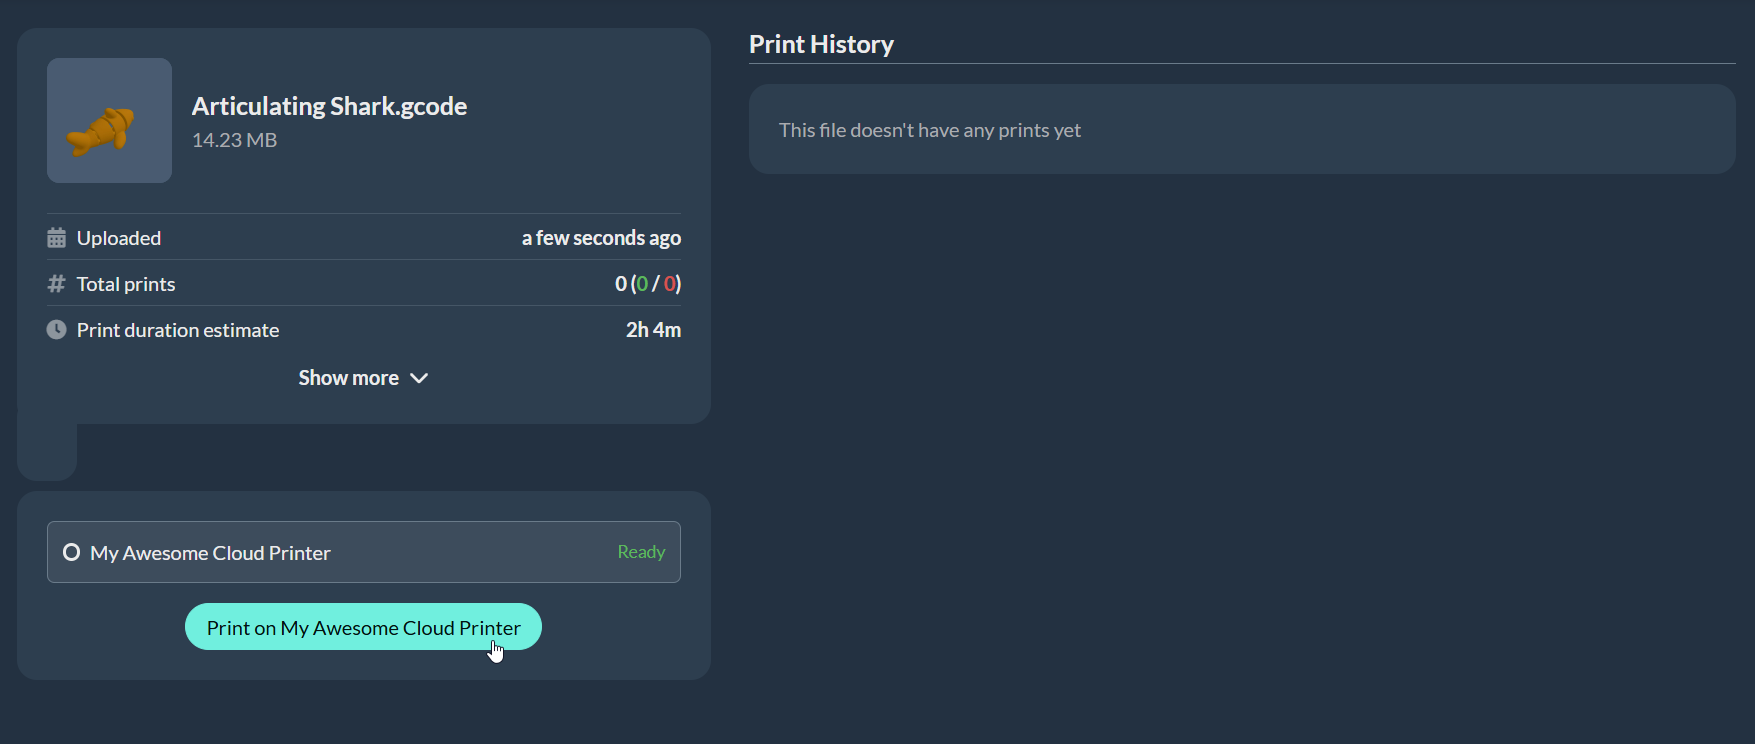
Not only can you start print jobs remotely with Obico’s online slicer, but you can also monitor every step of the print. With the Obico app, you can see real-time progress, make changes, or pause and cancel jobs if issues arise.
Plus, Obico’s AI failure detection watches the print progress and will alert you with any potential issues so you can intervene if needed.
Taking Control of Your Print with Obico’s AI Monitoring
Obico is more than just a slicer—it’s a full print management solution that includes AI monitoring to prevent print failures. Obico’s smart systems include a general detection system for overall print monitoring and Nozzle Ninja, an AI tool that ensures the first layer is perfect.
General AI Detection
Obico’s general detection system monitors the entire print job, looking for common issues like spaghetti failures caused by misprints. With a connected camera, Obico’s AI takes pictures of the print at intervals and analyzes them in real time.
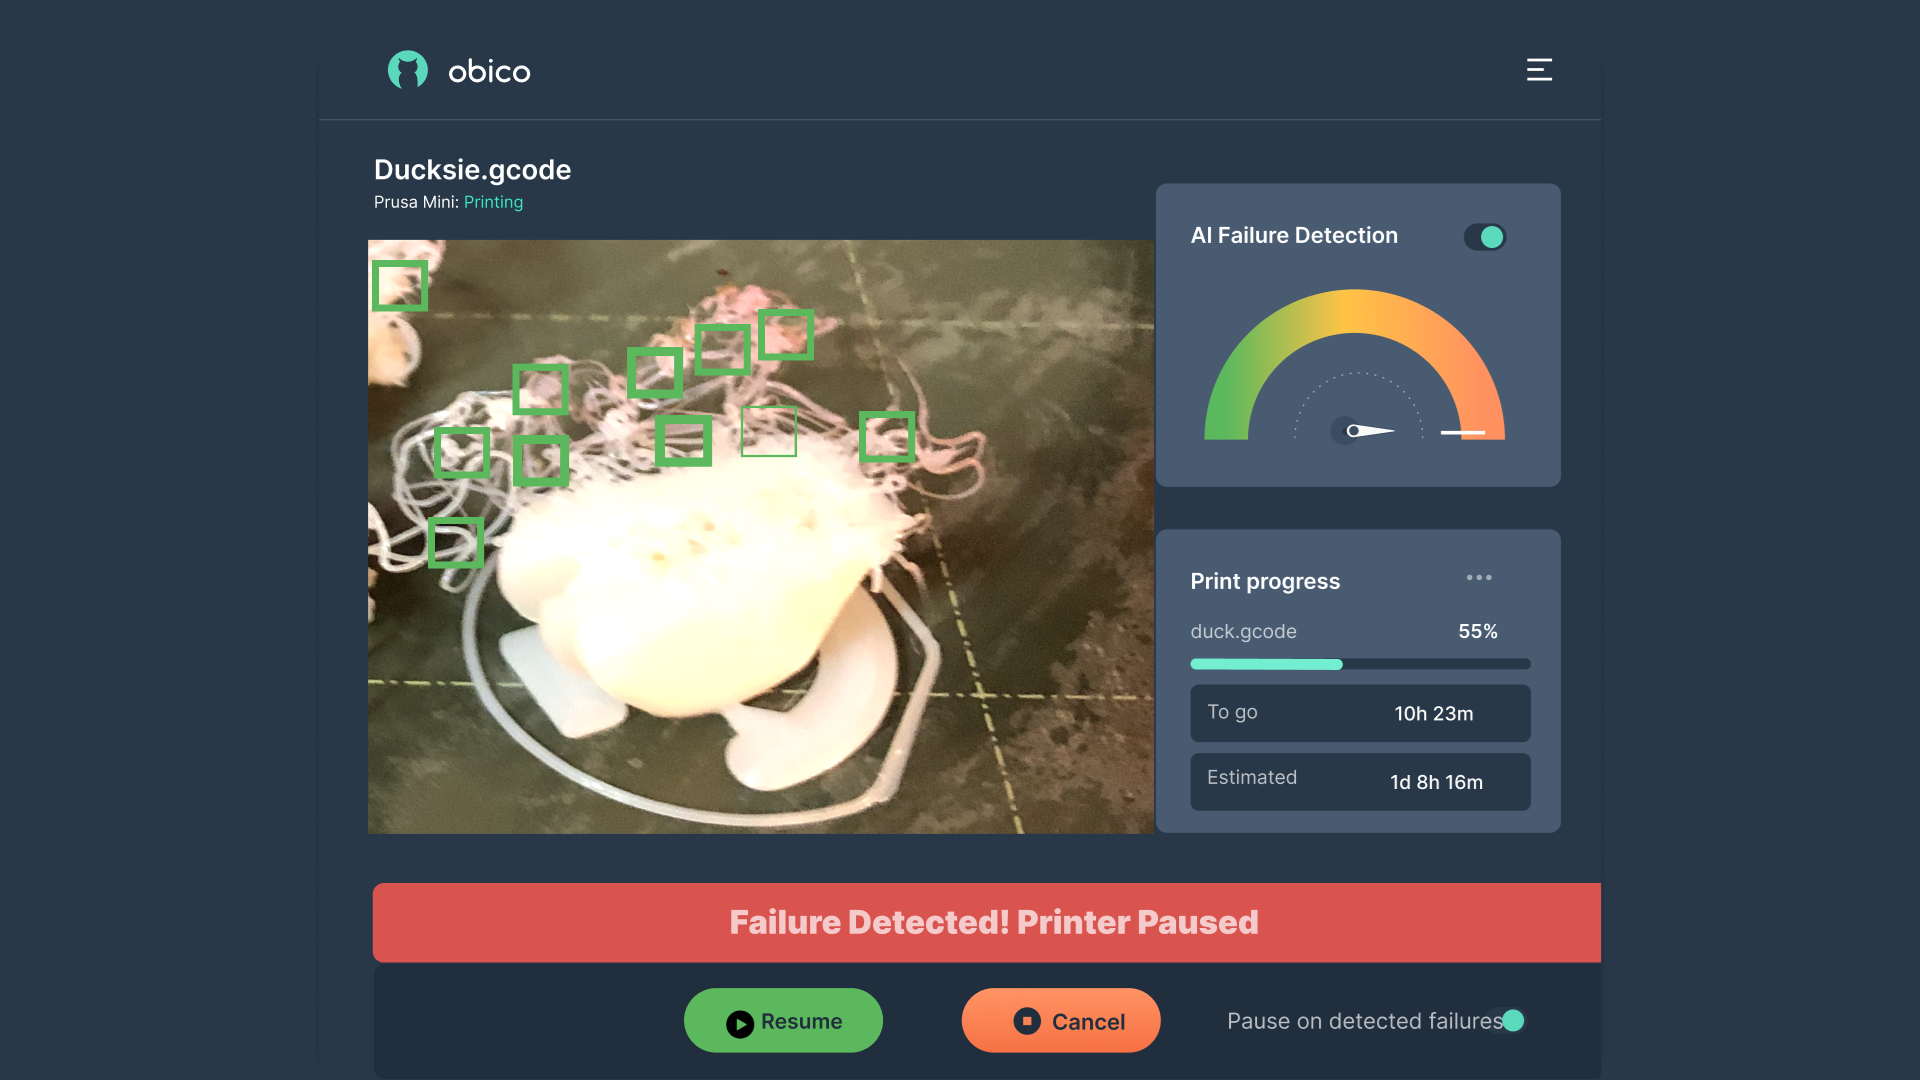
If the AI detects a problem, it can pause the print and send you an alert through the app, email, or SMS.
Nozzle Ninja: First Layer Monitoring
Nozzle Ninja focuses on the first layer, the foundation of any print. With a dedicated nozzle camera, Nozzle Ninja checks for common issues like under extrusion, bed adhesion problems, warping, bubbling, and nozzle blobbing. It then generates a report with a grade (A-F) and suggestions for improvement so you can tweak your settings for future prints.
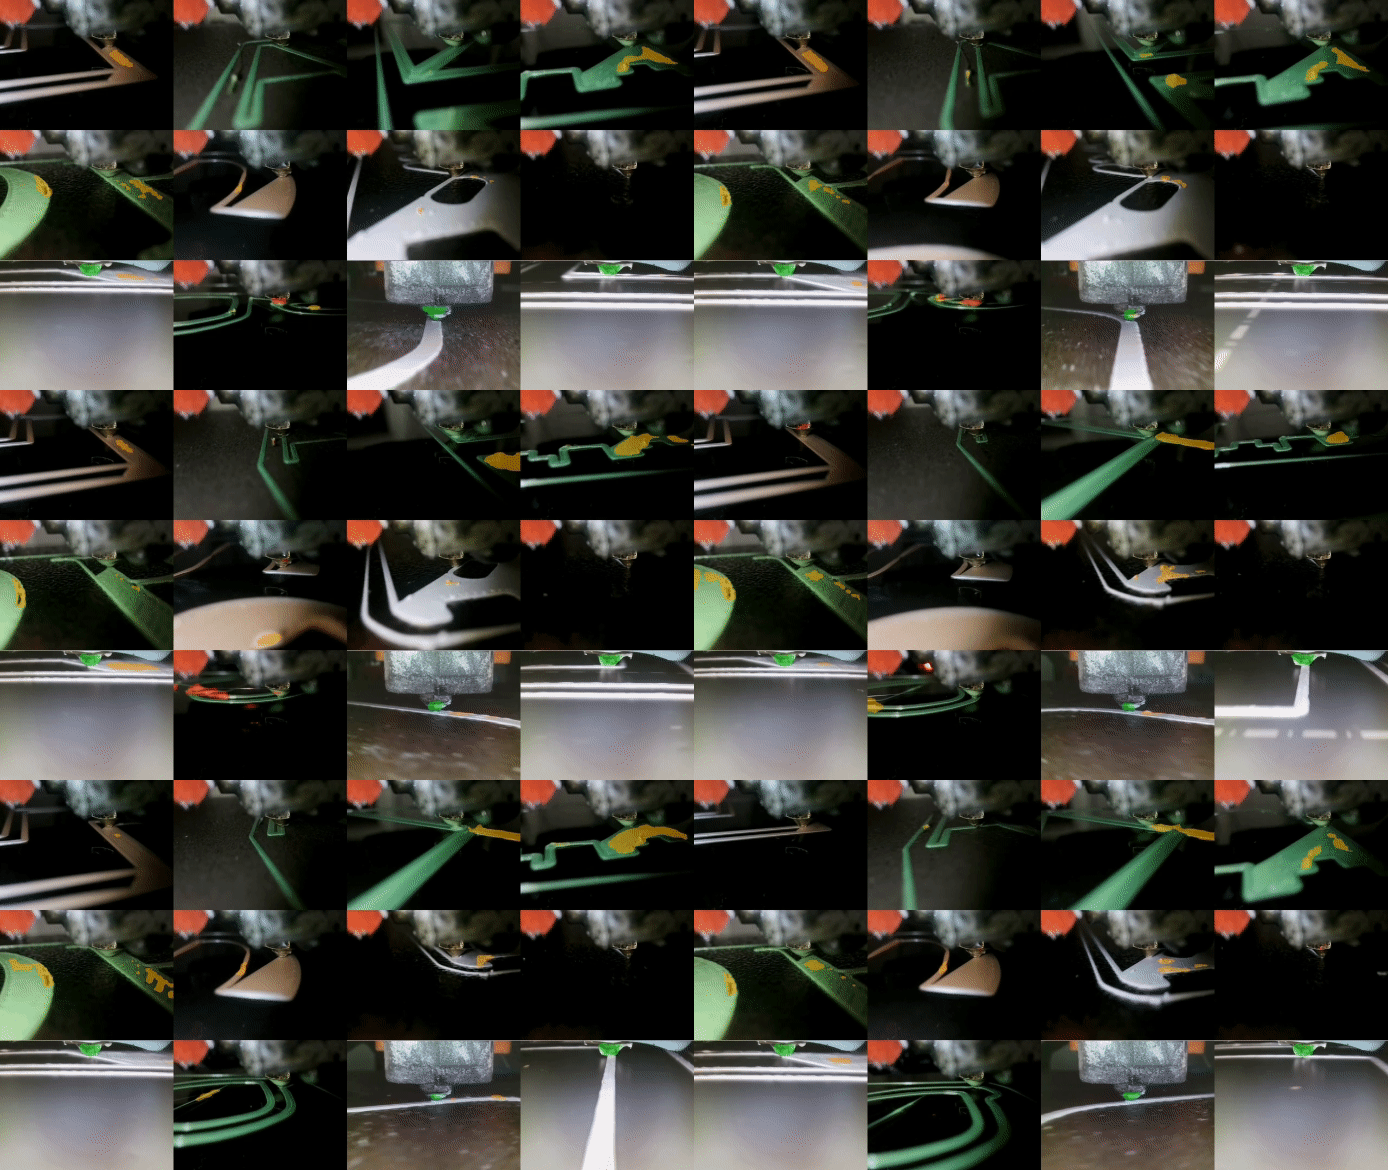
In total, these AI tools give you full control over your print process and reduce material waste and time by catching issues early.
FAQs
Q1. What is Obico’s Online Slicer and why should I use it?
Answer: Obico’s online slicer is a cloud-based 3D printing software that prepares your 3D models for printing by slicing them into layers your printer can follow. It’s accessible from any device, so you can slice, monitor, and control your prints from anywhere. Obico is for both beginners and advanced users because it’s easy to use, has advanced customization, and has AI-powered failure detection.
Q2. Can I use Obico’s slicer without installing any software?
Answer: Yes, Obico’s slicer is fully online and cloud-based. You don’t need to download any software to your computer, and you can access it from any web browser or mobile device, so it’s super convenient and accessible.
Q3. Does Obico’s slicer support all 3D printers?
Answer: Obico supports many popular 3D printers, including Creality, Elegoo, Anker, and more. You can also manually select or customize printer profiles if your specific model is not listed. For more complex setups, Obico works well with OctoPrint and Klipper, so it’s more compatible.
Q4. How does Obico handle different types of filament?
Answer: Obico’s slicer has pre-configured profiles for different types of filaments, like PLA, ABS, and PETG, each with optimal temperature settings for the nozzle and print bed. So, you don’t need to manually adjust the settings for your chosen material.
Q5. What are the Quality settings in Obico’s slicer, and how do they affect my prints?
Answer: Quality settings in Obico allow you to control the layer height and seam position, both of which affect surface smoothness and detail. Lower layer heights produce more detail but take longer to print; higher layer heights print faster with less detail. Seam position options help control the visibility of layer seams, which can improve aesthetics on certain models.
Q6. How does Obico’s slicer improve the strength of my 3D prints?
Answer: Obico’s slicer has customizable settings for wall loops, top/bottom shells, and infill density. Increasing wall loops and shell layers makes it more durable; adjusting infill density and pattern can add internal support. These settings help create sturdy prints that can withstand stress, so it’s perfect for functional parts.
Q7. What are support structures, and when should I use them?
Answer: Support structures are temporary scaffolds that help stabilize overhanging or intricate parts of your model during printing. Obico has automatic and manual support types, including Normal and Tree supports. These are necessary for models with protruding parts or complex designs to prevent sagging or misalignment.
Q8. Can I monitor and control my print remotely with Obico?
Answer: Yes, Obico’s slicer allows you to start, pause, and monitor your print job remotely through the app. Perfect for long or complex prints, you can check in from anywhere and get alerted if something goes wrong.
Q9. How does Obico’s AI-powered failure detection work?
Answer: Obico’s AI monitoring, including General AI and Nozzle Ninja, uses connected cameras to watch for issues during the print. General AI watches the entire print for common issues; Nozzle Ninja watches the critical first layer. If an issue is detected, Obico will pause the print and notify you so you don’t waste material and a failed print.
Q10. What are Spiral Vase Mode and Fuzzy Skin in Obico’s slicer?
Answer: Spiral Vase Mode is for creating seamless, hollow objects like vases by extruding continuously in a spiral, which eliminates visible layer seams. Fuzzy Skin is a feature that adds a rough texture to the outer surface of your model for functional grip and unique aesthetics.
Q11. Can I adjust the nozzle and bed temperature in Obico?
Answer: Yes, Obico’s slicer allows you to adjust the nozzle and bed temperature for optimal adhesion and to prevent warping. You can set different temperatures for the first layer and subsequent layers, which is useful for different filaments.
Q12. What is the purpose of the Skirt and Brim settings?
Answer: Skirt and Brim in Obico’s slicer are to improve adhesion and smooth extrusion. Skirt primes the nozzle, and Brim adds a thin base around your model to improve bed adhesion. These are useful for models with small contact points or small bases.
Q13. Is Obico’s online slicer suitable for beginners?
Answer: Yes. Obico’s slicer is designed to be easy to use and intuitive for beginners. But also has advanced options for experienced users.
Final thoughts
Obico’s online slicer is more than just slicing. It’s flexible, accessible, and smart 3D printing. With quality, strength, support, and special mode settings, you can customize every aspect of your print for the best results. The cloud-based interface means you can access your slicer from anywhere, and AI monitoring will protect your prints from common errors.
Hobbyist or pro—Obico has got you covered. With slicing, remote control, and AI monitoring, Obico makes 3D printing a breeze.
Bring your designs to life with ease and confidence.
