OrcaSlicer Profile Management: The Ultimate Guide

Introduction: Navigating the Hidden Complexity of OrcaSlicer Profiles
For many 3D printing enthusiasts, OrcaSlicer stands out as a powerful and versatile tool, offering granular control over print settings and advanced calibration features. However, the journey to achieving perfect prints is often marred by a common and deeply frustrating challenge: managing profiles. What might appear to be a straightforward administrative task—organizing, backing up, and migrating printer, filament, and process settings—frequently becomes a significant source of wasted time, repeated calibrations, and a pervasive sense of insecurity regarding the integrity of painstakingly configured settings. This is particularly true for those operating multiple 3D printers or experimenting with a wide array of custom filaments.
This pervasive difficulty can be attributed to what can be described as the "Hidden Complexity" of OrcaSlicer's profile management system. The underlying file structure and the inheritance model of profiles are often not intuitive, making it challenging to understand how settings are stored, linked, and affected by software updates or account interactions. This handbook aims to demystify these complexities, providing an authoritative, step-by-step guide to mastering OrcaSlicer profiles. From understanding their core architecture and implementing robust organization strategies to creating custom filament profiles, executing reliable backups, and troubleshooting the perplexing issue of disappearing profiles, this guide offers a clear roadmap to empower you and enhance your 3D printing journey.
Understanding OrcaSlicer Profiles: The Core Architecture
Effective profile management begins with a solid understanding of OrcaSlicer's foundational architecture. The software employs a structured system of profiles, each serving a distinct purpose in defining how a 3D model is translated into printable G-code.
Types of Profiles
OrcaSlicer categorizes its configuration settings into four primary profile types, each stored as a JSON file:
- Printer Model (machine_model): This profile defines the fundamental characteristics of a specific printer series. For instance, it might represent the base configuration for a "Bambu Lab A1".
- Printer Variant (machine): This specifies a particular configuration of a printer model, often tailored to a specific nozzle diameter or unique hardware setup. An example would be "Bambu Lab A1 0.4mm nozzle".
- Filament (filament): This profile contains settings specific to different material types and brands. Common examples include "Generic PLA" or a customized "Sunlu PLA Basic Matte" profile. These settings encompass parameters like temperature, flow rate, and retraction.
- Process (process): Also known as print settings, these profiles dictate print quality and speed parameters, such as layer height, infill density, and print speed. Examples include "0.20mm Standard" or "0.10mm Fine".
OrcaSlicer also employs specific naming conventions for these profiles, particularly for vendor-supplied or system-level presets. For example, a filament profile might be named filament_vendor_name + filament_name + " @" + vendor_name + printer_name / printer_variant_name +.json, while a process profile could be layer_height + preset_name + " @" + vendor_name + printer_name / printer_variant_name +.json. Adhering to or understanding these conventions can aid in organization.
The Power of Inheritance
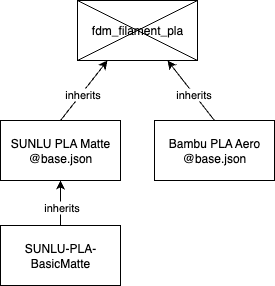
A central concept in OrcaSlicer's profile architecture is inheritance. This means that profiles can derive settings from other "parent" profiles, forming a hierarchical structure. For example, a specific filament profile like "Sunlu PLA Basic Matte" might inherit most of its base properties from a broader "Generic PLA" profile. Similarly, many process profiles inherit from a common base file, such as fdm_process_common.json. This inheritance model offers efficiency, as changes to a parent profile can propagate to all its dependent child profiles, streamlining adjustments across multiple configurations.
However, this powerful feature also introduces complexities. When OrcaSlicer updates, if a "stock printer profile" (a parent profile) has been modified, it can overwrite custom values in your presets that inherited from it. This means meticulously calibrated settings might be replaced by new stock values, and your changes only persist if the corresponding values in the updated stock profiles remain unchanged. Relying solely on direct inheritance from stock profiles for custom settings carries an inherent risk of losing valuable configurations with each software update. To mitigate this, consider creating truly independent custom profiles by copying all relevant settings from a stock profile and then removing the inheritance link, or by explicitly setting all critical, calibrated values in your custom profile to prevent unintended updates from parent profiles.
Furthermore, the hierarchical structure can lead to profiles seemingly "disappearing." If you inadvertently delete a "higher level" file or a parent profile in the inheritance chain, any custom profiles that relied on that deleted parent for their settings may vanish from the user interface. Even if the underlying JSON files for these custom profiles still exist, OrcaSlicer may no longer be able to find or recognize them due to the broken link. This highlights the need for extreme caution when deleting any profiles, particularly system-level ones, as an attempt to "clean up" the profile list can inadvertently break dependencies for custom configurations. Understanding this dependency chain is crucial to maintaining profile integrity.

Where OrcaSlicer Stores Your Profiles
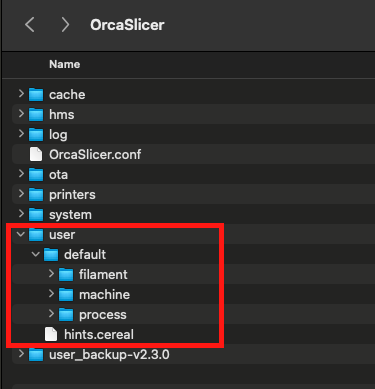
A common source of the "Hidden Complexity" in OrcaSlicer profile management is the storage location of these configuration files. They are typically found in "hidden" system directories, which can make manual access, backup, and troubleshooting challenging for many.
OrcaSlicer stores its configuration files, including all printer, filament, and process profiles, in specific directories that vary by operating system. Your created profiles are generally kept separate from system-bundled profiles.
OrcaSlicer Profile Storage Locations by Operating System
| Operating System | Default User Profile Path | Default System Profile Path | Notes |
|---|---|---|---|
| Windows | C:\Users\<username>\AppData\Roaming\OrcaSlicer\user\ (or user{10digitnumber}) | C:\Users\<username>\AppData\Roaming\OrcaSlicer\system\ | AppData is a hidden folder. User profiles are JSON files within subfolders (filament, machine, process). |
| macOS | ~/Library/Application Support/OrcaSlicer/user/ | ~/Library/Application Support/OrcaSlicer/system/ | Library is a hidden folder. Bundled system profiles can also be found by right-clicking the Orca app, then Show Contents > Contents > Resources > Profiles. |
| Linux | ~/.config/OrcaSlicer/user/ | ~/.config/OrcaSlicer/system/ | .config is a hidden folder. AppImage versions typically use this path. Some Flatpak installations may use /home/<user name>/.var/app/io.github.softfever.OrcaSlicer/config/OrcaSlicer. |
| Portable Version | (Custom data_dir or --datadir option) | (Custom data_dir or --datadir option) | If a data_dir folder exists under the application's path, Orca uses it. The --datadir command line option allows specifying any custom location. |
Understanding these specific file paths is fundamental. It empowers you to perform reliable manual backups by copying the user folder, to manually recover profiles that might have "disappeared" from the user interface but still exist as JSON files, and to facilitate profile migration between different machines by directly copying the user directory. This knowledge directly addresses a core aspect of the "Hidden Complexity" by making the profile storage locations explicit and easily referenceable, granting you greater control over your valuable configuration data.
Mastering Profile Organization & Naming Conventions
Effective organization and consistent naming are not merely aesthetic choices; they are paramount for managing a growing library of profiles, especially for those with multiple printers, varied nozzle sizes, or an extensive collection of filaments. Without a clear system, profiles can quickly become a "backlog of randomly named, unstructured content" that is difficult to find, utilize, and maintain.
Best Practices for Clarity and Consistency
A well-defined naming convention makes profiles easily identifiable, searchable, and manageable. Consistency across all profile types—printer, filament, and process—is key.
- Descriptive and Concise: Profile names should clearly indicate their purpose, the printer they are associated with, and the material or quality settings they represent. While descriptive, avoid overly lengthy names that become cumbersome.
- Standardized Elements: Incorporate key information consistently into every profile name. Consider the following structure:
- Printer Model/Nozzle: [PrinterModel]- (e.g., Ender3V2-0.4mm, P1P-0.6mm).
- Filament Type/Brand: [Vendor]-[Material]-[Color/Property] (e.g., Polymaker-PLA-Pro-Black, Sunlu-PETG-Matte).
- Process Quality: [LayerHeight]-[Quality] (e.g., 0.20mm-Standard, 0.12mm-Fine).
- Avoid Special Characters: It is generally advisable to stick to alphanumeric characters and common separators like underscores (_) or hyphens (-). Special characters such as & or @ can sometimes cause issues with file systems or software interpretation, even if OrcaSlicer's official naming conventions occasionally use them. For your created profiles, simplicity enhances compatibility and ease of manual manipulation.
- Version Control (Optional but Recommended): For highly customized or frequently tweaked profiles, adding a version number or a date can be beneficial (e.g., MyPLA-v1.2, Ender3-0.4mm-20240715). This practice helps track changes, identify the most recent iteration, and provides a clear point to revert to if a new setting introduces issues.
- Consistency in Case: Choose a consistent case style (e.g., CamelCase, snake_case, PascalCase) and apply it uniformly across all your profile names. This seemingly minor detail significantly improves readability and searchability.
Navigating Inheritance in Your Naming
While OrcaSlicer's internal architecture manages profile inheritance, a well-thought-out naming convention can visually reflect these dependencies, making it easier for you to understand which profiles are linked and how changes might propagate. Some adopt patterns that explicitly state dependencies, such as [Filament] @[Printer] @[Process] (e.g., Polymaker PETG @Ratrig 0.6n @0.3mm Standard PETG) to indicate compatibility and the intended use case for a given filament profile.
The community frequently reports that the concept of parent and child profiles, along with their compatibility nuances, often proves confusing. This difficulty is compounded by the fact that OrcaSlicer's user interface does not always intuitively display profile compatibility or inheritance relationships. For example, while the compatible_printers condition can be added to JSON files, its functionality is sometimes inconsistent, particularly for linking filaments to processes. This gap in the user interface means that a robust, descriptive naming convention becomes a crucial workaround. By baking compatibility information directly into your profile names, you create a form of "metadata in the name" that helps you quickly identify compatible profiles and understand their dependencies without needing to delve into complex JSON files or encountering unexpected incompatibilities during slicing. This proactive approach significantly compensates for potential UI shortcomings and reduces errors, making the profile selection process more efficient and reliable.
Creating Custom Filament Profiles
Custom filament profiles are indispensable for unlocking the full potential of your 3D printer and achieving optimal print quality with specific materials and brands. While OrcaSlicer provides generic profiles, fine-tuning them for each unique filament batch is a critical step for consistent and high-quality results.
Step-by-Step: Adding a New Filament Profile
Creating a new custom filament profile in OrcaSlicer typically involves duplicating and modifying an existing generic profile, then saving it as a user preset.
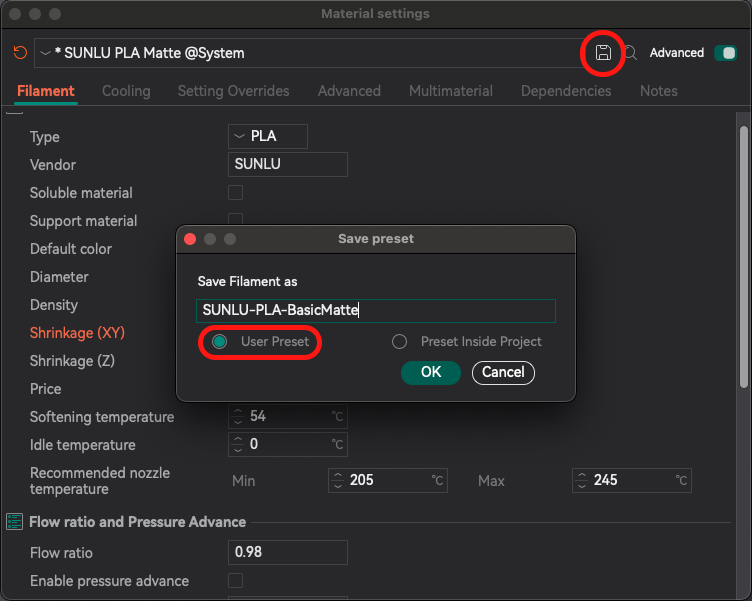
- Select an Existing Profile: In OrcaSlicer, navigate to the filament dropdown menu and choose a generic profile (e.g., "Generic PLA") that closely matches the new filament you intend to profile. This provides a solid starting point.
- Edit and Save As: Click the "pencil" icon located next to the selected filament profile to open its detailed settings window. Begin by making initial adjustments, such as specifying the filament's vendor and a descriptive name. Crucially, to save these changes as a new profile without altering the generic one, click the "Save current filament" button (often represented by a floppy disk icon) and then select "Save as new user preset". This action creates a new .json file in your user profile directory.
- Naming Your Profile: Provide a descriptive name for your new profile, adhering to the naming conventions established in the previous section (e.g., Sunlu PLA Basic Matte). This ensures easy identification later.
- Initial Temperature Settings: As a preliminary step, it is advisable to set the maximum temperature in the profile to +10°C above the filament manufacturer's highest recommended temperature and the lowest temperature to -10°C below their lowest recommendation. These ranges define the acceptable operational window for the filament, even if the final printing temperatures will be determined through calibration.
- Setting Vendor and Type: Ensure that the correct filament type (e.g., PLA, PETG, ABS) and vendor are accurately selected within the profile settings.
Robust Strategies for Backing Up & Migrating Profiles
Protecting your meticulously crafted profiles is essential to prevent data loss and ensure continuity across different software versions or machines. This section details both OrcaSlicer's built-in tools and more robust manual methods for reliable backup and migration.
Using OrcaSlicer's Built-in Export/Import Functions
OrcaSlicer provides convenient options to export your custom presets as bundles or zip files, which can then be imported into another installation or used for sharing specific configurations.
- Exporting Presets:
- Launch OrcaSlicer.
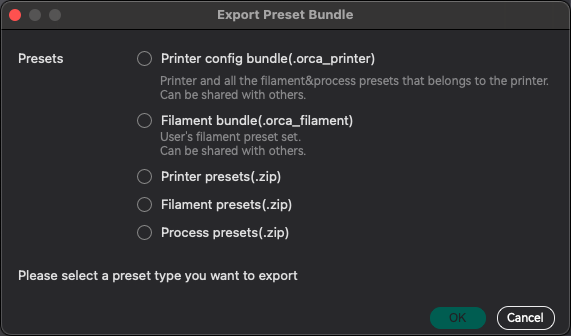
- Navigate to File > Export > Export Preset Bundle….
- Choose the desired export type from the options:
- Printer config bundle (.orca_printer): This exports an entire printer setup, including its associated custom filament and process presets.
- Filament bundle (.orca_filament): This exports custom filament profiles along with their printer connections.
- Printer presets (.zip), Filament presets (.zip), Process presets (.zip): These options export individual types of presets as standard zip archives, containing the respective JSON files.
- From the displayed list, select the specific presets you wish to export.
- Save the generated file to a secure and easily accessible location on your computer or an external drive.
- Importing Presets:
- In OrcaSlicer, go to File > Import > Import Configs….
- Browse to the location where you saved your preset bundle (e.g., .orca_printer, .orca_filament) or the unzipped .json files from a .zip export.
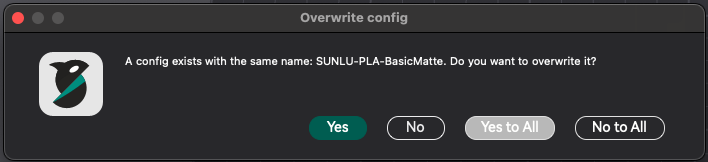
- Select the desired file(s) and click "Open." OrcaSlicer will typically prompt you if you are about to overwrite existing profiles, allowing you to confirm.
Manual Backup: Copying Your User Data Directory
While OrcaSlicer's built-in export functions are useful for sharing or targeted backups, the most robust and comprehensive backup method involves manually copying your entire user data directory. This folder contains all your custom printer, filament, and process profiles as individual .json files, alongside other user-specific settings and configurations. This manual method is crucial because it captures everything and can be used to restore profiles even in scenarios where OrcaSlicer's internal import mechanism might fail, or in cases of severe data corruption.
- Process:
- Locate Your User Data Directory: Refer to the "OrcaSlicer Profile Storage Locations by Operating System" table provided earlier in this handbook. The key folder to back up is the user directory, which is typically found within the main OrcaSlicer AppData (Windows), Application Support (macOS), or .config (Linux) folder.
- Close OrcaSlicer: Before initiating the copy process, ensure that OrcaSlicer is completely closed. This prevents any potential data corruption or inconsistencies during the backup.
- Copy the user Folder: Navigate to the identified user folder (e.g.,
C:\Users\<username>\AppData\Roaming\OrcaSlicer\user\) and copy its entire contents to a safe, external backup location, such as an external hard drive, USB stick, or cloud storage service. - Date Your Backups: To maintain clear version control and easily identify different backup points, it is highly recommended to name your backup folders with a clear date (e.g., OrcaSlicer_Profiles_2024-07-15).
Migrating Profiles Across Machines and Software Versions
Migrating profiles is a common necessity when upgrading OrcaSlicer versions, transitioning to a new computer, or setting up multiple 3D printers.
- Across Software Versions (on the same machine):
- Backup First: Always perform a manual backup of your user data directory before updating OrcaSlicer to a new version. This provides a critical safety net.
- Install New Version: Proceed with installing the latest version of OrcaSlicer. The software is generally designed to store user profiles in a separate folder, meaning they should persist across updates.
- Verify: After the update is complete, launch the new OrcaSlicer version and thoroughly check that all your custom profiles are present and functioning as expected.
- Restore if Needed: If any profiles are lost or appear corrupted, use the built-in import function to bring back your backed-up .orca_printer or .orca_filament bundles. Alternatively, if issues persist, manually copy your backed-up user folder contents back into the new OrcaSlicer installation's data directory.
- Across Different Machines:
- Export Bundles: For a more streamlined transfer, utilize the "Export Preset Bundle" feature to create .orca_printer and .orca_filament bundles on the source machine. These bundles encapsulate multiple related settings for easy transfer.
- Manual Copy (for full transfer): For a complete migration, copy the entire user data directory from the source machine to the target machine's corresponding OrcaSlicer user directory. This method is particularly effective for syncing all settings between, for example, a desktop and a laptop.
- JSON File Manipulation (Advanced): For advanced users or in specific troubleshooting scenarios, it is possible to manually copy individual .json files between the filament, machine, and process subfolders within the user directory. If migrating filament profiles between vastly different printer setups, manual editing of the compatible_printers settings within the JSON files might be necessary to ensure proper recognition and functionality.
While OrcaSlicer offers built-in export and import functionalities, reports indicate that these tools are not always flawless. Instances of "0 files imported" messages or profiles appearing correctly in the configuration folder but failing to show up in the slicer's user interface are not uncommon. This suggests that OrcaSlicer's internal indexing or recognition of profiles can sometimes fail, even when the files are physically present. This means that even with the provided tools, you might still encounter challenges, and manual intervention—such as directly copying the user folder or even editing the JSON files to adjust inherits or compatible_printers fields—remains a necessary fallback for robust migration. This understanding empowers you to troubleshoot beyond the graphical user interface, ensuring your valuable configurations are preserved and functional.
Troubleshooting: Profiles Disappearing with Bambu Lab Account Interactions
The phenomenon of custom profiles inexplicably disappearing, particularly after OrcaSlicer updates or interactions with Bambu Lab accounts, is a highly frustrating and frequently reported issue within the community. Addressing this requires a clear understanding of its underlying causes and the implementation of effective preventative measures and workarounds.
Understanding the Root Cause
Several factors contribute to profiles vanishing from the OrcaSlicer interface:
- Registry/Index Corruption: A common observation is that while profiles disappear from the UI, their .json files often still exist within the AppData (Windows) or equivalent user directories. This indicates that OrcaSlicer may lose its internal reference to these files due to incorrect registry entries (on Windows) or corruption in its internal indexing system, preventing the program from finding or recognizing them.
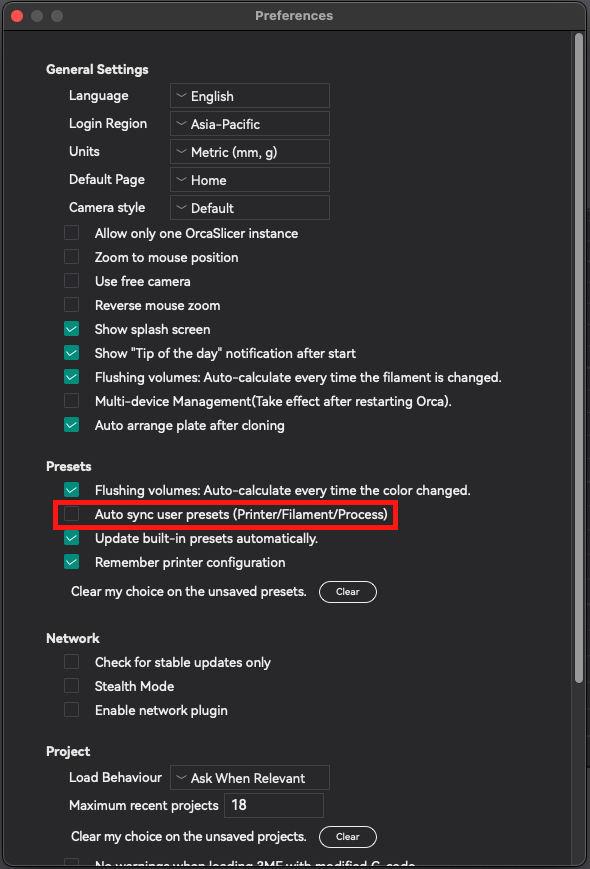
- Cloud Sync Overwrites: A significant cause of data loss is related to the "Auto sync user presets" feature, especially when linked to Bambu Lab accounts. If this setting is enabled, logging into OrcaSlicer on a new device or a sync conflict with the Bambu cloud can result in local custom settings being overwritten by older, default, or conflicting versions stored in the cloud. You may lose meticulously crafted local profiles when the cloud state takes precedence.
- Inheritance Chain Breaks: As discussed in Section 2, if a "parent" profile within an inheritance chain is deleted or becomes corrupted, any custom profiles that depend on it may "disappear" from the user interface, even if their individual JSON files remain intact.
The challenges with cloud synchronization represent a significant dilemma. While cloud sync offers the convenience of accessing profiles across multiple devices, its current implementation or associated bugs frequently lead to the loss of custom profiles, particularly when logging into or out of Bambu Lab accounts. This creates a direct conflict between convenience and the integrity of your data. This issue can erode confidence in OrcaSlicer's stability and the reliability of its cloud features, forcing you to choose between the ease of synchronization and the security of your painstakingly tuned profiles. It points to a potential design flaw where cloud sync might prioritize the cloud state over local changes or handle synchronization conflicts inadequately. Therefore, for critical custom profiles, it is strongly advised to disable "Auto sync user presets" and rely on more robust local backup strategies.
Workarounds and Preventative Measures
Implementing a proactive approach is the best defense against disappearing profiles.
- Preventative Measure 1: Disable Auto Sync (Highly Recommended):
- In OrcaSlicer, navigate to File > Preferences (or click the down arrow next to the File menu).
- Locate and uncheck the "Auto sync user presets" option.
- Restart OrcaSlicer to ensure the change takes effect.
This action prevents the cloud from potentially overwriting your local custom profiles.
- Preventative Measure 2: Regular Manual Backups: As detailed in Section 4, regularly copying your entire AppData\Roaming\OrcaSlicer\user folder (or its macOS/Linux equivalent) to a safe, external location is the ultimate safety net against any form of profile loss.
- Workaround for Windows (Comprehensive Reset & Restore for Persistent Issues): For severe and persistent profile loss, particularly those stemming from registry errors or deep corruption, a comprehensive reset and restore procedure can be effective. This is a drastic measure and should be undertaken by advanced users only.
- Backup: Crucially, create a complete manual backup of your %AppData%\OrcaSlicer\user folder before proceeding.
- Uninstall OrcaSlicer: Use Windows' "Add or Remove Programs" feature to uninstall all OrcaSlicer-related entries.
- Delete AppData Folder: Manually navigate to and delete the entire %AppData%\OrcaSlicer folder. This ensures a clean slate.
- RESTART System: Perform a full system restart to clear memory and cache.
- Edit Registry (Advanced Users Only!):
- Open the Registry Editor by pressing Windows Key + R, typing regedit, and pressing Enter.
- ALWAYS Back Up Registry First: Before making any changes, go to File > Export and save a backup of your entire registry.
- Press CTRL + F to open the Find dialog. Search for "Orca" and then "SoftFever." Delete any related entries found.
- RESTART System Again: A second restart is essential after making registry edits.
- Reinstall OrcaSlicer: Download and install the latest stable version of OrcaSlicer directly from its GitHub repository.
- Final RESTART: Perform one last system restart.
- Run OrcaSlicer: Launch OrcaSlicer and follow the initial setup wizard.
- Import Profiles: Use File > Import > Import Configs… to import your backed-up profiles. If direct import fails for some profiles, you may need to open their JSON files in a text editor (such as VSCode) and manually recreate the settings within new generic profiles in OrcaSlicer's UI.
Recovering Lost Profiles
Often, profiles are not truly "deleted" but merely become unrecognized by OrcaSlicer's user interface due to broken inheritance links, corrupted internal indices, or sync issues. Their .json files frequently still reside within your user data directory.
- Process:
- Locate the Files: Navigate to your
AppData\Roaming\OrcaSlicer\user\default\(oruser{10digitnumber}\on Windows, or the equivalent path on macOS/Linux). Check the filament, machine, and process subfolders. Your "lost" profiles are highly likely to be present as .json files within these directories. - Inspect JSON: Open the .json file of a lost profile using a plain text editor (e.g., VSCode, Notepad++). This allows you to view all the settings you had previously configured, providing a complete record of your lost profile.
- Recreate or Re-integrate:
- Option A (Manual Re-creation - Safest): The most reliable method is to create a new generic profile directly within OrcaSlicer. Then, manually copy the settings from the inspected .json file into the corresponding fields in the new profile's user interface. Save this as a new user preset. This approach effectively rebuilds the profile within OrcaSlicer's active recognition system.
- Option B (Advanced - Direct File Placement): In some minor cases, if the issue is not severe (e.g., a simple indexing glitch), you might be able to copy the .json file directly back into the appropriate user subfolder. However, this method is less reliable and can sometimes lead to further issues if the underlying cause (such as a broken inheritance link or a registry error) is not fully resolved.
- Option C (Fixing Inheritance): If the problem is identified as a broken inheritance chain, you might need to re-add the "parent" printer model or system profile that was previously deleted. This action can sometimes cause your custom profiles that depend on it to "re-appear" in the OrcaSlicer UI.
- Locate the Files: Navigate to your
Leveraging Community Preset Repositories
The 3D printing community is a vibrant and invaluable resource, with many sharing their optimized profiles and insights. Community-driven preset repositories, often hosted on platforms like GitHub, offer a wealth of pre-calibrated profiles for various printers and filaments. While these resources can significantly save time and effort, their utilization often requires manual import processes that may not be intuitive for all.
How to Effectively Use and Contribute
- Using Community Presets:
- Find a Repository: Begin by searching platforms like GitHub or dedicated 3D printing community forums for "OrcaSlicer presets" or "Bambu Studio OrcaSlicer presets." An example is the DRIgnazGortngschirl/bambulab-studio-orca-slicer-presets repository.
- Download the Repository: Download the entire repository as a .zip file to your computer.
- Extract and Locate Profiles: Unzip the downloaded folder. Inside, you will typically find organized subfolders labeled filament, machine, and process, containing the individual .json profile files.
- Manual Import: The most common and reliable method for incorporating these profiles is to manually copy the .json files into the corresponding subfolders within your OrcaSlicer user data directory (e.g.,
C:\Users\<username>\AppData\Roaming\OrcaSlicer\user\default\filament\). - Crucial: Inherited Presets: Pay close attention to the contents of the .json files, specifically any inherits fields. If a community profile inherits settings from another profile (e.g., a specific filament profile inheriting from a "Generic PLA" profile that is also part of the repository), you must ensure that the inherited parent profile is also placed in its correct location within your OrcaSlicer folders for the child profile to function correctly. Failure to do so will result in the child profile not loading or behaving unexpectedly.
- Restart OrcaSlicer: After copying the files, restart OrcaSlicer. The newly added profiles should then appear in the user interface.
- Calibrate/Verify: Even when using community-shared profiles, it is highly recommended to perform your own calibration tests (such as Flow Rate, Pressure Advance, and Temperature Tower tests) for your specific printer and environment. Printer variations, filament batches, and environmental factors mean that even optimized profiles may require minor fine-tuning to achieve optimal results on your machine.
- Contributing to Community Presets:
- If you have developed highly optimized or unique profiles that could benefit others, consider contributing them back to the community. Always review and adhere to the specific guidelines of the repository you wish to contribute to, which may include conventional commit styles or specific file structures.
- When contributing, provide clear and comprehensive documentation. This should include details on your calibration results, the specific printer and filament combinations the profile is optimized for, and any unique considerations. This transparency helps others effectively utilize and build upon your contributions.
Conclusion: Empowering Your 3D Printing Journey
Mastering profile management in OrcaSlicer is not merely about administrative tidiness; it represents a fundamental shift from frustration to empowerment in the 3D printing workflow. By thoroughly understanding the intricate architecture of OrcaSlicer profiles, implementing robust organization and naming conventions, and diligently performing essential calibrations, you can unlock unprecedented levels of consistency and quality in your 3D prints.
The knowledge of where profiles reside, how inheritance functions, and the critical importance of proactive backup strategies directly addresses the "Hidden Complexity" that often plagues. Furthermore, armed with specific workarounds for common issues like disappearing profiles—especially those linked to Bambu Lab account interactions—you can navigate potential pitfalls with confidence, safeguarding your valuable configurations. The ability to leverage and contribute to community-driven preset repositories further enriches the experience, fostering a collaborative environment where collective knowledge elevates individual capabilities.
Ultimately, this comprehensive approach to profile management transforms a source of anxiety into a powerful tool. It allows you to spend less time troubleshooting and more time innovating, experimenting, and bringing your creative visions to life with reliable, high-quality 3D prints. Continuous learning and careful management are not just best practices; they are the keys to unlocking the full potential of OrcaSlicer and, by extension, the boundless possibilities of 3D printing.
Also available in: Deutsch | Español | Français | Italiano | Nederlands | Polski | Português | Русский