The Best OctoPrint Plugins And How To Install Them
This article was updated on August 12, 2022
OctoPrint is a web interface dedicated to making 3D printing easier by allowing you to control and monitor the process. The software allows you to access and control virtually any parameter on your printer.
Moreover, in a heart-warming, traditional internet fashion, it’s open source.
There is a vast database of plugins developed by the 3D printing community that make your experience with OctoPrint even better, and here we list and explain the most popular ones.
Table of Contents
- Plugin #1: Obico ( successor of The Spaghetti Detective)
- Plugin #2: Bed Level Visualizer
- Plugin #3: OctoPrint-PrintTimeGenius
- Plugin #4: Octolapse
- Plugin #5: DisplayLayerProgress
- Plugin #6: Themeify
- Plugin #7: Firmware Updater
- Plugin #8: Navbar Temp
- Plugin #9: OctoPrint-Dashboard
- Plugin #10: Creality 2x temperature reporting fix
- Plugin #11: HeaterTimeout
- Plugin #12: GcodeEditor
- Plugin #13: Touch UI
- Plugin #14: Arc Welder
- Plugin #15: OctoPrint-BLTouch
- Plugin #16: Simple Emergency Stop
- Plugin #17: OctoPrint-Display-ETA
- Plugin #18: OctoPrint-TPLinkSmartplug
- Plugin #19: OctoPrint-CustomBackground
- Plugin #20: Exclude Region
- Plugin #21: OctoPrint-Enclosure
- How to get OctoPrint plugins?
Plugin #1: Obico ( successor of The Spaghetti Detective)
Obico, which has replaced The Spaghetti Detective, is an all in one plugin that gives you the ability to monitor and control your 3D printer from anywhere with internet connection. Using Artificial Intelligence, and a webcam or Raspberry Ri camera, it determines whether there's something wrong going on with your print in real time and can send you a notification or intervene by itself preventing equipment damage and wasted filament.
Check out Obico in action. Pay attention to the gauge at the bottom. Video from the official Obico youtube account.
If it sounds a bit too futuristic, that's what I thought at first too! While Obico is still learning, and she does make mistakes, she has already watched over 45,000,000 hours of prints, caught over 575,000 failures and saved over 10,000 spools of filament from being wasted. Moreover, this plugin gives you the ability to access your webcam from any device, as well as save time-lapses of your prints. A dedicated smartphone app works both on iOS and Android devices.
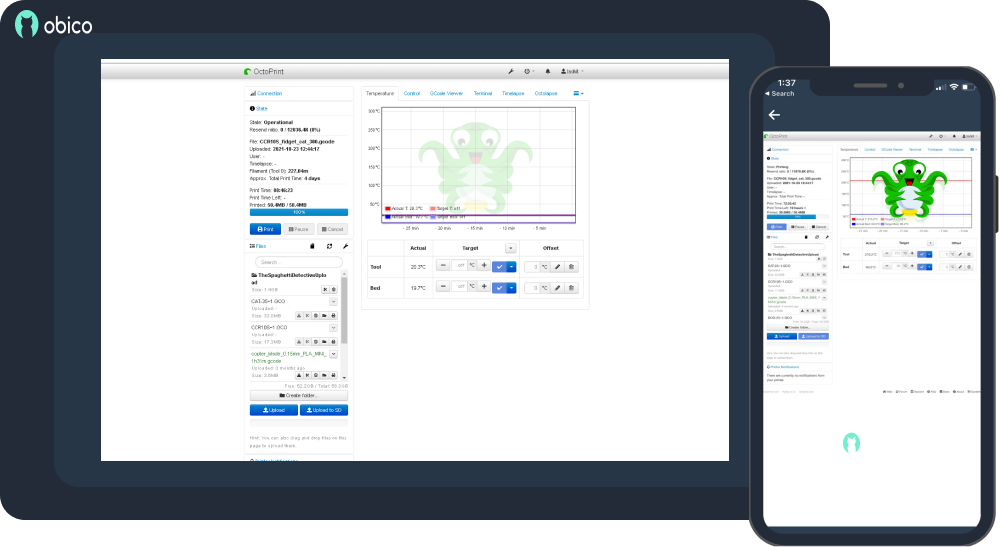
Obico remote control (Source: Obico page on OctoPrint Plugin Repository)
However, this plugin has one "but". It's open source, but to obtain additional features like e-mail support customization of the AI model you have to get a paid subscription from the official Obico website.
Recommended for:
- Recognising print fails in real time.
- Getting live feed of the printing process on your phone.
Created by:
Plugin #2: Bed Level Visualizer
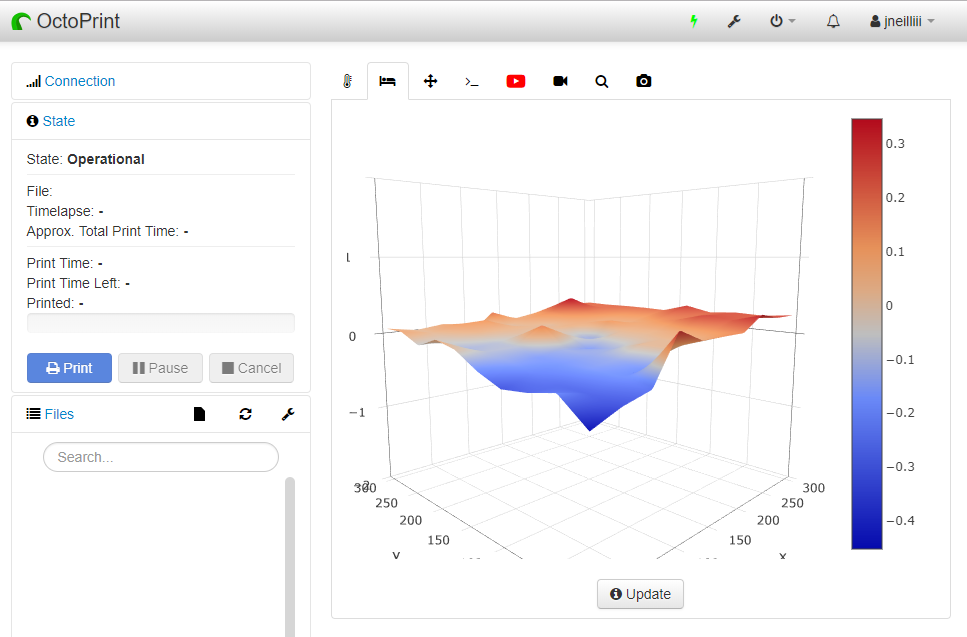 Bed Level Visualizer tab view (Source:Bed Level Visualizer page on OctoPrint Plugin Repository
Nothing is more important to get the perfect print than your printer’s bed. It’s surface needs to be spotless and levelled. If your printer has a mesh levelling feature, this OctoPrint plugin is one of the best tools for you.
The Bed Level Visualizer converts data from the bed topography report into a comprehensive 3D map. Thanks to that you get a visualization of the build plate.
Check out this user guide video to learn more.
Recommended for:
- Diagnosing any build plate issues, for example mechanical damage or wrong bed level.
Created by:
Plugin #3: OctoPrint-PrintTimeGenius

Time waits for no one, and every second counts when you have a bunch of prints queuing up.
PrintTimeGenius gives the most accurate estimation of the print time, using both gcode analysers and print history.
The plugin can include the bed and nozzle heating time in its calculations, as well as correct the print time during the process. It promises to get your time right to even seconds!
Recommended for:
- Precise estimation of printing time.
Created by:
Plugin #4: Octolapse
Time lapses are like a dash of magic in our technical world Octolapse is here to make an enchanting journey out of your print.
The plugin allows to move the extruder out of the frame and position the print bed at the same place each snapshot is taken. All the features are explained in-depth on the Octolapse project website
Play some copyright-free relaxing music in the background and share it with the world to see!
 Video made with Octolapse by WitdRoseBuilds
Recommended for:
- Making smooth and highly customable time-lapse videos that are a sight to behold.
Created by:
Plugin #5: DisplayLayerProgress
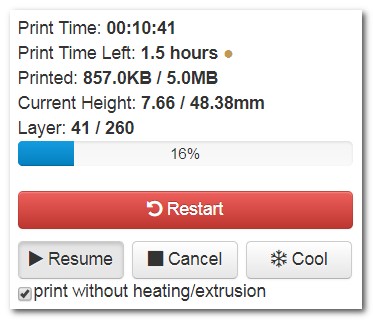 DisplayLayerProgress pop-up (Source: DisplayLayerProgress on OctoPrint Plugin Repository)
This plugin informs you of print layer progress, estimated end time and current height, all compressed into a simple progress bar.
The information that DisplayLayerProgress provides can be displayed on OctoPrint’s NavBar and as a tab title or as a pop-up. It even allows you to display progress percentage and current layer on the printer display itself!
Recommended for:
- Checking printing progress in real time.
Created by:
Plugin #6: Themeify
 Discord-inspired Dark Theme for OctoPrint (Source: Themeify on OctoPrint Plugin Repository)
When you’re done messing with the OctoPrint settings, there’s a room for adding a bit of personality to the interface.
Themeify lets you modify the colour palette and basically any other aspect of the browser display.
The community is having a lot of fun with this plugin, so if you’re interested in making your OctoPrint shine like a diamond, be sure to visit the forum thread.
Recommended for:
- Personalized app look, including colour, font types and sizes, etc.
Created by:
Plugin #7: Firmware Updater
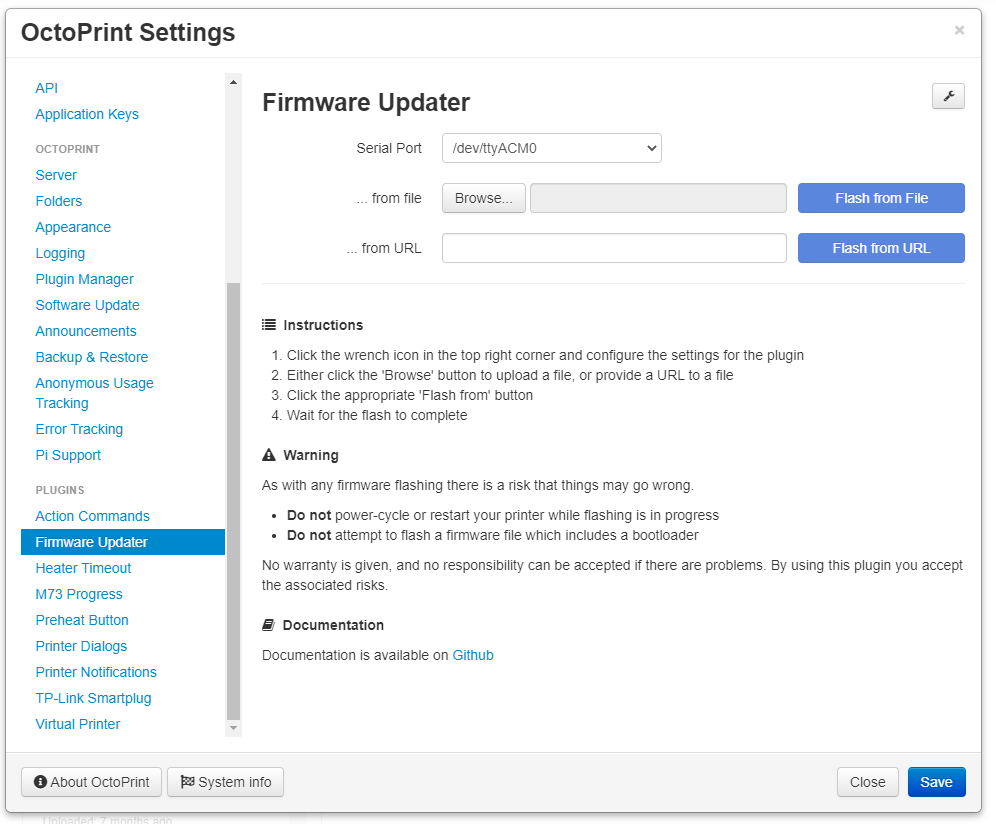
As the title name suggests, this tool updates your printer's firmware from OctoPrint.
Instead of getting printer-specific software or looking for a dedicated flashing program, this smart plugin aggregates many types of firmware, including boards used in Creality and Prusa printers.
Firmware Updater also allows to customize and configure flashing methods and run a gcode or system command before or after firmware update.
Recommended for:
- Flashing many types of printers and adding pre- or post-flashing commands.
Created by:
Ben Lye, Gina Häußge, Nicanor Romero Venier
Plugin #8: Navbar Temp
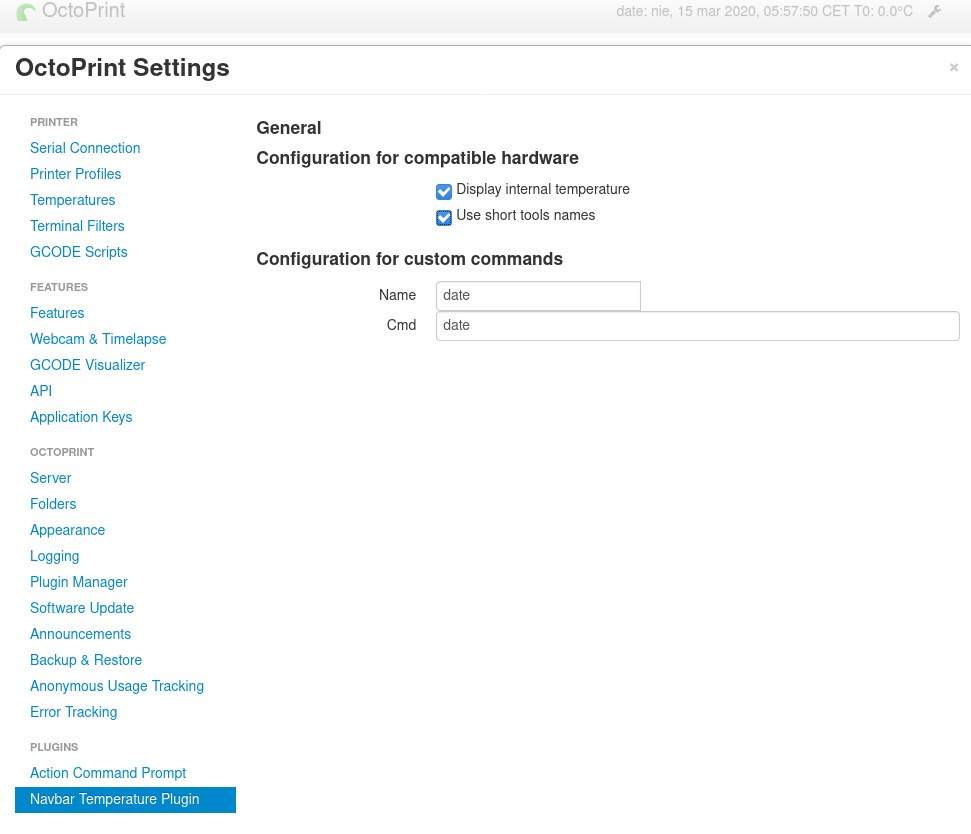 NavBar Temp plugin settings window Source: Navbar page on OctoPrint Plugin Repository)
The Navbar Temp tool displays bed, nozzle and SoC (Raspberry Pi’s chip) temperature on NavBar.
It is still in development, so as the authors say: “get ready for testing".
Recommended for:
- Checking temperatures on the printer and Raspberry Pi.
Created by:
Plugin #9: OctoPrint-Dashboard
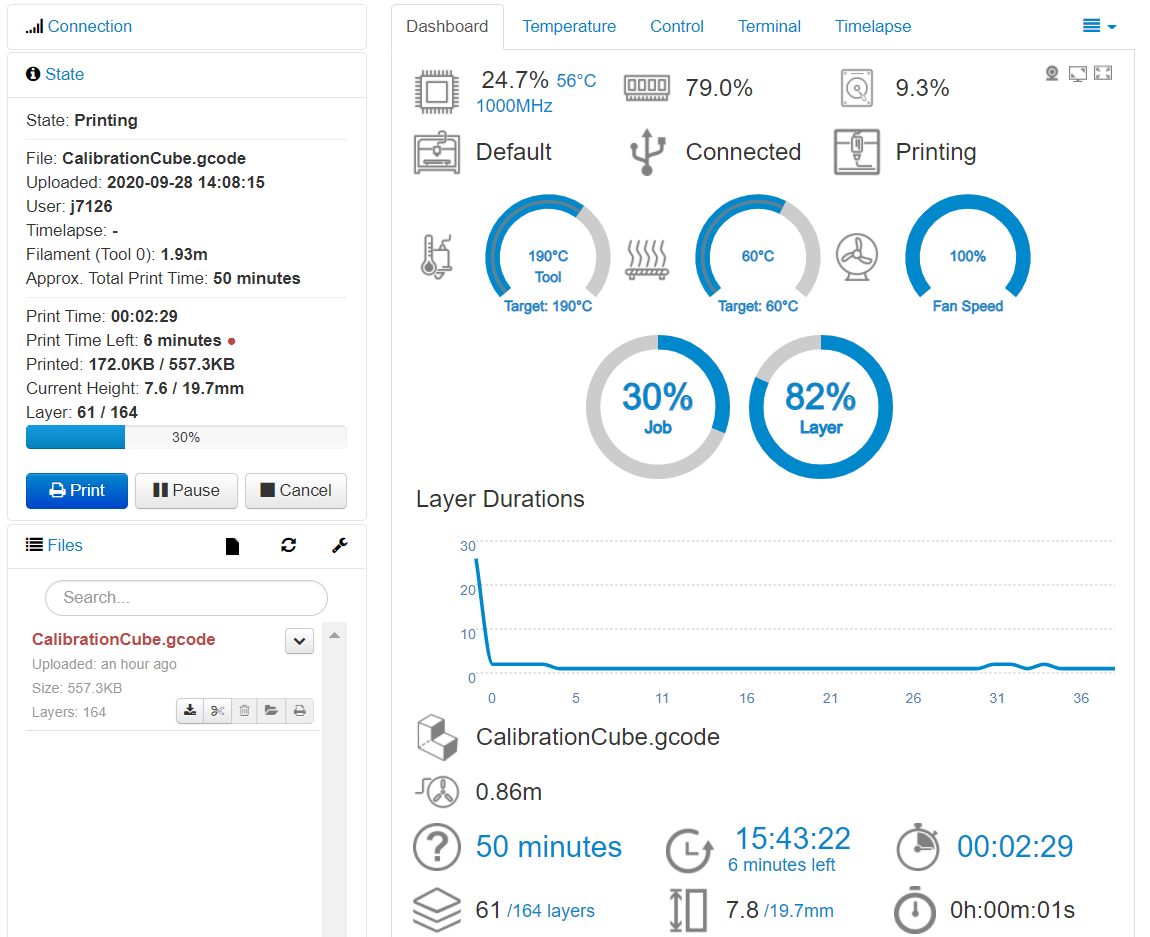 Dashboard’s user-friendly display (Source: OctoPrint-Dashboard page on OctoPrint Plugin Repository)
OctoPrint-Dashboard plugin gives you all the basic data of an ongoing print in a user-friendly and informative format.
In general, widgets include:
-
Temperatures readout
-
Print progress
-
Print time
-
Current layer and height
-
Webcam view
It can be accompanied with PrintTimeGenius and DisplayLayerProgress explained above.
Recommended for:
- Real time overview of a bunch of printing parameters.
Created by:
Stefan Cohen, j7126, Willmac16
Plugin #10: Creality 2x temperature reporting fix
Creality is renowned for making affordable desktop printers, but any Ender or CR series user knows all too well there is much space for improvement (and fun DIY’s!). With the release of v2 line, we receive a set of new “challenges" to overcome.
Creality 2x temperature reporting fix corrects temperature reporting for printers with new mainboard: Ender-3 Pro's, Ender-3 Pro v2, CR-6 SE and others.
Recommended for:
- Fixing readout errors for the new generation of Creality machines.
Created by:
Albert MN. @ SimplyPrint, b-morgan
Plugin #11: HeaterTimeout
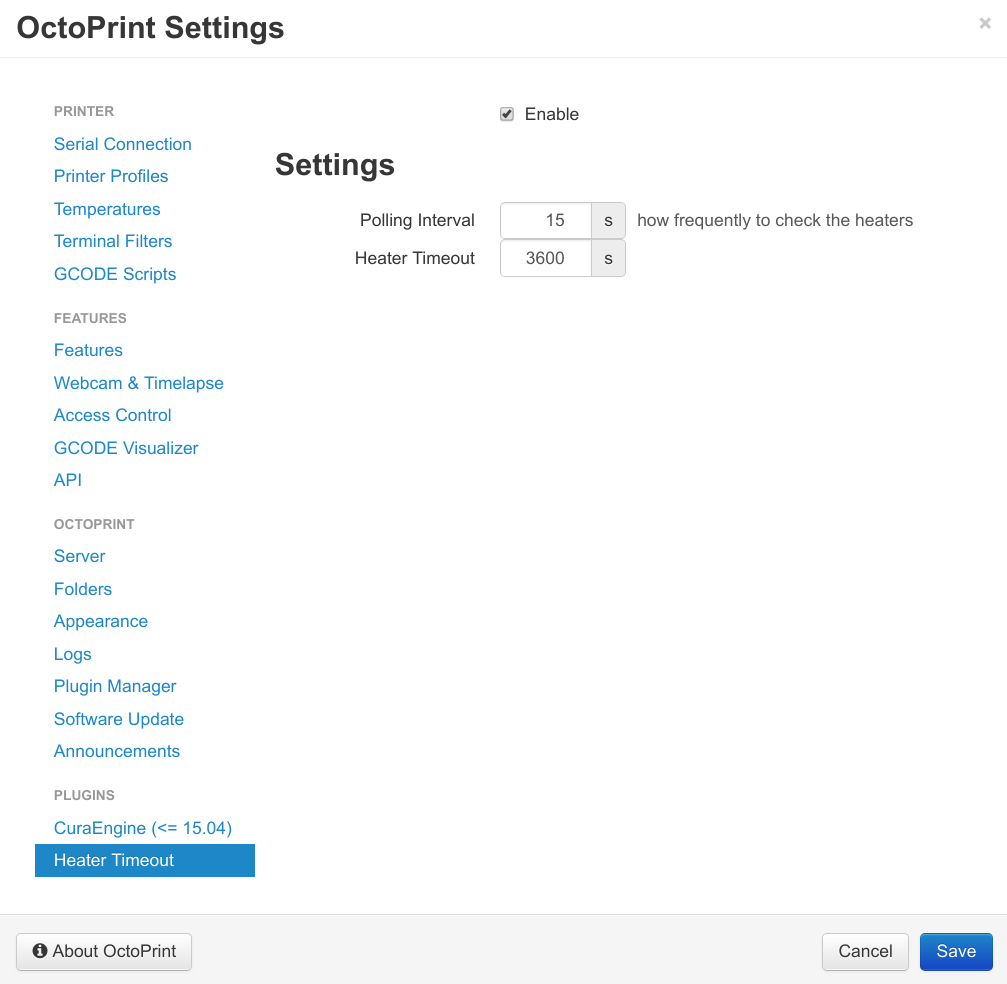
Configure Heater Timeout (Source: HeaterTimeout page on OctoPrint Plugin Repository)
Has the hot end of your 3D printer accidentally been left on? This is a serious issue as it can prove to be fire-hazard for your nozzle, your 3D printer and even your house. The good news is that HeaterTimeout has your back. Octoprint will turn off the heat to your printer bed and nozzle after a predefined amount of time has passed to prevent thermal runaway.
The plugin settings allow you to control how often the heaters are inspected.
Let's be honest, we all try our hardest to practice safe 3D printing, but mistakes do happen. It would almost be silly not to have this installed as a fail-safe because an overheated printer could potentially burn down your workspace or house.
Recommended for:
- As a final precaution against thermal runaway, this is an essential safety feature.
Created by:
Andrew Cherevatkin, Uriah Welcome
Plugin #12: GcodeEditor
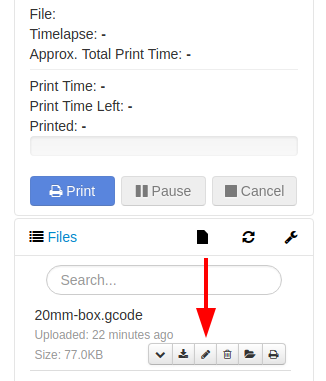
Gcode Editor plugin adds edit button in file list (Source: GcodeEditor page on OctoPrint Plugin Repository)
The next plugin on the list is called GcodeEditor, and it does exactly that. How many times has it happened to you that you sliced a model only to find that you have actually entered some wrong parameters. Maybe you wanted to print in PLA but selected ABS in your slicer. Or forgot to add a bed temperature when printing with ABS, or even just want to tweak the fan speed a bit. Well, in all these cases, you will have to reslice the model, unless there is a solution. The solution is GcodeEditor. This is one of the best OctoPrint plugins that enables you to make instant modifications to gcode files without having to re-slice the entire thing.
To access the Gcode editor, simply click the pencil icon that appears next to each file that has been loaded for printing. Simply scroll down and change the line that needs to be changed, then click the Save button.
Recommended for.
- Editing and making final or instant modifications to the Gcode of any file that's not printing.
Created by:
Plugin #13: Touch UI
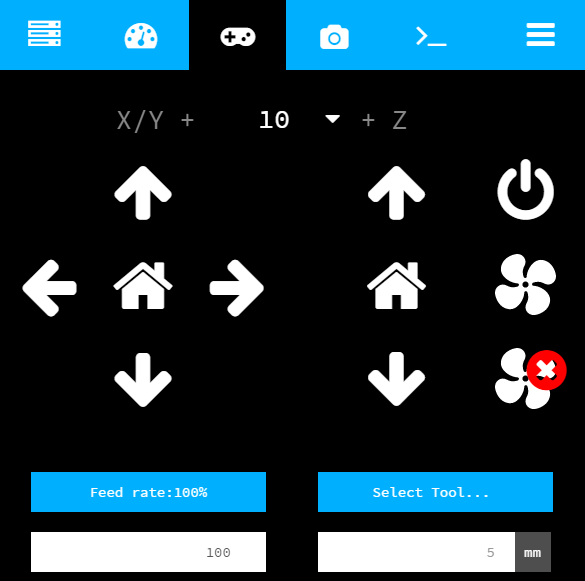
TouchUI control tab (Source: TouchUI page on OctoPrint Plugin Repository)
With the TouchUI plugin for OctoPrint, you can easily control your printer via a custom Graphic User Interface (GUI) that is installed on your display. This means you can use this plugin as a direct printer interface right beside your machine or on a smartphone/ tablet to use on the fly. You can use TouchUI to move and home your machine's axes, set temperatures, change the fan speed, and more.
Using the TouchUI platform, you can quickly check on your prints and have full control over your printer in an aesthetically pleasing interface.
Recommended For:
- Creating a nice compact touchscreen environment you can use right next to your 3D printer or your phone to help you control it.
Created by:
Plugin #14: Arc Welder
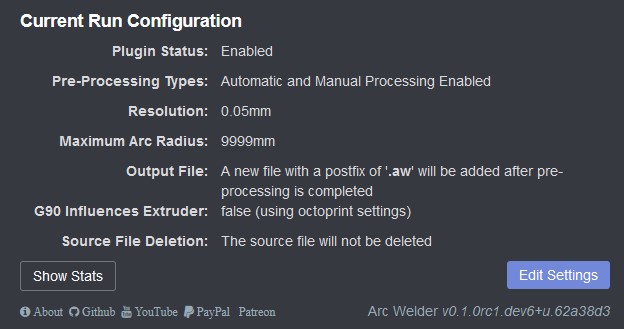
Arc Welder tab (Source: Arc Welder page on OctoPrint Plugin Repository)
3D printers used gcodes to take actions in order to print a part. Most commonly used gcodes are the G0 & G1 codes, used for linear movements, but sometimes G2 & G3 codes are also used for arc movements. Arc movements greatly help in the case of printing circular objects. Basically, it reduces the multiple linear movements required for regular gcodes with simpler arc movements. This substantially compresses the gcode file and also reduces stuttering due to tiny movements over a small space.
This is where the Arc Welder plugin comes in handy. This plugin takes different points that are straight lines in your 3D print and repurposes them to arcs using G2/G3 gcodes. The arc movements also means you get better print quality for round objects, faster print times, and more.
Recommended For:
- Speeding up 3D printing and producing smoother prints.
Created by:
Plugin #15: OctoPrint-BLTouch
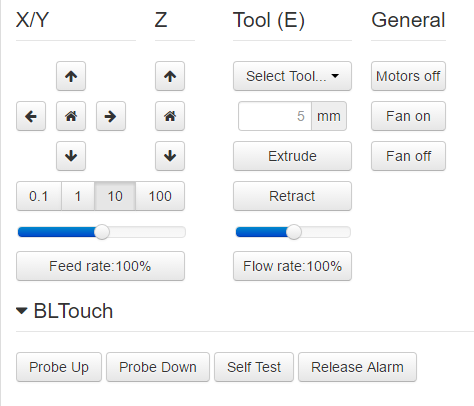
BLTouch controls (Source: BLTouch page on OctoPrint Plugin Repository)
For 3D printing, BLTouch sensors have gained a lot of attention in recent years because of their use in automatic bed leveling. OctoPrint-BLTouch plugin, while not adding any new features, allows you to control the BLTouch sensor through your OctoPrint interface.
Tasks such as elevating the probe pin or lowering the probe can be performed, as well as releasing the alarm and saving settings.
Basically, the OctoPrint-BLTouch plugin gives your OctoPrint control interface a digital version of these buttons, which hide the actual gcode commands. Since you no longer have to be close to your printer to use it, your BLTouch is much easier to manage and use.
Recommended for:
- Adding BLTouch controls to the Control tab using a simple plugin
Created by:
Plugin #16: Simple Emergency Stop
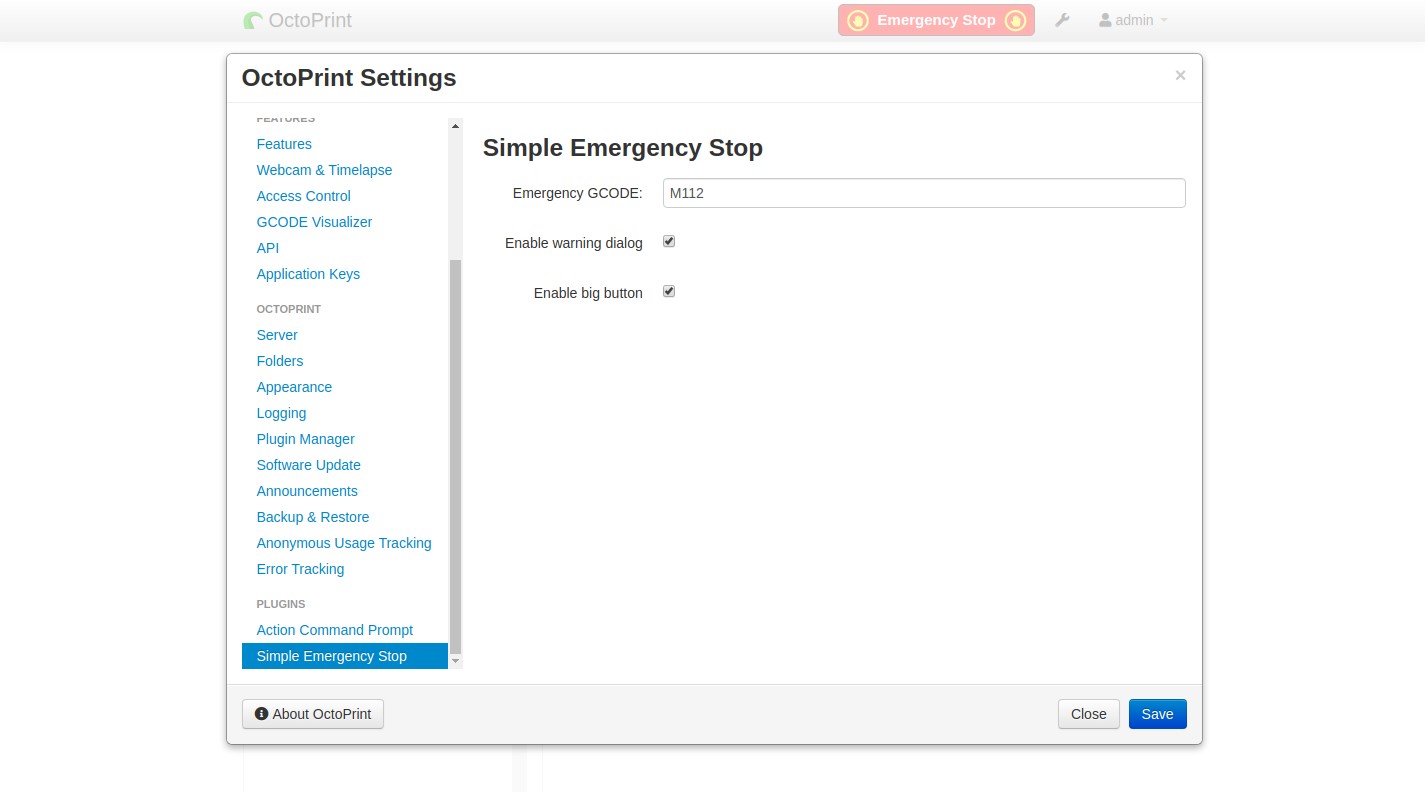
Simple Emergency Stop button on NavBar (Source: Simple Emergency Stop page on OctoPrint Plugin Repository)
This is a really simple plugin (sorry, couldn't resist). But using a 3D printer is rarely simple and easy. Often, prints do not go as planned, and the natural impulse is to STOP them right away.
And that's exactly what the Simple Emergency Stop plugin does! It adds an EMERGENCY STOP button to the OctoPrint interface's NavBar so that you don't have to spend time searching for the Stop button. The button has two size options: the big one or the little one.
If your print screws up, hit EMERGENCY STOP.
Recommended for:
- Adding an Emergency Stop button to the NavBar in case something goes wrong and you want to stop the print immediately.
Created by:
Plugin #17: OctoPrint-Display-ETA
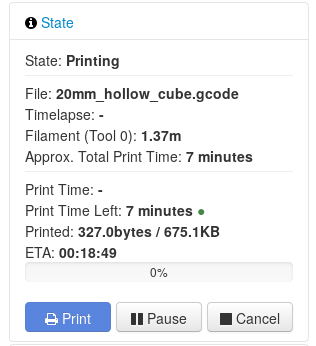
OctoPrint-Display-ETA status (Source: Display-ETA page on OctoPrint Plugin Repository)
The OctoPrint-Display-ETA plugin is a valuable addition to any printer's toolkit. Every user wants to know how much time is left until the task is done. Slicer software often has a print time estimate capability, however these estimations are rarely accurate. AlexVerrico and Pablo Ventura's clever Display ETA plugin estimates the time remaining to finish the print and does so fairly accurately.
Monitoring the print and seeing how far it has progressed is no longer a bothersome task.
Recommended for:
- Displaying the time required to complete the current as estimated by Octoprint.
Created by:
Plugin #18: OctoPrint-TPLinkSmartplug
TP-Link Smartplug editor (Source: TP link smartplug page on OctoPrint Plugin Repository)
TP link smartplug is a great home automation plugin that allows you to control your 3D printer through voice commands. To use this you will need the help of a WiFi smartplug from TP Link named KASA. Once you buy this device and install it, you will be able to control your 3D printer with voice commands over your smartphone through its app, and also through your Google Assistant or Amazon Alexa device.
This is especially useful if you are not around your 3D printer and want to turn it ON, or OFF. It also has a scheduling mode which lets you switch OFF your 3D printer after a pre-set time.
You can use multiple such devices and by naming different 3D printers with different names, you can switch them ON or OFF just by speaking the command followed by the name of the printer.
Recommended for:
- Using voice commands to remotely turn your 3D printer ON or OFF.
Created by:
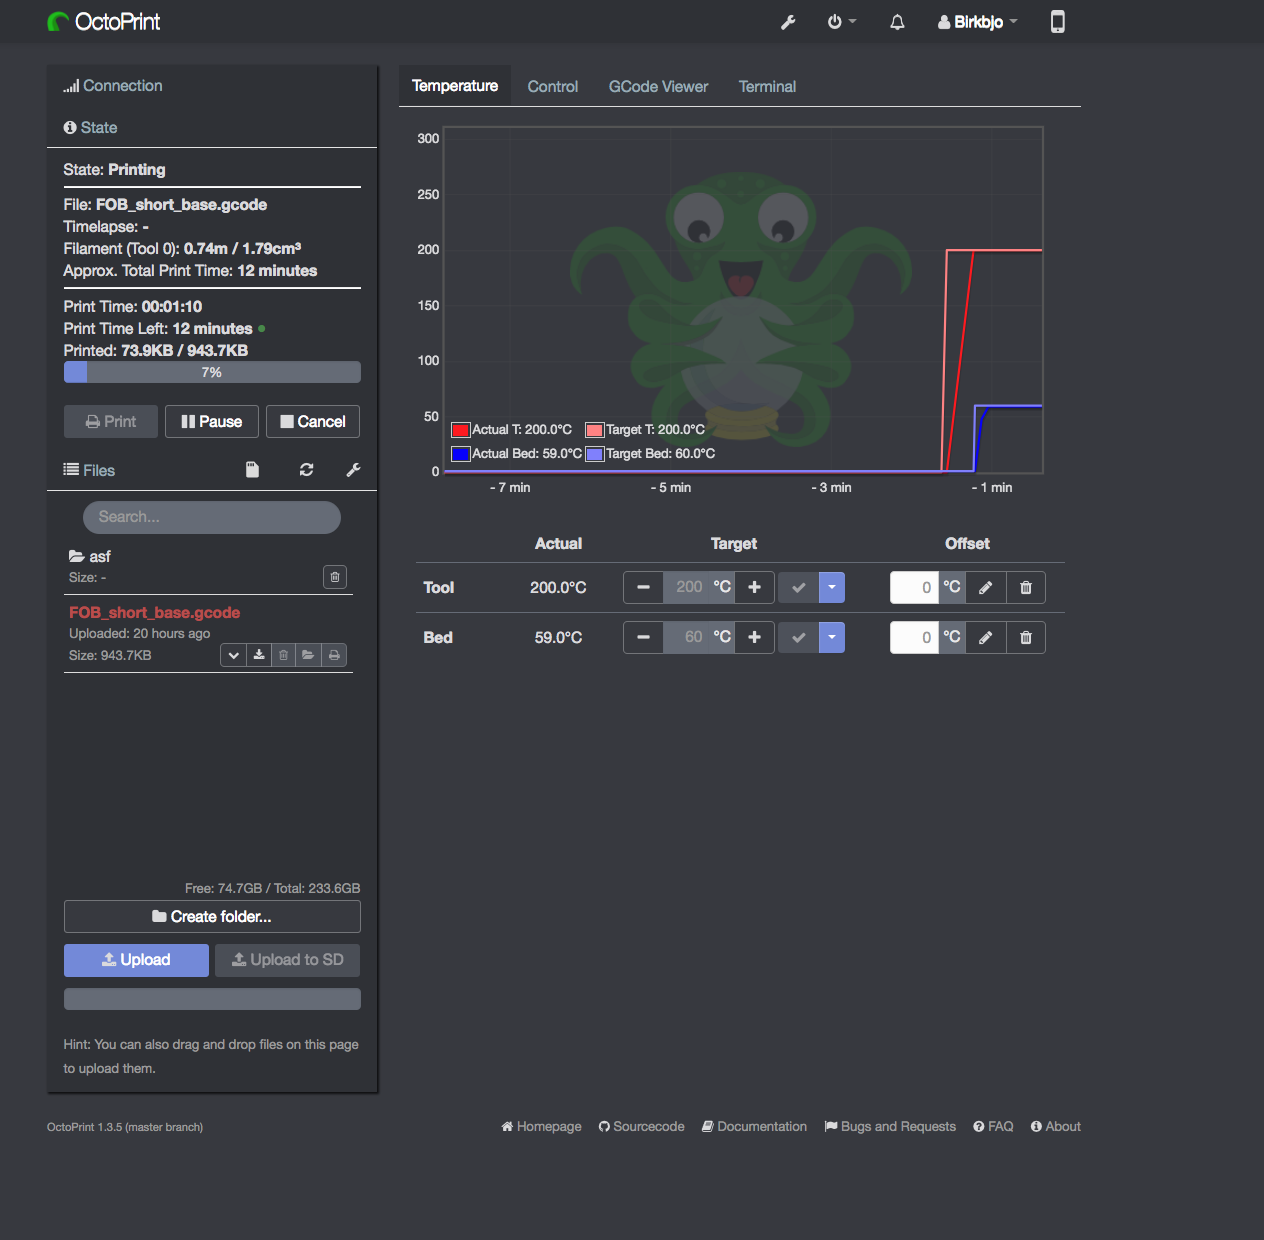
Plugin #19: OctoPrint-CustomBackground
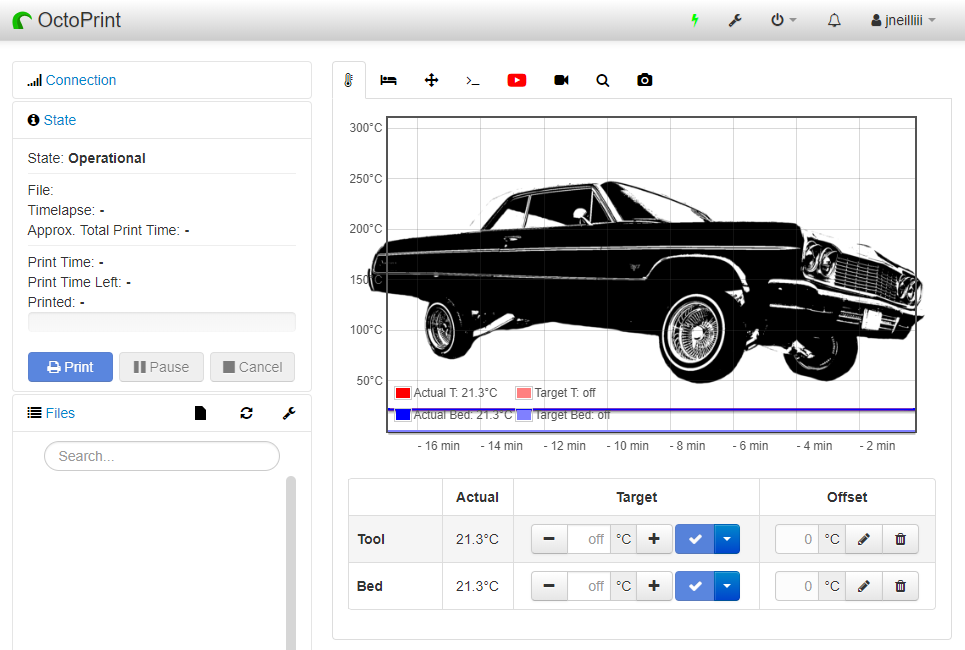
OctoPrint-CustomBackground (Source: CustomBackground page on OctoPrint Plugin Repository)
With OctoPrint-CustomBackground, you can change the image used as the background for the temperature output tab. You can replace the background image with a picture you clicked or created in any other picture app.
Using many printers? Add an image with the printer's name, what's being printed, and its location. With several printers, monitoring the Octoprint interface for each one of them can get confusing. But, with OctoPrint-CustomBackground, all of this information is easily accessible at a glance. Now that's quite handy.
You can choose whether the image fills the entire screen (the default) or just the center.
If you only have one printer, you can have some fun with the background images. You can use a picture of Darth Vader as your background if you want.
Recommended for:
- Changing the temperature graph's background image.
Created by:
Plugin #20: Exclude Region
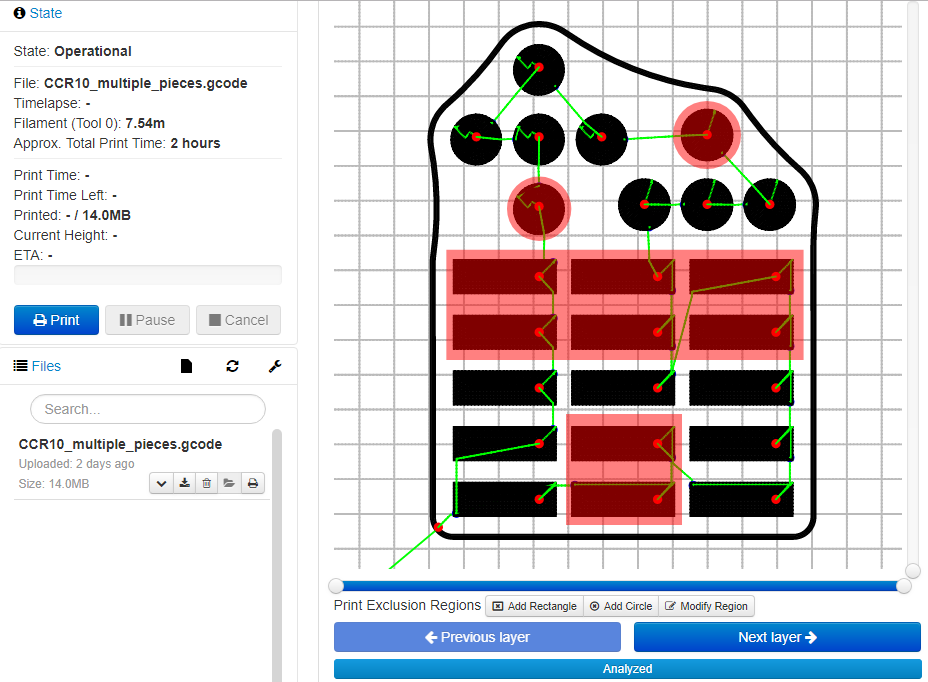
OctoPrint gcode viewer with Exclude Region plugin installed (Source: Exclude Region page on OctoPrint Plugin Repository)
Imagine a long running, multi-part print job only to have one of the parts fail half-way through. If you let the project continue, the spaghetti-like extrusions in the failed area will stick to other areas and cause additional failures or blemishes (as well as wasted filament). You may need to spend hours removing spaghetti by hand or gluing the failed part to the print bed, which creates toxic fumes.
Exclude Region plugin is here to save the day! With this plugin, you simply drag a box or select the failing part, and OctoPrint will ignore it thereafter and not print it. This saves filament and avoids spaghetti from ruining the other good parts. This is one of the most helpful 3D printing plugins you'll ever find.
Recommended for:
- Ability to prevent printing within rectangular or circular portions of the presently active gcode file.
Created by:
Plugin #21: OctoPrint-Enclosure
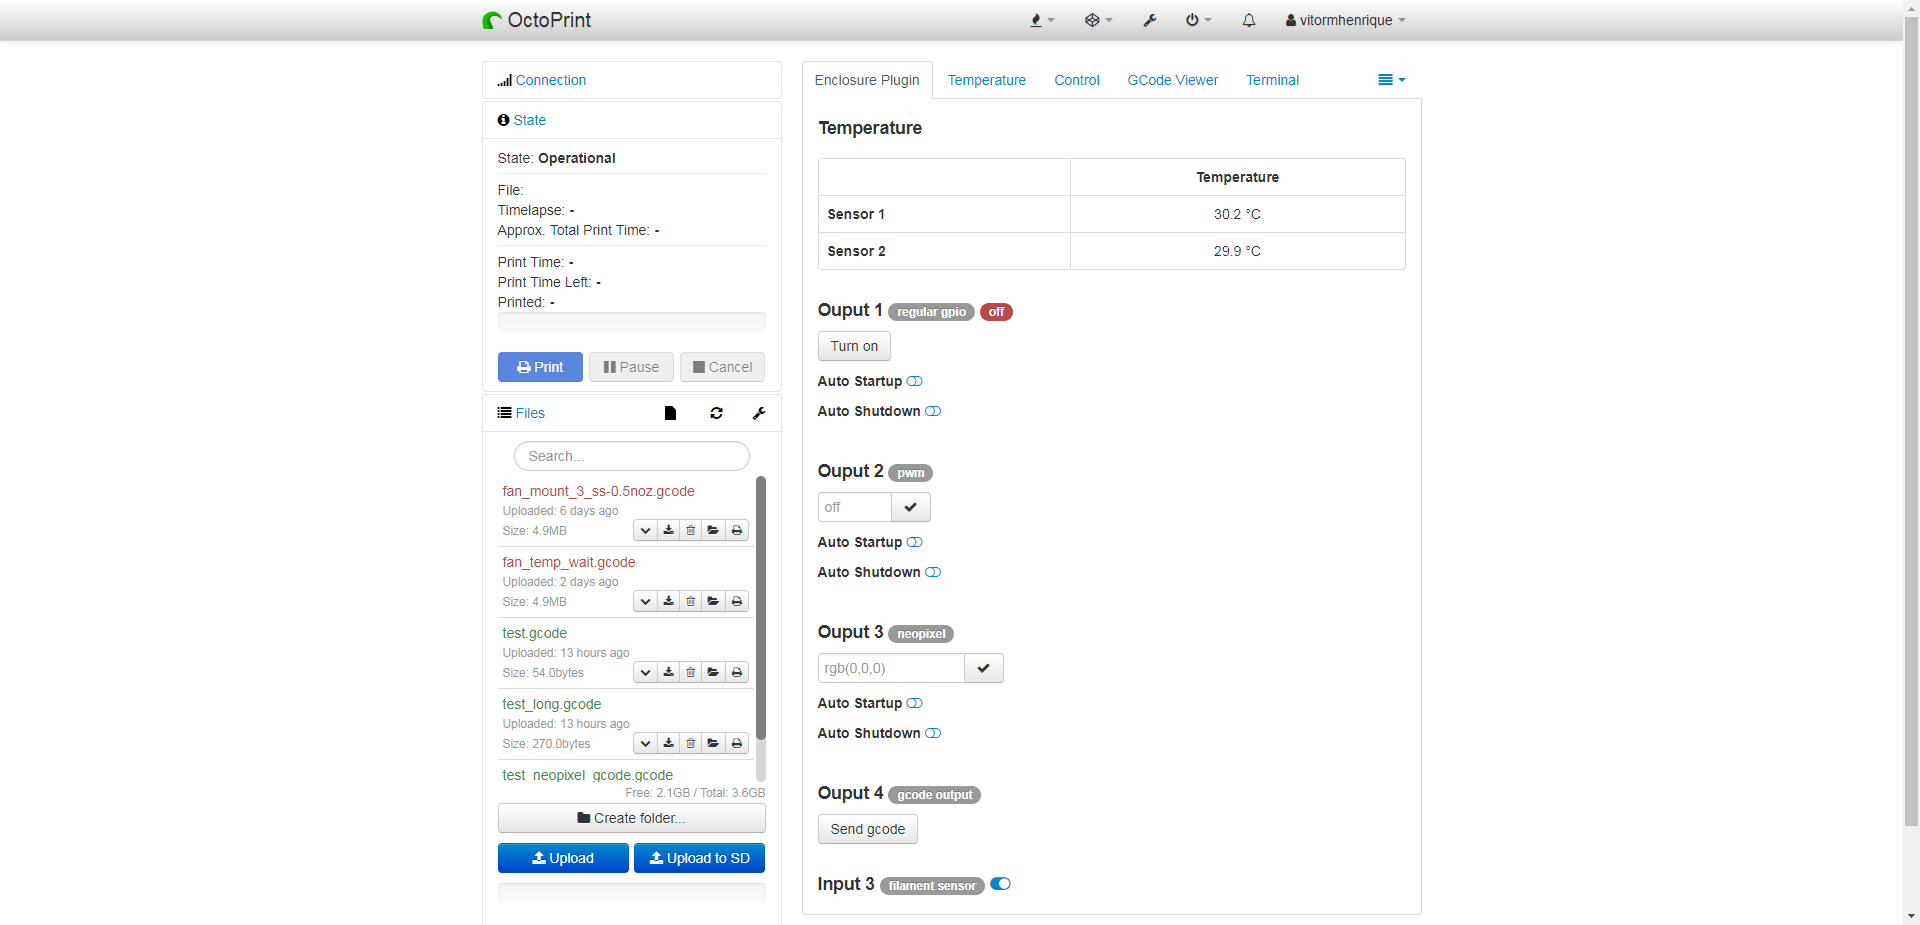
OctoPrint Enclosure main screen (Source: Enclosure page on OctoPrint Plugin Repository)
As of now, most 3D printers have a protective enclosure to keep dust and dirt out. There are numerous other uses for an enclosure, including lighting, heaters for the enclosure, which controls temperature, or even more sensors. Taking control of the printer's environment will always lead to better quality prints.
Despite this, most users are unable to utilize their enclosures to their full potential. In response, developers created the Enclosure plugin for Octoprint, which allows users to handle all enclosure activities such as lighting and switches. This plugin even controls the temperature and fan settings.
This plugin is very flexible and can take care of almost any part of your enclosure environment you can think of. This is a sure-fire way to boost the quality of your 3D prints.
The plugin currently only works with the Raspberry Pi.
Recommended For:
- Using Raspberry Pi GPIO to control the printer environment (temperature control, lights, fans, and filament sensor).
Created by:
How to get OctoPrint plugins?
To get the plugins, simply open the links provided, or browse OctoPrint plugin repository by yourself.
The installation process can be done via Plugin Manager built into OctoPrint or with a command line.
Plugin Manager gives 3 options to install a plugin: from the listed plugin repository (using search bar), from URL or from an archive stored in your hardware.
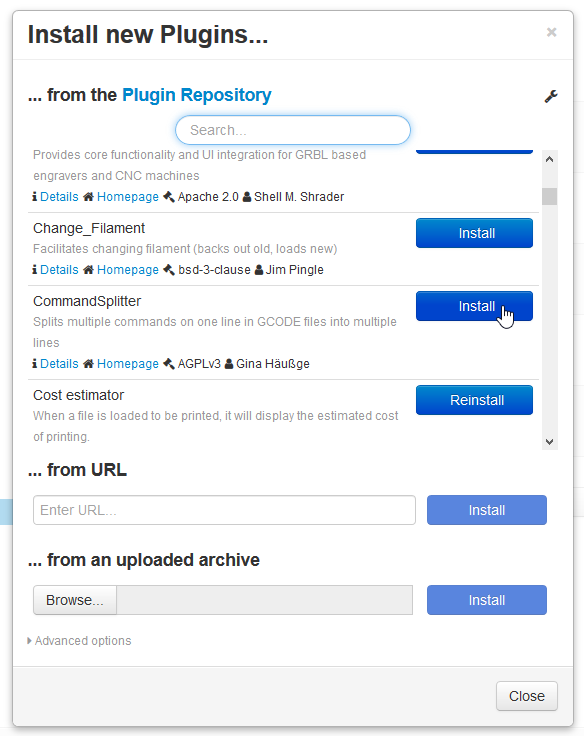 Plugin Manager Browser (Source: OctoPrint Help)
To install a plugin via command line, paste it into the command line of the host you installed OctoPrint on.
This wonderful video by Thomas Sanladerer can help you get through the process.
For more information see OctoPrint Help Page.