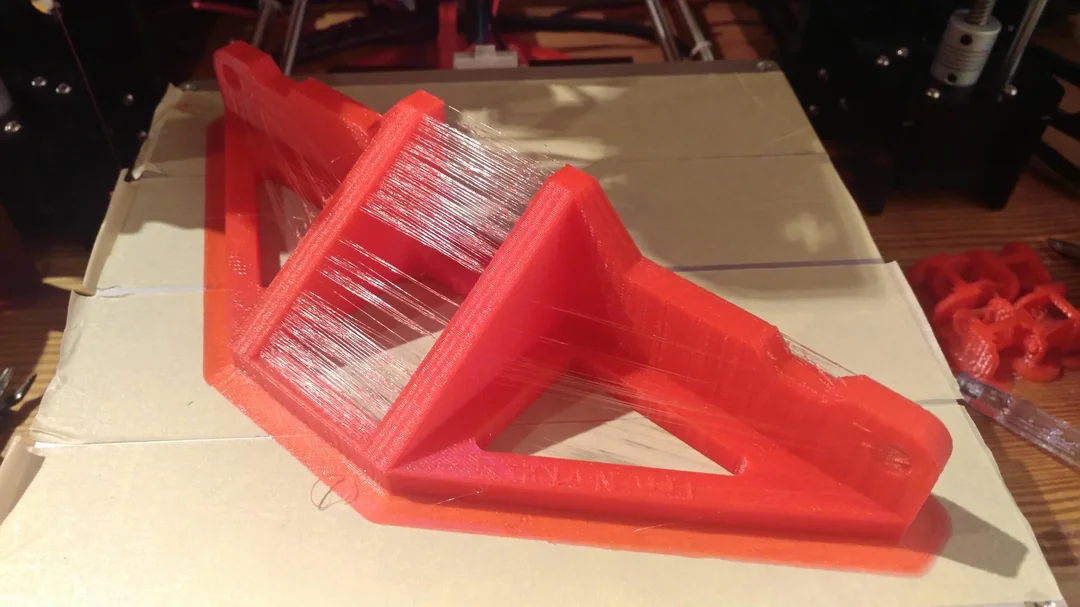
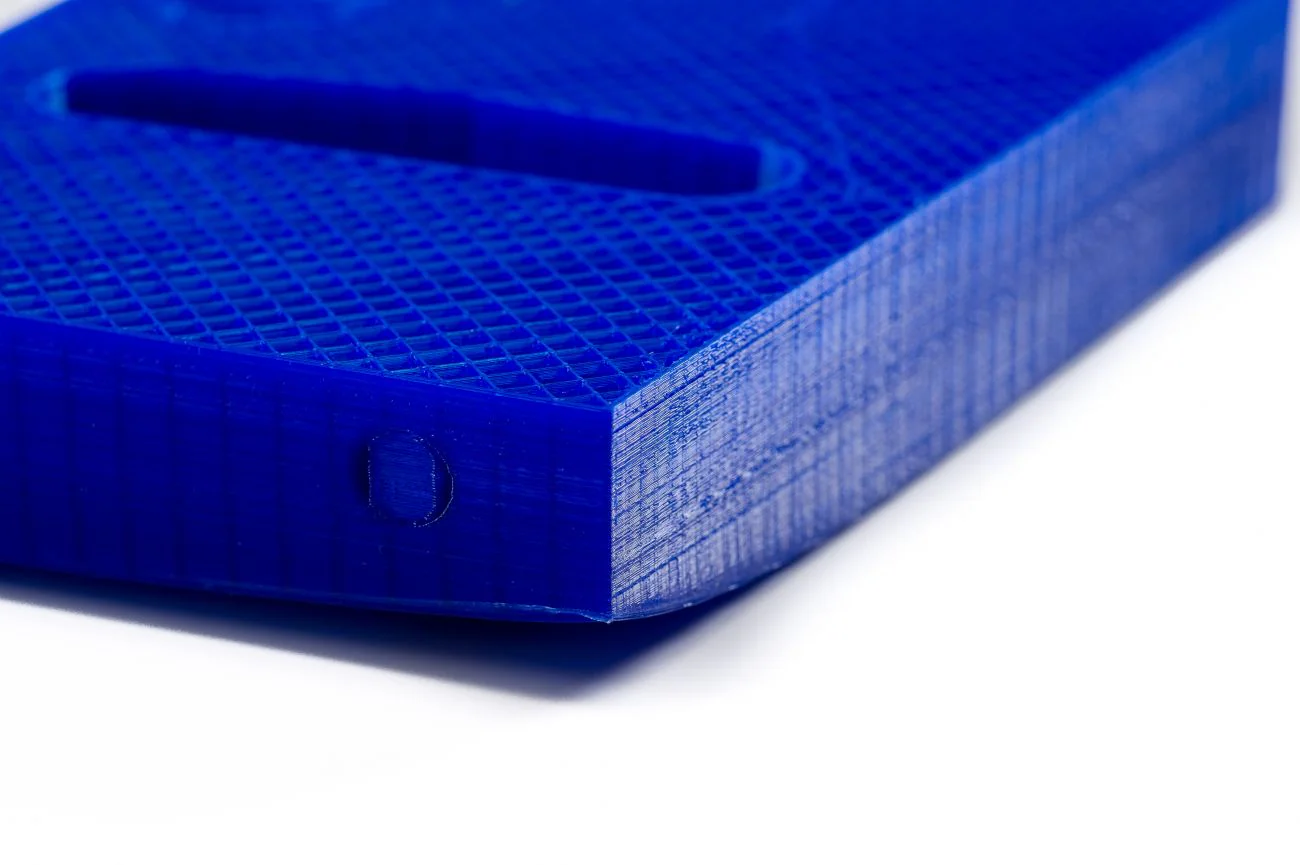
A obtenção de impressões 3D de alta qualidade depende fortemente da calibração precisa da impressora. Sem ela, você encontrará problemas comuns como formação de fios, má adesão da mesa e dimensões imprecisas. A calibração é a base para resultados de impressão consistentes, confiáveis e excelentes.
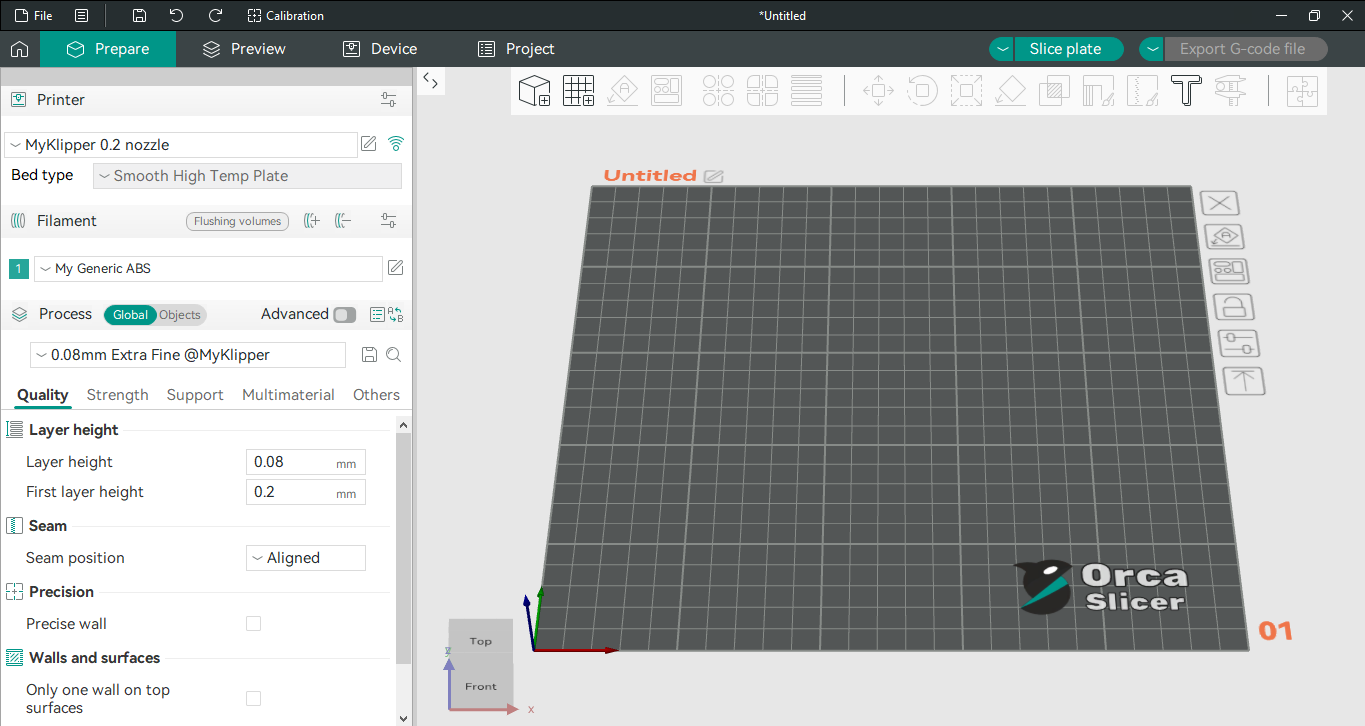
O OrcaSlicer é um software de fatiamento avançado e de código aberto com poderosas ferramentas de calibração integradas. Este guia ajudará você a usar as versões estáveis mais recentes do OrcaSlicer (normalmente a versão 2.3.0 ou as compilações noturnas recentes da 2.3.1) para ajustar sua impressora. Abordaremos as calibrações de temperatura, vazão, avanço de pressão, retração, tolerância, velocidade volumétrica máxima e artefatos finos verticais (VFA). Esses testes foram projetados para serem realizados em uma ordem específica, melhorando progressivamente a qualidade de impressão.
O OrcaSlicer oferece recursos avançados como controle preciso de paredes, "modo sanduíche" para melhor acabamento de superfície, "conversão de polifuros" para geometrias complexas e integração perfeita com Klipper, OctoPrint e PrusaLink. Ele oferece controle granular e, ao mesmo tempo, é fácil de usar, com design de arrastar e soltar e perfis de impressora pré-definidos.
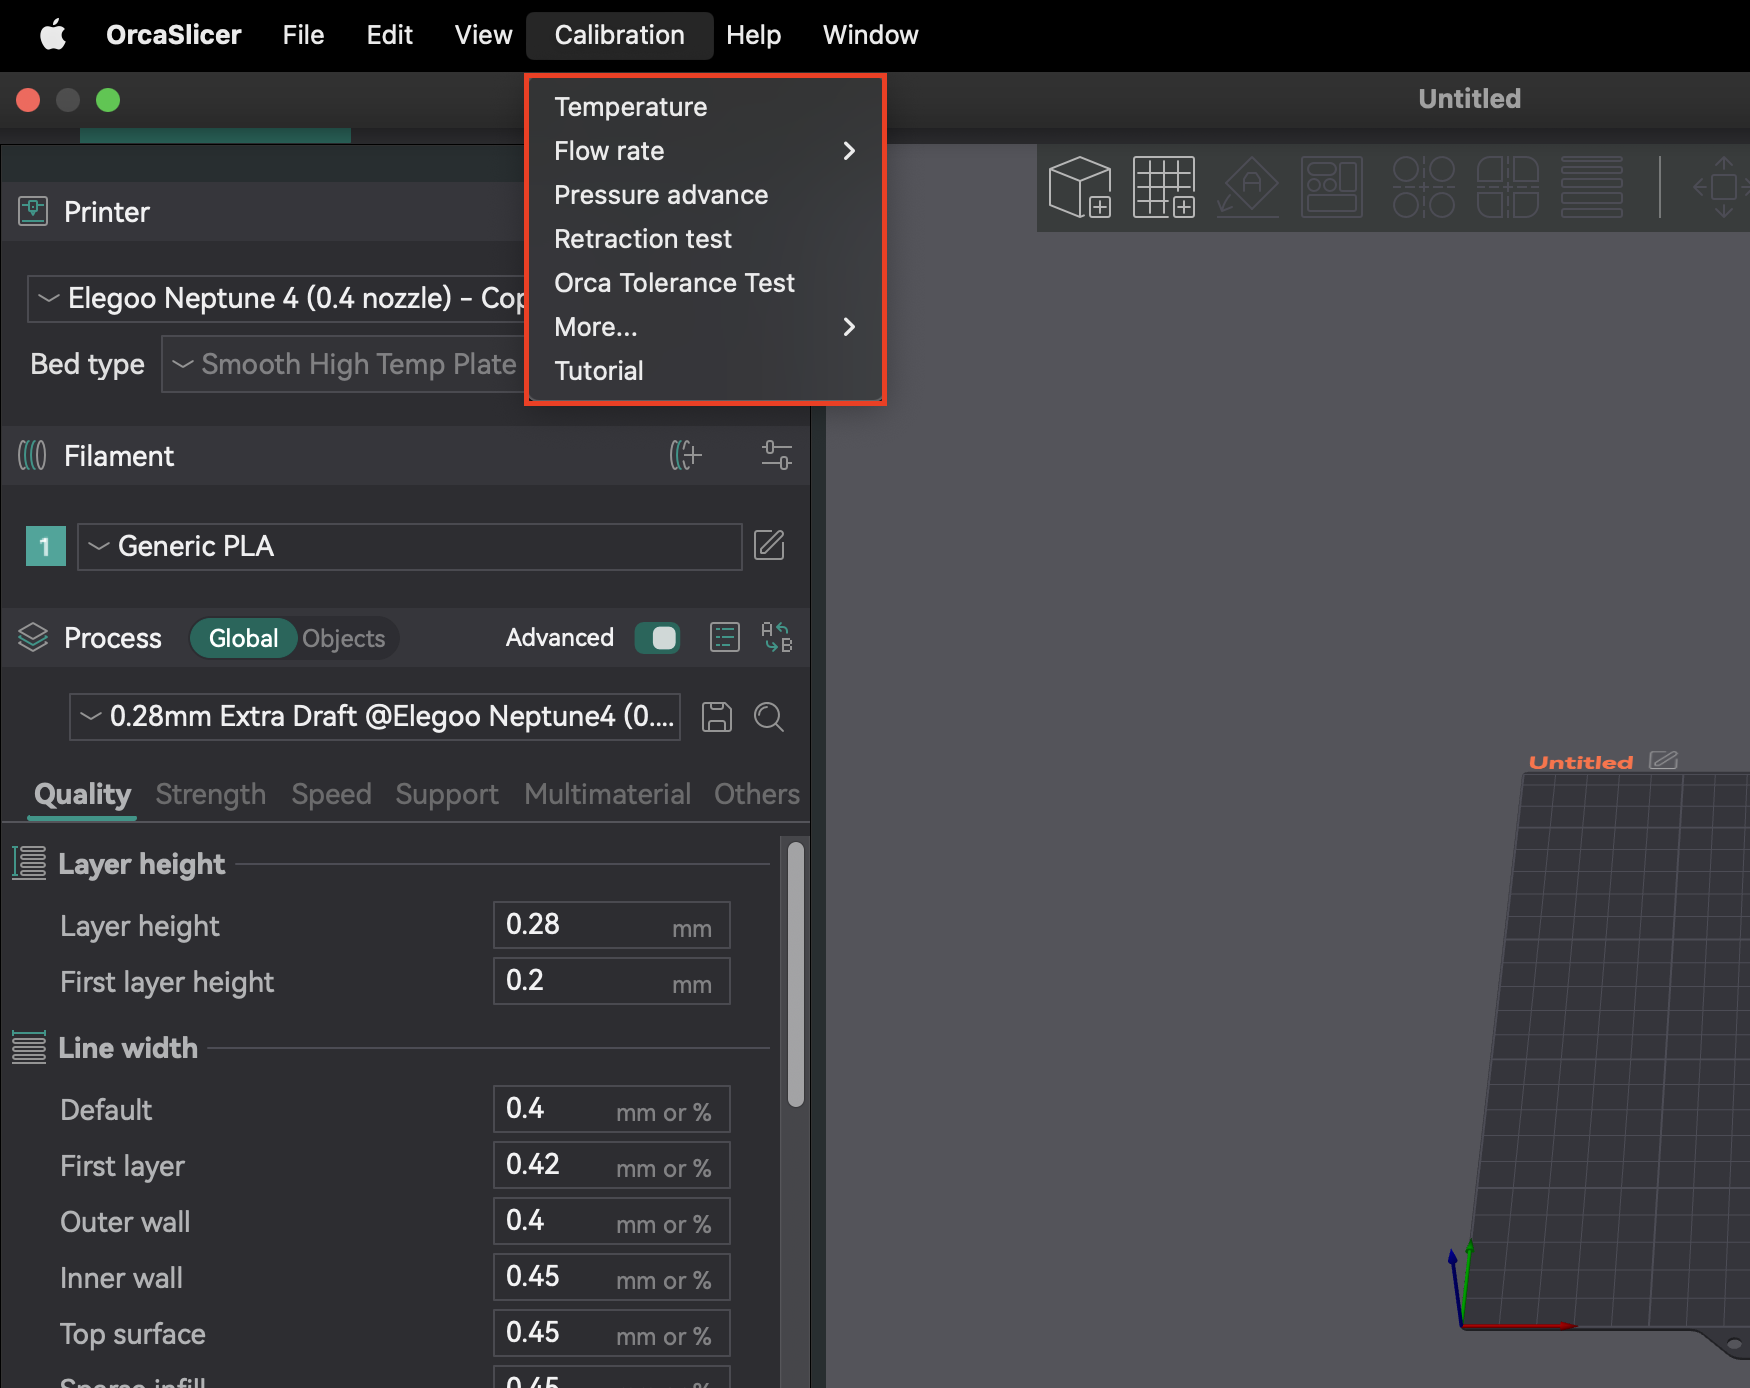
A maioria dos recursos de calibração está no menu "Calibração". Após concluir qualquer teste de calibração, sempre crie um novo projeto. Isso garante que o OrcaSlicer saia do modo de calibração e redefina os parâmetros para suas próximas impressões.
Seguir uma ordem de calibração específica é crucial, pois muitas configurações são interdependentes. Começar com parâmetros básicos garante resultados precisos para ajustes subsequentes mais detalhados. Essa abordagem sistemática minimiza a necessidade de solução de problemas e ajuda você a obter melhor qualidade de impressão com eficiência.
| Etapa de Calibração | Objetivo | Observação/Objetivo Principal | Dependência/Pré-requisito |
|---|
| Temperatura | Otimizar a fusão e a ligação do filamento | Menor formação de filamentos, melhor adesão de camadas | Nenhum (assume boa configuração mecânica) |
| Taxa de Fluxo | Garantir a quantidade correta de extrusão do filamento | Superfície superior mais lisa, sem lacunas ou bolhas | Temperatura, Etapas E/Distância de Rotação Precisas |
| Avanço de Pressão | Reduzir artefatos de flutuações de pressão do bico | Cantos mais afiados, extrusão consistente | Taxa de Fluxo, Temperatura |
| Retração | Minimizar a formação de filamentos e o escoamento | Menor comprimento com formação mínima de filamentos | Taxa de Fluxo, Avanço de Pressão |
| Tolerância | Reproduzir com precisão as dimensões do modelo | Encaixe ideal entre as peças impressas | Todas as calibrações dimensionais/de extrusão anteriores |
| Velocidade Volumétrica Máxima | Determinar a taxa de fluxo máxima do filamento sem problemas | Maior velocidade antes da subextrusão | Temperatura, Taxa de fluxo |
| Curvas/Solavancos/Desvio de junção | Redução de artefatos de cantos vivos | Cantos mais suaves, redução de zumbido | Taxa de fluxo, Avanço de pressão |
| Moldagem de entrada | Redução de zumbido e melhoria da qualidade de impressão | Superfícies mais suaves, redução de fantasmas | Taxa de fluxo, Avanço de pressão |
Tabela 1: Ordem de calibração recomendada do OrcaSlicer
Antes de usar as ferramentas avançadas do OrcaSlicer, certifique-se de que os sistemas mecânicos e térmicos fundamentais da sua impressora estejam configurados. Essas etapas geralmente são realizadas diretamente no firmware da impressora ou por meio de ajustes físicos, e não no OrcaSlicer. Ignorá-las pode causar problemas persistentes na qualidade da impressão.
O deslocamento Z define a distância precisa entre o bico e a plataforma de impressão para a primeira camada. É fundamental para a adesão à plataforma. Se o bico estiver muito alto, o filamento não grudará; se estiver muito baixo, pode raspar a plataforma, causar "pé de elefante" ou causar cliques na extrusora.
Este é principalmente um ajuste físico ou de firmware da impressora. Embora o OrcaSlicer tenha um campo de deslocamento Z (em Predefinições da impressora > guia Geral), entenda como o firmware da sua impressora lida com isso. A maioria das impressoras depende de ajustes físicos ou de firmware. Sempre execute a calibração de deslocamento Z na sua impressora primeiro. Use a configuração do OrcaSlicer apenas para pequenos ajustes se a sua impressora permitir o deslocamento Z definido pelo fatiador.
Uma cama de impressão nivelada garante uma adesão consistente da primeira camada em toda a superfície. Uma cama irregular faz com que algumas áreas adiram bem e outras se levantem. A OrcaSlicer oferece a "Malha Adaptável da Cama" para compensar pequenas imperfeições, mapeando a cama.
A malha adaptável da cama da OrcaSlicer é uma ferramenta de software, não um substituto para uma cama mecanicamente sólida e inicialmente nivelada. Confiar apenas em software sem nivelamento manual ou assistido inicial (por exemplo, método de papel) pode mascarar problemas mecânicos. Se a cama estiver significativamente deformada, a malha pode apresentar dificuldades. Primeiro, nivele a cama mecanicamente, depois defina o deslocamento Z e, por fim, deixe o nivelamento automático da impressora ou a malha adaptável da cama da OrcaSlicer fazer o ajuste fino.
Antes de ajustar a vazão no fatiador, certifique-se de que os passos E (Marlin) ou a distância de rotação (Klipper) da sua extrusora estejam calibrados. Isso indica à sua impressora a quantidade de filamento a ser empurrada. Se a calibração estiver incorreta, a impressora extrudará a quantidade errada, tornando a calibração da vazão do fatiador imprecisa. Esta é uma calibração de firmware da impressora, não uma configuração do OrcaSlicer.
Depois que as configurações básicas da impressora forem feitas, use os testes de calibração integrados do OrcaSlicer para otimizar a qualidade de impressão.
A temperatura afeta a forma como o filamento derrete, flui e se liga. Temperaturas muito baixas causam subextrusão, baixa adesão e peças fracas. Temperaturas muito altas causam vazamentos, formação de fios, deformações e bolhas.
A calibração precisa da temperatura depende do deslocamento Z prévio, do nivelamento da mesa e do ajuste do PID. Se estes estiverem incorretos, os resultados da torre de temperatura podem ser enganosos. Certifique-se de que sua impressora esteja mecanicamente em boas condições e com o PID ajustado antes de executar testes de temperatura para obter resultados precisos.
- Preparação: No OrcaSlicer, selecione o material (PLA, PETG, etc.). Isso define as faixas de temperatura padrão da cama e do bico. Acesse "Calibração" > "Temperatura". Defina as temperaturas inicial/final personalizadas (o incremento é fixo em 5 °C).
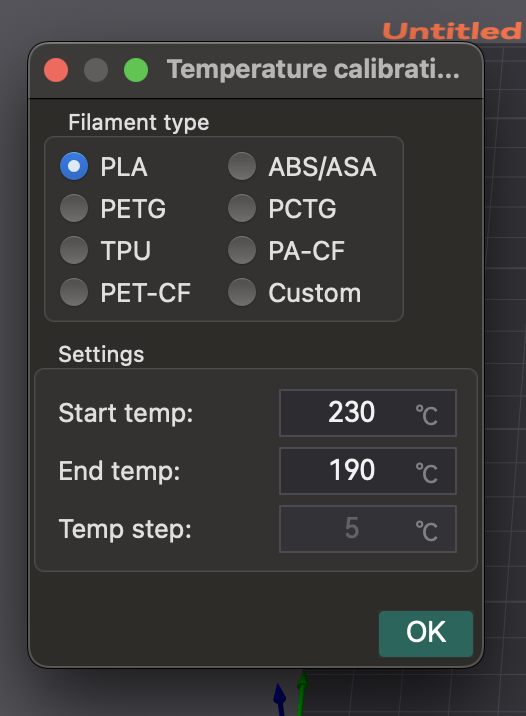
- Imprimindo a Torre: O OrcaSlicer gera uma torre de temperatura. Fatie e imprima.
- Analisando os Resultados: Após a impressão, inspecione cada camada quanto à formação de cordões, adesão de camadas, deformações e desempenho de saliência/ponte. Encontre o bloco de temperatura com a melhor qualidade geral de impressão e o menor número de defeitos.
- Aplicando Configurações: Atualize a temperatura ideal do bico nas configurações do seu perfil de filamento no OrcaSlicer. Salve o perfil e crie um novo projeto.
A temperatura é específica para cada filamento. Diferentes marcas ou cores do mesmo tipo de filamento podem ter diferentes faixas ideais. Realize este teste para cada novo filamento para criar uma biblioteca de perfis ajustados.
- Encordoamento/Escorrimento: geralmente significa que a temperatura está muito alta ou que as configurações de retração estão incorretas.
- Má adesão da camada/Subextrusão: a temperatura do bico costuma estar muito baixa.
- Deformação: pode ser devido a temperaturas incorretas da base/bico ou resfriamento insuficiente.
| Tipo/Marca de Filamento | Faixa de Temperatura Testada | Temperatura Ideal | Principais Observações na Temperatura Ideal |
|---|
| PLA (Genérico) | 190-230°C | 205°C | Mínimo encordoamento, forte adesão entre camadas, boas saliências |
| PETG (Prusament) | 230-250°C | 240°C | Superfície lisa, sem empenamento, boa ligação em ponte |
| ABS (Hatchbox) | 230-260°C | 245°C | Menor formação de trincas, boa ligação entre camadas |
Tabela 2: Configurações e observações da torre de temperatura
A vazão (multiplicador de extrusão) controla a quantidade de filamento extrudado. É crucial para superfícies lisas e precisão dimensional. Se for muito alta, ocorre superextrusão: bolhas, formação de fios, baixa precisão. Se for muito baixa, ocorre subextrusão: lacunas, adesão fraca, acabamento ruim.
A calibração da vazão depende muito da temperatura e dos passos E/distância de rotação. Se a sua extrusora não estiver calibrada, os ajustes da vazão no fatiador serão imprecisos. Certifique-se primeiro de que os passos E estejam corretos e a temperatura esteja ideal.
A altura da camada e a velocidade de impressão também podem afetar a vazão ideal. Se os limites de velocidade de impressão mudarem, execute a calibração novamente.
- Criando o Projeto de Teste: No OrcaSlicer, selecione as configurações da impressora, do filamento e do processo. Vá em "Calibração" > "Passo 1". Isso gera nove blocos, cada um com um modificador de vazão diferente.
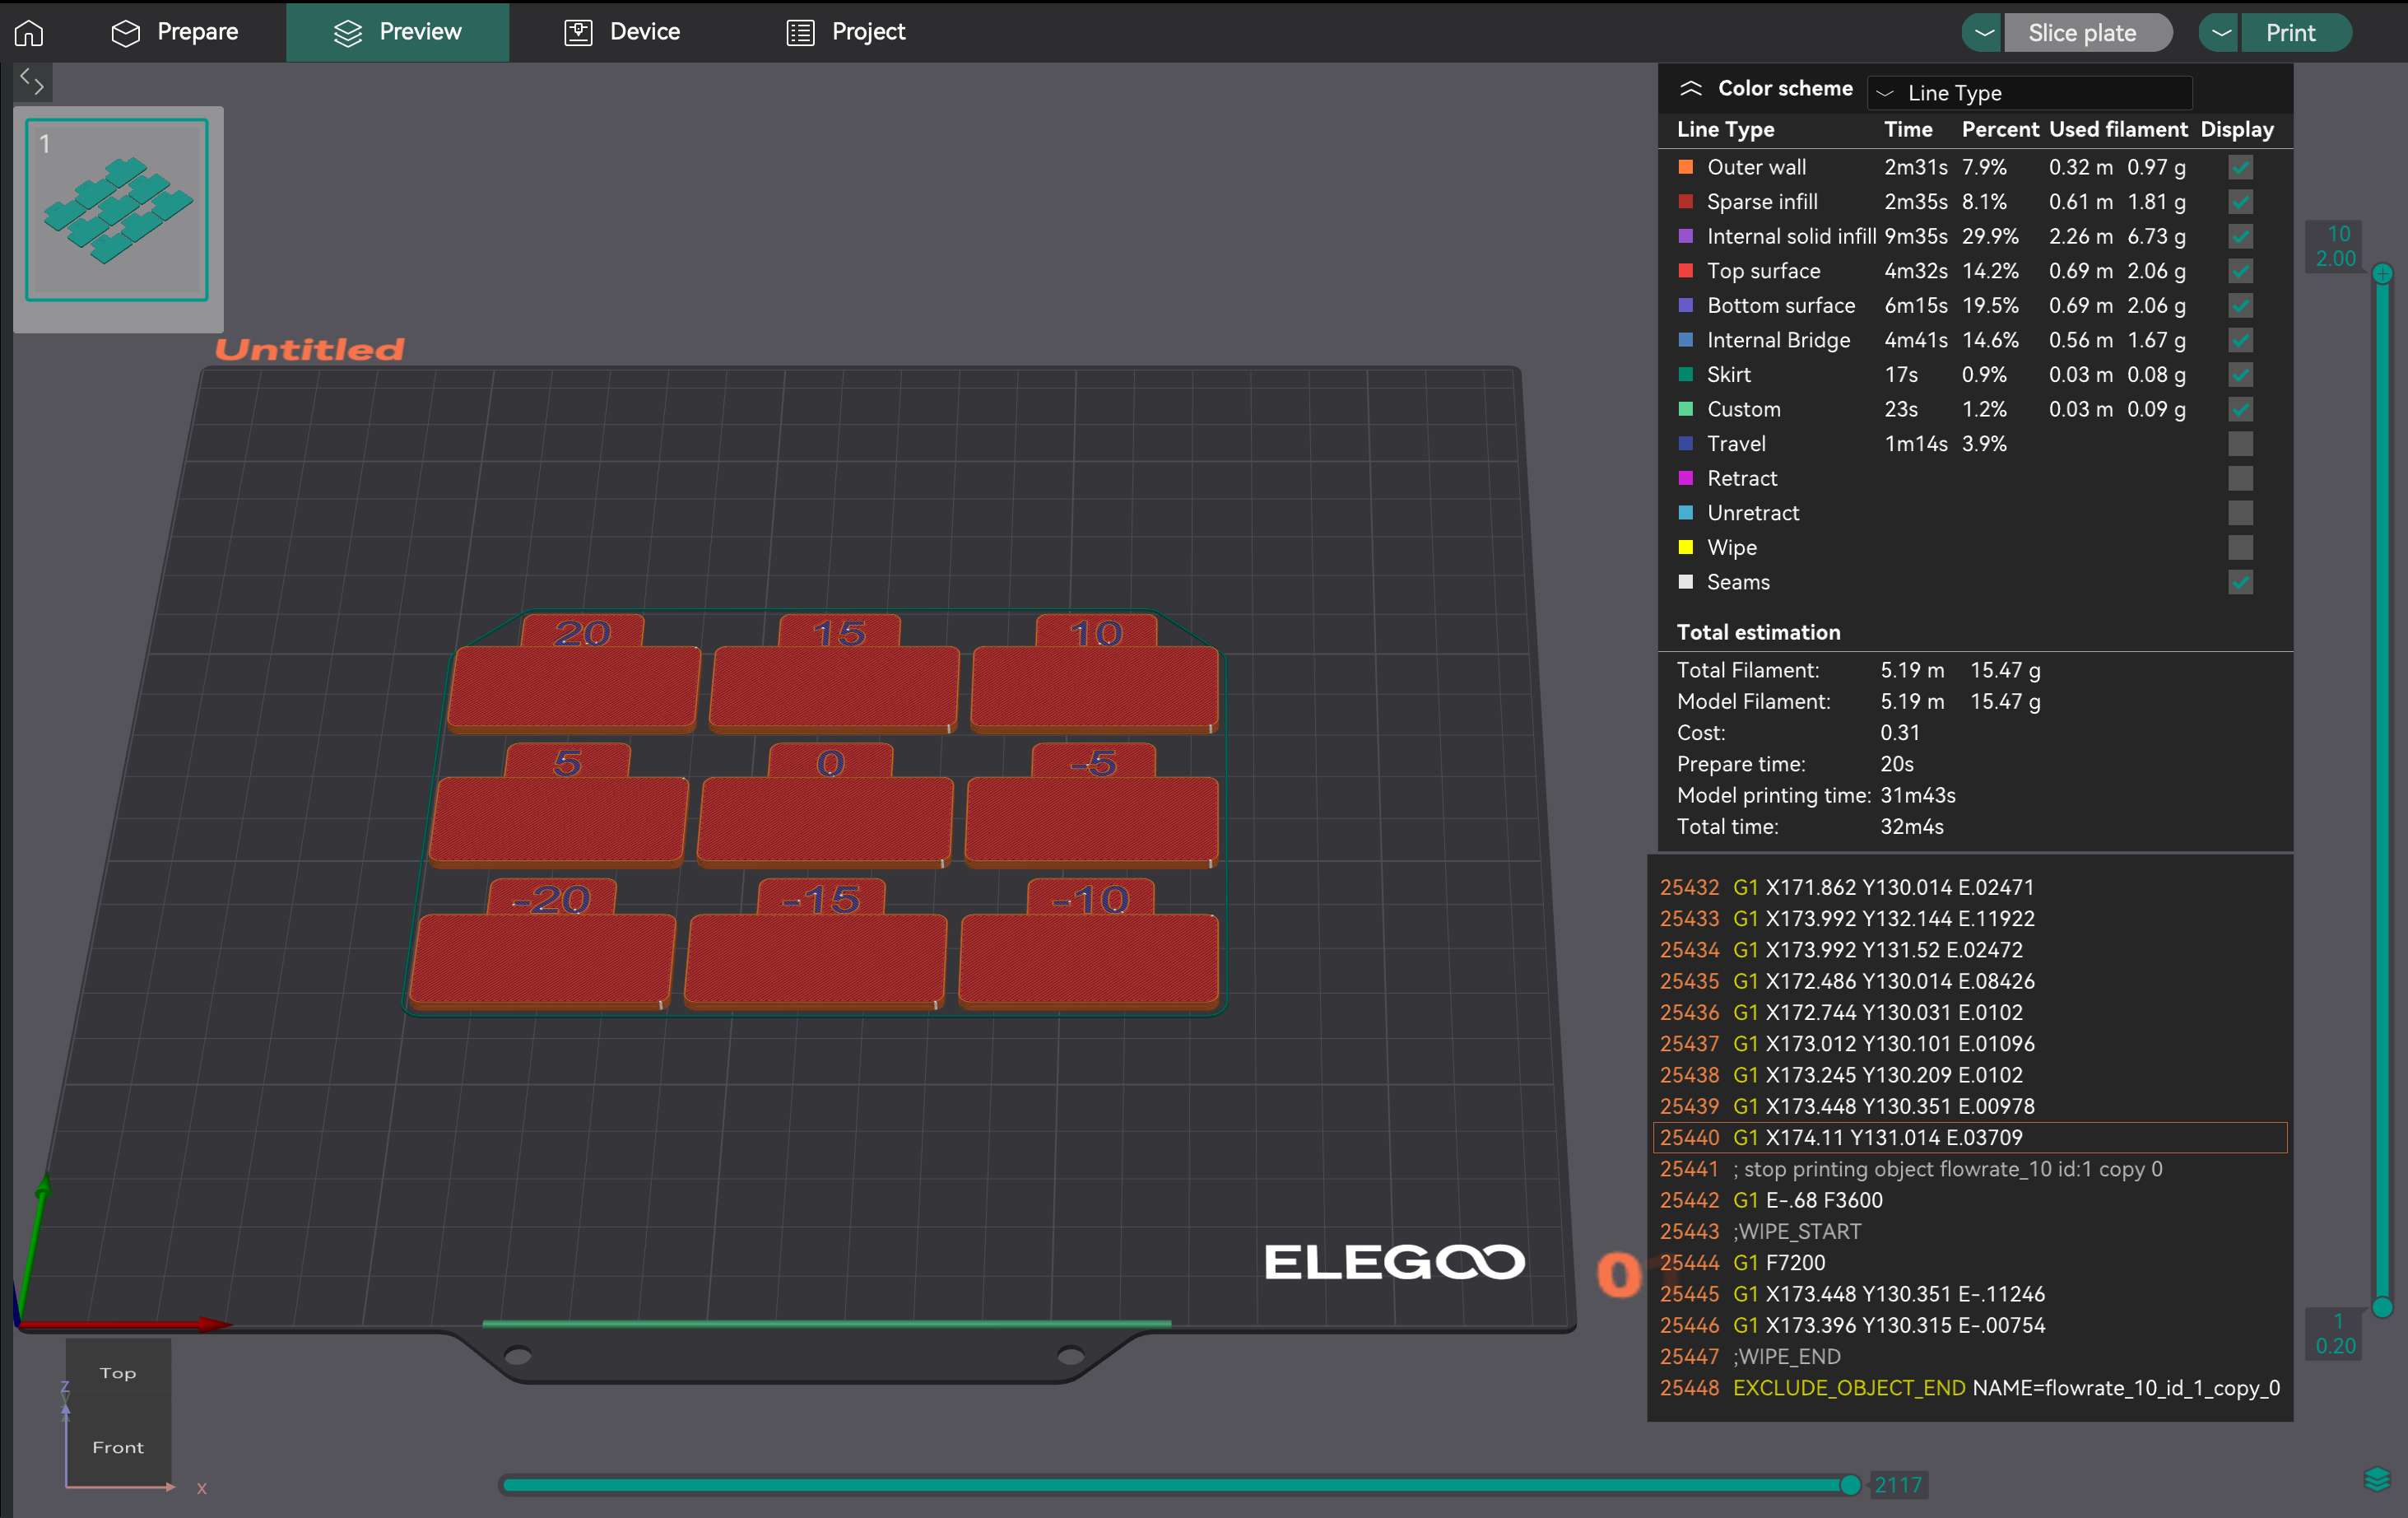
- Analisando a Superfície Mais Lisa: Imprima o projeto. Examine as superfícies superiores. Encontre o bloco com a superfície mais lisa, livre de sobreextrusão (sulcos, bolhas) ou subextrusão (lacunas). Se dois forem semelhantes, escolha aquele com a maior vazão.
- Calculando a Taxa de Vazão: Calcule Taxa_de_Vazão_nova = Taxa_de_Vazão_antiga * (100 + modificador) / 100. Exemplo: 0,98 * (100 + 5) / 100 = 1,029.
- Gerando o Projeto de Ajuste Fino: Crie um novo projeto. Vá em "Calibração" > "Passo 2". Isso gera dez blocos com modificadores de -9 a 0 para ajustes precisos.
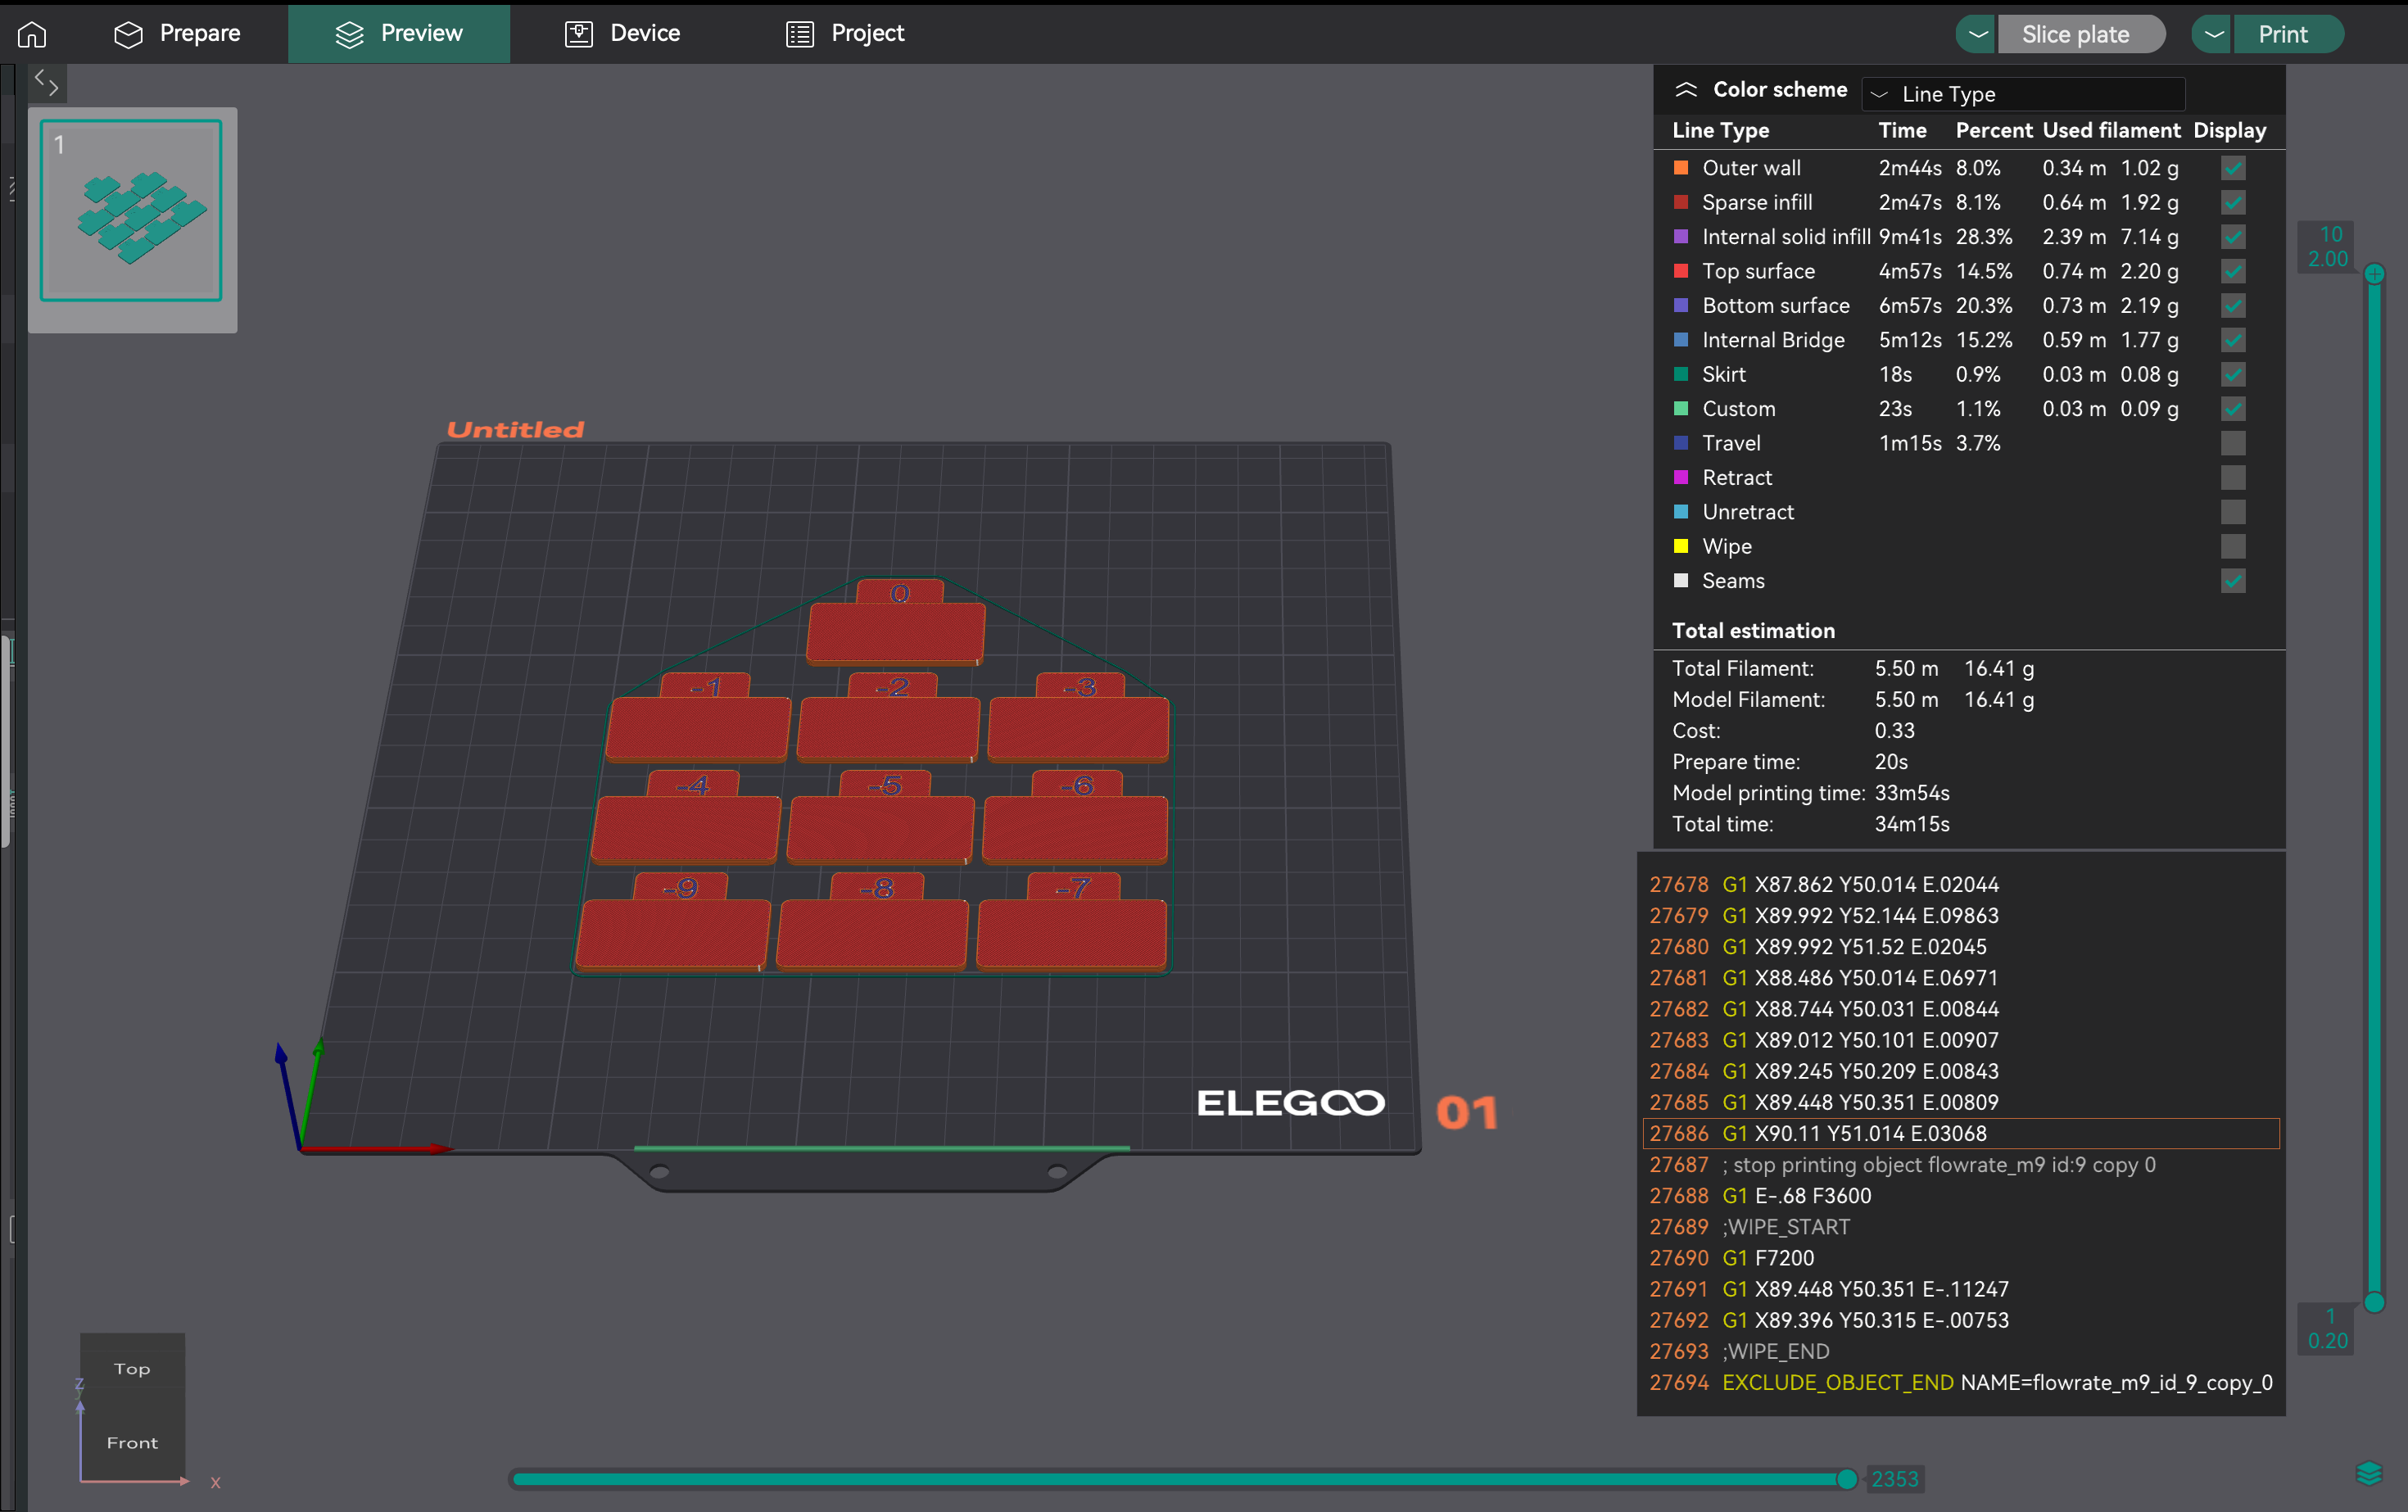
- Avaliando a Consistência: Imprima o Passo 2. Examine as superfícies superiores para obter a melhor qualidade, adesão das camadas e consistência. Calcule a taxa de fluxo atualizada usando a mesma fórmula. Exemplo: 1,029 * (100 - 6) / 100 = 0,96726.
- Aplicando as Configurações: Salve a taxa de fluxo ideal final nas configurações do seu perfil de filamento no OrcaSlicer.
Você pode achar os resultados da calibração de fluxo integrada do OrcaSlicer "terríveis" e exigir intervenção manual. Isso indica a necessidade de orientação de "metacalibração": como solucionar problemas no próprio processo de calibração.
-
Extrusão excessiva/arrasto inicial: Isso pode significar que a temperatura de impressão está muito alta ou que os passos E/distância de rotação não estão calibrados. Verifique novamente os passos E antes de executar novamente a calibração de fluxo.
-
Clique na extrusora: Muitas vezes significa que a temperatura está muito baixa para o fluxo desejado, fazendo com que o motor da extrusora falhe. Aumente ligeiramente a temperatura do bico ou diminua a velocidade volumétrica máxima (abordada posteriormente) antes de tentar novamente a calibração de fluxo.
-
Inconsistência/Resultados ambíguos do teste: Se as impressões de calibração parecerem ruins, mas outras impressões estiverem boas, considere:
-
Velocidade de impressão do teste: A velocidade padrão pode estar muito alta. Tente diminuir a velocidade das impressões de calibração.
-
Configurações de largura de linha: Se a largura da linha (nas configurações do processo) for muito grande para o seu bico, isso pode causar extrusão excessiva. Certifique-se de que as larguras sejam adequadas (por exemplo, 0,45 mm para um bico de 0,4 mm).
-
Subjetividade do Teste Visual: A avaliação visual pode ser subjetiva. Para resultados mais objetivos, imprima um cubo de parede única:
- Imprima um cubo de parede única (por exemplo, 20x20x20 mm, 0% de preenchimento, 1 perímetro).
- Meça a espessura da parede com um paquímetro.
- Calcule a espessura de parede desejada (por exemplo, 0,4 mm para um bico de 0,4 mm).
- Ajuste a taxa de fluxo: Nova taxa de fluxo = Taxa de fluxo atual * (Espessura de parede desejada / Espessura de parede medida).
- Persistência de problemas: Se a calibração de fluxo falhar consistentemente, uma calibração anterior (temperatura, passos E/distância de rotação ou problemas mecânicos) provavelmente ainda está incorreta. Não prossiga para Avanço ou Retração de Pressão até que o fluxo esteja regulado de forma confiável.
| Aprovado | Faixa do Modificador | Número de Blocos | Fórmula de Cálculo | Finalidade |
|---|
| Aprovado 1 | +5 a -5 | 9 | Nova Taxa de Fluxo = Antiga Taxa de Fluxo * (100 + modificador) / 100 | Calibração inicial para encontrar a faixa ideal aproximada |
| Aprovado 2 | -9 a 0 | 10 | Nova Taxa de Fluxo = Antiga Taxa de Fluxo * (100 + modificador) / 100 | Ajuste fino para uma taxa de fluxo ideal precisa |
Tabela 3: Resumo das passagens 1 e 2 da calibração da vazão
O Avanço de Pressão (PA) compensa as variações de pressão no bico durante as flutuações de velocidade (aceleração/desaceleração). Ele previne cantos arredondados, bolhas e "espinhas" pré-ajustando a extrusão para manter o fluxo uniforme.
Sempre realize a calibração de Avanço de Pressão após a calibração da Taxa de Fluxo. Se a taxa de fluxo estiver incorreta, a PA compensará de forma imprecisa. Uma taxa de fluxo estável é essencial para uma PA eficaz. Se os seus testes de PA parecerem confusos, reveja as calibrações de Taxa de Fluxo e Temperatura primeiro.
Os valores de PA variam significativamente de acordo com o tipo de extrusora (Direct Drive vs. Bowden), tipo/marca de filamento, tamanho do bico, temperatura do hotend e modificações de hardware. Diferentes materiais têm um fluxo de fusão único, e as alterações no comprimento do caminho de fluxo afetam o PA. Isso significa que o PA frequentemente requer recalibração para diferentes configurações ou materiais.
O OrcaSlicer solicita que você selecione o tipo de extrusora (Direct Drive ou Bowden). Os valores de PA variam bastante devido ao comprimento do caminho do filamento. Configurações Bowden geralmente exigem valores de PA mais altos.
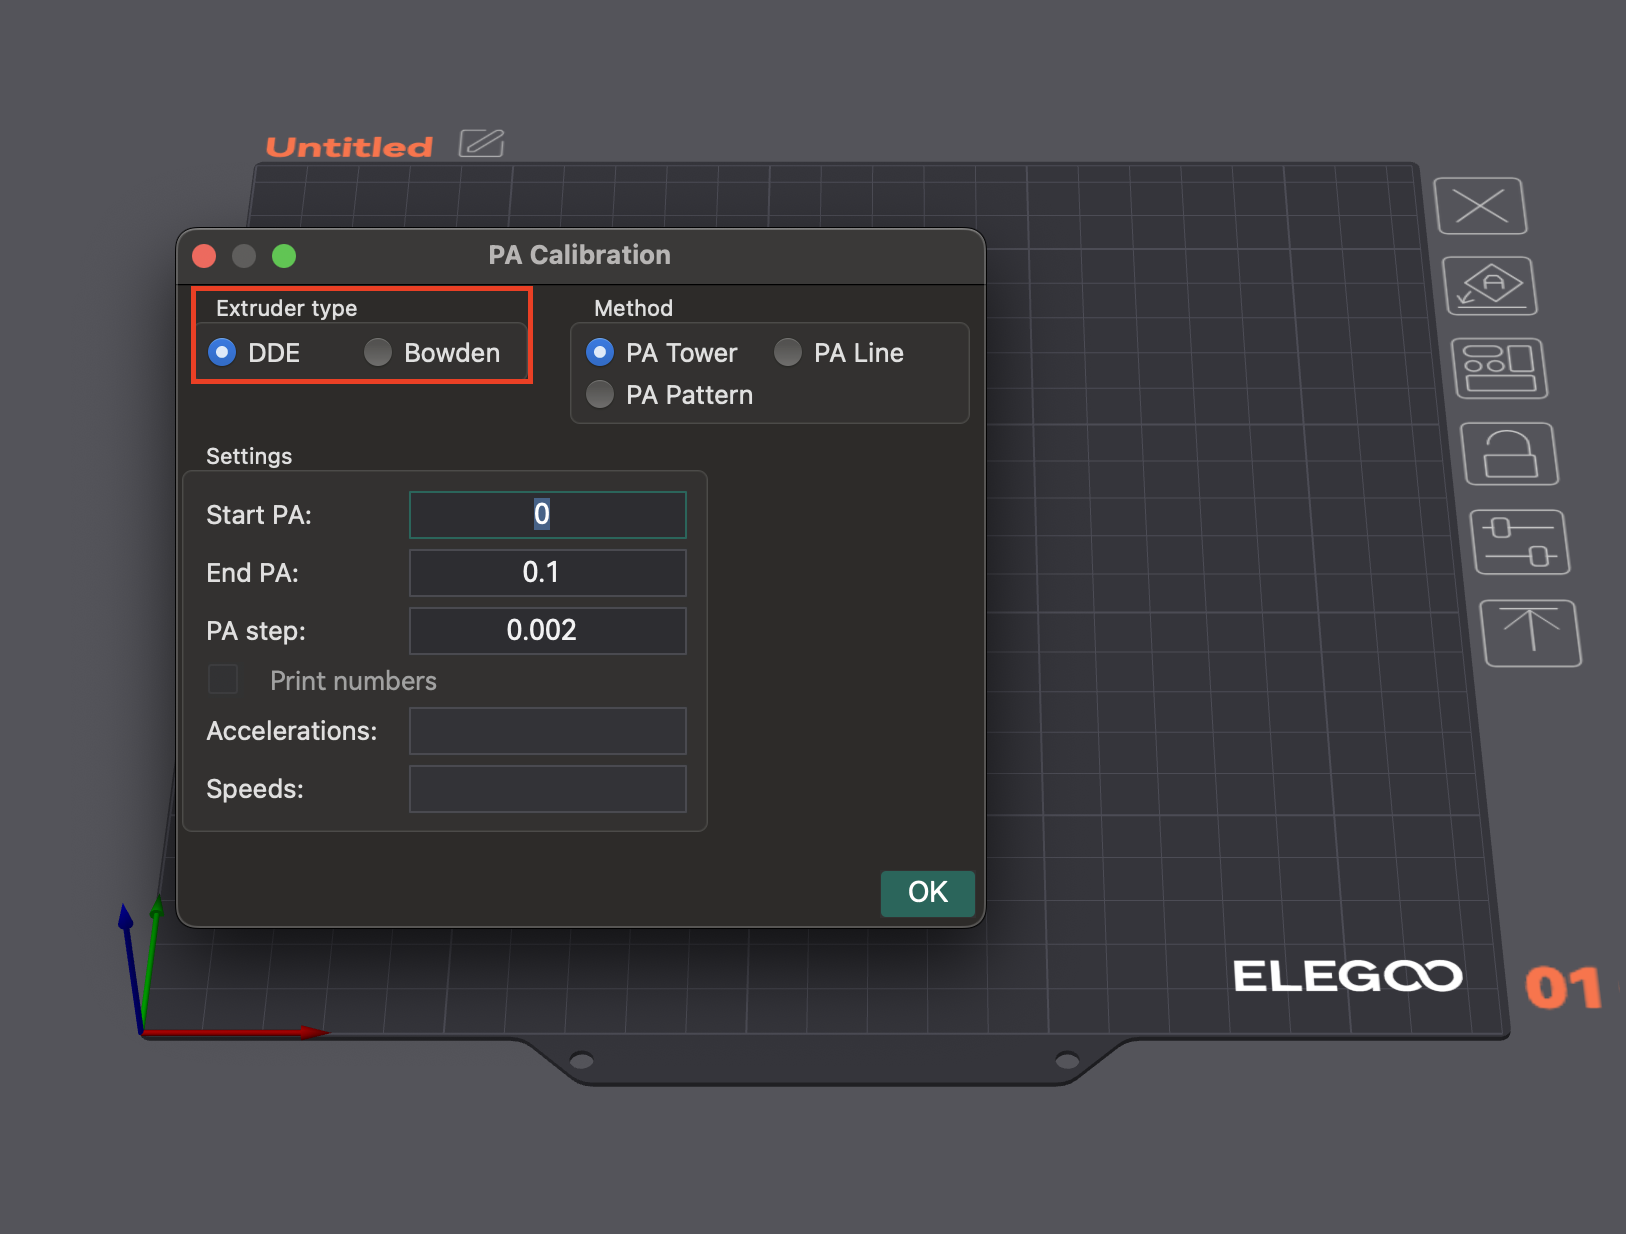
O OrcaSlicer oferece vários métodos para calibração de avanço de pressão:
- Método da Linha: Este método ajuda a identificar rapidamente um valor ideal de Avanço de Pressão.
- Acesso: Acesse "Calibração" > "Avanço de Pressão" > "Linha PA".
- Teste: O OrcaSlicer gera uma série de linhas, cada uma impressa com um valor de PA incrementalmente diferente. O objetivo é observar onde o início e o fim de cada linha parecem mais "limpos" e a transição para dentro e para fora da linha é mais nítida, indicando a extrusão mais consistente.
- Dependência: Este método é sensível à qualidade da primeira camada. Certifique-se de que sua base esteja devidamente nivelada antes de realizar este teste.
- Método do Padrão: Avaliação visual dos cantos.
- Acesso: No menu "Calibração", selecione "Avanço de Pressão" e, em seguida, escolha o "Método do Padrão".
- Teste: O OrcaSlicer gera um padrão semelhante a um prisma. Verifique a consistência da qualidade da extrusão e identifique os cantos mais nítidos com menos artefatos (como vãos, saliências ou depressões).
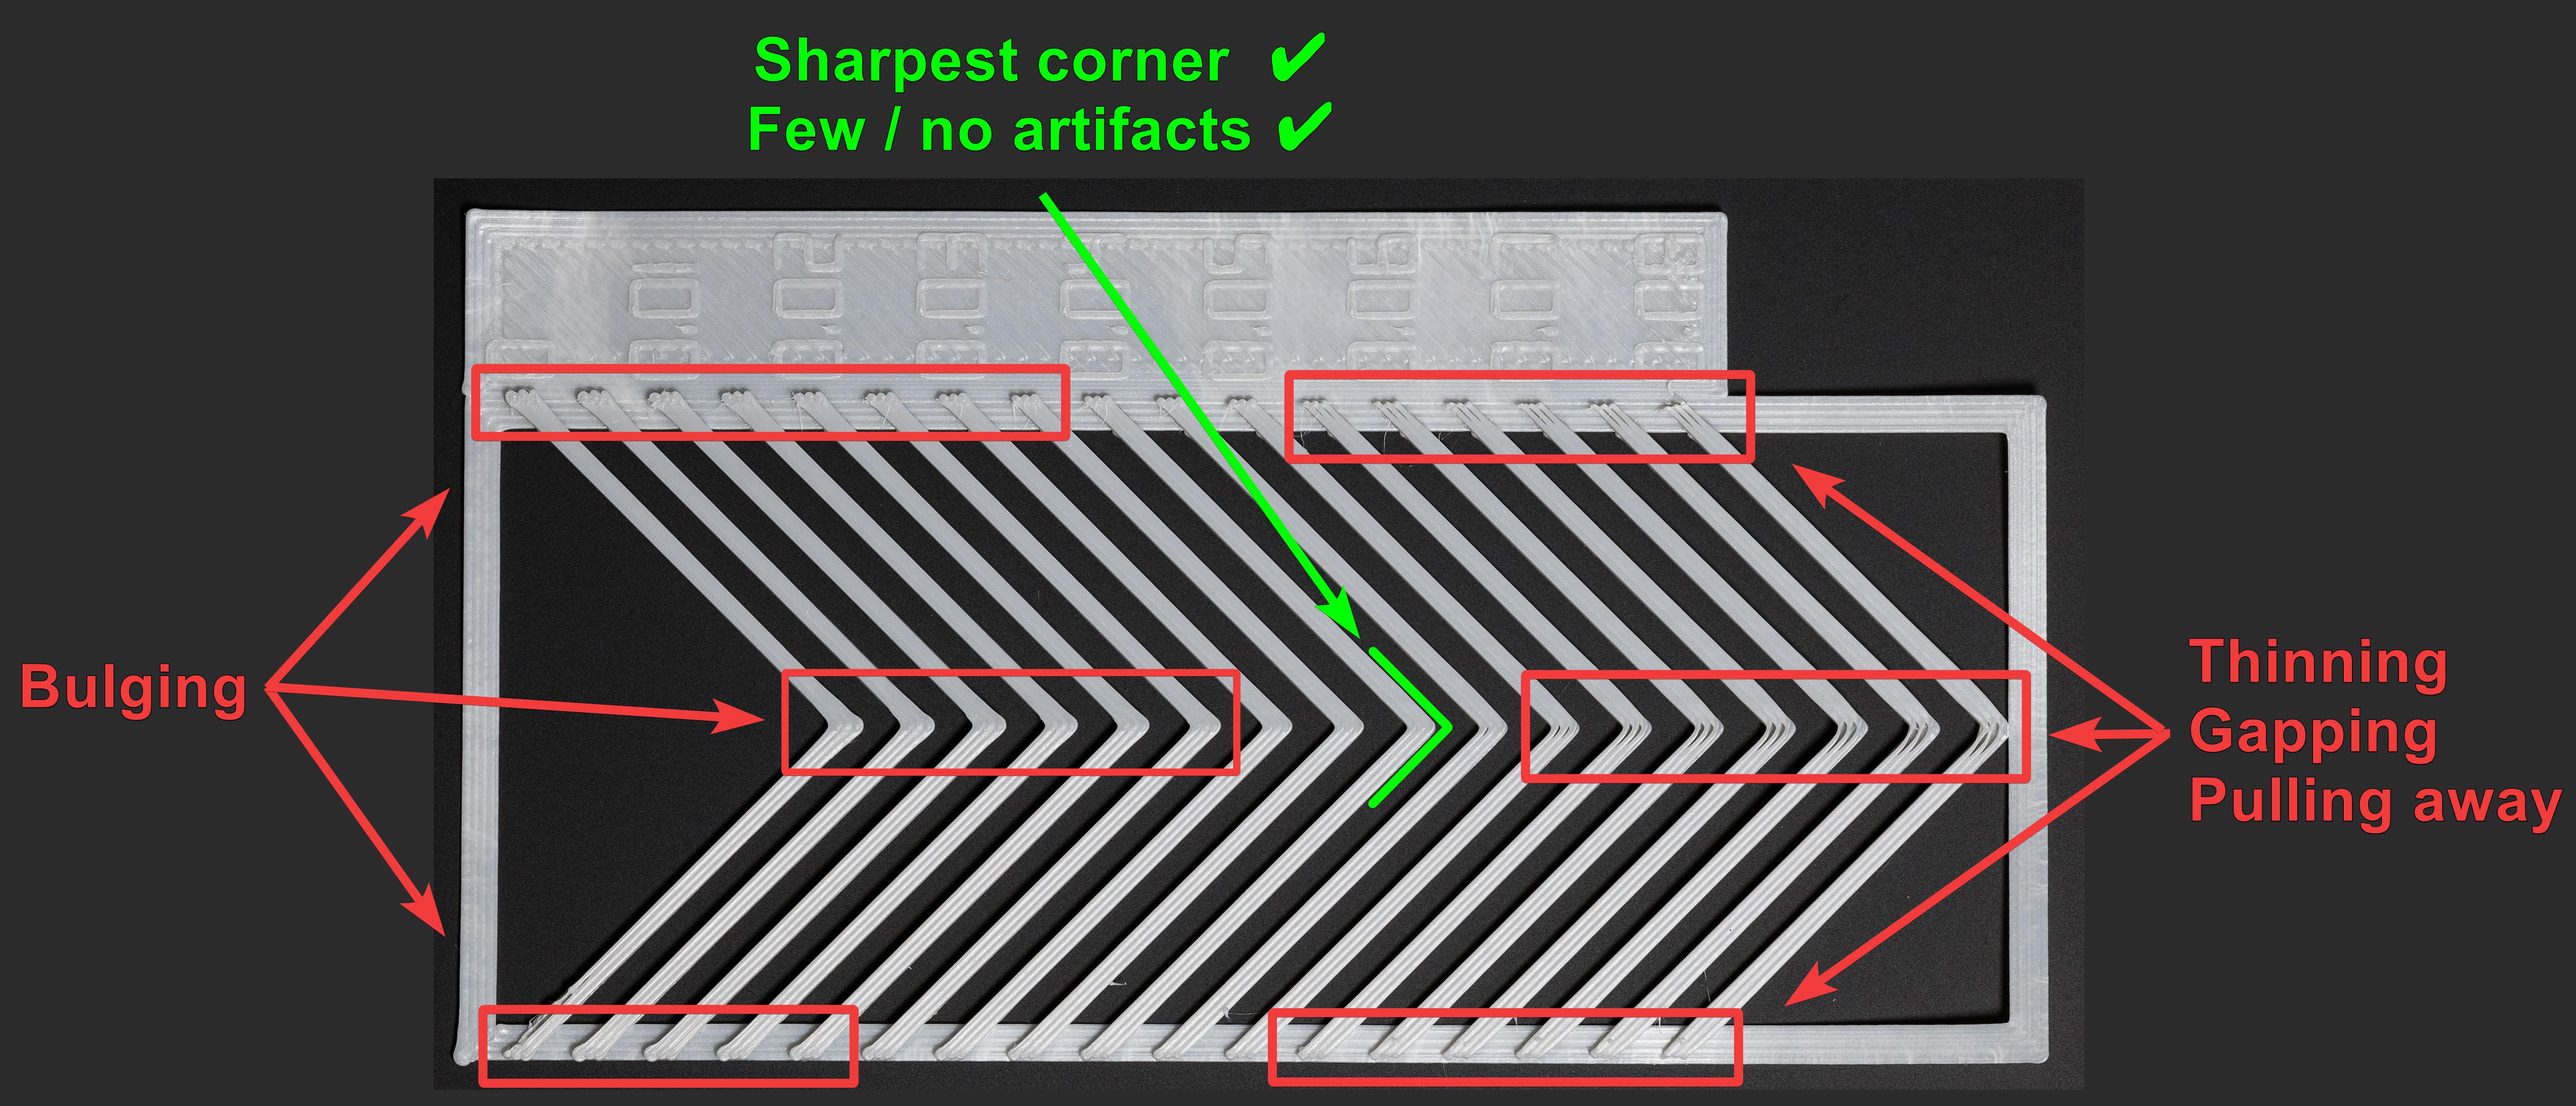
Fonte: obico.io
3. Método da Torre: Menos sensível à qualidade da primeira camada, mas leva mais tempo.
- Acesso: No menu "Calibração", selecione "Avanço de Pressão" e, em seguida, escolha "Torre PA".
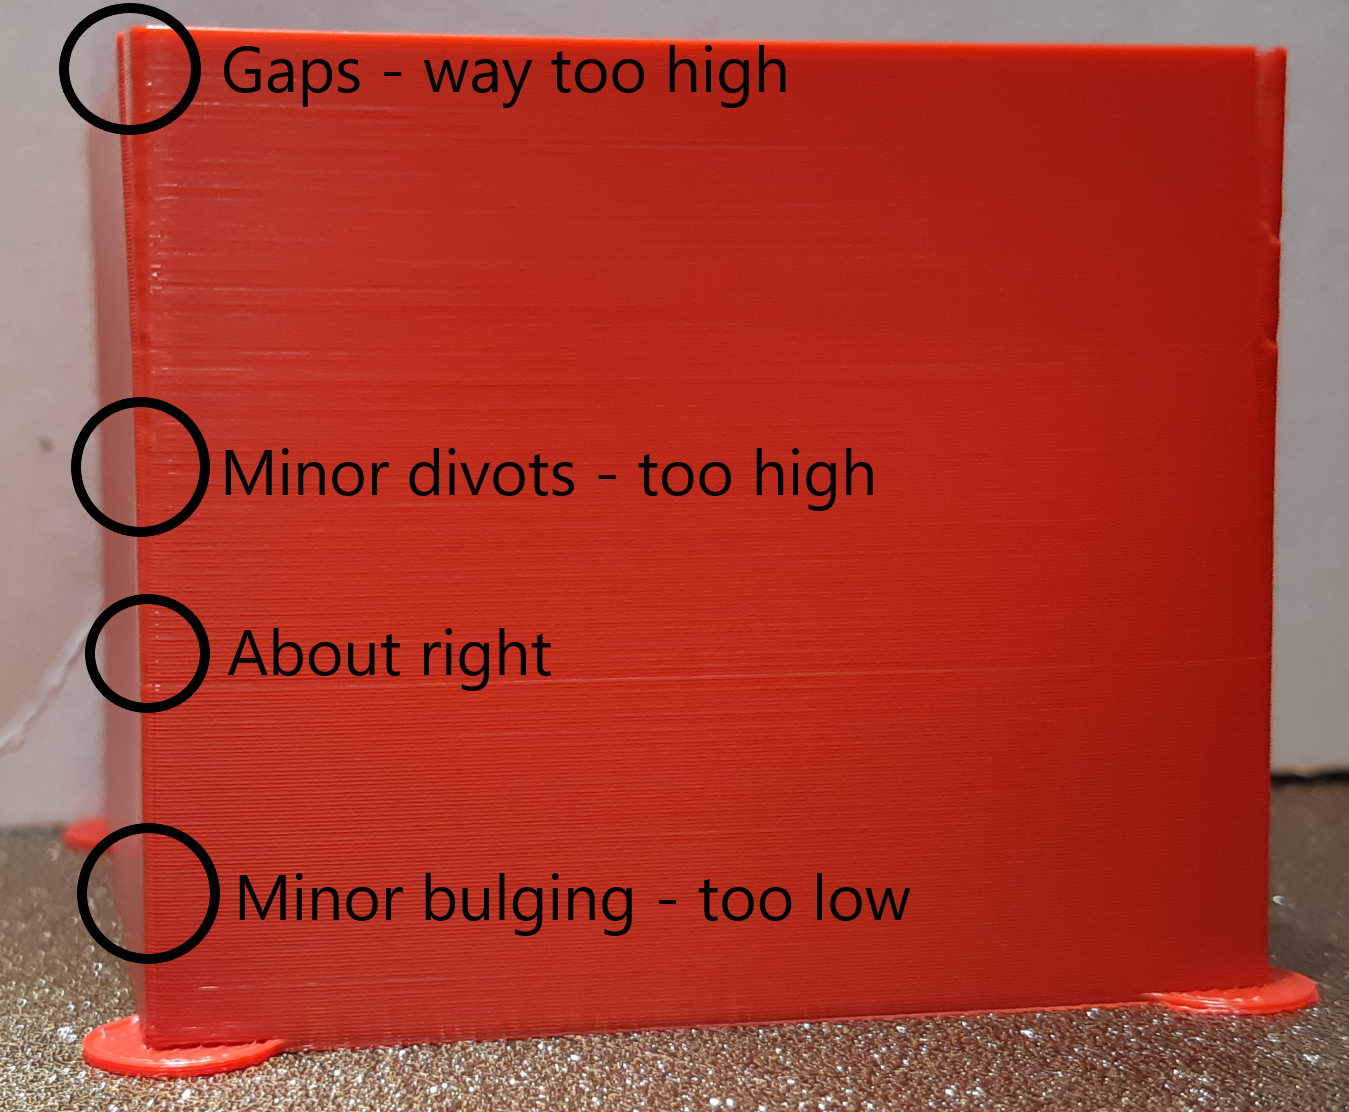
- Teste: O software gera uma torre onde a PA aumenta com a altura (tipicamente 0,002 por mm para Direct Drive, 0,02 para Bowden). Examine cada canto para encontrar a altura com cantos nítidos e limpos.
- Recomendação: Imprima em velocidades mais altas (acima de 120 mm/s) para verificar o impacto da PA em condições típicas de impressão.
Fonte: ellis3dp.com
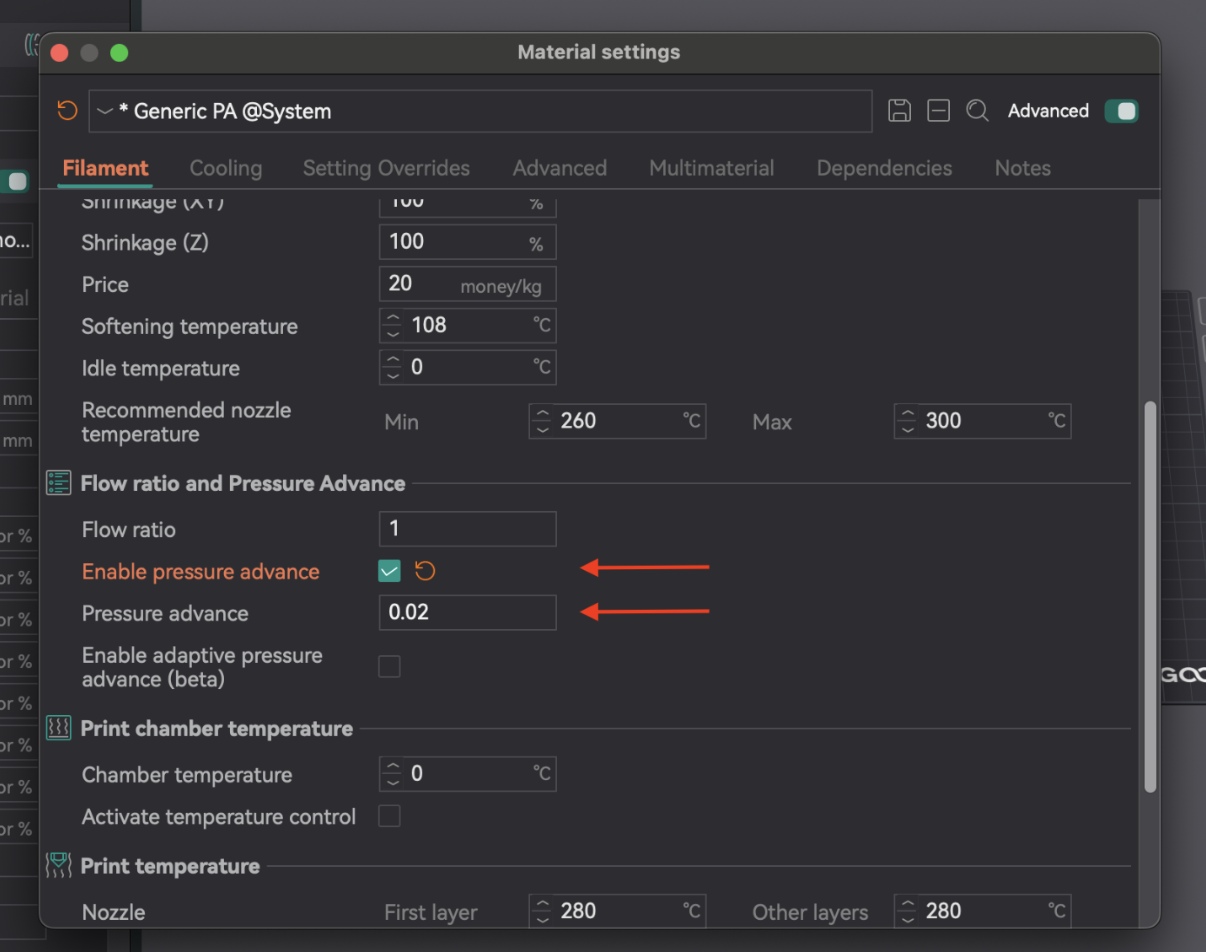
Após determinar o valor ideal de PA, abra as configurações do filamento (ícone de edição ao lado do perfil). Ative "Ativar avanço de pressão" e insira o valor. Salve o perfil do filamento.
| Método | Tipo de Extrusora | Prós | Contras | Observação Principal |
|---|
| Linha | Ambas | Rápido, simples de testar | Altamente dependente da qualidade da primeira camada | Extremidades de linha mais limpas, ponta mais afiada |
| Padrão | Ambas | Avaliação visual dos cantos, mais avançada | Ainda um pouco dependente da primeira camada | Extrusão mais consistente, canto mais afiado com menos artefatos |
| Torre | Ambas | Menos sensível à qualidade da primeira camada, bom para altas velocidades | Consome mais tempo e material | Melhor qualidade geral dos cantos em uma altura específica |
Tabela 4: Comparação do método de avanço de pressão
A retração puxa o filamento para trás antes do movimento de deslocamento, criando pressão negativa para evitar vazamentos, fios ou bolhas. Os principais parâmetros são o comprimento da retração, a velocidade e o salto Z.
A retração interage com o avanço da pressão. A retração ideal ajuda a controlar o recuo físico, enquanto o PA lida com a pressão no hotend. Se o PA não estiver calibrado, a retração pode apresentar dificuldades. O objetivo é obter o menor comprimento possível que minimize o encordoamento sem causar obstruções ou "marcas de buraco".
Se a formação de cordas persistir após os testes de retração, reavalie primeiro as configurações de temperatura e vazão e, depois, o avanço de pressão. Essas configurações básicas devem estar corretas para que a retração seja eficaz.
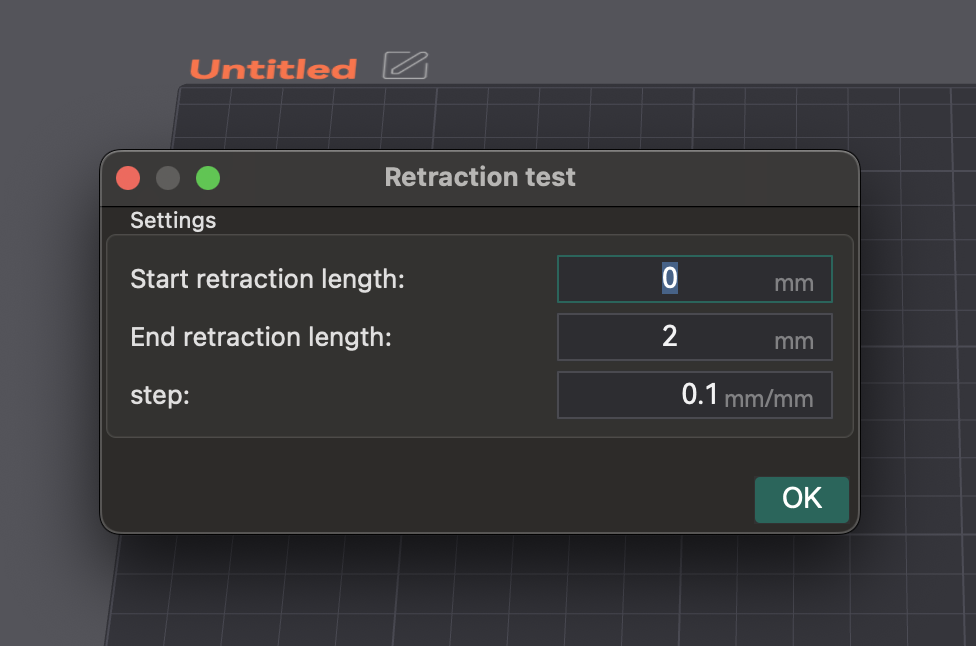
- Acessar e Configurar: Crie um novo projeto. Acesse "Calibração" > "Teste de Retração". Configure "Comprimento inicial de retração", "Comprimento final de retração" e "Passo" (padrões normalmente 0 mm, 2 mm, 0,1 mm). Extrusoras Bowden geralmente precisam de comprimentos maiores (1-6 mm) do que o acionamento direto (0-2 mm).
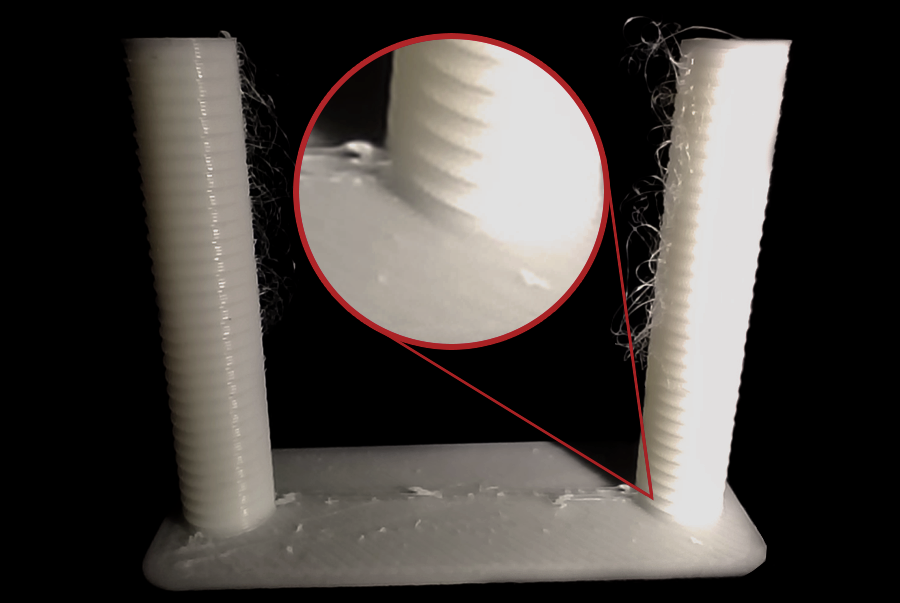
- Fatiar e Imprimir: Fatie e imprima a torre de retração. Certifique-se de que a opção Z-hop "Normal" esteja selecionada. Você pode pintar as costuras nas laterais internas da torre na pré-visualização para uma observação mais clara das linhas.
Fonte: obico.io
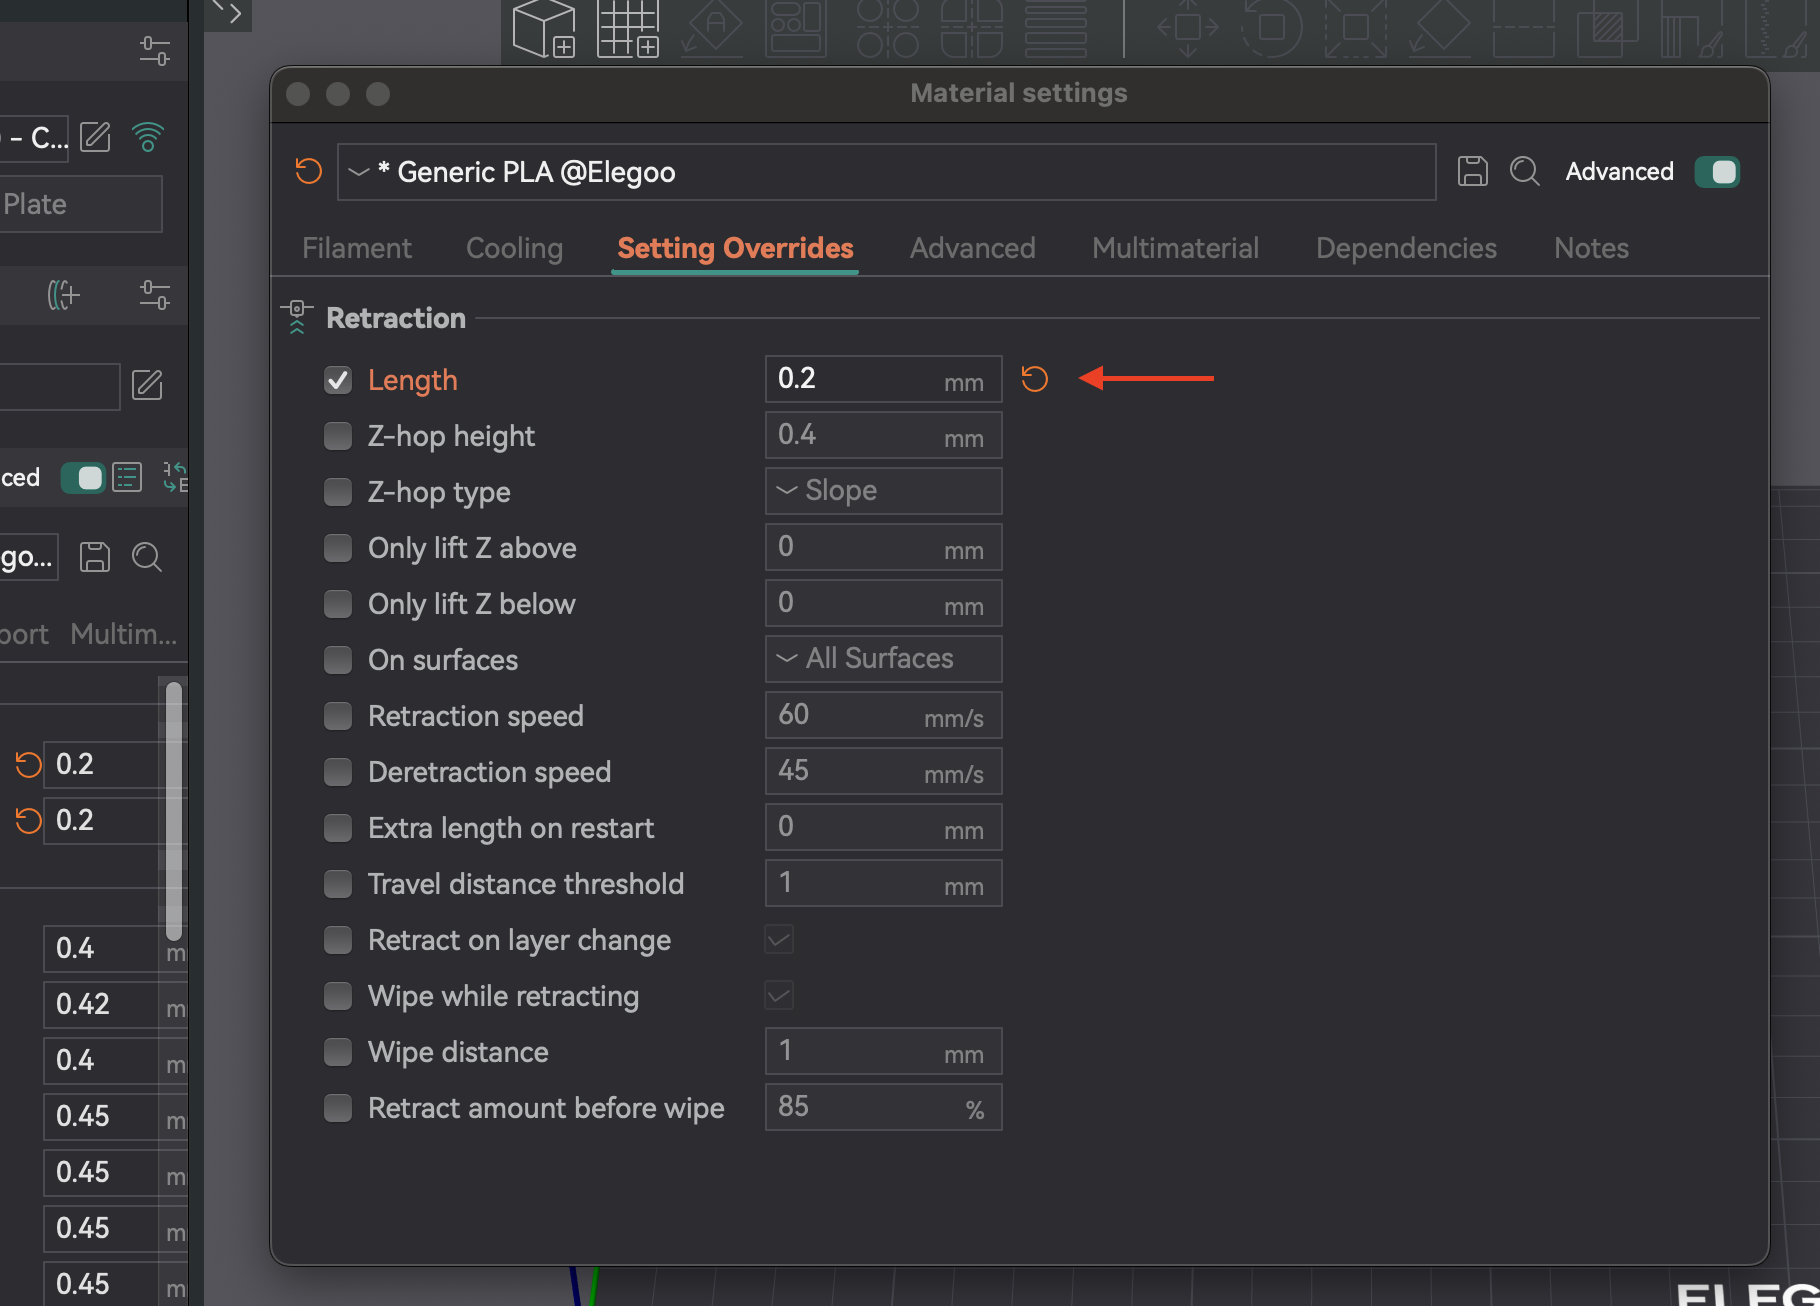
3. Analisando os Resultados e Ajustando: Examine cada entalhe. Encontre o menor comprimento que minimize a formação de fios e o escoamento sem outros problemas. Exemplo: se a melhor qualidade for um entalhe da base com passo de 0,1 mm, o comprimento ideal é 0,2 mm. Abra as configurações do filamento, aba "Substituições de Configurações", marque "comprimento" em retração, insira o novo valor e salve.
- Tipo de Filamento: Diferentes materiais apresentam diferentes escoamentos. PLA/ABS normalmente necessitam de menor retração (0,2-0,4 mm) do que filamentos flexíveis ou higroscópicos.
- Secagem do Filamento: A umidade é uma causa comum de formação de fios. Se o escoamento persistir, seque o filamento. Geralmente, esta é a primeira coisa a verificar.
- Instalação do Bico: Um bico solto ou parcialmente obstruído pode causar formação de fios. Verifique a instalação e remova obstruções regularmente.
- Limpeza durante a retração: Esta configuração faz com que o bico se mova durante a retração, limpando-o e reduzindo a formação de fios/escorrimento.
- Velocidade de Desretração: Controla a velocidade de recarga após a retração. Definir como 0 utiliza a velocidade de retração.
- Limite de Distância de Percurso: Retrai somente se o percurso exceder um limite, evitando retrações desnecessárias e reduzindo a formação de fios em pequenos espaços.
| Configuração | Descrição | Problema comum | Solução/Dica |
|---|
| Comprimento de retração | Quantidade de filamento puxado para trás. | Enfiamento, vazamento, obstruções (se muito alto) | Aumente para enfiamento, diminua para obstruções/marcas. |
| Velocidade de retração | Velocidade de retração do filamento. | Enfiamento, bolhas, trituração do filamento | Aumente para uma resposta mais rápida, evite trituração. |
| Z-Hop | Levanta o bico durante o deslocamento. | Bico raspando, bolhas na superfície | Habilite para impressões complexas, ajuste a altura. |
| Velocidade de desretração | Velocidade para recarregar o filamento. | Subextrusão no início de uma nova linha | Defina como 0 (usa a velocidade de retração) ou um pouco menos. |
| Limite de distância de deslocamento | Percurso mínimo para retração. | Enfiamento em pequenos espaços | Ajuste para ativar para o deslocamento relevante. |
| Limpar durante a retração | O bico se move ao longo do caminho durante a retração. | Visibilidade da costura em Z, vazamento | Habilita para melhorar as costuras da parede externa e reduzir o vazamento. |
Tabela 5: Configurações de retração e solução de problemas
Tolerância é a precisão com que sua impressora reproduz as dimensões. Ela é crucial para peças que se encaixam (montagens, componentes de encaixe). Variações dimensionais decorrem da contração do filamento e da mecânica da impressora. O teste de tolerância ajuda você a entender o comportamento da sua impressora para ajustar os designs e obter encaixes perfeitos.
A tolerância é uma característica da combinação filamento-impressora. Não se trata de uma configuração única. Filamentos diferentes encolhem de forma diferente, e até mesmo marcas/cores podem variar. Teste novamente ao trocar de tipo ou marca de filamento ou ao fazer modificações significativas no hardware. Mantenha os perfis por filamento para uma precisão consistente.
- Acesso: Vá em "Calibração" > "Teste de tolerância Orca". Isso abrirá um novo projeto com o modelo de teste.
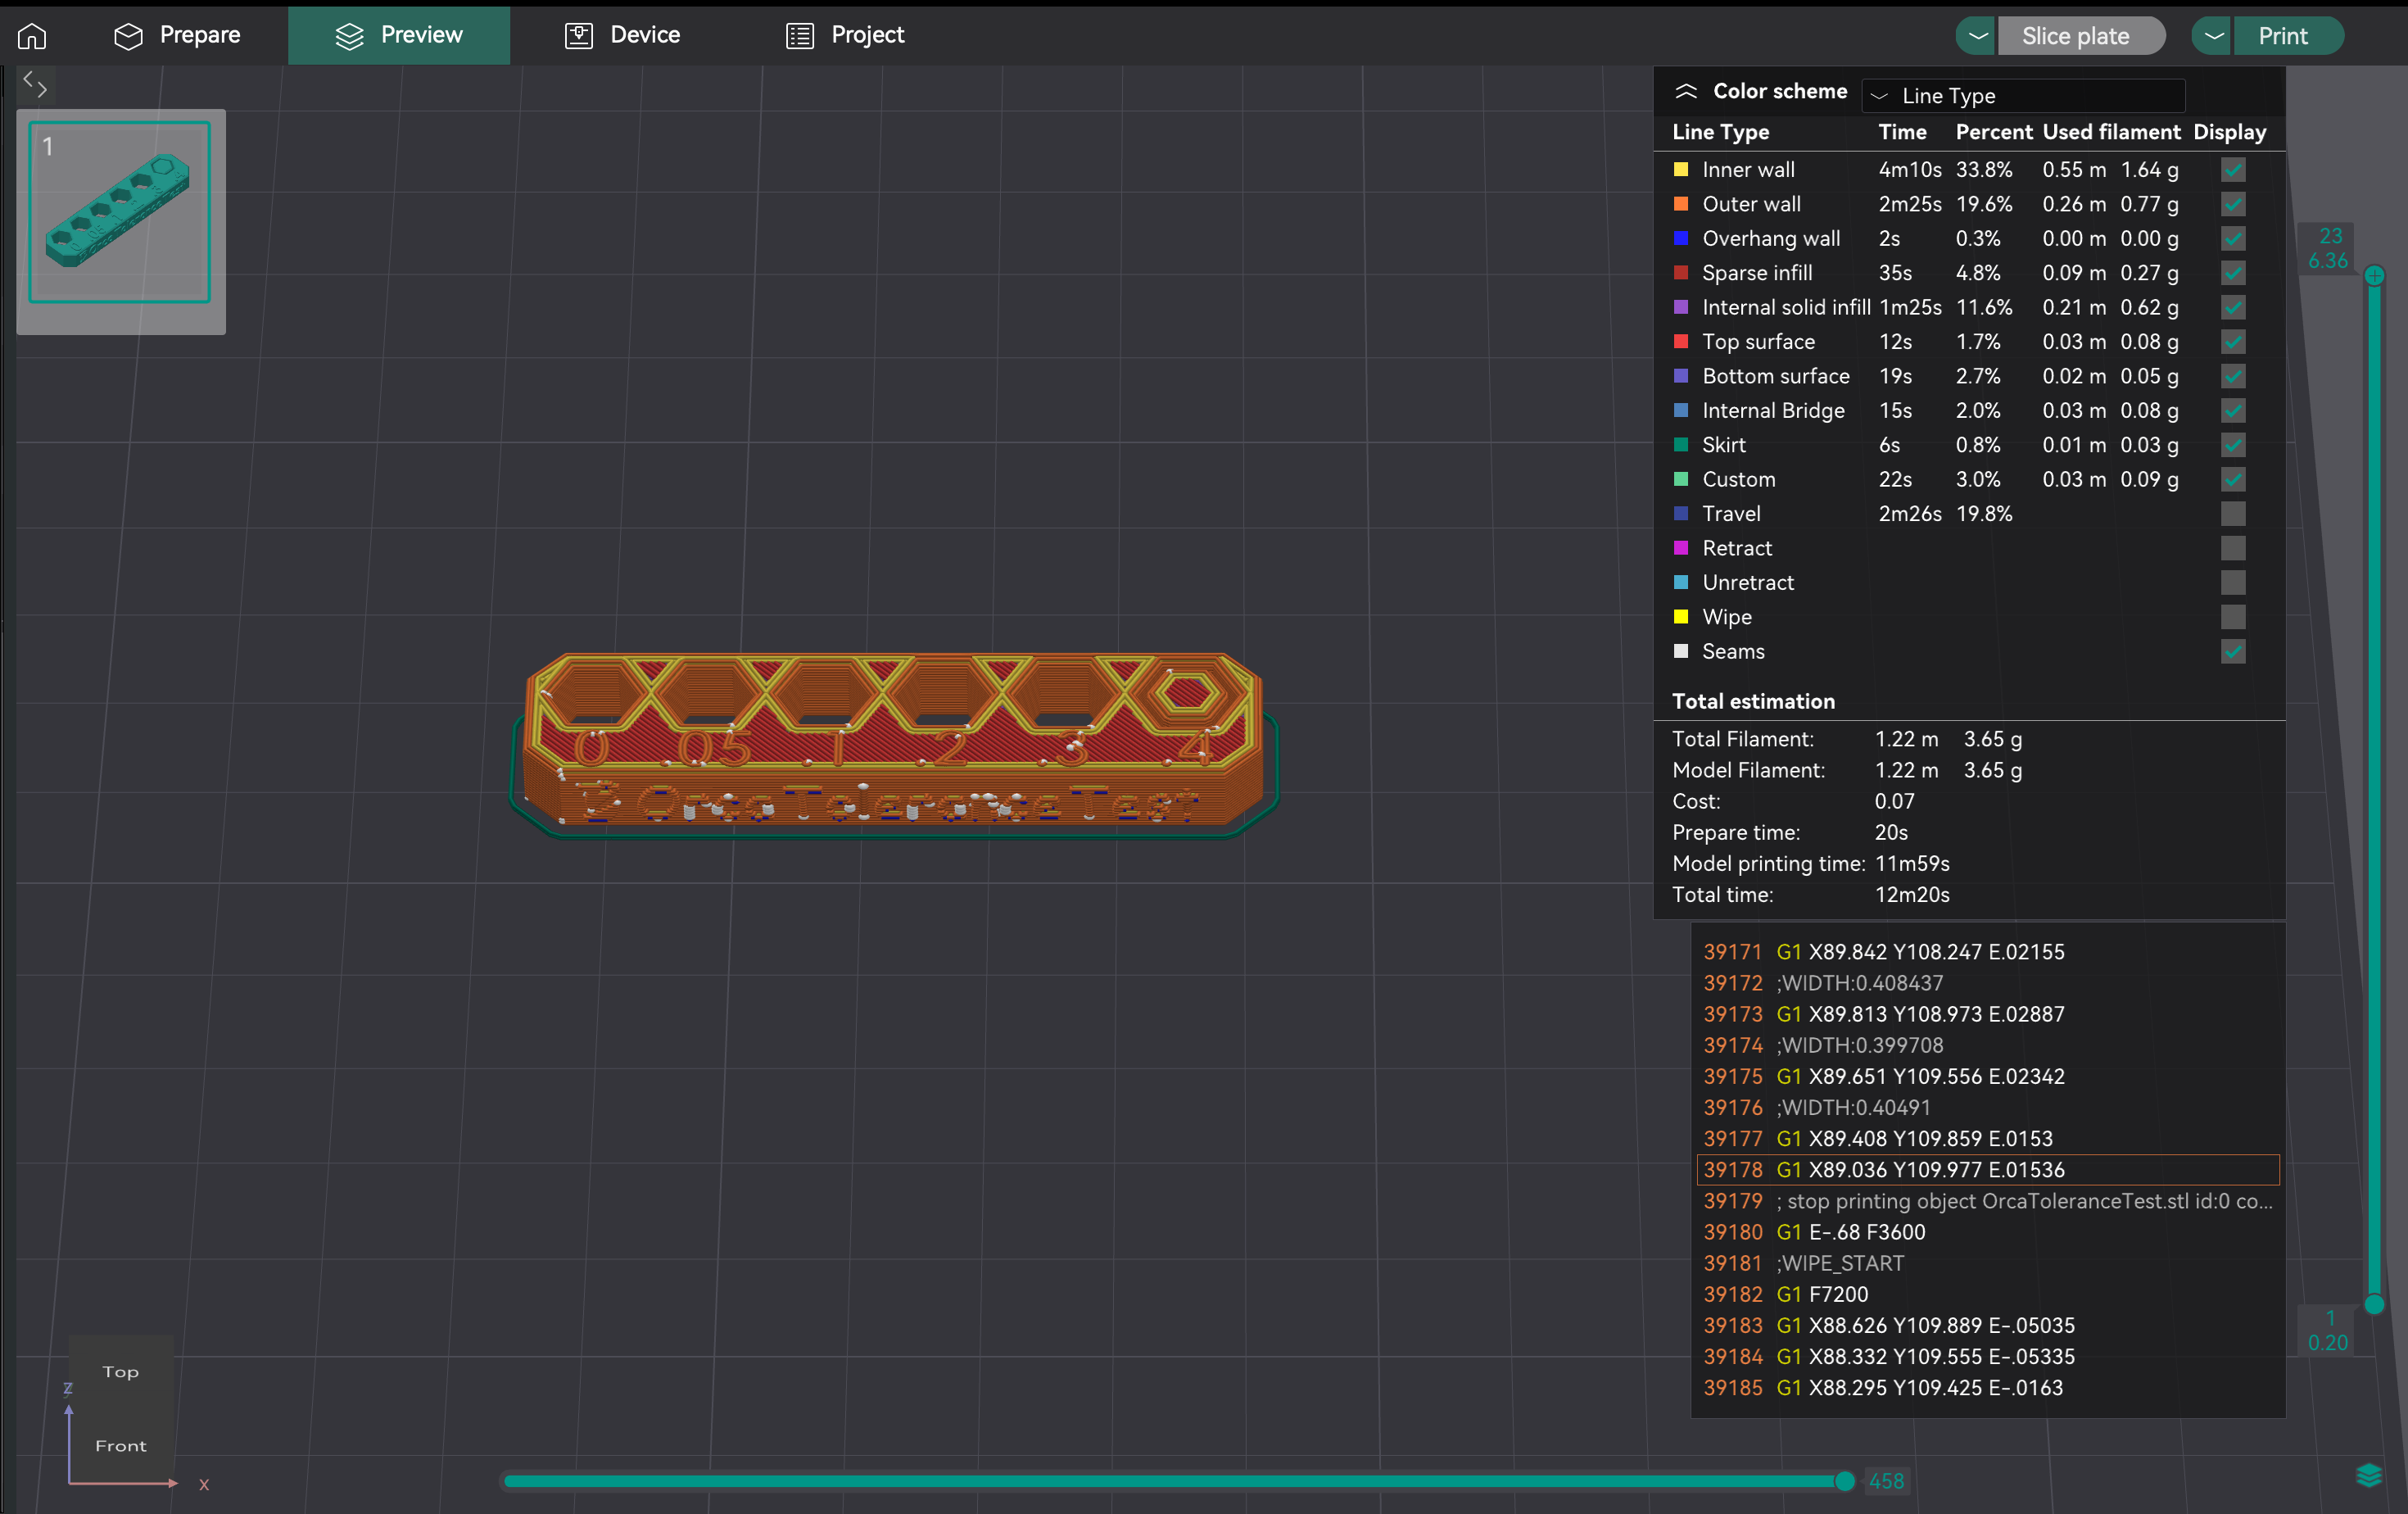
- Descrição do Modelo: O modelo possui uma base com seis furos hexagonais (tolerâncias de 0,0 mm, 0,05 mm, 0,1 mm, 0,2 mm, 0,3 mm e 0,4 mm) e um testador hexagonal.
- Impressão: Selecione as configurações da impressora, do filamento e do processo. Fatie e imprima.
- Importante: Evite usar a compensação de furos X-Y e a compensação de contornos X-Y (definidas como 0 mm) durante este teste, pois elas podem distorcer os resultados.
Após a conclusão da impressão, use uma chave Allen M6 ou o testador hexagonal impresso incluso. Seu objetivo é identificar o menor orifício na impressão de teste em que o testador possa deslizar com o mínimo ou nenhuma força, e sem qualquer oscilação ou folga perceptível. Este orifício específico representa a saída real da sua impressora para um encaixe "confortável" ou "suave" com aquele filamento.
Veja como determinar objetivamente esse ajuste "perfeito":
- Comece pelos furos menores: Comece tentando inserir o testador nos furos de 0,0 mm, 0,05 mm e 0,1 mm.
- Avalie o encaixe para cada um:
- Muito apertado: Se você precisar forçar o testador ou se ele simplesmente não entrar, o furo está muito apertado para um encaixe "perfeito".
- Muito frouxo/instável: Se o testador entrar com muita facilidade e apresentar folga perceptível ou se mover, o furo está muito frouxo para um encaixe "perfeito".
- Perfeito: Este é o furo mais apertado, onde o testador entra suavemente, exigindo uma pressão leve, mas consistente, e apresenta pouca ou nenhuma folga perceptível após a inserção.
- O tamanho indicado para este furo "exatamente certo" (por exemplo, 0,1 mm, 0,2 mm ou 0,3 mm) indica a precisão dimensional inerente da sua impressora para furos com aquele filamento específico. Este valor observado é crucial para determinar como aplicar a compensação para atingir o ajuste desejado em projetos futuros.

Fonte: hta3d.com
Depois de identificar o ajuste "perfeito" na impressão do teste de tolerância (por exemplo, o furo de 0,2 mm se encaixa perfeitamente no teste), você usará essa observação para ajustar a compensação de furos X-Y no OrcaSlicer. Essa configuração será aplicada a todos os furos em seus projetos futuros para garantir que eles sejam impressos com o ajuste desejado.
- Cenário 1: Seus furos impressos estão consistentemente saindo menores do que o projetado (muito apertados).
- Exemplo: Você projeta uma peça com um furo de folga de 0,2 mm esperando um encaixe "perfeito". Na impressão do teste de tolerância, o furo de 0,2 mm está muito apertado e o testador só encaixa suavemente no furo de 0,3 mm. Isso indica que sua impressora está fazendo furos aproximadamente 0,1 mm menores do que o projetado.
- Ação: Você precisa aumentar a compensação do furo X-Y com um valor positivo. Neste exemplo, definir a compensação do furo X-Y para +0,1 mm faria com que todos os furos em suas impressões futuras fossem impressos 0,1 mm maiores, fazendo com que os furos de folga de 0,2 mm projetados ficassem mais próximos do encaixe "perfeito".
- Cen�ário 2: Seus furos impressos estão consistentemente saindo maiores do que o projetado (muito frouxos).
- Exemplo: Você projeta uma peça com um furo de folga de 0,2 mm esperando um encaixe "perfeito". No seu teste de tolerância, o furo de 0,2 mm está muito frouxo e o testador só se encaixa suavemente no furo de 0,1 mm. Isso indica que a sua impressora está fazendo furos aproximadamente 0,1 mm maiores do que o projetado.
- Ação: Você precisa diminuir a compensação do furo X-Y com um valor negativo. Neste exemplo, definir a compensação do furo X-Y para -0,1 mm faria com que todos os furos em suas impressões futuras fossem impressos 0,1 mm menores, fazendo com que os furos de folga de 0,2 mm projetados ficassem mais próximos do encaixe "perfeito".
Lembre-se de que a compensação de furos X-Y é específica para características internas, como furos. A compensação de contorno X-Y é usada para ajustar as dimensões externas gerais da sua peça e normalmente não é ajustada com base nos resultados deste teste específico de tolerância de furo.
A velocidade volumétrica máxima (ou vazão máxima) é o maior volume de filamento (mm³/s) que seu hotend consegue fundir e extrudar consistentemente sem problemas. Isso garante que sua impressora possa lidar com o fluxo comandado, especialmente em altas velocidades, sem subextrusão (o hotend não consegue fundir rápido o suficiente) ou superextrusão (pressão excessiva). Determinar esse limite otimiza as velocidades de impressão sem sacrificar a qualidade.
A velocidade volumétrica máxima é um limite para o hotend e o filamento. Filamentos diferentes têm taxas de fluxo de fusão únicas. PLA, PETG e ABS terão valores máximos diferentes. Você deve testar cada tipo de filamento que planeja imprimir em altas velocidades para definir configurações específicas de velocidade volumétrica em cada perfil de filamento.
- Acesso: Vá em "Calibração" > "Velocidade Volumétrica Máxima".
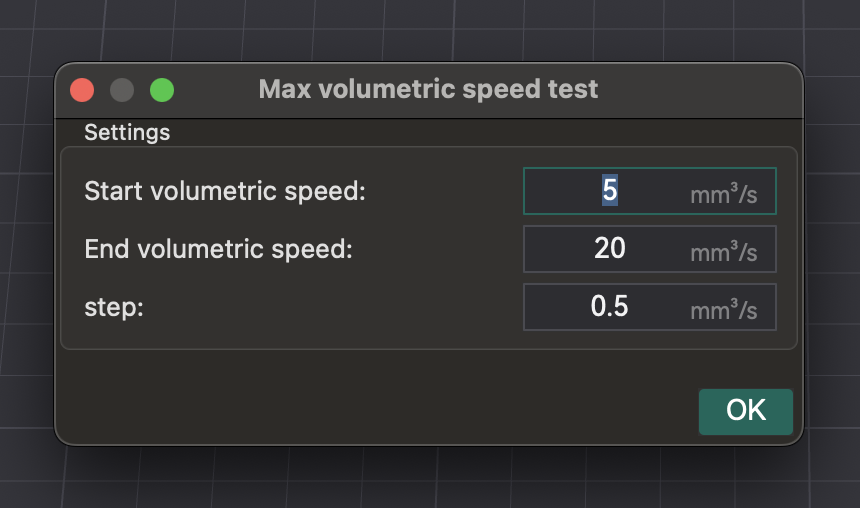
- Teste: o OrcaSlicer gera um modelo. Imprima-o e observe a qualidade conforme a velocidade (e o fluxo volumétrico) aumenta. Identifique onde a qualidade de impressão se degrada (subextrusão, lacunas, superfície rugosa).
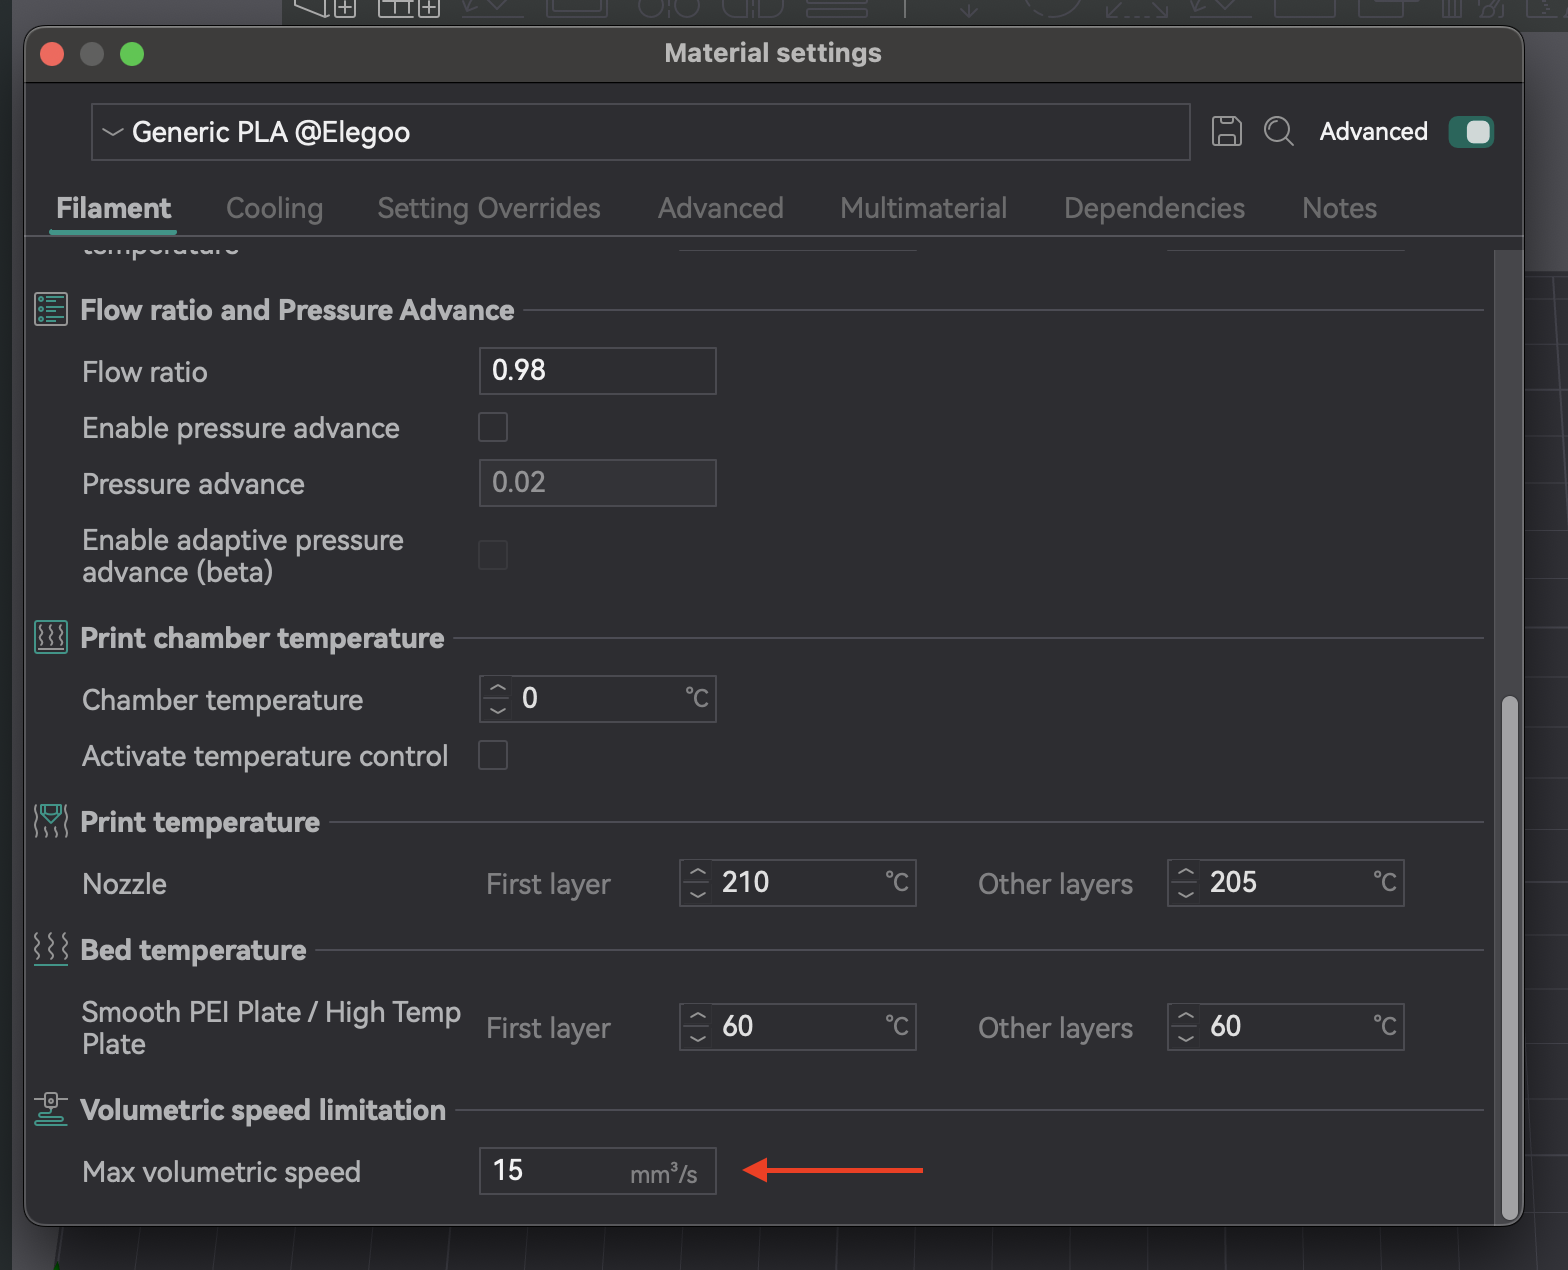
- Identificando a Velocidade Máxima Segura: Anote a velocidade volumétrica imediatamente antes da degradação. Esta é a sua velocidade volumétrica máxima segura para aquele hotend e filamento.
- Aplicando Configurações: Insira este valor nas configurações do filamento no OrcaSlicer. Isso evita que o fatiador comande velocidades que excedam a capacidade do seu hotend.
| Tipo/Marca de Filamento | Velocidade Volumétrica Máxima Ótima (mm³/s) | Observações |
|---|
| PLA (Genérico) | 16,75 | Subextrusão e lacunas entre camadas além deste ponto |
| PETG (Prusament) | 14,5 | Degradação da qualidade da superfície em velocidades mais altas |
| ABS (Hatchbox) | 18,0 | Extrusão consistente até este limite |
Tabela 6: Resultados da Velocidade Volumétrica Máxima
Artefatos Finos Verticais (AFVs) são padrões ou linhas sutis e rítmicas em impressões, geralmente próximos a cantos ou mudanças de direção. São causados por vibrações mecânicas ou ressonância no sistema de movimento em alta velocidade.
A calibração VFA encontra o limite prático de velocidade para qualidade, diferente da Velocidade Volumétrica Máxima. Enquanto a velocidade volumétrica se refere à capacidade do hotend, a VFA aborda as limitações do sistema de movimento. Sua impressora pode extrudar filamento suficiente, mas sua estrutura, correias ou motores podem introduzir vibrações como VFAs. O teste VFA fornece uma velocidade máxima de impressão "real" onde a qualidade é mantida, verificando a estabilidade do sistema de movimento após a velocidade volumétrica ser definida.
- Acesso: Vá em "Calibração" > "Mais" > "VFA".
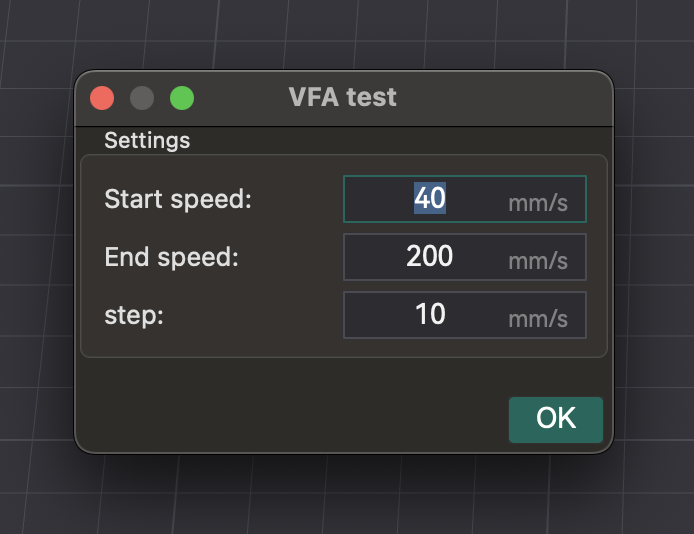
- Configuração de Parâmetros: Uma janela aparece para configurar "Velocidade inicial", "Velocidade final" e "Incrementos de passo". Exemplo: início de 160 mm/s, final de 500 mm/s, incrementos de 20 mm/s.
- Análise de Defeitos: Fatie e imprima a torre de velocidade VFA. Inspecione visualmente quanto a encadeamentos, subextrusão, deslocamentos de camada e acabamento superficial. Identifique a velocidade mais alta com boa qualidade antes da degradação. O modelo possui marcações correspondentes às velocidades. Exemplo: se a subextrusão começa no entalhe 11 (início de 160 mm/s, incrementos de 20 mm/s), a velocidade ideal �é 360 mm/s (160 + (20 * 10)).
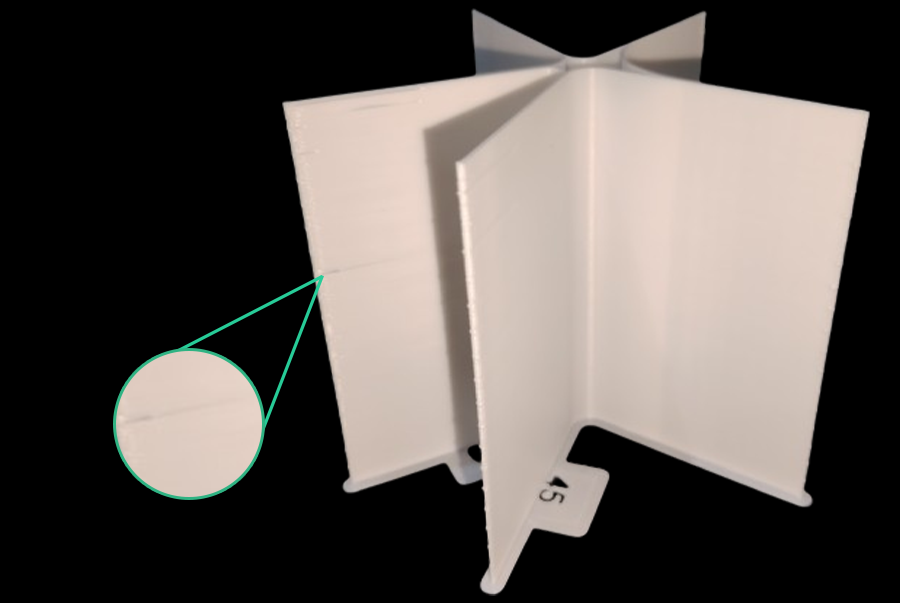
Fonte: obico.io
A qualidade ideal da impressão 3D exige mais do que apenas testes de calibração. É preciso manutenção da impressora, gerenciamento de filamentos e controle ambiental.
A manutenção regular é fundamental: verifique se há desgaste/entupimentos no bico, garanta o funcionamento da extrusora, limpe a mesa e verifique a tensão da correia. A limpeza de rotina, o nivelamento da mesa e o ajuste do PID mantêm sua impressora otimizada.
A qualidade do filamento afeta as impressões. A umidade em filamentos higroscópicos (PETG, Nylon, TPU) causa bolhas, chiados, formação de fios e peças frágeis. Use sempre filamento novo e seco. Armazene em sacos/recipientes lacrados com dessecante. Seque o filamento úmido em uma secadora ou forno.
Um ambiente estável é crucial. Flutuações de temperatura, umidade ou fluxo de ar causam deformações e inconsistências. Use um gabinete, se possível. Monitore com um termômetro e um higrômetro para evitar problemas.
A calibração é contínua, não é algo do tipo "configure e esqueça". As configurações são dinâmicas e mudam.
- Novo filamento: Recalibre para novos tipos, marcas ou até mesmo cores.
- Alterações de hardware: Novos hotends, extrusoras ou alterações no comprimento do tubo Bowden exigem a recalibração dos parâmetros afetados.
- Degradação da qualidade de impressão: Se a qualidade cair inesperadamente, a recalibração costuma ser o primeiro passo para diagnosticar a causa.
Muitos problemas de qualidade de impressão decorrem de problemas de calibração. Utilize uma abordagem sistemática para diagnosticá-los e resolvê-los, evitando ajustes aleatórios. Problemas durante a calibração do fluxo (cliques, impressões irregulares) geralmente indicam problemas de pré-calibração ou dependências como temperatura ou passos E. Comece com verificações básicas antes de calibrações específicas do fatiador.
| Problema | Possível causa da calibração | Primeiros passos para verificar |
|---|
| Má adesão da primeira camada | Deslocamento Z, nivelamento da cama, temperatura | Renivele a cama (manual/automático), ajuste o deslocamento Z, verifique a temperatura da cama. |
| Fio de filamento/exsudação | Retração, temperatura, vazão | Filamento seco, repita o teste de retração, verifique a temperatura do bico. |
| Cantos arredondados/borbulhados | Avanço de pressão, velocidade de impressão | Repita o teste de PA (considere o método da torre), reduza a velocidade de impressão. |
| Subextrusão/Lacunas | Vazão, temperatura, velocidade volumétrica máxima | Repita a calibração de vazão, aumente a temperatura do bico, verifique se há obstruções. |
| Superextrusão/Superfícies ásperas | Vazão, temperatura | Repita a calibração de vazão, diminua a temperatura do bico. |
| Imprecisão Dimensional | Tolerância, Vazão | Repetir o teste de tolerância, verificar a compensação X-Y. |
| Artefatos Finos Verticais (AFVs) | Calibração de AFV, Modelagem de Entrada, Problemas Mecânicos | Repetir o teste de AFV, verificar correias/estrutura, considerar Modelagem de Entrada. |
| Mudanças de Camada | Problemas Mecânicos (correias, motores), Aceleração | Verificar a tensão das correias, inspecionar a estrutura, reduzir a aceleração. |
Tabela 7: Fluxograma de solução de problemas de qualidade de impressão (conceitual)
A calibração completa com o OrcaSlicer é uma prática indispensável para qualquer entusiasta ou profissional de impressão 3D. Ao ajustar cuidadosamente parâmetros como temperatura, vazão, avanço de pressão, retração, tolerância, velocidade volumétrica máxima e VFA, você libera todo o potencial da sua impressora. Essa precisão resulta em impressões de maior qualidade, confiabilidade e precisão, reduzindo o desperdício de filamentos e aumentando as taxas de sucesso.
A calibração é um processo contínuo. À medida que você introduz novos filamentos, modifica hardware ou vivencia mudanças ambientais, reavalie e ajuste suas configurações. Essa otimização contínua garante que sua impressora tenha um desempenho consistente e máximo. Boa impressão!
Also available in: Deutsch | English | Español | Français | Italiano | Nederlands | Polski | Русский


