3D Print Quality Guide

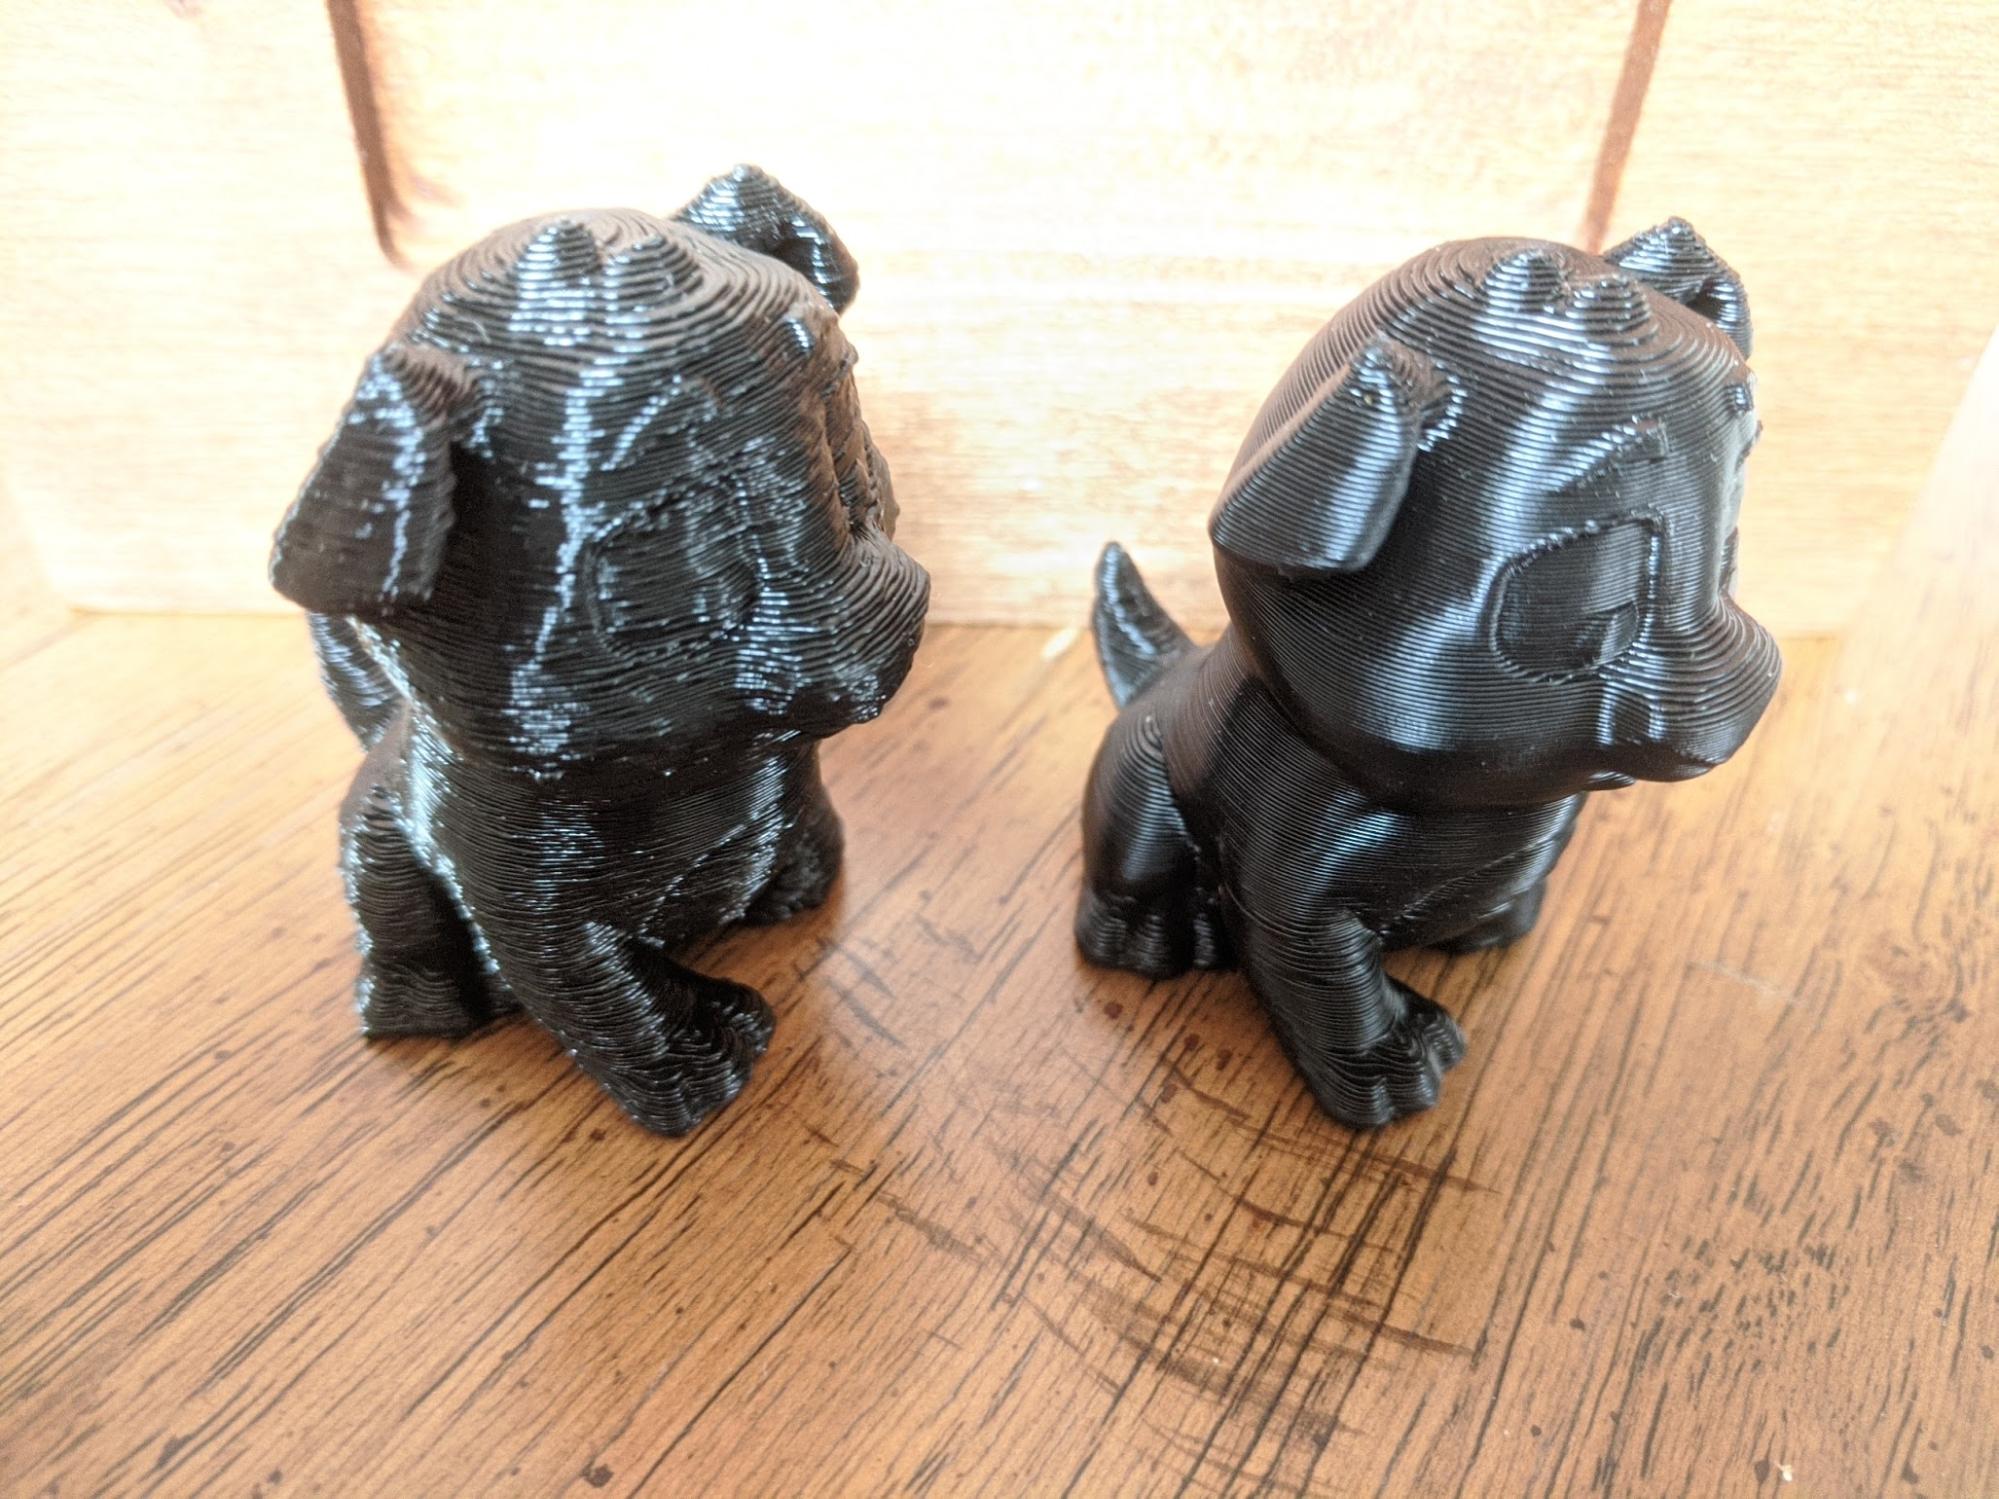
Today we're here to teach you about 3D print quality and some of the easy ways you can improve surface finish with minimal effort. Above are two 3D prints of the same exact GCODE done back to back on the same printer with the same filament. In this article we'll discuss what caused surface blobs seen on the left and how you can avoid this in your prints!
TLDR; if you want the absolute best quality prints, unfortunately you really still need to just manually copy the full GCODE over to the SD card before the print starts.
| Most Parts | SD Card | OctoPrint to SD | OctoPrint (no UI access) | OctoPrint (heavily loaded UI) | OctoPrint + TSD (heavily loaded UI) |
|---|---|---|---|---|---|
| Set Up Time | Medium | High | Low | Low | Low |
| Print Quality | High | High | High | High | High |
| Convenience | Poor | Poor | Poor | High | High |
| Curvy Organic Parts | SD Card | OctoPrint to SD | OctoPrint (no UI access) | OctoPrint (heavily loaded UI) | OctoPrint + TSD (heavily loaded UI) |
|---|---|---|---|---|---|
| Set Up Time | Medium | High | Low | Low | Low |
| Print Quality | High | High | Medium | Poor | Medium |
| Convenience | Poor | Poor | Poor | High | High |
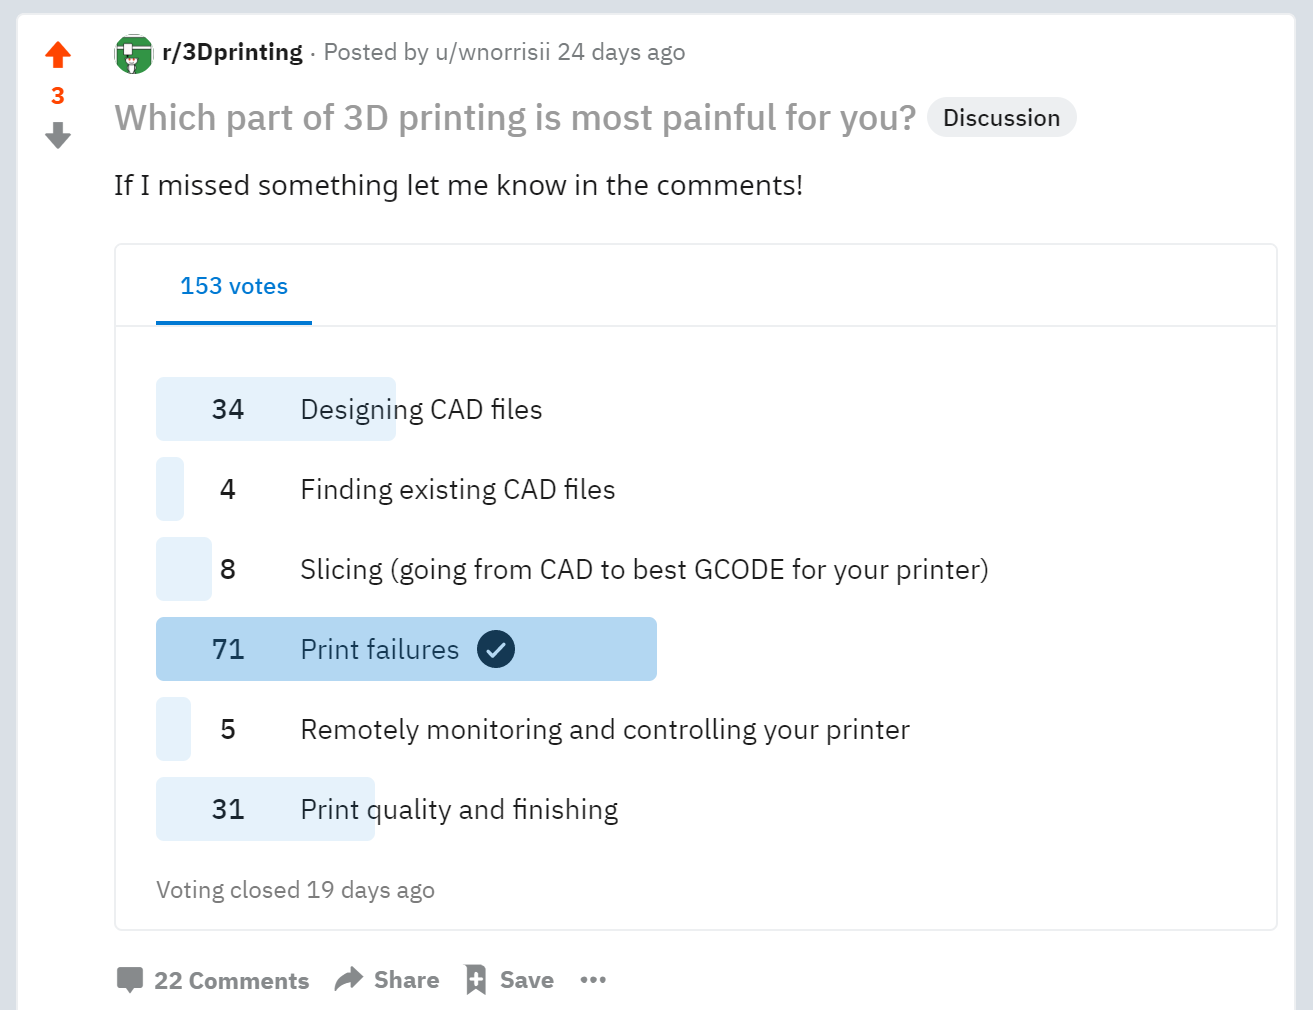
How much do 3D printing hobbyists care about print quality?
So a quick bit of motivation -- we surveyed 3D print enthusiasts, and 3D print quality was consistently one of the biggest pain points.
The cause
First I want to give credit to TH3D Studio and this video that was a great starting point for replicating the issues people experience when switching from SD card to Octoprint. They explore some of the variables that play a factor in this issue coming up, but we found that there might be a few nuances to some of these that are worth further exploration. Roughly speaking you encounter 3D print quality issues when ALL of the following conditions are true:
- You are printing over the USB serial connection to your printer
- Your GCODE has sections where it is a quick burst of very short movements
- Your print server running Octoprint gets distracted from the task of sending GCODE
So what happens if all of these conditions are met?
The 3D printer has a buffer of next GCODE commands stored locally. When it pulls commands out of the buffer new ones are normally sent to replace them over the USB Serial connection. In practice these buffers can be as low as 8 commands long. A set of quick movements will cause the buffer to be rapidly exhausted. Once empty, the print head will just sit idle and ooze extra filament, waiting for more commands to be sent over USB. This leads to blobs and inconsistencies on the print surface.
Why would there be so many super short GCODE movements?
At a high level this has to do with the type of prints you tend to do. If your prints are largely functional parts (e.g. for robotics) you may have mostly long line segments and never run into this issue. If your prints are more organic in nature (e.g. figurines) you may have mostly curved lines and surfaces. We've found curves are the main source of this issue.
The reason curves are so problematic has to do with nuances around how your file is sliced into GCODE. Long straight lines can be encoded as a single command. For example "G1 X100 F500 E0.1" can tell the printer to move 100mm in the x axis extruding a certain amount of material. If you have a curve however, many slicers encode the curve as a series of very short straight lines. The default print resolution of my slicer is 0.05mm. This means when printing a curve, each GCODE command will only correspond to a short line segment of about 0.05mm that slowly changes directions.
Why would your print server get distracted?
Your print server has a full linux operating system, a web server to provide you a nice user interface, and processes for dedicated tasks like sending commands over USB. Balancing tasks that need to be executed and their priorities is a challenging process. Only so many processes can be run at a time and it turns out that if we stress the web server enough it will cause the process sending GCODE to not get scheduled as quickly, and the GCODE buffer on your 3D printer can get exhausted.
The fix
The fix is that we need to make sure the process that is responsible for sending GCODE has priority for execution on the CPU. Anytime there is work for it to do it should be first in line to hop on the CPU and get that work done.
Ironically you may think that adding tasks, such as a plugin like TSD can only make things worse, but actually if that work is scheduled at the right priority it can make things a lot better. How? It can offload the tasks such as the web server to another server in the cloud and make sure that the Raspberry Pi (or whatever device you're using as your print server) only uses the CPU to update the cloud endpoint when there is down time on the CPU.
Prove it!
We ran an experiment to demonstrate this. To make the impact of the CPU load more noticeable we developed an especially nefarious chrome extension. It automatically injected the following line of code onto any webpage it loaded:
window.onload = function() { window.location.reload(); }
In effect this causes the browser to repeatedly reload the page the entire time the plugin is activated. It's effectively a naive denial of service attack and while we hope that this is not simulating what a real user would be doing while monitoring a print, it will demonstrate the 3D print quality issues that can occur from reloading in a more pronounced manner. In all three experiments we made sure we were printing the exact same GCODE from the same printer with the same filament. The only differences are described below.
- Octoprint Baseline: Clicked print from Octoprint, closed the webpage and did not request the UI again until the print was finished.
- Octoprint with TSD: Clicked print from Octoprint, closed the webpage and then monitored the print from the TSD site with our plugin compulsively reloading.
- Octoprint without TSD: Clicked print from Octoprint, and monitored the print from the Octoprint web page with our plugin compulsively reloading.
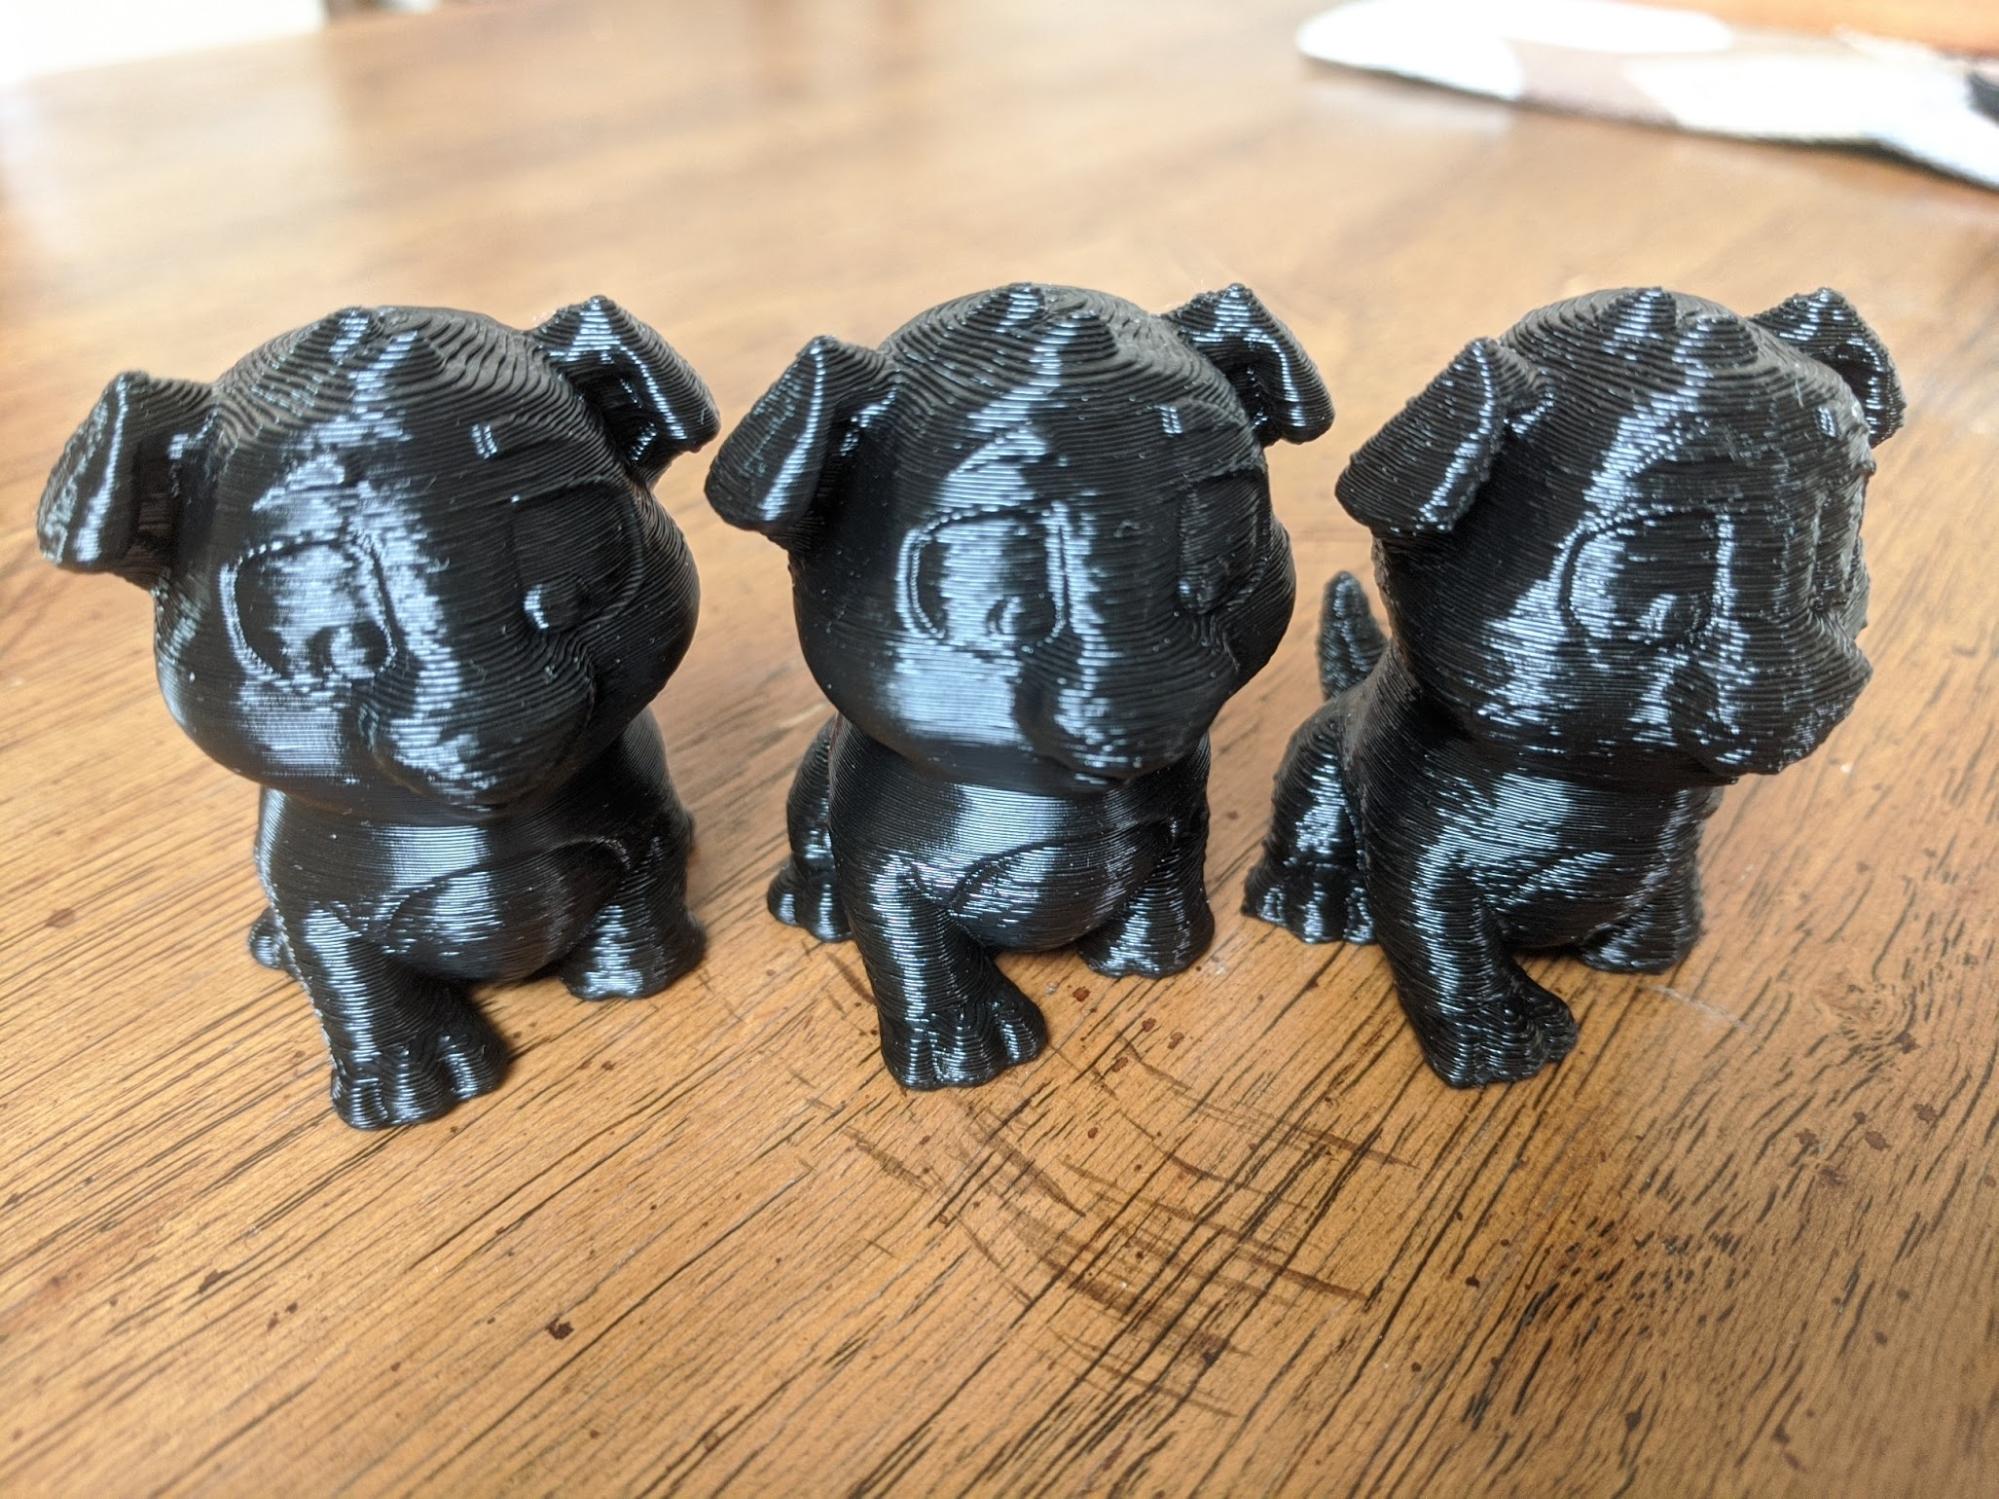
The results are shown from left to right:
- Octoprint Baseline.
- Octoprint with TSD.
- Octoprint without TSD.
It's clear there are some 3D print quality issues on all three relative to the SD card print, but it would appear that using TSD allows you to compulsively check on your print without worrying about impacting the quality, whereas compulsively reloading Octoprint (on the right) clearly degrades quality.
Conclusion
If you want the best possible 3D print quality, you definitely need to do the work of transferring to the SD card before starting the print. If you want the convenience of quickly starting your print via Octoprint, use TSD to monitor the print so you don't add load to the CPU.
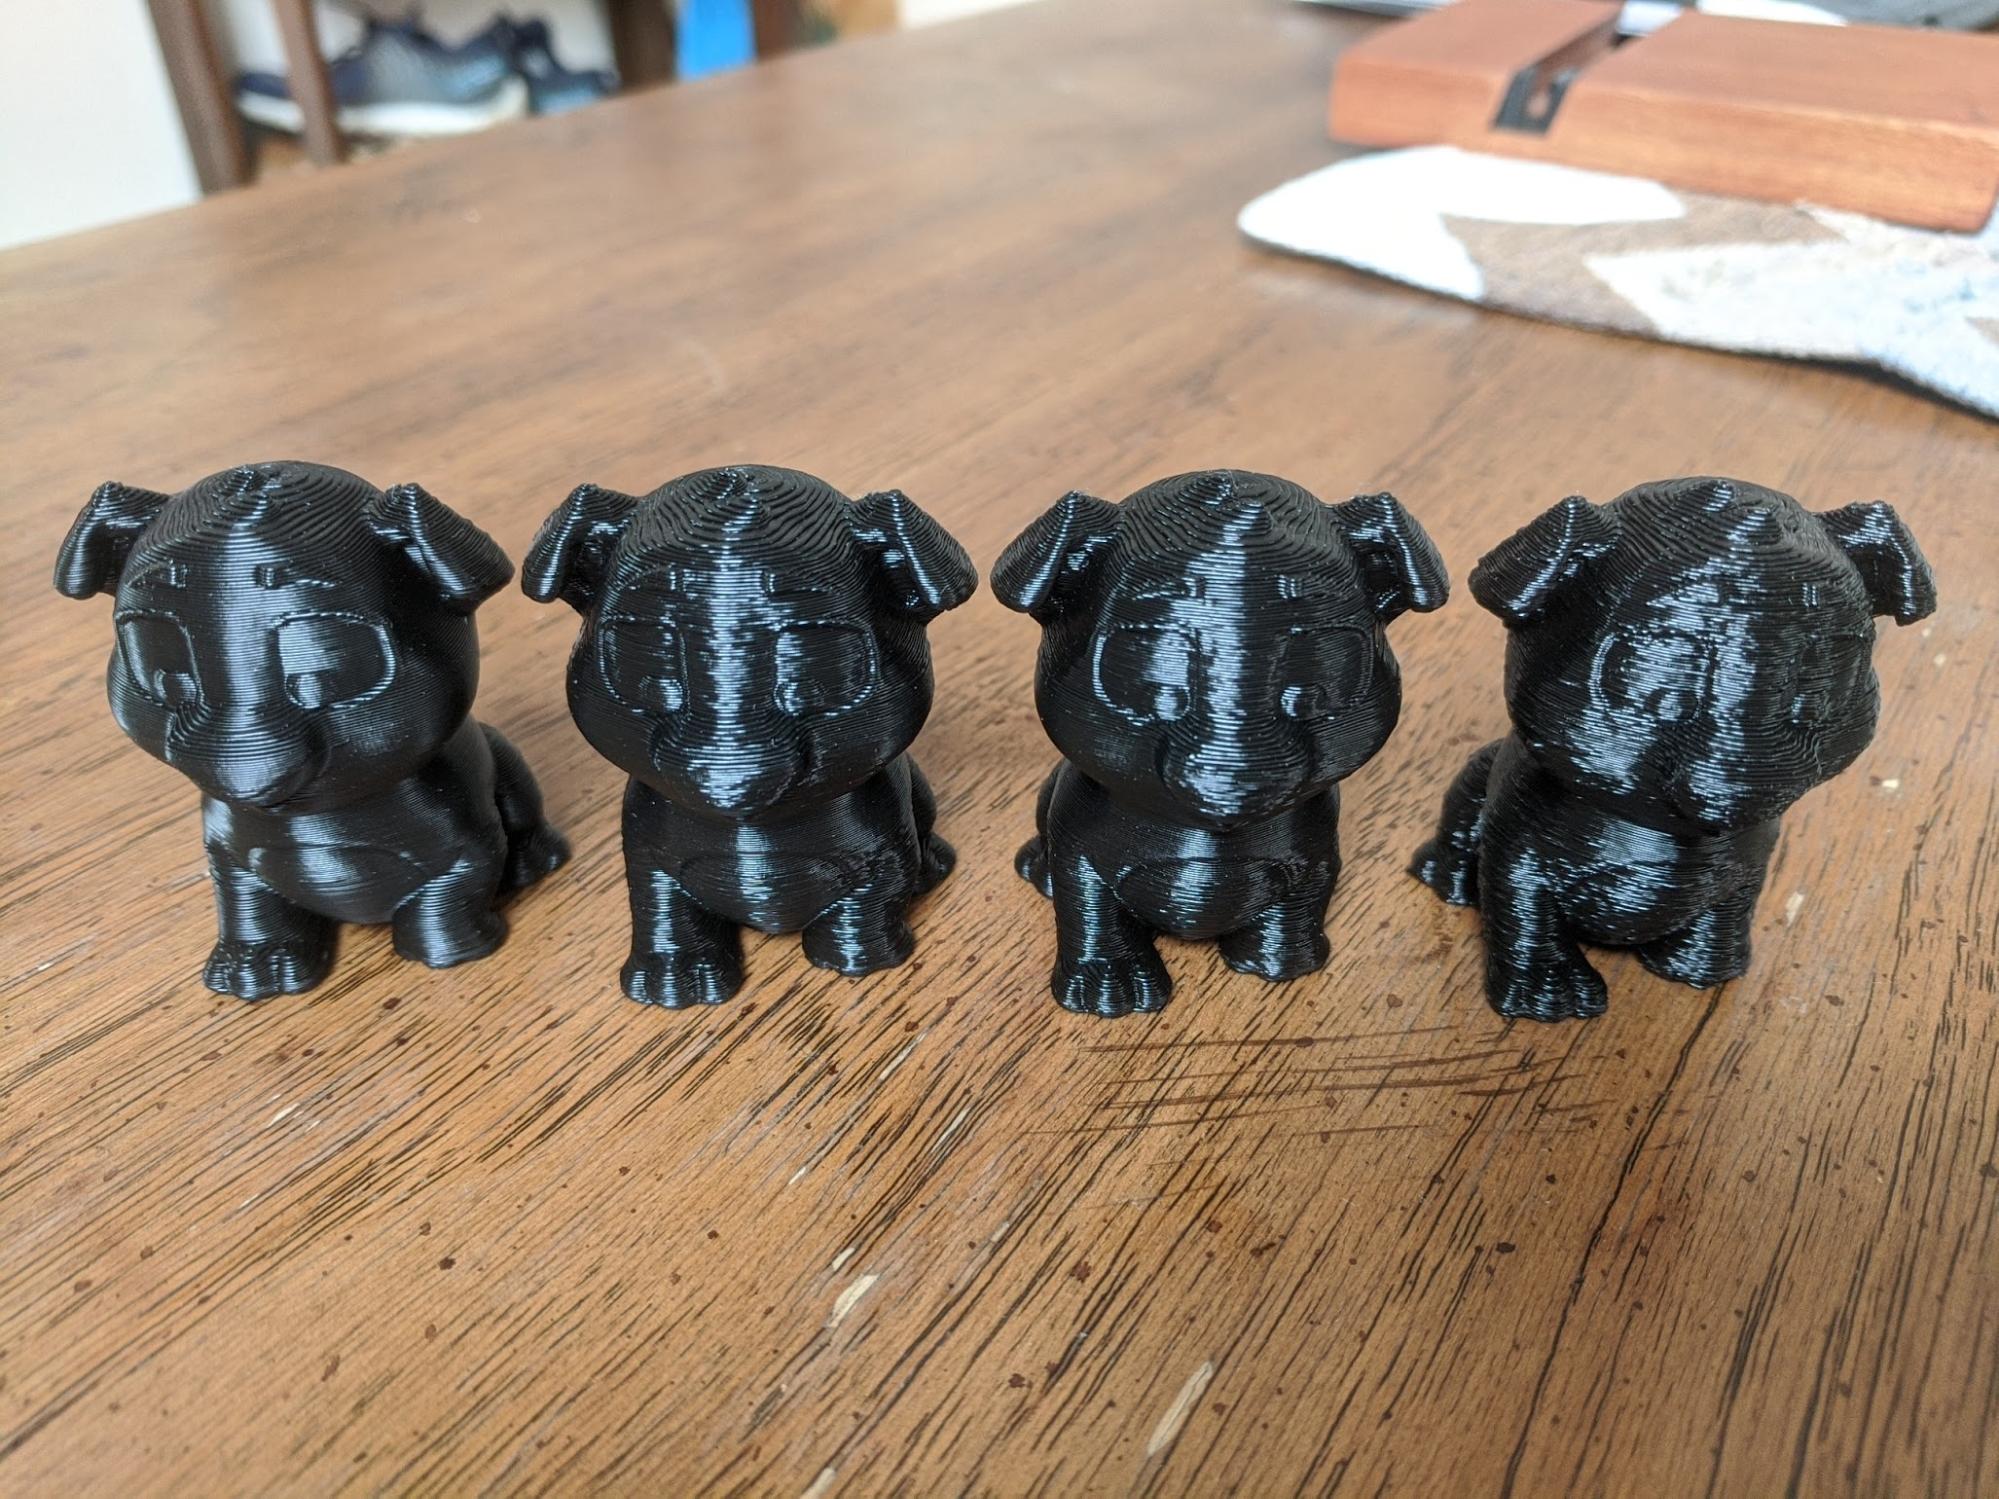
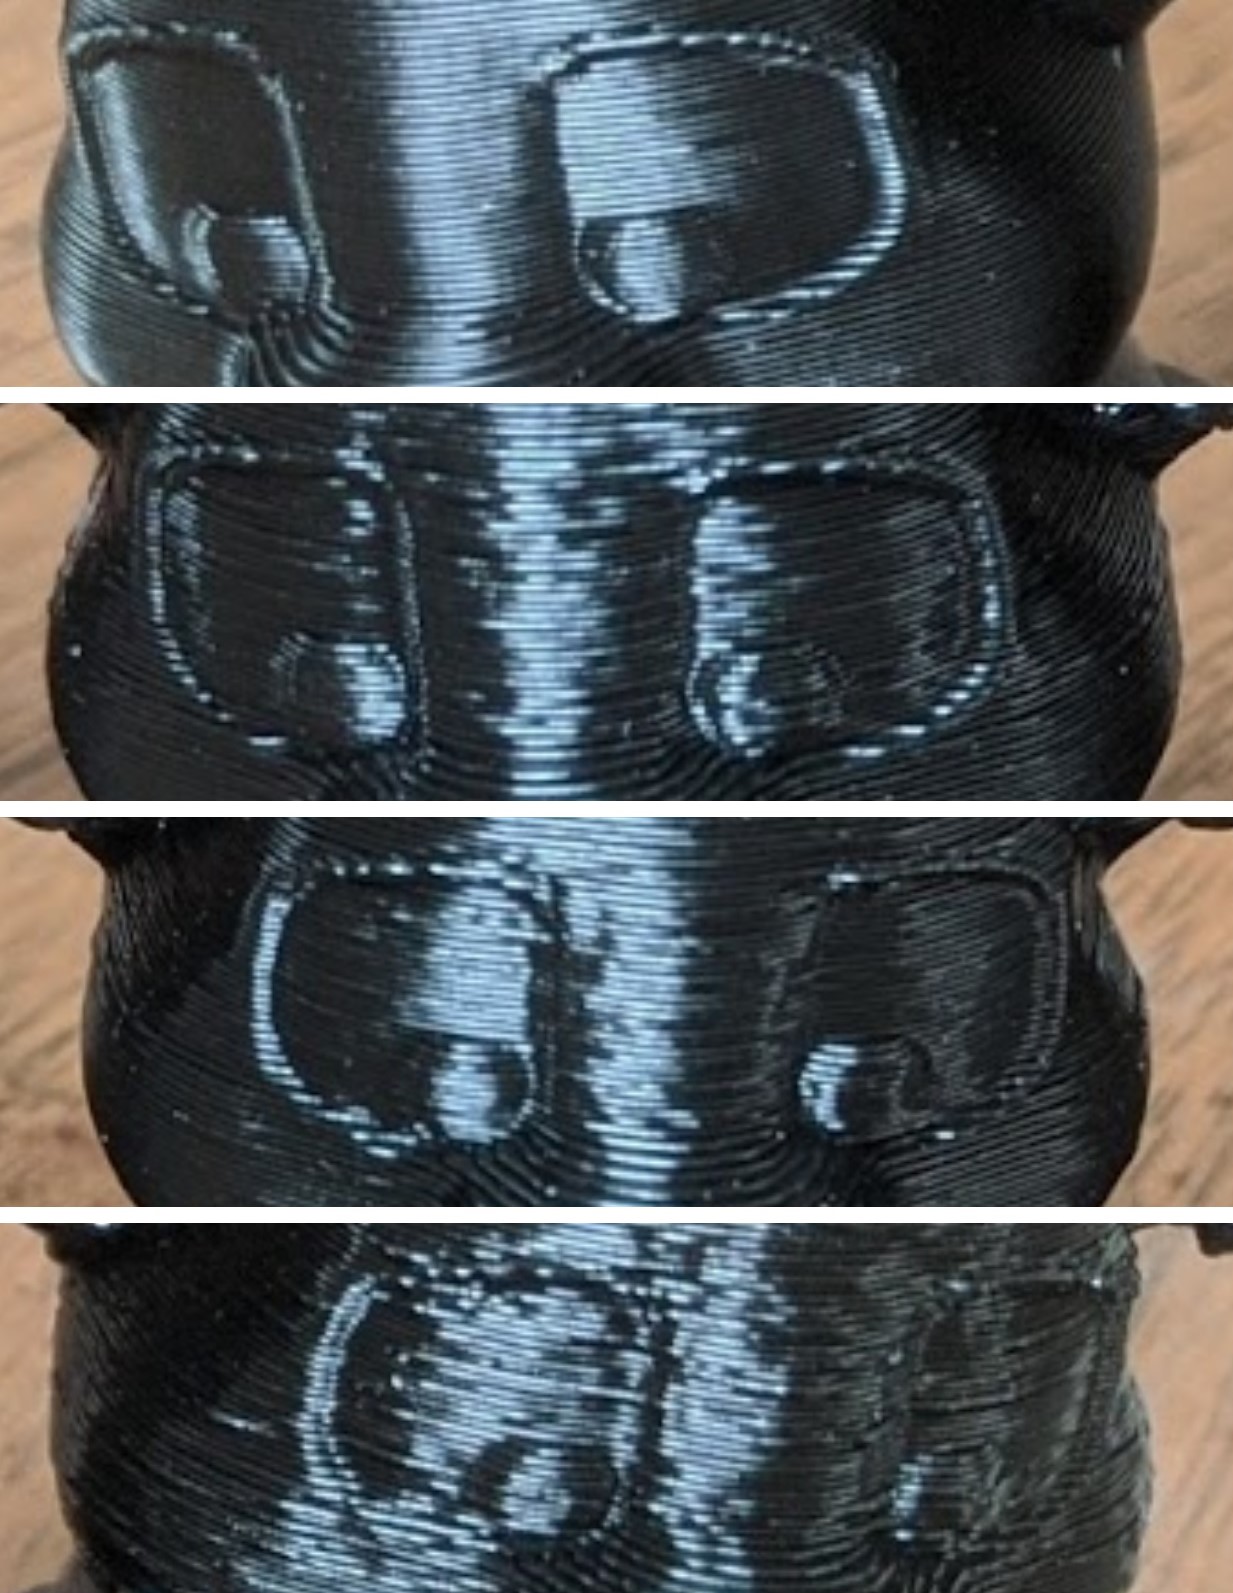
Left to right/top to bottom: SD Card, Octoprint Baseline, Octoprint + TSD w/ auto reload, Octoprint w/ auto reload.