Достижение высококачественных 3D-отпечатков во многом зависит от точной калибровки принтера. Без нее вы столкнетесь с такими распространенными проблемами, как натяжение, плохое сцепление с платформой и неточные размеры. Калибровка — это основа для стабильных, надежных и превосходных результатов печати.
OrcaSlicer — это передовое программное обеспечение для нарезки с открытым исходным кодом и мощными встроенными инструментами калибровки. Это руководство поможет вам использовать последние стабильные версии OrcaSlicer (обычно версии 2.3.0 или последние ночные сборки 2.3.1) для точной настройки принтера. Мы рассмотрим калибровки температуры, расхода, подачи давления, ретракции, допуска, максимальной объемной скорости и вертикальных мелких артефактов (VFA). Эти тесты предназначены для выполнения в определенном порядке, постепенно улучшая качество печати.
OrcaSlicer предлагает расширенные функции, такие как точный контроль стенок, «режим сэндвича» для лучшей отделки поверхности, «преобразование полиотверстий» для сложных геометрий и бесшовную интеграцию с Klipper, OctoPrint и PrusaLink. Он обеспечивает детальный контроль, оставаясь при этом удобным для пользователя с дизайном перетаскивания и готовыми профилями принтера.
Большинство функций калибровки находятся в меню «Калибровка». После завершения любого калибровочного теста всегда создавайте новый проект. Это гарантирует выход OrcaSlicer из режима калибровки и сброс параметр�ов для следующих отпечатков.

Соблюдение определенного порядка калибровки имеет решающее значение, поскольку многие настройки взаимозависимы. Начиная с базовых параметров, вы получаете точные результаты для последующих, более тонких настроек. Этот систематический подход сводит к минимуму устранение неполадок и помогает вам эффективно достигать лучшего качества печати.
| Шаг калибровки | Назначение | Ключевое наблюдение/цель | Зависимость/предпосылка |
|---|
| Температура | Оптимизация плавления и склеивания нити | Наим�еньшее образование нитей, наилучшая адгезия слоев | Нет (предполагается хорошая механическая настройка) |
| Скорость потока | Обеспечение правильного количества экструзии нити | Самая гладкая верхняя поверхность, без зазоров или пятен | Температура, Точные E-шаги/Расстояние вращения |
| Подача давления | Уменьшение артефактов от колебаний давления сопла | Самые острые углы, постоянная экструзия | Скорость потока, Температура |
| Втягивание | Минимизация образования нитей и просачивания | Самая короткая длина с минимальным образованием нитей | Скорость потока, Подача давления |
| Допуск | Точное воспроизведение размеров модели | Оптимальное соответствие между напечатанными деталями | Все предыдущие калибровки экструзии/размеров |
| Максимальная объемная скорость | Определите максимальную скорость потока нити без проблем | Самая высокая скорость до недоэкструзии | Температура, скорость потока |
| Отклонение углов/рывков/стыков | Уменьшение артефактов от острых углов | Более гладкие углы, уменьшение звона | Скорость потока, подача давления |
| Формирование входного сигнала | Уменьшение звона и улучшение качества печати | Более гладкие поверхности, уменьшение ореолов | Скорость потока, подача давления |
Таблица 1: Рекомендуемый порядок калибровки OrcaSlicer
Перед использованием расширенных инструментов OrcaSlicer убедитесь, что основные механические и тепловые системы вашего принтера настроены. Эти шаги часто выполняются непосредственно в прошивке принтера или посредством физических настроек, а не в OrcaSlicer. Их пропуск может привести к постоянным проблемам с качеством печати.
Z-смещение определяет точное расстояние между соплом и печатной платформой для первого слоя. Это критически важно для адгезии платформы. Если сопло слишком высоко, нить не будет прилипать; если слишком низко, она может царапать платформу, вызывать эффект «слоновьей ноги» или приводить к щелчкам экструдера.
Это в первую очередь настройка прошивки принтера или физическая настройка. Хотя OrcaSlicer имеет поле Z-смещения (в разделе Предустановки принтера > вкладка Общие), узнайт�е, как прошивка вашего принтера обрабатывает его. Большинство принтеров полагаются на прошивку или физическую настройку. Всегда сначала выполняйте калибровку Z-смещения на вашем принтере. Используйте настройку OrcaSlicer только для небольших настроек, если ваш принтер допускает Z-смещение, определенное слайсером.
Ровный печатный стол обеспечивает равномерное прилипание первого слоя по всей поверхности. Неровный стол приводит к тому, что некоторые области хорошо прилипают, а другие поднимаются. OrcaSlicer предлагает «Adaptive Bed Mesh» для компенсации мелких дефектов путем картирования стола.
Адаптивная сетка кровати OrcaSlicer — это программный инструмент, а не замена механически прочной и изначально выровненной кр�овати. Использование исключительно программного обеспечения без первоначального ручного или вспомогательного выравнивания (например, бумажного метода) может скрыть механические проблемы. Если кровать значительно деформирована, сетка может испытывать трудности. Сначала механически выровняйте кровать, затем установите смещение по оси Z и, наконец, позвольте автоматическому выравниванию принтера или адаптивной сетке кровати OrcaSlicer точно настроиться.
Перед регулировкой расхода в слайсере убедитесь, что E-steps (Marlin) или расстояние вращения (Klipper) вашего экструдера откалиброваны. Это сообщает принтеру, сколько нити нужно протолкнуть. Если это не так, принтер выдавит неправильное количество, что сделает калибровку расхода слайсера неточной. Это калибровка прошивки принтера, а не настройка OrcaSlicer.
После настройки основных параметров принтера воспользуйтесь встроенными калибровочными тестами OrcaSlicer для оптимизации качества печати.
Температура влияет на то, как нить плавится, течет и связывается. Слишком низкая температура — и вы получите недоэкструзию, плохую адгезию и слабые детали. Слишком высокая температура — и вы увидите подтекание, тяжи, деформацию и сгустки.
Точная калибровка температуры зависит от предварительного смещения по оси Z, выравнивания платформы и настройки ПИД. Если они отключены, результаты температурной башни могут быть обманчивыми. Убедитесь, что ваш принтер механически исправен и настроен ПИД, прежде чем проводить температурные испытания для получения точных результатов.
- Подготовка: в OrcaSlicer выберите материал (PLA, PETG и т. д.). Это задаст диапазоны температур стола и сопла по умолчанию. Перейдите в «Калибровка» > «Температура». Установите пользовательские начальные/конечные температуры (шаг фиксирован на 5 °C).

- Печать башни: OrcaSlicer создает температурную башню. Нарежьте и распечатайте ее.
- Анализ результатов: После печати проверьте каждый слой на наличие натяжения, адгезии слоев, коробления и нависания/перемычек. Найдите температурный блок с наилучшим общим качеством печати и наименьшим количеством дефектов.
- Применение настроек: Обновите оптимальную температуру сопла в настройках профиля нити в OrcaSlicer. Сохраните профиль и создайте новый проект.
Температура зависит от нити. Разные марки или цвета одного и того же типа нити могут иметь разные оптимальные диапазоны. Выполните этот тест для каждой новой нити, чтобы создать библиотеку точно настроенных профилей.
- Вытягивание/вытекание: часто означает, что температура слишком высокая или настройки ретракции отключены.
- Плохая адгезия слоя/недоэкструзия: температура сопла часто слишком низкая.
- Деформация: может быть вызвана неправильной температурой стола/сопла или недостаточным охлаждением.
| Тип/марка нити | Протестированный диапазон температур | Оптимальная температура | Ключевые наблюдения при оптимальной температуре |
|---|
| PLA (Generic) | 190-230°C | 205°C | Минимальное волокно, сильная адгезия слоев, хорошие нависания |
| PETG (Prusament) | 230-250°C | 240°C | Гладкая поверхность, без коробления, хорошее перекрытие |
| ABS (Hatchbox) | 230-260°C | 245°C | Уменьшенное растрескивание, хорошее межслоевое соединение |
Таблица 2: Настройки и наблюдения температурной башни
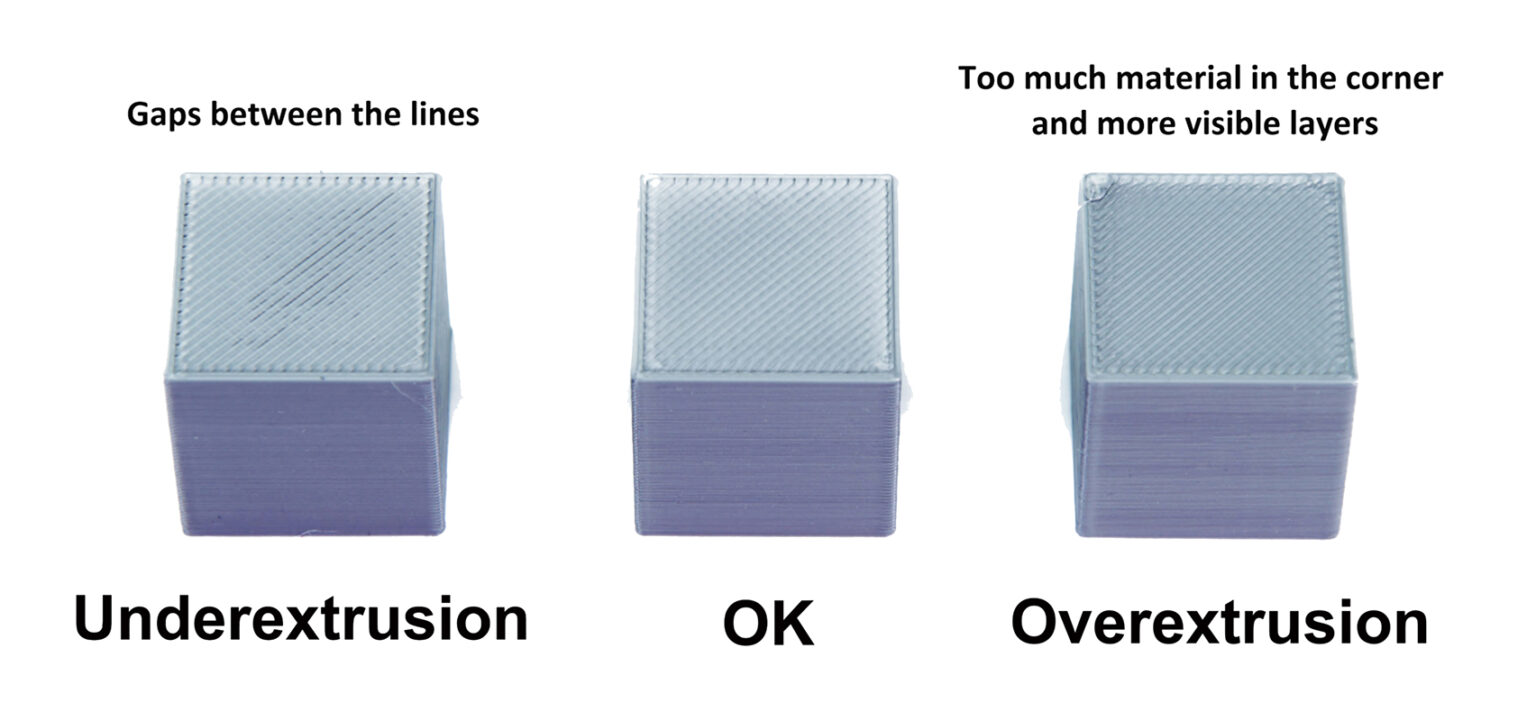
Скорость потока (множитель экструзии) контролирует количество экструдируемой нити. Это имеет решающее значение для гладких поверхностей и точности размеров. Слишком высокая — и вы получите переэкструзию: капли, тяжи, плохая точность. Слишком низкая — и вы получите недоэкструзию: зазоры, слабая адгезия, плохая отделка.
Калибровка расхода сильно зависит от температуры и E-шагов/расстояния вращения. Если ваш экструдер не откалиброван, регулировка расхода в слайсере будет неточ�ной. Сначала убедитесь, что E-шаги правильные, а температура оптимальна.
Высота слоя и скорость печати также могут влиять на оптимальную скорость потока. Если пределы скорости печати изменились, выполните калибровку повторно.
- Создание тестового проекта: в OrcaSlicer выберите принтер, нить и параметры процесса. Перейдите в «Калибровка» > «Проход 1». Это сгенерирует девять блоков, каждый с различным модификатором скорости потока.

- Анализ на предмет самой гладкой поверхности: Распечатайте проект. Изучите верхние поверхности. Найдите блок с самой гладкой поверхностью, без чрезмерной экструзии (выступы, пятна) или недостаточной экструзии (пробелы). Если �два блока похожи, выберите тот, у которого скорость потока выше.
- Расчет коэффициента потока: Рассчитайте FlowRatio_new = FlowRatio_old * (100 + модификатор) / 100. Пример: 0,98 * (100 + 5) / 100 = 1,029.
- Создание проекта тонкой настройки: создайте новый проект. Перейдите в «Калибровка» > «Проход 2». Это сгенерирует десять блоков с модификаторами от -9 до 0 для точной настройки.

- Оценка согласованности: Печать прохода 2. Проверьте верхние поверхности на наилучшее качество, адгезию слоев и согласованность. Рассчитайте обновленное соотношение потока, используя ту же формулу. Пример: 1,029 * (100 - 6) / 100 = 0,96726.
- Применение настроек: Сохраните окончательное оптимальное соотношение потока в настройках профиля нити в OrcaSlicer.
Вы можете посчитать встроенные результаты калибровки потока OrcaSlicer "ужасными" и требующими ручного вмешательства. Это указывает на необходимость руководства по "мета-калибровке": как устранить неполадки в самом процессе калибровки.
- Начальная переэкструзия/перетаскивание: Это может означать, что температура печати слишком высокая или E-шаги/расстояние вращения не откалиброваны. Перепр�оверьте E-шаги перед повторным запуском калибровки потока.
- Щелчки экструдера: Часто означает, что температура слишком низкая для желаемого потока, что приводит к пропускам двигателя экструдера. Слегка увеличьте температуру сопла или уменьшите максимальную объемную скорость (рассмотрено позже) перед повторной попыткой калибровки потока.
- Непоследовательность теста/неоднозначные результаты: Если калибровочные отпечатки выглядят плохо, а другие отпечатки в порядке, рассмотрите следующее:
- Скорость печати теста: Скорость по умолчанию может быть слишком высокой. Попробуйте замедлить калибровочные отпечатки.
- Настройки ширины линии: Если ширина линии (в настройках процесса) слишком велика для вашего сопла, это может привести к переэкструзии. Убедитесь, что ширина подходящая (например, 0,45 мм для сопла 0,4 мм).
- Субъективность визуального теста: Визуальная оценка может быть субъективной. Для получения более объективных результатов распечатайте куб с одной стенкой:
- Распечатайте куб с одной стенкой (например, 20x20x20 мм, заполнение 0%, 1 периметр).
- Измерьте толщину стенки штангенциркулем.
- Рассчитайте желаемую толщину стенки (например, 0,4 мм для сопла 0,4 мм).
- Отрегулируйте соотношение расхода: новое соотношение расхода = текущее соотношение расхода * (желаемая толщина стенки / измеренная толщина стенки).
- Сохранение проблем: Если калибровка расхода постоянно не удается, предыдущая калибровка (температура, E-шаги/расстояние вращения или механические проблемы), вероятно, все еще неверна. Не переходите к повышению или понижению давления, пока поток не будет надежно настроен.
| Проход | Диапазон модификаторов | Количество блоков | Формула расчета | Назначение |
|---|
| Проход 1 | от +5 до -5 | 9 | FlowRatio_new = FlowRatio_old * (100 + модификатор) / 100 | Начальная калибровка для поиска приблизительного оптимального диапазона |
| Проход 2 | от -9 до 0 | 10 | FlowRatio_new = FlowRatio_old * (100 + модификатор) / 100 | Тонкая настройка для точного оптимального соотношения потоков |
Таблица 3: Сводка проходов калибровки расхода 1 и 2
Pressure Advance (PA) компенсирует изменения давления в сопле при колебаниях скорости (ускорение/замедление). Он предотвращает закругленные углы, капли и «прыщи» путем предварительной регулировки экструзии для поддержания равномерного потока.
Всегда выполняйте калибровку Pressure Advance после калибровки Flow Rate. Если расход неправильный, PA будет компенсировать неточно. Стабильный расход необходим для эффективного PA. Если ваши тесты PA выглядят грязными, пересмотрите калибровки Flow Rate и Temperature сначала.
Значения PA значительно различаются в зависимости от типа экструдера (Direct Drive или Bowden), типа/марки филамента, размера сопла, температуры горячего конца и модификаций оборудования. Различные материалы имеют уникальный поток расплава, а изменения длины пути влияют на PA. Это означает, что PA часто требует повторной калибровки для разных настроек или материалов.
OrcaSlicer просит вас выбрать тип экструдера (Direct Drive или Bowden). Значения PA сильно различаются из-за длины пути нити. Для установок Bowden обычно требуются более высокие значения PA.

OrcaSlicer предлагает несколько методов калибровки Pressure Advance:
- Метод линий: Этот метод помогает быстро определить оптимальное значение Pressure Advance.
- Доступ: Перейдите в меню «Калибровка» > «Pressure Advance» > «PA Line».
- Тест: OrcaSlicer генерирует серию линий, каждая из которых печатается с пошаговым изменением значения PA. Цель состоит в том, чтобы наблюдать, где начало и конец каждой линии выглядят «чистее всего», а переход в линию и из нее — наиболее резким, что указывает на наиболее последовательную экструзию.
- Зависимость: Этот метод чувствителен к качеству первого слоя. Перед выполнением этого теста убедитесь, что ваша платформа правильно выровнена.
- Метод шаблона: Визуальная оценка углов.
- Доступ: В меню «Калибровка» выберите «Pressure Advance», а затем выберите «Метод шаблона».
- Тест: OrcaSlicer генерирует призмообразный шаблон. Проверьте качество экструзии и определите самые острые углы с наименьшим количеством артефактов (таких как зазоры, выпуклости или выбоины).

Источник: obico.io
3. Метод башни: Менее чувствителен к качеству первого слоя, но занимает больше времени.
- Доступ: В меню «Калибровка» выберите «Pressure Advance», а затем выберите «PA Tower».
- Тест: Программное обеспечение создает башню, в которой PA увеличивается с высотой (обычно 0,002 на мм для Direct Drive, 0,02 для Bowden). Проверьте каждый угол, чтобы найти высоту с четкими, чистыми углами.
- Рекомендация: печатайте на более высоких скоростях (выше 120 мм/с), чтобы увидеть влияние PA при типичных условиях печати.

Источник: ellis3dp.com
После определения оптимального значения PA откройте настройки филамента (значок редактирования рядом с профилем). Включите «Включить повышение давления» и введите значение. Сохраните профиль филамента.

| Метод | Тип экструдера | Плюсы | Минусы | Ключевые наблюдения |
|---|
| Линия | Оба | Быстро, просто проверить | Сильно зависит от качества первого слоя | Самые чистые концы линии, самая острая точка |
| Шаблон | Оба | Визуальная оценка углов, более продвинутая | Все еще несколько зависит от первого слоя | Самая стабильная экструзия, самый острый угол с наименьшим количеством артефактов |
| Башня | Оба | Менее чувствительна к качеству первого слоя, подходит для высоких скоростей | Требует больше времени и материала | Лучшее общее качество углов на определенной высоте |
Таблица 4: Сравнение методов повышения давления
Втягивание оттягивает нить назад перед перем�ещением, создавая отрицательное давление для предотвращения просачивания, нитей или капель. Ключевыми параметрами являются длина втягивания, скорость и Z-скачкообразное перемещение.
Втягивание взаимодействует с Pressure Advance. Оптимальное втягивание помогает управлять физическим оттягиванием, в то время как PA управляет давлением в хотэнде. Если PA не откалиброван, втягивание может быть затруднено. Целью является самая короткая длина, которая минимизирует натяжение, не вызывая засоров или «оспин».
Если после испытаний на втягивание натяжение сохраняется, сначала пересмотрите настройки температуры и расхода, а затем давление подачи. Эти основные настройки должны быть правильными, чтобы втягивание было эффективным.
- Доступ и настройка: создайте новый проект. Перейдите в «Калибровка» > «Тест на отвод». Настройте «Начальную длину отвода», «Конечную длину отвода» и «Шаг» (по умолчанию обычно 0 мм, 2 мм, 0,1 мм). Экструдерам Боудена обычно требуются более длинные линии (1–6 мм), чем экструдерам с прямым приводом (0–2 мм).

- Нарезка и печать: нарежьте и напечатайте башню отвода. Убедитесь, что выбран «Нормальный» Z-скач. Вы можете нарисовать швы на внутренних сторонах башни в предварительном просмотре для более четкого наблюдения за нанизыванием.

Источник: obico.io
3. Анализ результатов и настройка: осмотрите каждую выемку. Найдите самую короткую длину, которая минимизирует натяжение и просачивание без других проблем. Пример: если наилучшее качество — одна выемка от основания с шагом 0,1 мм, оптимальная длина — 0,2 мм. Откройте настройки нити, вкладку «Переопределения настроек», проверьте «длину» под втягиванием, введите новое значение и сохраните.

- Тип нити: Разные материалы просачиваются по-разному. PLA/ABS обычно требуют меньшего втягивания (0,2–0,4 мм), чем гибкие или гигроскопичные нити.
- Сушка нити: Влага является частой причиной образования нитей. Если образование нитей не прекращается, высушите нить. Часто это первое, что нужно проверить.
- Установка сопла: Неплотное или частично засоренное сопло может привести к образованию нитей. Регулярно проверяйте установку и устраняйте препятствия.
- Протирайте во время втягивания: Эта настройка заставляет сопло двигаться во время втягивания, очищая сопло и уменьшая образование нитей/просачивание.
- Скорость деретракции: Управляет скоростью перезагрузки после втягивания. Установка на 0 использует скорость втягивания.
- Пороговое значение расстояния перемещения: Втягивается только в том случае, если перемещение превышает предел, предотвращая ненужные втягивания и уменьшая образование нитей в небольших зазорах.
| Настройка | Описание | Распространенная проблема | Решение/Совет |
|---|
| Длина втягивания | Количество вытянутой нити. | Натяжение, просачивание, засоры (если слишком большое) | Увеличить для натяжения, уменьшить для засоров/оспин. |
| Скорость втягивания | Скорость вытягивания нити. | Натяжение, капли, шлифование нити | Увеличить для более быстрого отклика, избежать шлифования. |
| Z-Hop | Поднимает сопло во время перемещения. | Соскребание сопла, капли на поверхности | Включить для сложных отпечатков, отрегулировать высоту. |
| Скорость деретракции | Скорость повторной загрузки нити. | Недоэкструзия в начале новой строки | Установите на 0 (использует скорость втягивания) или немного ниже. |
| Порог расстояния перемещения | Минимальный ход для втягивания. | Натяжение в небольших зазорах | Отрегулируйте, чтобы активировать для соответствующего перемещения. |
| Протирание при втягивании | Сопло движется по траектории во время втягивания. | Видимость Z-шва, просачивание | Включите для улучшения швов внешней стенки и уменьшения просачивания. |
Таблица 5: Настройки отзыва и устранение неполадок
Допуск — это то, насколько точно ваш принтер воспроизводит размеры. Это важно для деталей, которые подходят друг другу (сборки, взаимозаменяемые компоненты). Изменения размеров возникают из-за усадки нити и механики принтера. Тест на допуск помогает вам понять поведение вашего принтера, чтобы �скорректировать дизайн для идеальной подгонки.
Допуск — это характеристика комбинации нити и принтера. Это не одноразовая настройка. Разные нити усаживаются по-разному, и даже марки/цвета могут различаться. Повторно тестируйте при смене типов нити, марок или при внесении существенных изменений в оборудование. Поддерживайте профили каждой нити для постоянной точности.
- Доступ: перейдите в «Калибровка» > «Тест на устойчивость к косатке». Откроется новый проект с тестовой моделью.

- Описание модели: М�одель имеет основание с шестью шестиугольными отверстиями (допуск 0,0 мм, 0,05 мм, 0,1 мм, 0,2 мм, 0,3 мм, 0,4 мм) и шестиугольный тестер.
- Печать: Выберите принтер, нить и параметры процесса. Нарежьте и напечатайте.
- Важно: Избегайте использования компенсации отверстий X-Y и компенсации контура X-Y (установленной на 0 мм) во время этого теста, так как они могут исказить результаты.
После завершения печати используйте шестигранный ключ M6 или прилагаемый печатный шестигранный тестер. Ваша цель — определить самое маленькое отверстие на тестовой печати, в которое тестер может вставиться с минимальным усилием или без него, и без заметного шатания или люфта. Это конкретное отверстие представляет собой реальный выход вашего принтера для «плотного» или «гладкого» прилегания к этой нити.
Вот как объективно определить эту «идеальную» посадку:
- Начните с самых маленьких отверстий: Начните с попытки вставить тестер в отверстия 0,0 мм, 0,05 мм и 0,1 мм.
- Оцените посадку для каждого из них:
- Слишком туго: Если вам приходится прилагать силу к тестеру или он просто не входит, это отверстие слишком тугое для «правильной» посадки.
- Слишком свободно/шатается: Если тестер входит очень легко и имеет заметный люфт или шатается, это отверстие слишком свободно для «правильной» посадки.
- В самый раз: Это самое тугое отверстие, в которое тестер входит плавно, требуя небольшого, но постоянного давления, и после вставки практически не имеет заметного люфта.
- Обозначенный размер этого "правильного" отверстия (например, 0,1 мм, 0,2 мм или 0,3 мм) говорит вам о присущей вашему принтеру точности размеров отверстий с этой конкретной нитью. Это наблюдаемое значение имеет решающее значение для определения того, как применять компенсацию для достижения желаемой подгонки в будущих проектах.

Источник: hta3d.com
После того, как вы определили "правильное" соответствие на тестовой печати допуска (например, отверстие 0,2 мм идеально подходит для теста), вы используете это наблюдение для настройки компенсации отверстий X-Y в OrcaSlicer. Затем эта настройка будет применена ко всем отверстиям в ваших будущих проектах, чтобы гарантировать, что они будут напечатаны с желаемым соответствием.
- Сценарий 1: ваши напечатанные отверстия постоянно выходят меньше, чем задумано (слишком плотно).
- Пример: вы проектируете деталь с отверстием с зазором 0,2 мм, ожидая "точно правильной" посадки. На вашей тестовой печати с допуском отверстие 0,2 мм слишком плотно, и тестер только плавно входит в отверстие 0,3 мм. Это означает, что ваш принтер делает отверстия примерно на 0,1 мм меньше, чем задумано.
- Действие: вам нужно увеличить компенсацию отверстий X-Y на положительное значение. В этом примере установка компенсации отверстий X-Y на +0,1 мм приведет к тому, что все отверстия в ваших будущих отпечатках будут напечатаны на 0,1 мм больше, таким образом, ваши спроектированные отверстия с зазором 0,2 мм будут ближе к "точно правильной" посадке.
- Сценарий 2: Ваши напечатанные отверстия постоянно выходят больше, чем рассчитано (слишком свободно).
- Пример: Вы проектируете деталь с отверстием с зазором 0,2 мм, ожидая "точно правильной" посадки. На вашей тестовой печати с допуском отверстие 0,2 мм слишком свободно, и тестер только плавно входит в отверстие 0,1 мм. Это означает, что ваш принтер делает отверстия примерно на 0,1 мм больше, чем рассчитано.
- Действие: Вам нужно уменьшить компенсацию отверстий X-Y на отрицательное значение. В этом примере установка компенсации отверстий X-Y на -0,1 мм приведет к тому, что все отверстия в ваших будущих распечатках будут напечатаны на 0,1 мм меньше, таким образом, ваши спроектированные отверстия с зазором 0,2 мм будут ближе к "точно правильной" посадке.
Помните, компенсация отверстий X-Y предназначена специально для внутренних элементов, таких как отверстия. Компенсация контура X-Y используется для корректировки общих внешних размеров вашей детали и обычно не корректируется на основе результатов этого конкретного теста допуска отверстий.
Максимальная объемная скорость (или максимальный расход) — это максимальный объем нити (мм³/с), который ваш хотэнд может плавить и экструдировать без проблем. Это гарантирует, что ваш принтер сможет обрабатывать заданный поток, особенно на высоких скоростях, без недоэкструзии (хотэнд не может плавиться достаточно быстро) или переэкструзии (чрезмерное давление). Определение этого предела оптимизирует скорость печати без ущерба для качества.
Максимальная объемная скорость — это предел hotend-и-filament. Разные филаменты имеют уникальные скорости расплавления. PLA, PETG и ABS будут иметь разные максимальные значения. Вы должны протестировать каждый тип филамента, который вы планируете печатать на высоких скоростях, чтобы задать конкретные настройки объемной скорости в каждом профиле филамента.
- Доступ: перейдите в «Калибровка» > «Максимальная объемная скорость».

- Тест: OrcaSlicer генерирует модель. Распечатайте ее и наблюдайте за качеством по мере увеличения скорости (и объемного расхода). Определите, где качество печати ухудшается (недоэкструзия, зазоры, шероховатая поверхность).
- Определение максимальной безопасной скорости: Обратите внимание на объемную скорость непосредственно перед ухудшением. Это ваша максимальная безопасная объемная скорость для этого хотэнда и нити.
- Применение настроек: введите это значение в настройки нити в OrcaSlicer. Это не позволит слайсеру задавать скорости, превышающие возможности вашего хотэнда.

| Тип/марка нити | Оптимальная максимальная объемная скоро�сть (мм³/с) | Наблюдения |
|---|
| PLA (Generic) | 16,75 | Недоэкструзия и зазоры между слоями за пределами этой точки |
| PETG (Prusament) | 14,5 | Ухудшение качества поверхности на более высоких скоростях |
| ABS (Hatchbox) | 18,0 | Последовательная экструзия до этого предела |
Таблица 6: Результаты максимальной объемной скорости
Вертикальные мелкие артефакты (VFA) — это тонкие ритмичные узоры или линии на отпечатках, часто около углов или изменений направления. Они вызваны механическими вибрациями или резонансом в системе движения на скорости.
Калибровка VFA находит практический предел скорости для качества, отличный от максимальной объемной скорости. В то время как объемная скорость касается мощности хотэнда, VFA учитывает ограничения системы движения. Ваш принтер может выдавливать достаточно нити, но его рама, ремни или двигатели могут вносить вибрации как VFA. Тест VFA обеспечивает максимальную скорость печати в «реальном мире», при которой сохраняется качество, проверяя стабильность системы движения после установки объемной скорости.
- Доступ: Перейдите в «Калибровка» > «еще» > «VFA».

- Параметры настройки: Появ�ится окно для настройки «Начальной скорости», «Конечной скорости» и «Шагов приращения». Пример: 160 мм/с начало, 500 мм/с конец, приращения 20 мм/с.
- Анализ дефектов: Разрежьте и распечатайте башню скорости VFA. Визуально проверьте наличие нитей, недоэкструзии, смещений слоев и качество поверхности. Определите самую высокую скорость с хорошим качеством до ухудшения. Модель имеет отметки, соответствующие скоростям. Пример: если недоэкструзия начинается с выемки 11 (160 мм/с начало, 20 мм/с приращения), оптимальная скорость составляет 360 мм/с (160 + (20 * 10)).

Источник: obico.io
Оптимальное качество 3D-печати требует не только калибровочных тестов. Оно требует обслуживания принтера, управления филаментом и контроля окружающей среды.
Регулярное обслуживание имеет ключевое значение: проверьте сопло на износ/засоры, убедитесь в работоспособности экструдера, очистите платформу, проверьте натяжение ремня. Регулярная очистка, выравнивание платформы и настройка ПИД поддерживают оптимальную работу принтера.
Качество нити влияет на отпечатки. Влага в гигроскопичных нитях (PETG, нейлон, TPU) вызывает появление пузырьков, шипение, натяжение и слабые детали. Всегда используйте свежую сухую нить. Храните в герметичных пакетах/контейнерах с осушителем. Сушите влажную нить в сушилке или духовке.
Стабильная среда имеет решающее значение. Колебания температуры, влажности или воздушного потока вызывают деформацию и несоответствия. По возможности используйте корпус. Контролируйте с помощью термометра и гигрометра, чтобы предотвратить проблемы.
Калибровка постоянная, а не «установил и забыл». Настройки динамичны и изменяются.
- Новая нить: Повторная калибровка для новых типов, марок или даже цветов.
- Изменения оборудования: Новые изменения длины горячего конца, экструдера или трубки Боудена требуют повторной калибровки затронутых параметров.
- Ухудшение качества печати: Если качество неожиданно падает, повторная калибровка часто является первым шагом для диагностики причины.
Многие проблемы с качеством печати возникают из-за проблем с калибровкой. Используйте системный подход для их диагностики и устранения, предотвращая случайные подст�ройки. Проблемы во время калибровки потока (щелчки, грубая печать) часто указывают на проблемы предварительной калибровки или зависимости, такие как температура или E-steps. Начните с базовых проверок перед калибровкой конкретных слайсеров.
| Проблема | Возможная причина калибровки | Первые шаги для проверки |
|---|
| Плохая адгезия первого слоя | Смещение по оси Z, выравнивание платформы, температура | Повторно выровняйте платформу (вручную/автоматически), отрегулируйте смещение по оси Z, проверьте температуру платформы. |
| Вытягивание/вытекание | Втягивание, температура, скорость потока | Сухая нить, повторно запустите тест на втягивание, проверьте температуру сопла. |
| Пузыри/скругленные углы | Подача давления, скорость печати | Повторно запустите тест PA (рассмотрите метод башни), уменьшите скорость печати. |
| Недоэкструзия/пробелы | Скорость потока, температура, максимальная объемная скорость | Повторно запустите калибровку потока, увеличьте температуру сопла, проверьте на засоры. |
| Чрезмерная экструзия/шероховатые поверхности | Скорость потока, температура | Повторно запустите калибровку потока, уменьшите температуру сопла. |
| Неточность размеров | Допуск, расход | Повторно запустите тест допуска, проверьте компенсацию X-Y. |
| Вертикальные мелкие артефакты (VFA) | Калибровка VFA, формирование входного сигнала, механические проблемы | Повторно запустите тест VFA, проверьте ремни/раму, рассмотрите формирование входного сигнала. |
| Сдвиги слоев | Механические проблемы (ремни, двигатели), ускорение | Проверьте натяжение ремня, осмотрите раму, уменьшите ускорение. |
Таблица 7: Блок-схема устранения неполадок качества печати (концептуальная)
Комплексная калибровка с OrcaSlicer — это незаменимая практика для любого энтузиаста или профессионала 3D-печати. Тщательно настраивая такие параметры, как температура, скорость потока, подача давления, отвод, допуск, максимальная объемная скорость и VFA, вы раскрываете весь потенциал своего принтера. Такая точность приводит к более высокому качеству, надежности и точности печати, сокращая отходы нити и повышая показатели успешности.
Калибровка — это непрерывный процесс. По мере внедрения новых нитей, модификации оборудования или изменения условий окружающей среды переоценивайте и корректируйте свои настройки. Эта непрерывная оптимизация гарантирует, что ваш принтер будет работать на пике своих возможностей. Удачной печати!
Also available in: Deutsch | English | Español | Français | Italiano | Nederlands | Polski | Português
 Источник: help.prusa3d.com


: Полное руководство")


