Retraction test in OrcaSlicer: A Comprehensive Guide
Introduction
3D printing is a fascinating technology that allows you to create almost anything you can imagine. However, it also comes with some challenges and limitations, such as the quality of the printed parts. One of the most common issues that affect the appearance and functionality of 3D prints is the presence of unwanted material residues, such as strings, blobs, and zits.
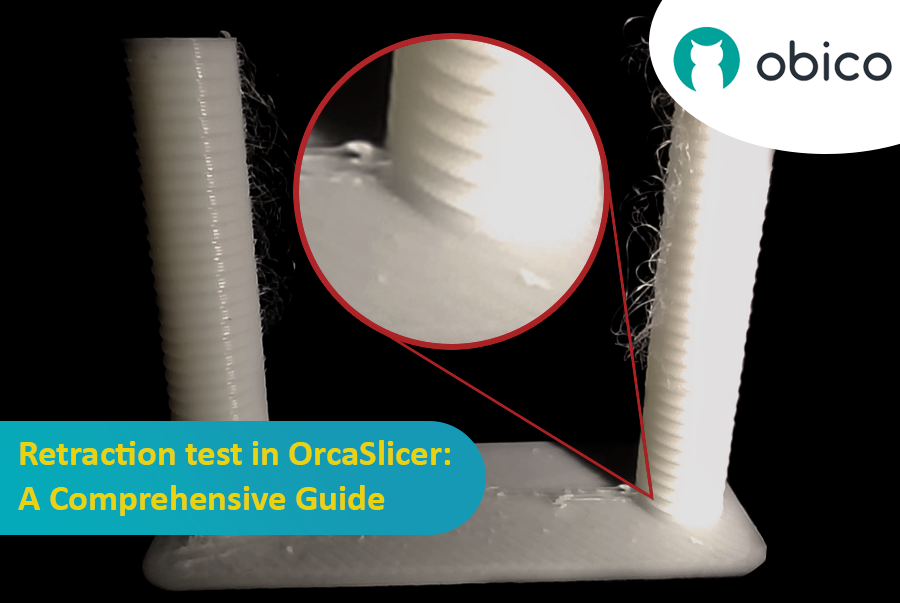
Fortunately, there is a way to reduce or eliminate these artifacts by using a feature called retraction. But what does retraction mean?
Let’s break it down:
What is the retraction and the retraction test?
The retraction test is a calibration procedure that aims to reduce or eliminate the stringing and oozing problems that may occur during 3D printing. Stringing and oozing are caused by the excess material that leaks out of the nozzle when the hotend moves from one part of the model to another without extruding. This results in unwanted strands or blobs of filament on the surface or between the parts of the model, affecting the quality and appearance of the print.
To prevent this, the retraction feature in the slicer software instructs the extruder to pull back or retract a certain amount of filament before performing a travel move. This creates a negative pressure inside the nozzle, reducing the flow of molten plastic. The retraction distance and speed are the two main parameters that control how much and how fast the filament is retracted. However, finding the optimal values for these parameters can be challenging, as they depend on various factors such as the type of filament, the nozzle size, the extruder type, the print speed, and the temperature.
A retraction test is a method to systematically test different combinations of retraction distance and speed and observe their effects on the print quality. By printing a series of test models with varying retraction settings, we can compare the results and select the best values for our specific setup and filament. A retraction test can help us achieve a cleaner and smoother print without compromising the print time or the material usage.
In this article, we will guide you through the steps of performing a retraction test using OrcaSlicer, a powerful and user-friendly slicer software that supports various 3D printers and filaments. We will explain how to use the built-in retraction test feature in OrcaSlicer, as well as how to manually adjust the retraction settings in the printer and filament profiles. By following this guide, you will be able to improve your 3D printing experience and enjoy the benefits of retraction.
Before diving into the details of how to perform the retraction test, let’s start with a brief overview of OrcaSlicer and why to use the built-in retraction test in it.
What is OrcaSlicer?
OrcaSlicer is an open-source slicer for FDM printers. It is a fork of Bambu Studio, a popular slicing software for BambuLab 3D printers. OrcaSlicer was developed by a programmer who wanted to improve the original software and add more features and options for users. Some of the main features of OrcaSlicer are:
- Auto calibrations for all printers
- Sandwich (inner-outer-inner) mode - an improved version of the External perimeters first mode
- Precise wall
- Polyholes conversion support
- Klipper support
- More granular controls
OrcaSlicer is available for Windows, Mac, and Linux platforms. You can download the latest stable or nightly version from the GitHub page.
If you're interested in diving into OrcaSlicer and learning more about it, feel free to explore our comprehensive guide. It covers the fundamentals and provides links to more in-depth topics to help you expand your skills.
Why is it Useful for Retraction Testing?
OrcaSlicer is useful for retraction testing because it allows you to easily adjust the retraction speed and distance parameters in the slicer. You can also use the built-in retraction calibration test to generate a custom G-code for testing different retraction settings. OrcaSlicer also supports the sandwich mode, which prints the inner and outer perimeters separately, reducing the need for retraction and improving the surface finish.
In addition, it offers various options for the retraction settings that allow you to adjust your settings for different materials and printer models for the best outcomes.
Now that you have understood what the retraction test is and why OrcaSlicer is handy for optimizing retraction settings, let’s get practical. We’ll walk through the steps of running the retraction test on your 3D printer.
Step 1: Download and Install OrcaSlicer
You can download OrcaSlicer from its GitHub page: OrcaSlicer GitHub. Follow the instructions to install it on your computer.
Step 2: Choose Your Printer, Filament, and Process
Open OrcaSlicer and select the printer, filament, and process that you want to use for the test. You can use the default profiles that come with the software, or create your own custom profiles if you have different settings.
Step 3: Access the Retraction Test Feature
After creating a new project, go to the OrcaSlicer Calibration menu and click on the “Retraction Test” option. This will open a new window where you can adjust the retraction tower settings. A retraction tower is a 3D model that has different sections with different retraction lengths. By printing it, you can see how each retraction length affects the print quality.
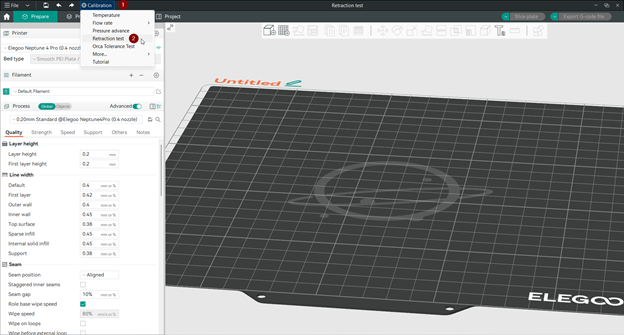
The retraction tower settings are:
- Start retraction length: This is the retraction length for the first section of the tower. The default value is 0 mm, which means no retraction.
- End retraction length: This is the retraction length for the last section of the tower. The default value is 2 mm, which means 2 mm of retraction.
- Step: This is how much the retraction length increases for each section of the tower. The default value is 0.1 mm, which means the retraction length goes up by 0.1 mm for every section until it reaches the end value. A smaller step gives a more precise test, but also makes the tower longer.
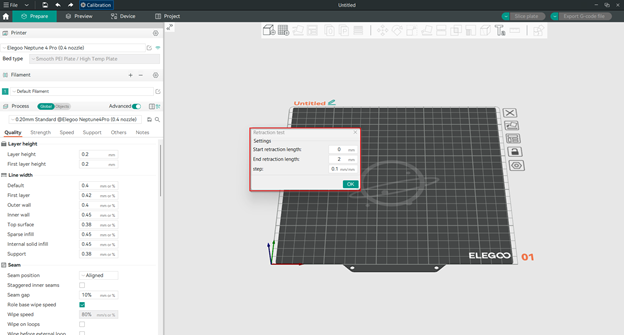
Step 4: Configure Retraction Lengths
The key to a successful retraction test is to choose the right range of retraction lengths to test. OrcaSlicer lets you enter these values, so you can either use the default settings or change them according to your needs. The goal is to test different retraction lengths and find the one that reduces stringing and oozing the most without affecting the print quality.
The recommended retraction lengths may depend on the type of extruder you have:
- For direct drive extruders, which have a short distance between the extruder and the nozzle, the default settings are usually good enough. You can start at 0 mm and end at 2 mm, with a 0.1 mm step.
- For Bowden extruders, which have a long tube between the extruder and the nozzle, you may need higher retraction lengths. You can start at 1 mm and end at 6 mm, with a 0.2 mm step.
Step 5: Slice and Print the Retraction Tower
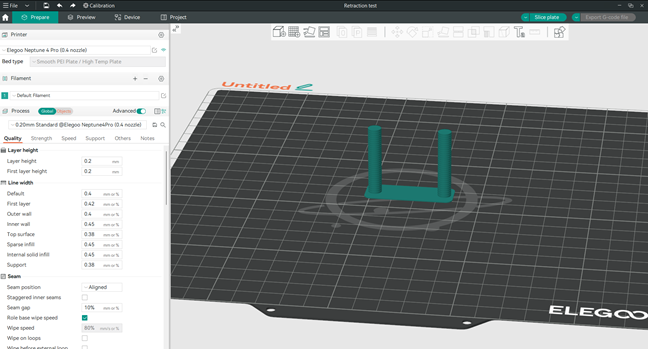
Once you have configured the retraction tower settings, a new project with the retraction tower will appear. You can slice the project and print it. The tower has multiple notches, each one corresponding to a different retraction length. By looking at the tower after printing, you can see how each retraction length affects the print quality.
Relax with Obico
Tip: Explore Obico for OctoPrint and Klipper!
While your retraction tower is printing, why not explore Obico, the ultimate Smart 3D printing software? With Obico, you can monitor and control your 3D printer from any device and anywhere. You can also relax with Obico's AI failure detection system that keeps an eye on your print and notifies you of any issues. Connect your printer to Obico for free and enjoy unlimited webcam streaming, 3D printer status notifications, 3D printer remote access, and more!

Obico also offers mobile apps for iOS and Android, so you can access and manage your 3D printer from any device and location. Join Obico for free and enjoy the ultimate 3D printing experience.
Step 6: Analyze the Results
The best retraction length is the shortest one that minimizes stringing and oozing without hurting the print quality. Check each notch of the tower and find the one that has the cleanest result. This is the optimal retraction length for your printer and filament.
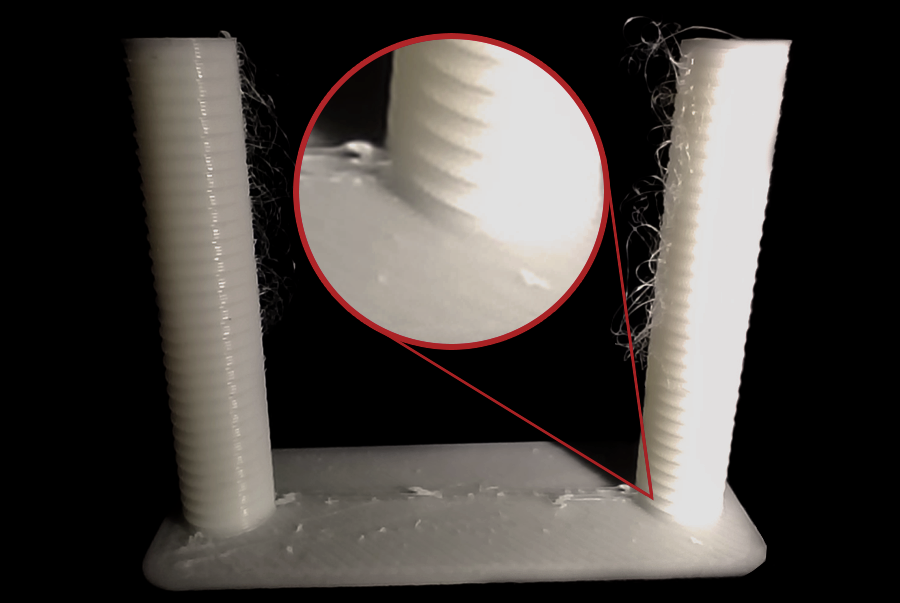
As we see in our test, the stringing appears at the top of the retraction tower, and the best quality is one notch in the tower from the base, and as the step is 0.1mm, then the best retraction value for this filament is 0.2mm length.
Step 7: Adjust Your Settings
After you have found the optimal retraction length, you can update your filament settings in OrcaSlicer to use this value. This will help you print with better quality, without stringing and oozing.
You should customize the retraction length for each filament type, as they vary from one to another. Here are the steps:
- Open filament settings by clicking in the setting small symbol.
- Click on the Settings overrides tap.
- Check in the length option in the retraction setting.
- Input your new best length value.
- Then click on the save icon to save the new updated value.

This will override the printer settings with the new updated value when you choose this filament next time.
Tips for designing a successful retraction tower:
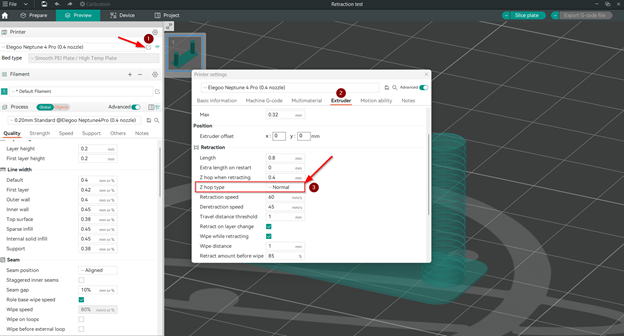
- In your printer retraction settings make sure to choose Normal Z hop types as other option may affect the results of the retraction tower leading to inaccurate results.
To achieve this, follow these simple steps:
- Open printer settings.
- Click on Extruder tap.
- Choose Normal Z hop type.
Note: We will explore Z hop types in more detail in this article.
-
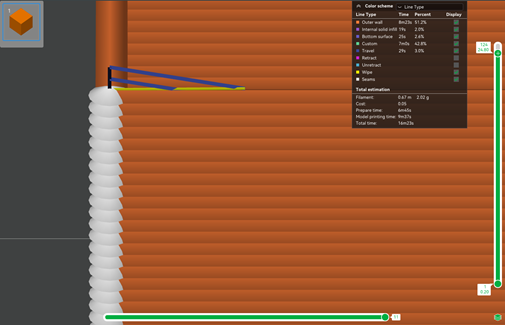
Ensure that the travel motion occurs directly between the two towers by selecting Aligned Seam position. You can also view the travel motion - presented in blue color - by following the steps in the image below.
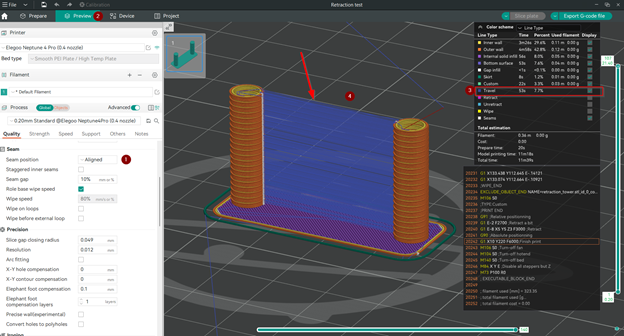
If the travel motion is not aligned between the two towers in your preview, you can make this manual. Here is how:
-
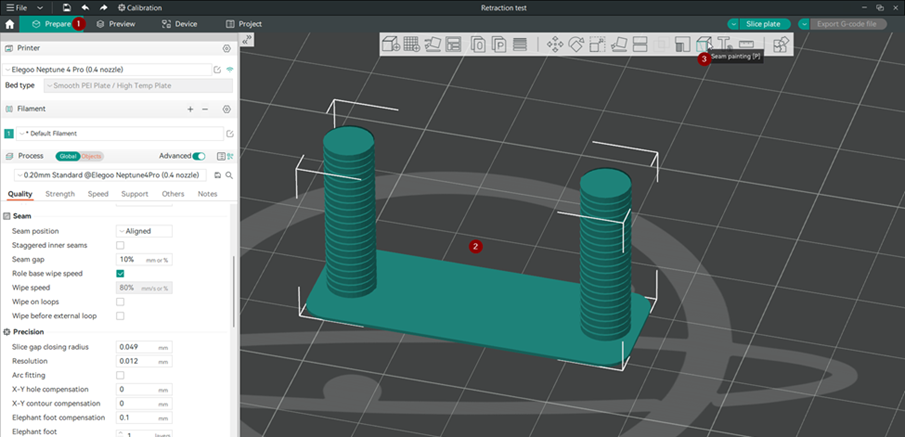
In the prepare tab, select the model and then choose seam painting from the floating horizontal menu.
-
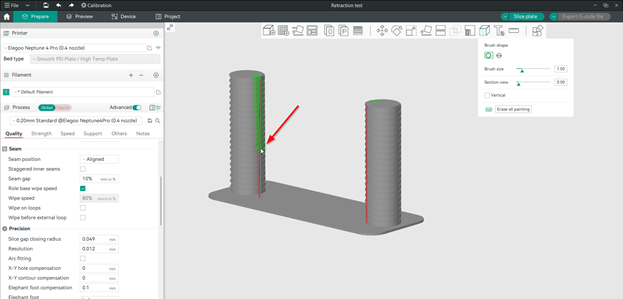
Paint the seam vertically on the inner side of each tower in the way they are opposite each other.
-
Click on slice plate.
You should now see the travel motions in between the two towers represented in the blue color when you preview it.
Additional Considerations
Some other factors that may affect your retraction test are:
- Filament type: Some materials, like PLA or ABS, are less likely to ooze than others. For these materials, you may be able to use lower retraction lengths (0.2 mm - 0.4 mm).
- Troubleshooting: If you still have stringing problems after the retraction test, you may need to dry your filament or check your nozzle installation.
Diving deep in the printer retraction settings in OrcaSlicer
Let’s dive deep into the retraction setting details and options in OrcaSlicer for better control on your prints.
When you open your printer settings to access the retraction section, you will find the following options:
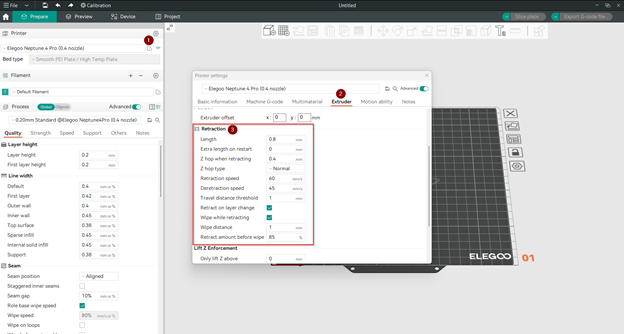
-
Retraction length:
- This is the amount of filament in the extruder that is pulled back to avoid oozing during long travel distances. Set to 0 to disable retraction.
-
Extra length on restart:
- When retraction is compensated after the travel move, the extruder will push this additional amount of filament. This setting is rarely needed.
-
Z hop when retracting:
- When the printer pulls back the material, it also lifts the nozzle up a bit. This makes sure the nozzle doesn't touch or hit the printed object when it moves to a different spot. The nozzle can't be lifted more than 5mm.
-
Z Hop type:
-
We will explain the several Z hop options to lift the nozzle after retraction is complete.
-
Slope
-
In this mode, the nozzle moves up in a diagonal line, reducing the travel distance and time.
-
-
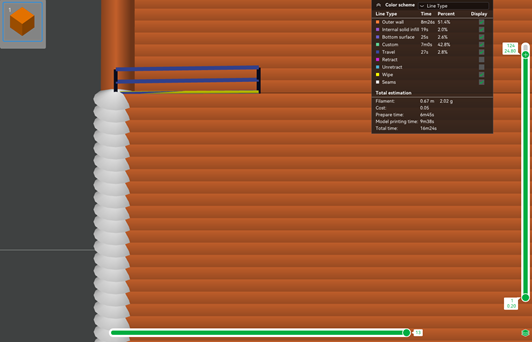
Normal
-
In this mode, the nozzle moves up and down in a straight line.

-
-
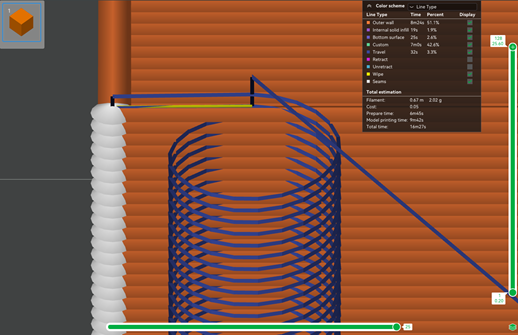
Spiral
-
In this mode, the nozzle moves up and down in a circular motion, minimizing the stringing and blobs.

-
-
Auto
-
In this mode, if you choose "Auto," the printer will automatically pick the best way to lift the Z-axis. Here's how it decides:
- For moving within the same layer, it first checks if the move will go through any overhanging parts while lifting in a sloped manner. Overhangs might get bigger and warp as they're printed. Slope lifting covers a wider area in the X and Y directions as it goes to the highest point, which could lead to bumping into or scraping these warped sections. If there's no risk of hitting anything, it'll use slope lifting. But if there's a chance of collision, it switches to spiral lifting. The spiral path goes in a tight circle, only going over a small area right above the print, so it's less likely to cause any damage.
- When it's time to move to a new layer, the printer always uses the spiral lift method.
-
-
-
-
Retraction speed:
- This option determines the speed at which the filament is retracted.
-
Deretraction speed:
- This option controls the speed for reloading the filament into the extruder after the retraction. Setting this to 0 means that it will be the same speed as the retraction.
-
Travel distance threshold
- To avoid stringing in models with small gaps, adjust the travel distance threshold for retraction. This will make the nozzle retract the filament when the travel distance is only above this limit. Otherwise, the travel distance may be too short to retract, and the nozzle will leave strings between the gaps.
-
Retract on layer change:
- Enabling this option tells the printer to pull back the filament before moving to a new layer.
-
Wipe while retracting:
- This option makes the nozzle move along the previous extrusion path while retracting the filament. This can help clean the nozzle and reduce stringing and oozing.
-
Wipe distance:
- This controls how far the nozzle moves along the previous extrusion path while retracting the filament.
-
Retract amount before wipe
- This is how much the nozzle retracts before wiping, as a percentage of the retraction length. The default is 0%, which means no retraction before wiping. This can improve the Z-seam on the outer wall (if the inner wall is printed first).
Now, we have covered all retraction settings in OrcaSlicer and you should know how to make a successful retraction test. If you’re interested in exploring additional calibration processes within OrcaSlicer, feel free to check out our comprehensive guide on OrcaSlicer Calibration Techniques. This guide covers a range of calibration techniques.
FAQs
What is a retraction test in 3D printing? A retraction test is a calibration process used to reduce or eliminate stringing and oozing issues during 3D printing. It involves systematically testing various combinations of retraction distance and speed to find the optimal settings that improve the print quality by preventing excess material from leaking out of the nozzle.
Why is retraction important in 3D printing? Retraction is crucial because it prevents unwanted strands or blobs of filament from appearing on the surface or between parts of the model, thereby affecting the quality and appearance of the print. By retracting the filament before moving the nozzle, it reduces the flow of molten plastic and helps achieve cleaner and smoother prints.
What is OrcaSlicer, and why use it for retraction testing? OrcaSlicer is an open-source slicer software developed as a fork of Bambu Studio for FDM printers. It's favored for retraction testing due to its user-friendly interface, support for various 3D printers and filaments, and features like the built-in retraction calibration test, which simplifies adjusting retraction parameters to optimize print quality.
How do you perform a retraction test in OrcaSlicer? To perform a retraction test in OrcaSlicer, follow these steps:
- Download and install OrcaSlicer.
- Select your printer, filament, and process settings.
- Access the retraction test feature via the Calibration menu and adjust the retraction tower settings.
- Configure retraction lengths based on your extruder type.
- Slice and print the retraction tower.
- Analyze the results to find the optimal retraction length.
- Adjust your filament settings in OrcaSlicer with the new retraction length.
What are the key settings to adjust in a retraction test? The key settings to adjust during a retraction test include the retraction distance (the amount of filament retracted) and the retraction speed (how fast the filament is retracted). These parameters need to be optimized based on factors like filament type, nozzle size, extruder type, print speed, and temperature.
Can retraction settings vary between different filaments? Yes, retraction settings can vary significantly between different filament types due to differences in material properties. For instance, PLA and ABS may require different retraction lengths and speeds. It's recommended to customize the retraction settings for each filament type used.
What are some tips for a successful retraction test? Some tips for a successful retraction test include:
- Choosing the right range of retraction lengths to test.
- Adjusting the Z hop settings to ensure the nozzle doesn't touch the print when moving.
- Aligning the travel motion directly between two points to avoid stringing.
- Considering the filament type, as some materials are less prone to oozing.
What should I do if I still have stringing issues after the retraction test? If stringing issues persist after optimizing retraction settings, consider drying your filament, as moisture can affect printing quality. Additionally, check your nozzle installation for any issues that may contribute to stringing.
Conclusion
This guide has taught you how to do the retraction test with OrcaSlicer. This is very important if you want to make your 3D prints much better. The retraction test helps you avoid problems like strings and blobs on your prints. These problems can ruin your prints, but with the right retraction settings, you can avoid them. OrcaSlicer is easy to use and has many options. You can save the best retraction settings for your printer and filament. You can also adjust them for each project you do. If you follow the tips and tricks in this guide, you can use your 3D printer to its full potential, and you can make sure every print is perfect.
