Klipper 3D Printer Firmware - Tips and Tricks

Introduction
Klipper is an upcoming and popular 3D printing firmware that's quickly becoming the standard in high-speed 3D printing. Its extensive feature set, vibrant community, and continuous development make it the go-to option for several new users and professionals.
Yet, Klipper is still in its nascent stages, and there's little information available on how to get the most out of the firmware. It causes new users to limit themselves to the basic functionalities and miss out on some valuable features of the Klipper firmware.
In this article, we'll go over some of the useful tips and tricks you can use with your Klipper 3D printer to get the most out of it. It'll help you use Klipper in the best way possible and improve your 3D printing experience.
Let's get started with some tips and tricks to optimize your klipping experience.
What Is Klipper?
Klipper is a 3D printing firmware that helps you to achieve high 3D printing speeds without losing print quality. It achieves this by utilizing an external processor, usually a Raspberry Pi, and combining it with the printer's onboard controller.
Kevin O'Connor has designed the Klipper in such a manner to take advantage of the Raspberry Pi's powerful processor and perform all the heavy tasks on it. In short, the Raspberry Pi processes the gcode file, executes commands, and passes it on to the printer's controller. The sole function of the printer's motherboard is to communicate these instructions to the hardware.
Practically, it opens up several avenues in 3D printing and gives you access to numerous useful features. You can use your old Ender 3 with Klipper and print at speeds above 100-150 mm/s without any significant loss in print quality.
You can refer to our detailed article on Klipper's functioning, which explains how it works and its various benefits.
In a nutshell, by using an external processor, Klipper gives you access to fast 3D printing speeds, better print quality, and various other features that are otherwise challenging to achieve using merely the printer's motherboard.
Let's look at these features and learn tips for using Klipper firmware with your 3D printer.
How to get the most from your Klipper firmware?
Calibrate Input Shaping
![]()
Source: Klipper
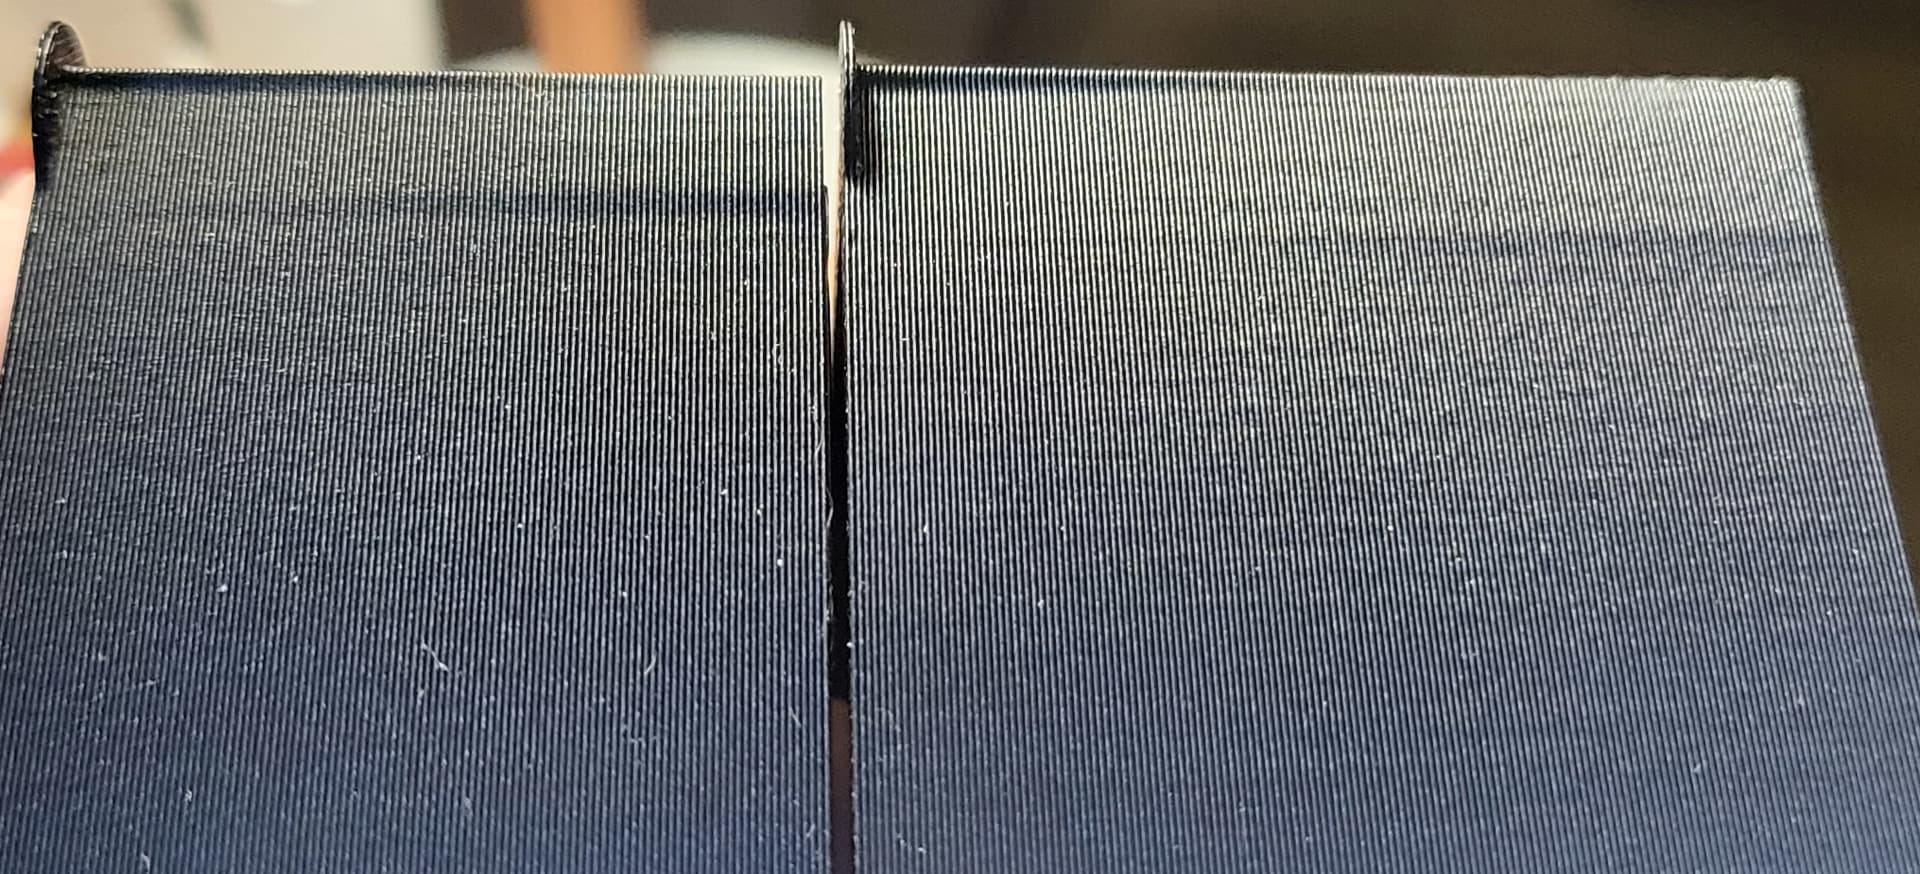
High-speed 3D printing causes the printer to vibrate, resulting in Z-artifacts like ringing or ghosting. The artifacts ruin the appearance of your 3D prints and negatively affect your overall printing quality. However, with some fine-tuning, you can minimize their effects on your prints.
Klipper employs Input Shaping to cancel these vibrations and reduce the chances of ringing and ghosting on your prints. Simply put, Input Shaping, shapes the signals that are sent to your stepper motors in such a way that each signal cancels out its own vibration.
Klipper lets you attach an external accelerometer to measure your printer's vibrations accurately. You can further use this data and configure the stepper motor commands to minimize the vibrations. Optionally, you can manually calibrate the Input shaping parameter to achieve similar results.
Input Shaping is at the core of Klipper's functioning, as it lets you achieve fast printing speeds without compromising print quality. You can manually fine-tune this setting by referring to Klipper's guide on Input Shaping and improve your printing output.
Use Pressure Advance
Pressure Advance helps you to achieve better quality corners and reduce stringing in your 3D prints. Klipper uses pressure advance to fine-tune the filament flow in the nozzle during the acceleration and deceleration speed moves.
When your nozzle accelerates, there's a need for high-filament flow in an instant. Likewise, when the nozzle decelerates, the nozzle must reduce the filament flow or completely stop it. Without pressure advance, it takes a while for the extruder and nozzle to adjust the filament flow.
But, with the Pressure Advance, the firmware estimates the flow of filament required at a particular instance. This way, the nozzle doesn't over-extrude or under-extrude in your prints.
The final result is clean, high-quality prints with sharp corners and almost zero stringing effects. Klipper has a detailed guide on Pressure advance which you can use to fine-tune your settings and reduce your retraction issues.
Easily Access Printer's Configuration Files
You can access your printer's configuration files directly from Klipper's web interface. Fluidd and Mainsail OS are designed to give you quick access to various config files for your printer.
Klipper's file directory, too, has many printer configurations that are available to download and use. You can customize these as per your needs, create their backup, and download them on your computer without any hassles.
Another one of Klipper's advantages is that you can edit the configuration files without having to reboot the printer. This ease of use comes in handy when you're calibrating your 3D printer and need to adjust several parameters related to your printer.
Use Raspberry Pi as a microcontroller
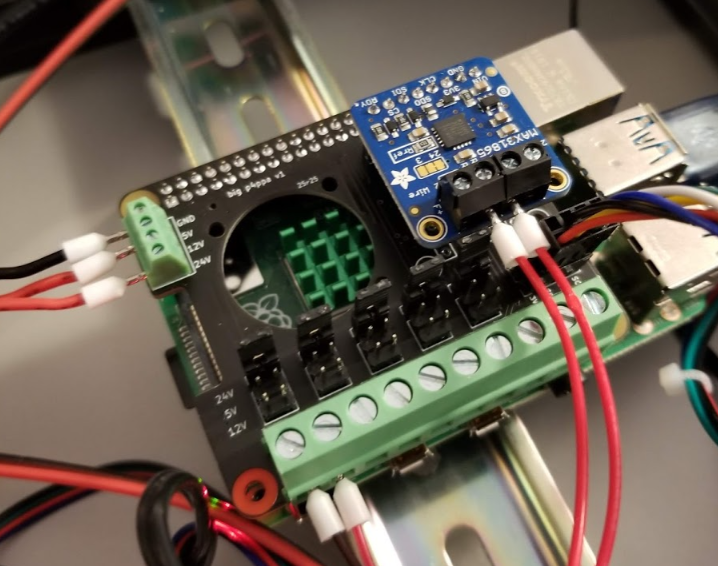
Most 3D printer microcontrollers are limited in I/O ports due to their design and low-processing capabilities. But, as Klipper uses a Raspberry Pi by design, you can take advantage of the GPIO pins of the Pi and use it as an extra controller unit.
You can connect external bed leveling probes, filament sensors, display units, and several other accessories with your printer using the Pi board. It extends your printer's capabilities and lets you customize it per your workflow.
The process is quite technical and involving, and it'd be helpful to have some prior knowledge of Raspberry Pi boards and Klipper. For help, you can refer to the Klipper documentation on this subject or use VeZ3D's extensive YouTube guide for using the Pi as a secondary MCU unit.
Choose between Multiple Interface Options

At its core, Klipper is a 3D printing firmware designed to control and interface with your 3D printers. You need some way to interact with Klipper to control and monitor your prints and access Klipper's various functionalities.
Mainsail OS and Fluidd are two of the popular web interfaces that are specifically developed for Klipper firmware. These interfaces work on your desktop or mobile browser. They have an intuitive user interface, using which you can access Klipper's several features. And while both of them are equally capable, Fluidd for Klipper has a relatively clean design and is easy to navigate.
Optionally, you can use Klipper with Octoprint if you already have it set up for your 3D printer. It might be an excellent option to consider if you're familiar with Octoprint's UI design. Octoprint with Klipper might lower your learning curve, making it easy for you to transition to Klipper firmware.
KlipperScreen, too, is an excellent interface option that you can use for onsite control of your 3D printer. It gives you a touchscreen interface to interact with your machine and lets you easily control your printer without any secondary device.
Create customized Gcode Macros
![]()
Macros are a neat way to execute repetitive tasks with a single button. A macro contains a series of commands necessary to perform any action on your 3D printer.
For example, you can create a Macro with all gcode commands to heat the hot end and print the bed to a predetermined temperature. Another macro might be solely for quickly calibrating the bed height before a print. Or you can create a macro to switch on the LED lights and fans for your 3D printers.
Macros can come in handy in numerous situations and, when used effectively, will help you save time and improve your productivity. You can find several Macros that are ready to use with Klipper. If you're technically inclined, you can create your ones to suit your specific needs. In such cases, you can refer to this detailed Macro Tutorial on Klipper's Discourse group that lays out the basics behind creating a Macro.
Calibrate heaters using PID tuning

Proportional Integral Derivative (PID) is an algorithmic control method to control your printer's hot end and print bed efficiently. During printing, the PID controller for your heating elements continuously measures the difference between the set and current values. And correspondingly, it determines whether to heat the hot end or let it cool down a bit.
The actual working of a PID controller is slightly more complex than explained above. An incorrectly tuned PID controller can significantly affect your printer's heating performance. Your printer might struggle to sustain a stable printing temperature in such cases. It might negatively affect the print quality and your printer's components.
Therefore, performing PID tuning is crucial whenever you change a heating element or notice erratic temperature fluctuations in your printing cycle.
Klipper gives you an easy way to fine-tune your PID settings using its command terminal instead of a complex manual PID tuning process. All you need to do is execute a few commands, and Klipper configures the PID settings and saves it for you.
Chris Riley has an excellent PID tuning tutorial that you can refer to and calibrate the PID settings for your 3D printer.
��
Exclude Objects from an Ongoing Print

While printing multiple parts in a single process, failure of even a single part will lead to failure of the entire print. It'll cause you to lose precious printing time and filament material, increasing your overall printing costs.
Using Klipper, you can exclude a specific object mid-way during printing. So, even if a single part fails, you don't need to cancel your entire 3D print, and you can skip out on the only failed part. This feature can come in handy for batch prints and printing multiple parts for a 3D-printed assembly.
Setting up this functionality is easy, and you can refer to this YouTube tutorial by Tom's Basement for that. It explains the initial setup for excluding objects from your prints in progress.
Yet, to use this functionality, you still need to look out for failed prints during the printing process manually. Alternatively, you can use tools like Obico that automatically detect any print failures and will send you a quick notification regarding it. It takes away the manual supervision aspect of the 3D printing process.
Correct Skew In Your Printer's Frame
Assembling DIY 3D printer kits can be pretty tedious. You need to ensure that the printer you've assembled is correct and that all its sides are squared and aligned.
But, even with all the care, it's possible that the printer is not exactly square, and there might be some skewness in the printer's frame. It might either be due to poor quality control or incorrect assembly procedure. Regardless, a skewed printer frame will affect your part's quality and dimensional accuracy.
You can adjust for this skewness in the printer's software with Klipper. It gives you a quick and easy way to calibrate your printer frame's skew and resolve the dimensional inaccuracies in your 3D prints.
Calibration Bro is a helpful test print available on Printables that you can use to calibrate your X, Y, and E steps and correct your printer's skew. You can refer to it with Klipper's Skew correction guide to measure and correct any skewness in your printer's frame.
Plugin Support
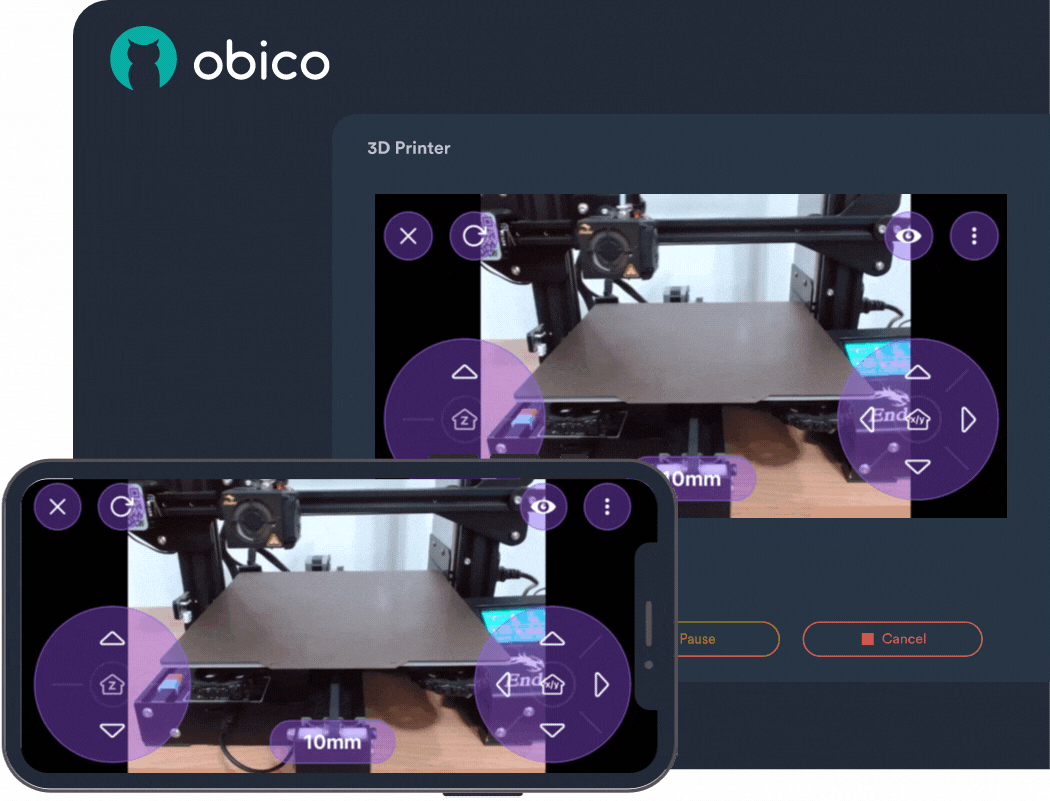
Klipper still has minimal external plugin support. However, as mentioned earlier, you can use Obico with Klipper to automatically detect print failures. In addition to print failure detection, you can use Obico to check and control your 3D printer from virtually anywhere and on any device.
The AI failure detection helps you save filament, printing time, and potential hazards that might occur if the failed prints go unnoticed. You can start the print and leave it in progress while you catch up on some other work. Obico will notify you if there's any print failure or after the print's completion.
The initial setup procedure is relatively easy and intuitive, and you can get started with Obico within minutes. You can refer to this Obico installation guide for setting up the plugin with your Klipper 3D printer.
Make use of the Klipper community
Klipper's main advantage lies in its open-source and free-to-use nature. It has led to the development of a supportive user and developer community around the Klipper firmware.
Klipper has its Discourse server, which you can use for quick help, feature requests, and guides on various functions. Its Discord community, too, is beneficial and has over 15,000 community members using Klipper. It's a go-to place for all your Klipper-related queries and information.
Additionally, Klipper is very well documented. You can refer to Klipper's various guides and documents and quickly resolve your issue.
Is Klipper the correct firmware for you?
As mentioned earlier, Klipper is still in its infancy as a 3D printing firmware, and there's much more ground to cover. Yet, Klipper has quickly gained massive traction in the 3D printing community as a reliable and feature-rich firmware.
You can use Klipper if you want to experience the best printing speeds and good print quality and get the most out of your printer. Klipper enables even the oldest printers to output excellent results and breathes new life into your old machines.
Once you're past the initial learning curve, there are numerous features and tips that you can use to get the best experience with your Klipper running the 3D printer.
Let us know which of these Klipper's tips you've already used with your printer. If you'd like to see more tips and tricks related to Klipper, feel free to comment below.