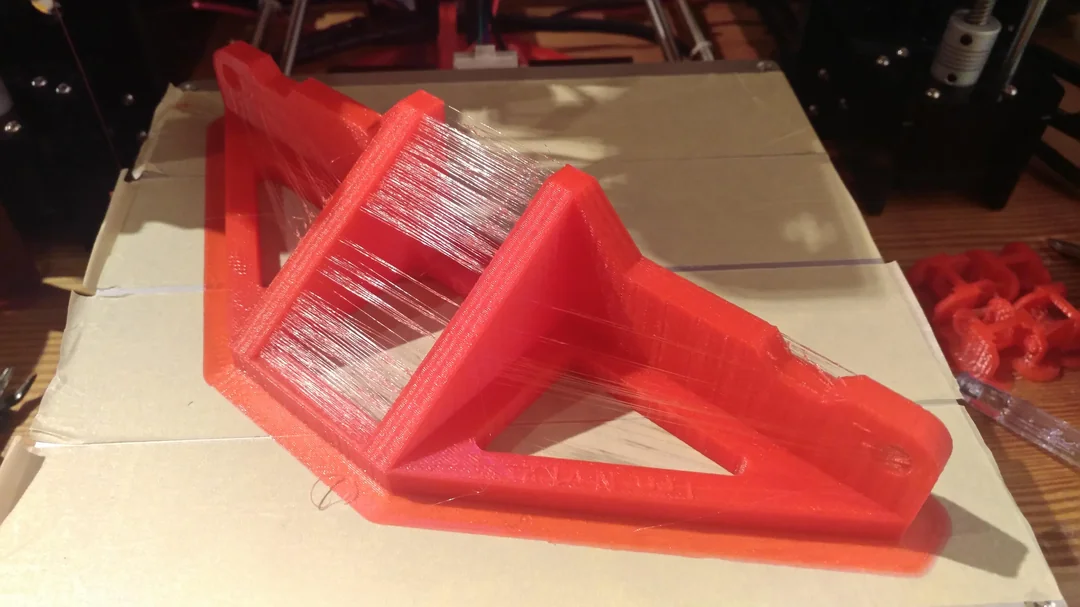
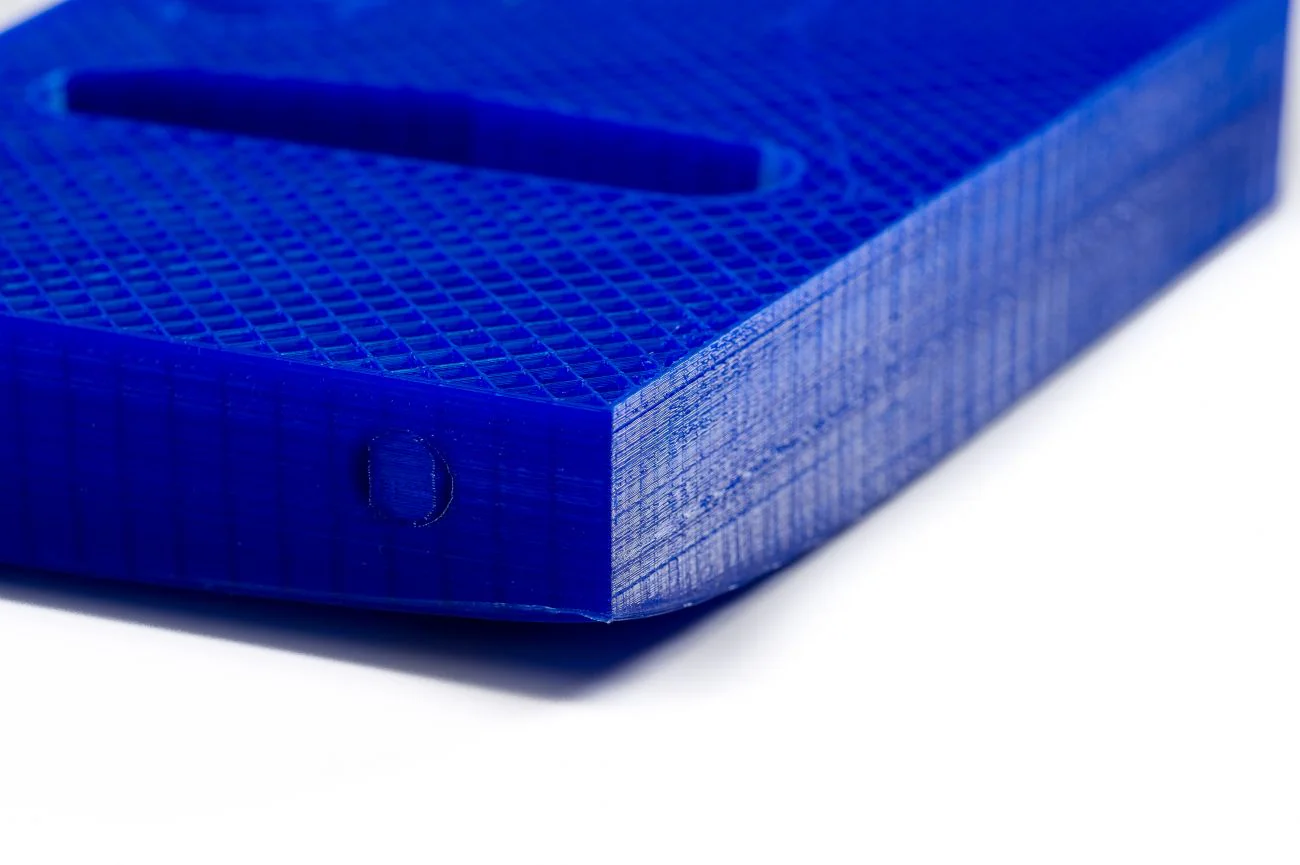
Het bereiken van hoogwaardige 3D-prints is sterk afhankelijk van nauwkeurige printerkalibratie. Zonder deze kalibratie krijgt u te maken met veelvoorkomende problemen zoals draadvorming, slechte bedhechting en onnauwkeurige afmetingen. Kalibratie vormt de basis voor consistente, betrouwbare en uitstekende printresultaten.
OrcaSlicer is geavanceerde, open-source slicingsoftware met krachtige ingebouwde kalibratietools. Deze handleiding helpt u bij het gebruik van de nieuwste stabiele versies van OrcaSlicer (meestal versie 2.3.0 of recente nightly builds 2.3.1) om uw printer te finetunen. We behandelen kalibraties voor temperatuur, stroomsnelheid, drukvervroeging, retractie, tolerantie, maximale volumetrische snelheid en verticale fijne artefacten (VFA). Deze tests zijn ontworpen om in een specifieke volgorde te worden uitgevoerd, waardoor uw afdrukkwaliteit geleidelijk verbetert.
OrcaSlicer biedt geavanceerde functies zoals nauwkeurige wandcontrole, een "sandwichmodus" voor een betere oppervlakteafwerking, "polyholesconversie" voor complexe geometrieën en naadloze integratie met Klipper, OctoPrint en PrusaLink. Het biedt gedetailleerde controle en blijft gebruiksvriendelijk dankzij drag-and-drop-ontwerp en vooraf gemaakte printerprofielen.
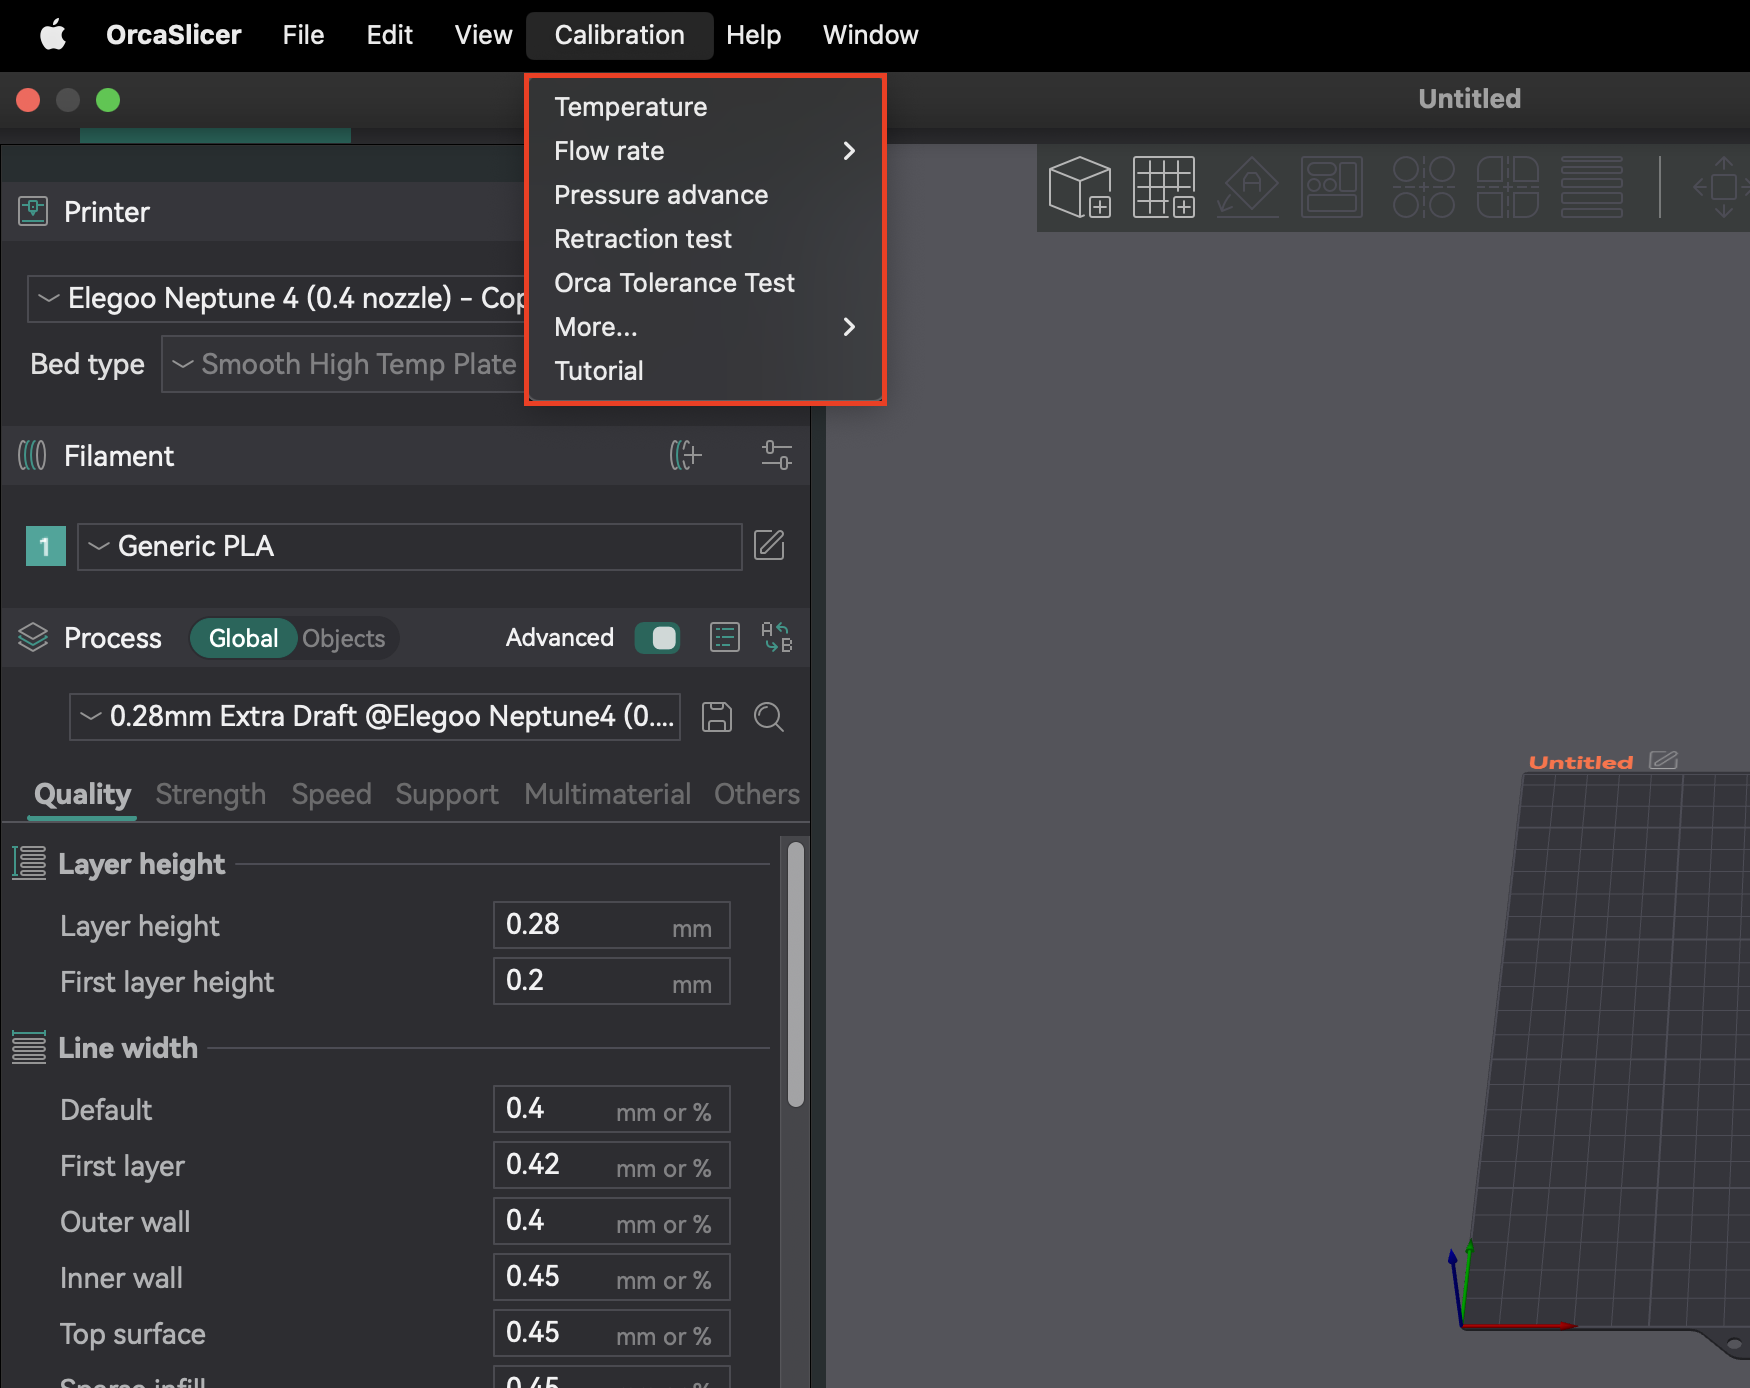
De meeste kalibratiefuncties bevinden zich in het menu "Kalibratie". Maak na het voltooien van een kalibratietest altijd een nieuw project aan. Dit zorgt ervoor dat OrcaSlicer de kalibratiemodus verlaat en de parameters opnieuw instelt voor uw volgende afdrukken.
Het volgen van een specifieke kalibratievolgorde is cruciaal, omdat veel instellingen onderling afhankelijk zijn. Beginnen met basisparameters garandeert nauwkeurige resultaten voor latere, meer genuanceerde aanpassingen. Deze systematische aanpak minimaliseert probleemoplossing en helpt u efficiënt een betere afdrukkwaliteit te bereiken.
| Kalibratiestap | Doel | Belangrijkste observatie/doel | Afhankelijkheid/vereiste |
|---|
| Temperatuur | Optimaliseer filamentsmelting en -binding | Minimale draadvorming, beste laaghechting | Geen (veronderstelt een goede mechanische instelling) |
| Stroomsnelheid | Zorg voor de juiste hoeveelheid filament-extrusie | Gladde bovenkant, geen openingen of klonten | Temperatuur, Nauwkeurige E-stappen/rotatieafstand |
| Drukvervroeging | Verminder artefacten door drukschommelingen in de nozzle | Scherpste hoeken, consistente extrusie | Stroomsnelheid, temperatuur |
| Terugtrekking | Minimaliseer draadvorming en lekkage | Kortste lengte met minimale draadvorming | Stroomsnelheid, Drukvervroeging |
| Tolerantie | Reproduceer modelafmetingen nauwkeurig | Optimale pasvorm tussen geprinte onderdelen | Alle eerdere extrusie-/maatvoeringkalibraties |
| Maximale volumetrische snelheid | Bepaal de maximale filamentstroomsnelheid zonder problemen | Hoogste snelheid vóór onderextrusie | Temperatuur, Stroomsnelheid |
| Afwijking in bochten/schokken/kruisingen | Verminder artefacten door scherpe hoeken | Gladdere hoeken, minder ringvorming | Stroomsnelheid, drukvervroeging |
| Invoervormgeving | Verminder ringvorming en verbeter de afdrukkwaliteit | Gladdere oppervlakken, minder ghosting | Stroomsnelheid, drukvervroeging |
Tabel 1: Aanbevolen OrcaSlicer-kalibratievolgorde
Voordat u de geavanceerde tools van OrcaSlicer gebruikt, moet u ervoor zorgen dat de fundamentele mechanische en thermische systemen van uw printer geconfigureerd zijn. Deze stappen worden vaak rechtstreeks in de firmware van uw printer of via fysieke aanpassingen uitgevoerd, niet in OrcaSlicer. Het overslaan ervan kan blijvende problemen met de afdrukkwaliteit veroorzaken.
Z-offset definieert de precieze afstand tussen de nozzle en het printbed voor de eerste laag. Dit is cruciaal voor de hechting op het printbed. Als de nozzle te hoog is, hecht het filament niet; te laag kan het langs het printbed schrapen, wat "olifantenpootjes" of klikkende extruders kan veroorzaken.
Dit is voornamelijk een aanpassing via de printerfirmware of een fysieke aanpassing. Hoewel OrcaSlicer een veld voor Z-offset heeft (onder Printerinstellingen > tabblad Algemeen), is het belangrijk te begrijpen hoe de firmware van uw printer hiermee omgaat. De meeste printers zijn afhankelijk van firmware of fysieke aanpassingen. Voer altijd eerst een Z-offsetkalibratie uit op uw printer. Gebruik de instellingen van OrcaSlicer alleen voor kleine aanpassingen als uw printer een door de slicer gedefinieerde Z-offset toestaat.
Een vlak printbed zorgt voor een consistente hechting van de eerste laag over het gehele oppervlak. Een oneffen printbed zorgt ervoor dat delen goed hechten en andere loslaten. OrcaSlicer biedt "Adaptive Bed Mesh" om kleine oneffenheden te compenseren door het printbed in kaart te brengen.
Het adaptieve bedgaas van OrcaSlicer is een softwaretool en geen vervanging voor een mechanisch goed en waterpas gesteld bed. Alleen vertrouwen op software zonder handmatige of ondersteunde waterpasstelling (bijv. papiermethode) kan mechanische problemen verhullen. Als het bed aanzienlijk kromgetrokken is, kan het gaas problemen ondervinden. Waterpas eerst het bed mechanisch af, stel vervolgens de Z-offset in en laat ten slotte de automatische waterpasstelling van uw printer of het adaptieve bedgaas van OrcaSlicer finetunen.
Voordat u de stroomsnelheid in de slicer aanpast, moet u ervoor zorgen dat de E-stappen (Marlin) of rotatieafstand (Klipper) van uw extruder gekalibreerd zijn. Dit vertelt uw printer hoeveel filament hij moet pushen. Als dit niet correct is, extrudeert uw printer de verkeerde hoeveelheid, waardoor de stroomsnelheid van de slicer onnauwkeurig is. Dit is een kalibratie via de printerfirmware, geen OrcaSlicer-instelling.
Zodra de basisinstellingen voor de printer zijn voltooid, kunt u de ingebouwde kalibratietests van OrcaSlicer gebruiken om de afdrukkwaliteit te optimaliseren.
Temperatuur beïnvloedt hoe filament smelt, vloeit en bindt. Te laag en je krijgt onderextrusie, slechte hechting en zwakke onderdelen. Te hoog en je ziet lekken, draden, kromtrekken en klonters.
Nauwkeurige temperatuurkalibratie is afhankelijk van de voorafgaande Z-offset, bednivellering en PID-afstelling. Als deze niet correct zijn, kunnen de resultaten van de temperatuurtoren misleidend zijn. Zorg ervoor dat uw printer mechanisch in orde is en PID-afgesteld is voordat u temperatuurtests uitvoert voor nauwkeurige resultaten.
- Voorbereiding: Selecteer in OrcaSlicer je materiaal (PLA, PETG, enz.). Hiermee stel je de standaard temperatuurbereiken voor het bed en de nozzle in. Ga naar "Kalibratie" > "Temperatuur". Stel aangepaste begin- en eindtemperaturen in (de stap is vast op 5 °C).
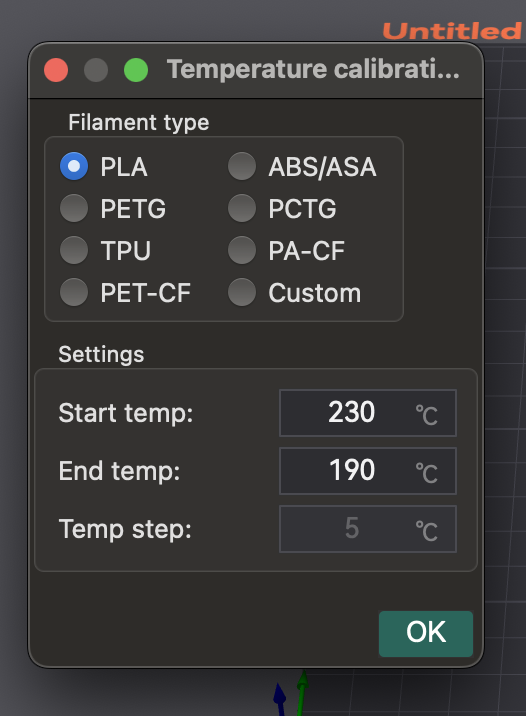
- De toren printen: OrcaSlicer genereert een temperatuurtoren. Snijd deze in plakjes en print hem.
- Resultaten analyseren: Inspecteer na het printen elke laag op stringing, laaghechting, kromtrekken en overhang/bridging. Zoek het temperatuurblok met de beste algehele printkwaliteit en de minste defecten.
- Instellingen toepassen: Werk de optimale nozzletemperatuur bij in de filamentprofielinstellingen in OrcaSlicer. Sla het profiel op en maak een nieuw project aan.
Temperatuur is filamentspecifiek. Verschillende merken of kleuren van hetzelfde filamenttype kunnen verschillende optimale bereiken hebben. Voer deze test uit voor elk nieuw filament om een bibliotheek met nauwkeurig afgestemde profielen op te bouwen.
- Stringing/Oozing: Betekent vaak een te hoge temperatuur of een verkeerde retractie-instelling.
- Slechte laaghechting/onder-extrusie: De nozzletemperatuur is vaak te laag.
- Kromtrekken: Kan het gevolg zijn van onjuiste bed-/nozzletemperaturen of onvoldoende koeling.
| Filamenttype/merk | Geteste temperatuurbereik | Optimale temperatuur | Belangrijkste observaties bij optimale temperatuur |
|---|
| PLA (Generiek) | 190-230 °C | 205 °C | Minimale vezelvorming, sterke laaghechting, goede overhang |
| PETG (Prusament) | 230-250 °C | 240 °C | Glad oppervlak, geen kromtrekken, goede overbrugging |
| ABS (Hatchbox) | 230-260 °C | 245 °C | Minder scheurvorming, goede hechting tussen de lagen |
Tabel 2: Temperatuurtoreninstellingen en observaties
De stroomsnelheid (extrusievermenigvuldiger) bepaalt de hoeveelheid geëxtrudeerd filament. Dit is cruciaal voor gladde oppervlakken en maatnauwkeurigheid. Te hoog en je krijgt overextrusie: klonten, stringing, slechte nauwkeurigheid. Te laag en je krijgt onderextrusie: gaten, zwakke hechting, slechte afwerking.
De kalibratie van de stroomsnelheid is sterk afhankelijk van de temperatuur en de E-stappen/rotatieafstand. Als uw extruder niet gekalibreerd is, zullen de stroomsnelheidsaanpassingen in de slicer onnauwkeurig zijn. Zorg er eerst voor dat de E-stappen correct zijn en de temperatuur optimaal is.
De laaghoogte en de afdruksnelheid kunnen ook van invloed zijn op de optimale doorvoersnelheid. Voer de kalibratie opnieuw uit als de afdruksnelheidslimieten veranderen.
- Het testproject aanmaken: Selecteer in OrcaSlicer de printer-, filament- en procesinstellingen. Ga naar "Kalibratie" > "Pass 1". Dit genereert negen blokken, elk met een andere stroomsnelheidsmodifier.
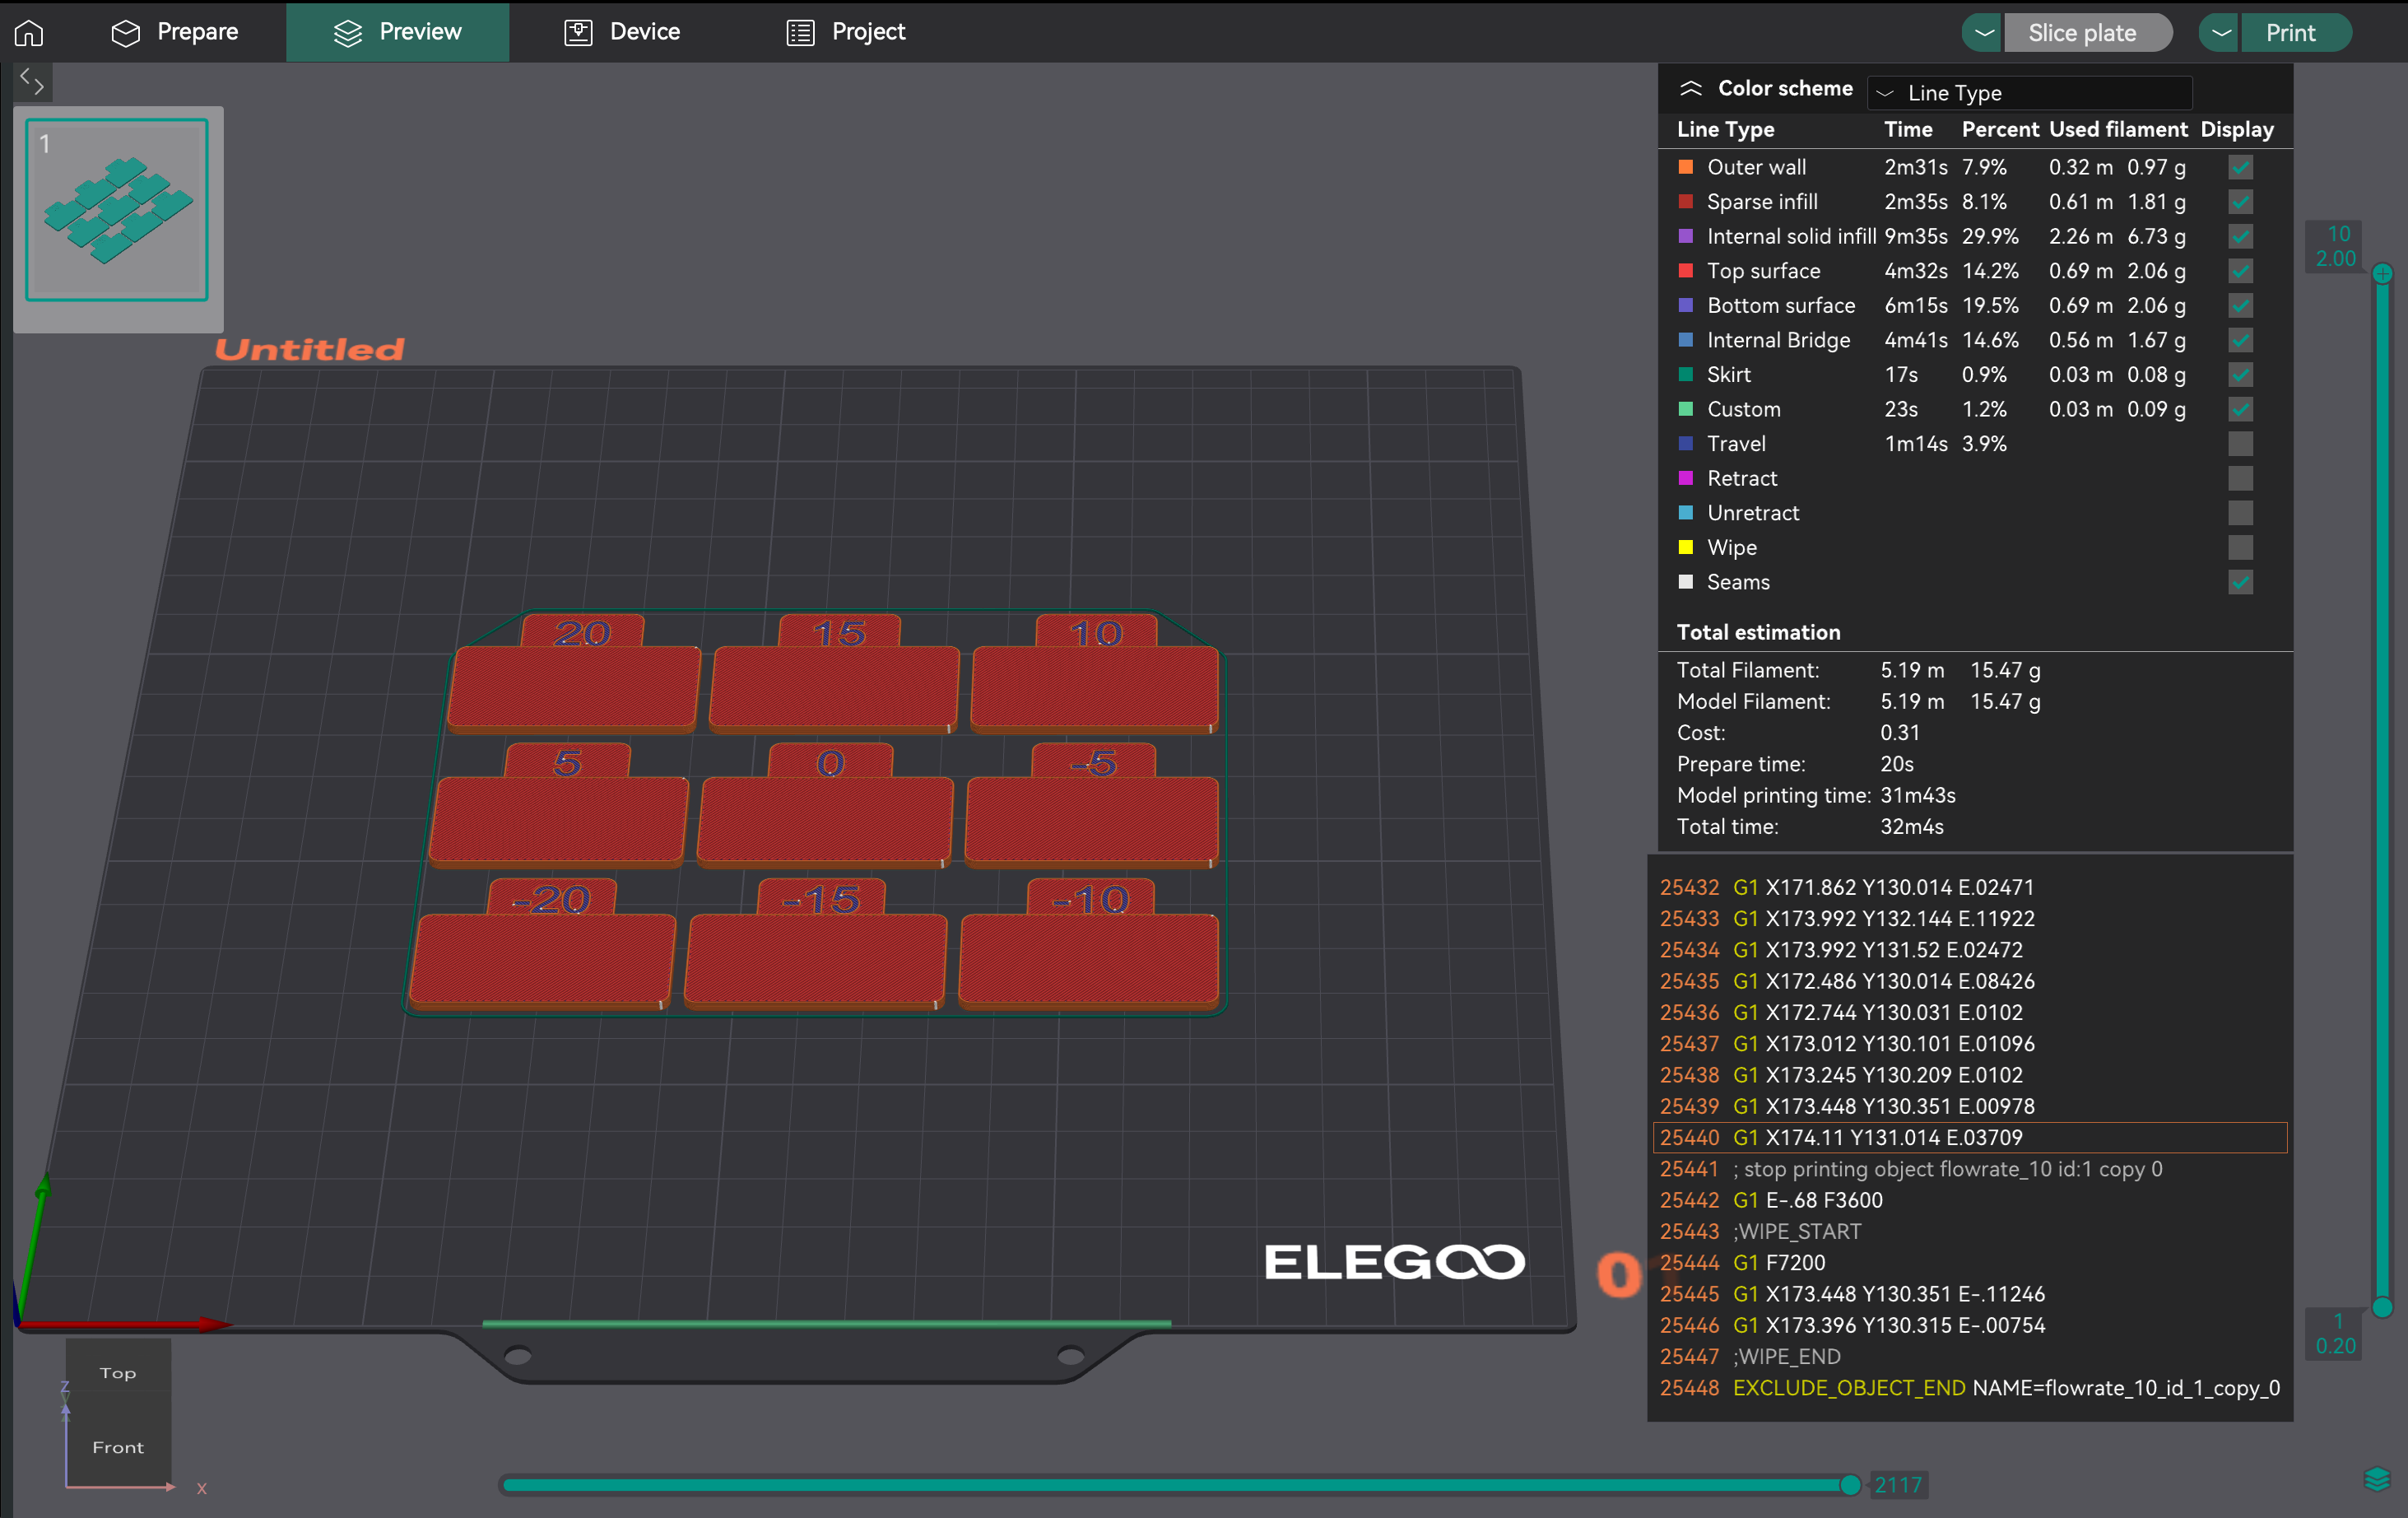
- Analyse voor het gladste oppervlak: Print het project. Onderzoek de bovenoppervlakken. Zoek het blok met het gladste oppervlak, zonder overextrusie (ribbels, blobs) of onderextrusie (gaten). Als twee blokken vergelijkbaar zijn, kies dan het blok met de hoogste stroomsnelheid.
- Berekening van de stroomverhouding: Bereken FlowRatio_new = FlowRatio_old * (100 + modifier) / 100. Voorbeeld: 0,98 * (100 + 5) / 100 = 1,029.
- Fine-Tuning Project genereren: Maak een nieuw project. Ga naar "Kalibratie" > "Pass 2". Dit genereert tien blokken met modifiers van -9 tot 0 voor nauwkeurige aanpassingen.
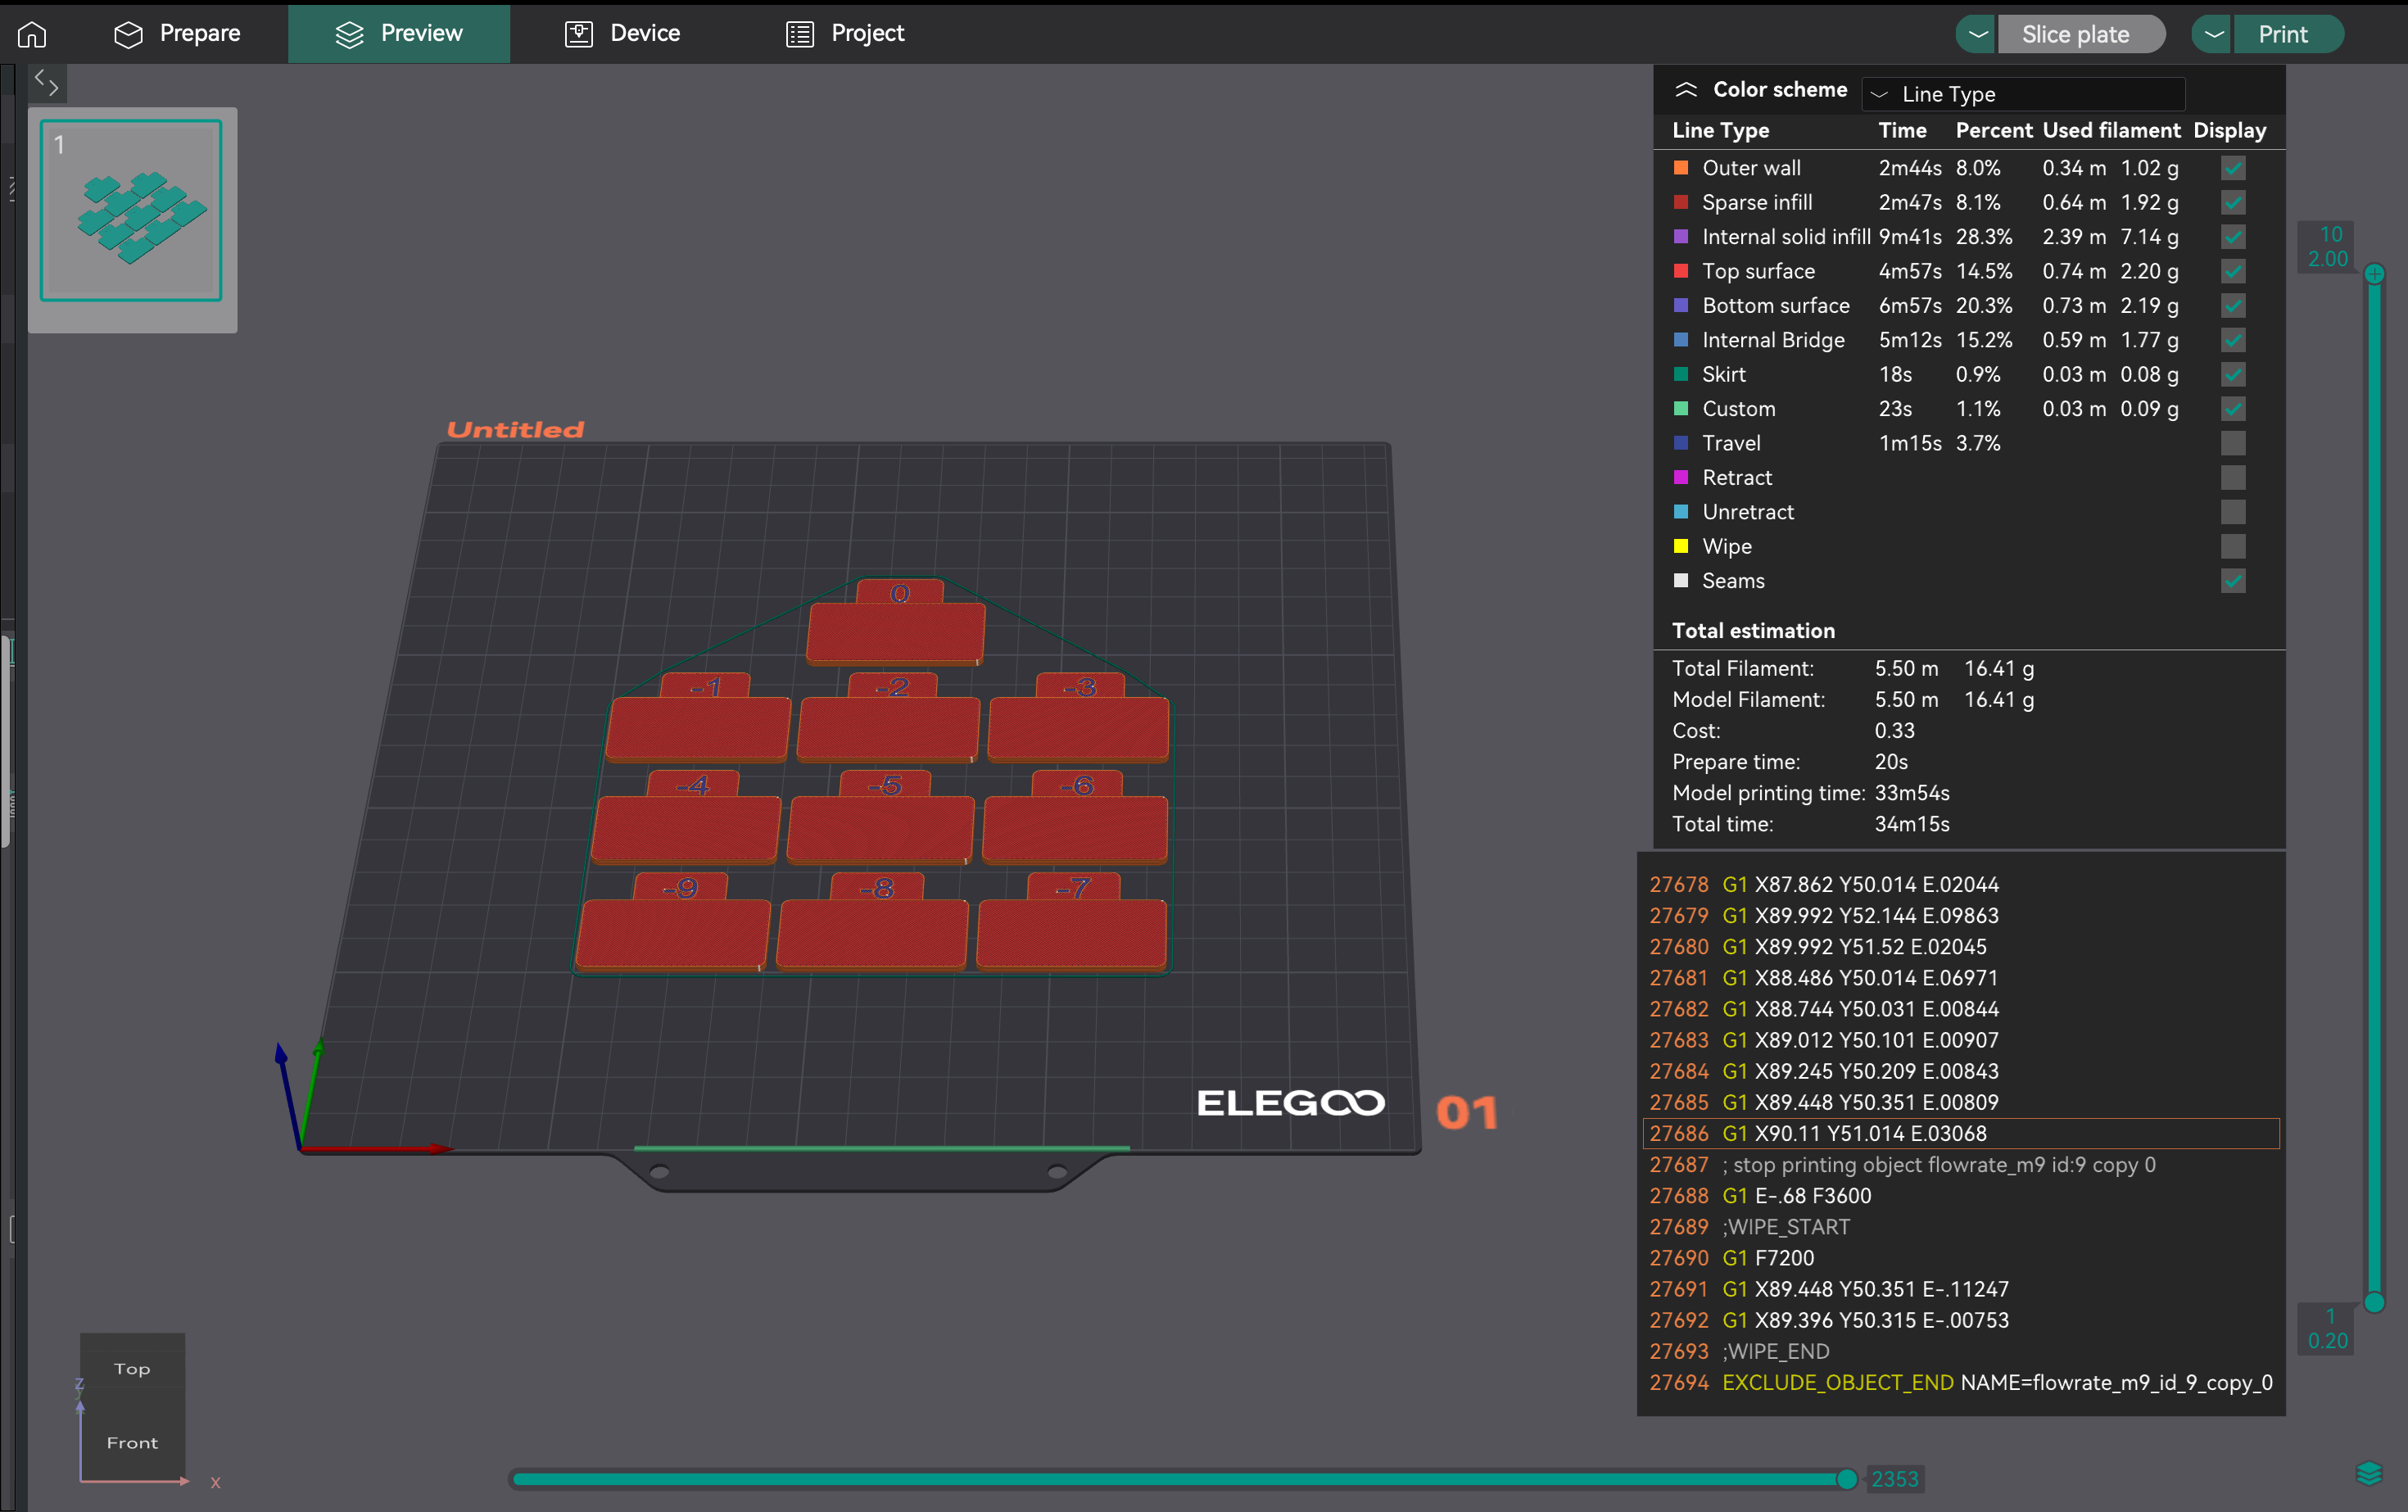
- Evalueren op consistentie: Print Pass 2. Onderzoek de bovenoppervlakken op de beste kwaliteit, laaghechting en consistentie. Bereken de bijgewerkte stroomverhouding met dezelfde formule. Voorbeeld: 1,029 * (100 - 6) / 100 = 0,96726.
- Instellingen toepassen: Sla de uiteindelijke optimale stroomverhouding op in de instellingen van je filamentprofiel in OrcaSlicer.
Mogelijk vindt u de resultaten van de ingebouwde flowkalibratie van OrcaSlicer "verschrikkelijk" en vereist deze handmatige tussenkomst. Dit wijst erop dat er behoefte is aan begeleiding bij "metakalibratie": hoe u problemen met het kalibratieproces zelf kunt oplossen.
- Initiële overextrusie/slepen: Dit kan betekenen dat de printtemperatuur te hoog is, of dat de E-stappen/rotatieafstand niet gekalibreerd zijn. Controleer uw E-stappen opnieuw voordat u de flowkalibratie opnieuw uitvoert.
- Klikkende extruder: Betekent vaak dat de temperatuur te laag is voor de gewenste flow, waardoor de extrudermotor overslaat. Verhoog de temperatuur van uw nozzle iets of verlaag uw maximale volumetrische snelheid (zie later) voordat u de flowkalibratie opnieuw uitvoert.
- Testinconsistentie/dubbelzinnige resultaten: Als de kalibratieprints er slecht uitzien, maar andere prints prima zijn, overweeg dan het volgende:
- Printsnelheid van de test: De standaardsnelheid is mogelijk te hoog. Probeer de kalibratieprints te vertragen.
- Lijnbreedte-instellingen: Als de lijnbreedte (in de procesinstellingen) te groot is voor uw nozzle, kan dit overextrusie veroorzaken. Zorg ervoor dat de breedtes geschikt zijn (bijv. 0,45 mm voor een nozzle van 0,4 mm).
- Subjectiviteit van de visuele test: Visuele beoordeling kan subjectief zijn. Voor meer objectieve resultaten, print een kubus met één wand:
- Print een kubus met één wand (bijv. 20x20x20 mm, 0% vulling, 1 omtrek).
- Meet de wanddikte met een schuifmaat.
- Bereken de gewenste wanddikte (bijv. 0,4 mm voor een nozzle van 0,4 mm).
- Pas de stroomverhouding aan: Nieuwe stroomverhouding = Huidige stroomverhouding * (Gewenste wanddikte / Gemeten wanddikte).
- Aanhoudende problemen: Als de stroomkalibratie consistent mislukt, is een eerdere kalibratie (temperatuur, E-stappen/rotatieafstand of mechanische problemen) waarschijnlijk nog steeds onjuist. Ga niet verder met drukvervroeging of -vermindering totdat de stroom betrouwbaar is ingesteld.
| Geslaagd | Modifier Bereik | Aantal blokken | Berekeningsformule | Doel |
|---|
| Geslaagd 1 | +5 tot -5 | 9 | FlowRatio_new = FlowRatio_old * (100 + modifier) / 100 | Initiële kalibratie om het optimale bereik bij benadering te vinden |
| Geslaagd 2 | -9 tot 0 | 10 | FlowRatio_new = FlowRatio_old * (100 + modifier) / 100 | Fijnafstemming voor een precieze optimale stroomverhouding |
Tabel 3: Samenvatting van debietkalibratiepassage 1 en 2
Pressure Advance (PA) compenseert drukveranderingen in de nozzle tijdens snelheidsschommelingen (acceleratie/deceleratie). Het voorkomt ronde hoeken, klonters en "puistjes" door de extrusie vooraf aan te passen en zo een gelijkmatige doorstroming te garanderen.
Voer altijd een drukvervroegingskalibratie uit na de kalibratie van de stroomsnelheid. Als de stroomsnelheid onjuist is, compenseert PA onnauwkeurig. Een stabiele stroomsnelheid is essentieel voor effectieve PA. Als uw PA-tests er rommelig uitzien, controleer dan eerst de kalibraties van de stroomsnelheid en temperatuur.
PA-waarden variëren aanzienlijk per extrudertype (direct drive versus Bowden), filamenttype/merk, nozzlegrootte, hotend-temperatuur en hardwareaanpassingen. Verschillende materialen hebben een unieke smeltstroom en veranderingen in de padlengte hebben invloed op PA. Dit betekent dat PA vaak opnieuw moet worden gekalibreerd voor verschillende configuraties of materialen.
OrcaSlicer vraagt u om uw extrudertype te selecteren (Direct Drive of Bowden). PA-waarden verschillen sterk afhankelijk van de filamentpadlengte. Bowden-configuraties vereisen doorgaans hogere PA-waarden.
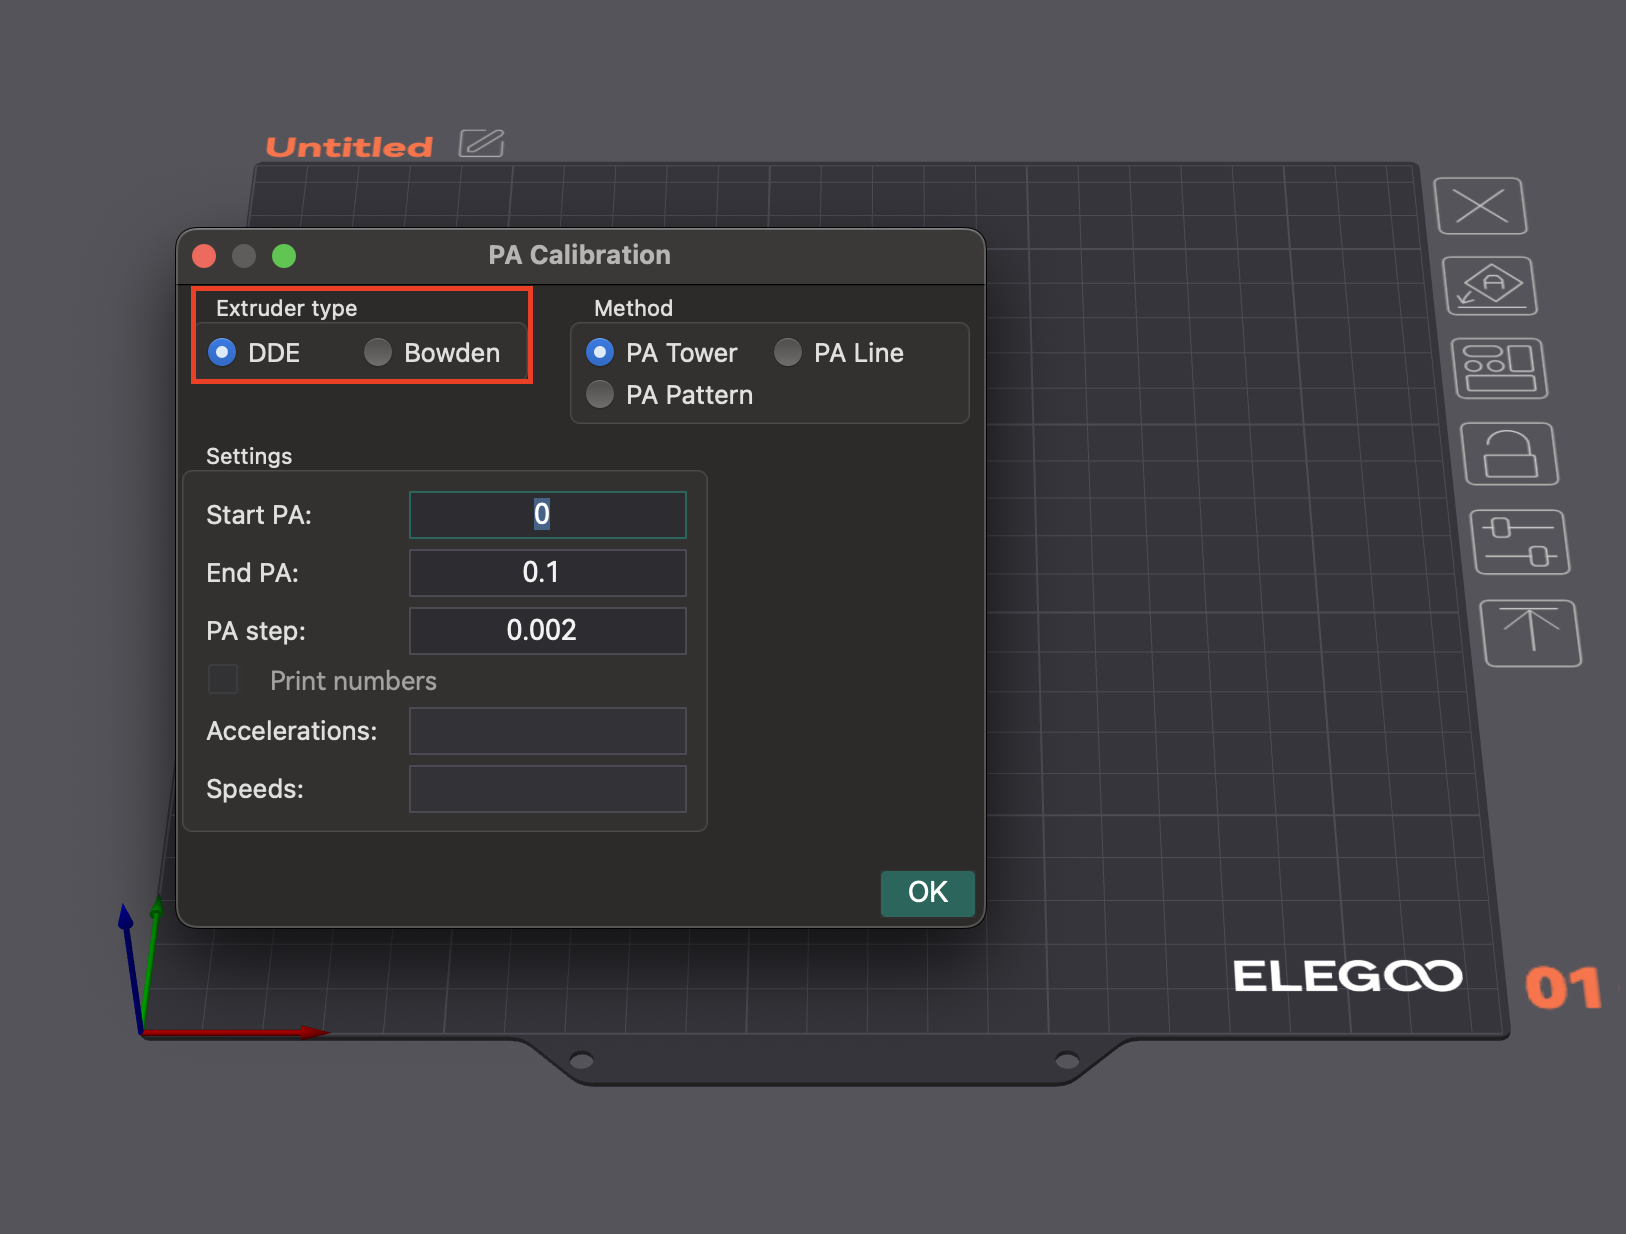
OrcaSlicer biedt meerdere methoden voor het kalibreren van de drukvooruitgang:
- Lijnmethode: Deze methode helpt snel een optimale drukvervroegingwaarde te bepalen.
- Toegang: Ga naar "Kalibratie" > "Drukvervroeging" > "PA-lijn".
- Test: OrcaSlicer genereert een reeks lijnen, elk geprint met een incrementeel verschillende PA-waarde. Het doel is om te observeren waar het begin en einde van elke lijn het "schoonst" lijken en de overgang in en uit de lijn het scherpst is, wat de meest consistente extrusie aangeeft.
- Afhankelijkheid: Deze methode is gevoelig voor de kwaliteit van de eerste laag. Zorg ervoor dat uw bed goed is genivelleerd voordat u deze test uitvoert.
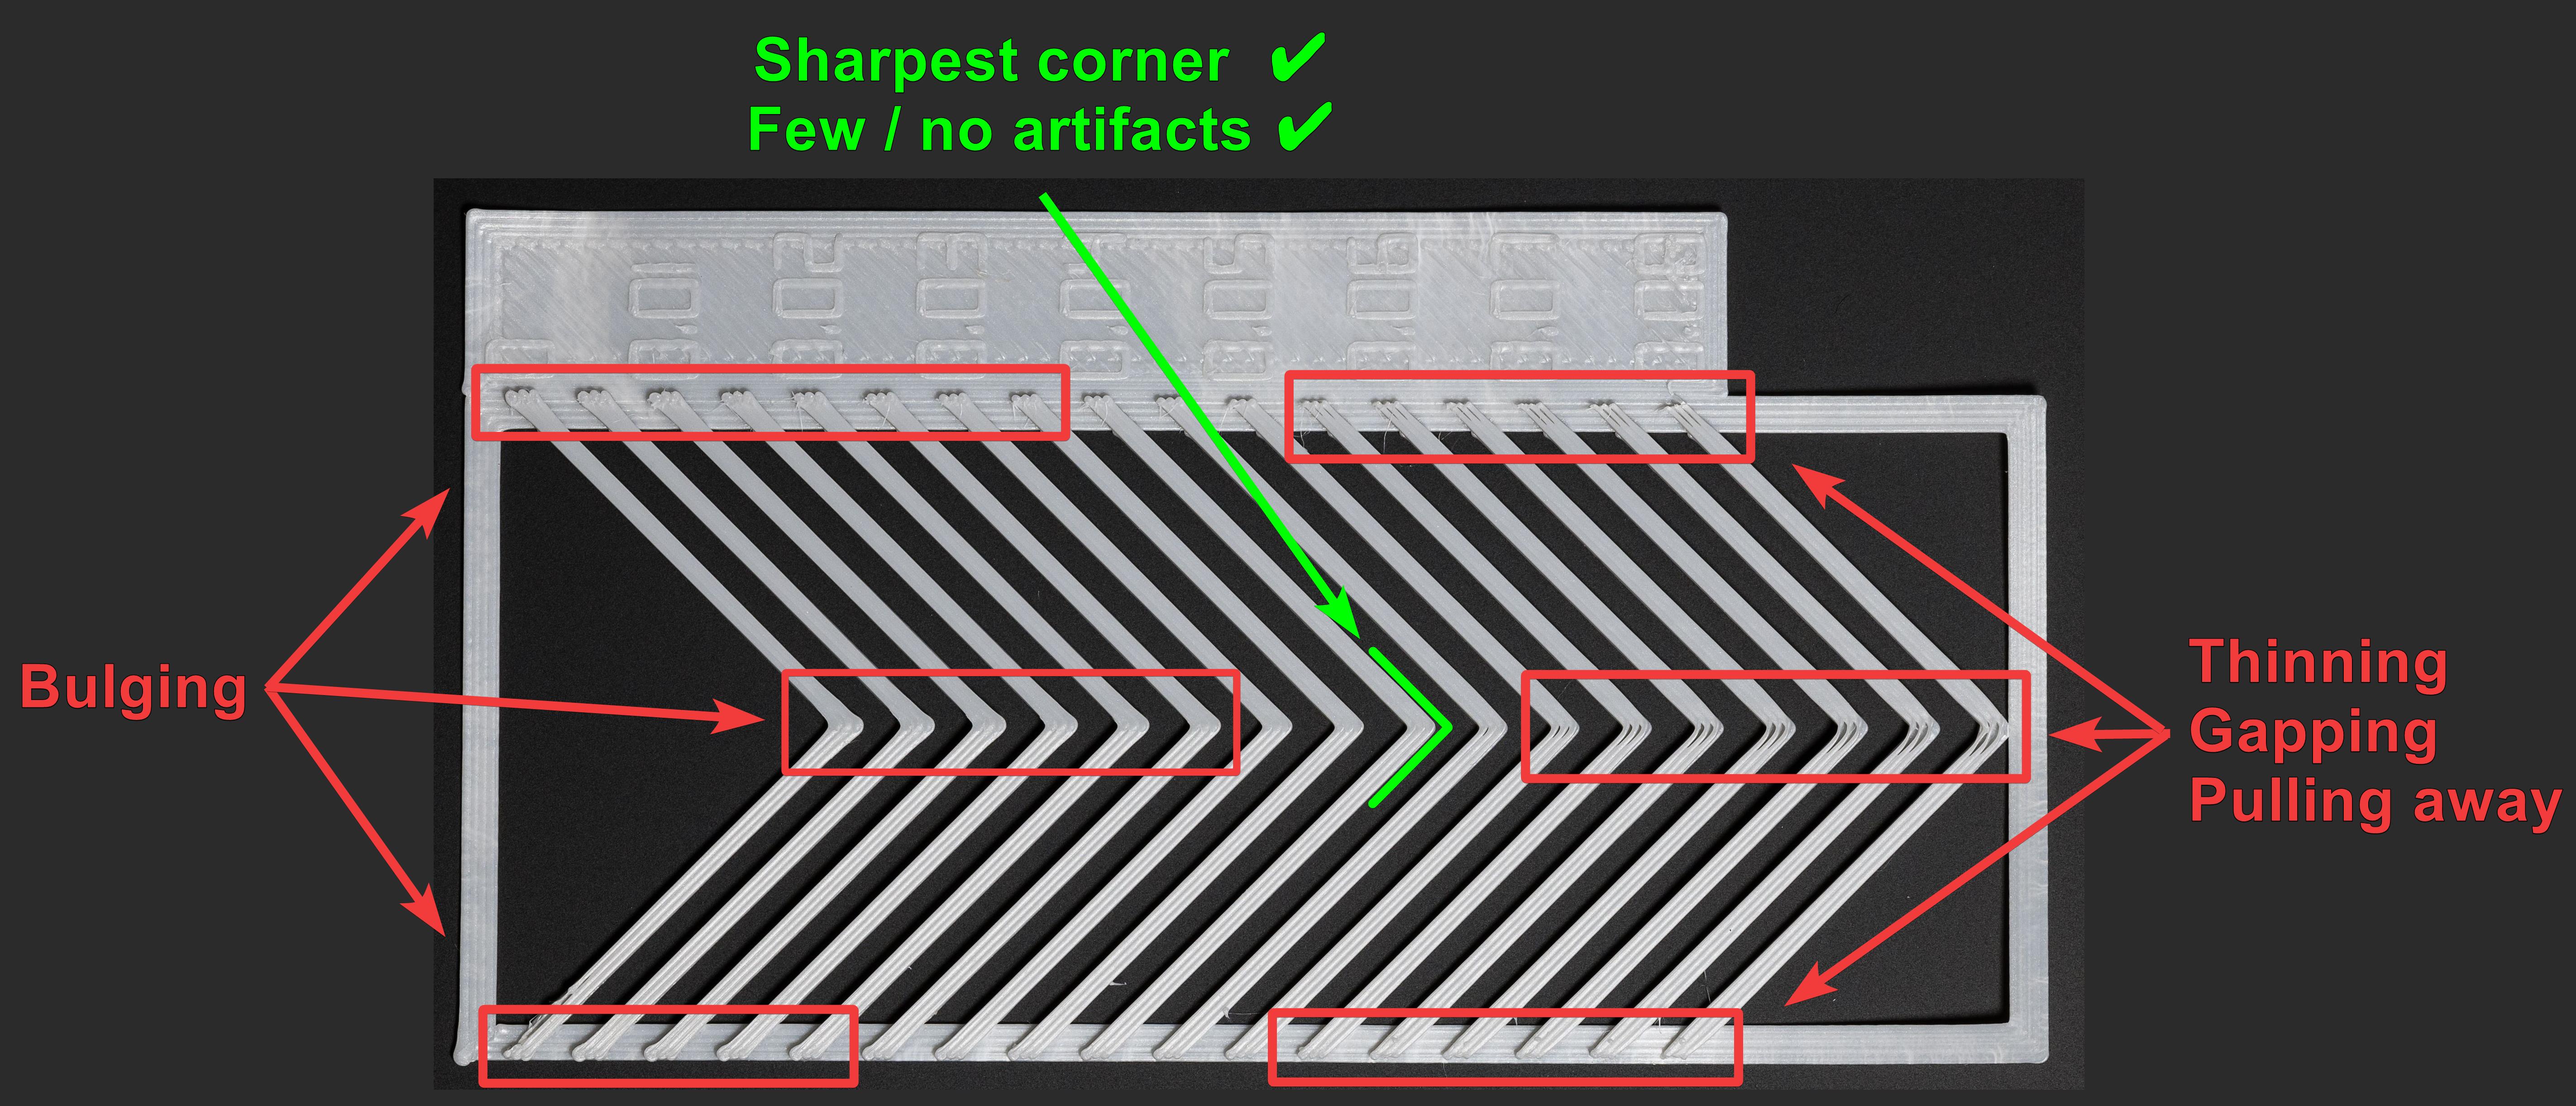
- Patroonmethode: Visuele beoordeling van hoeken.
- Toegang: Selecteer in het menu "Kalibratie" "Drukvervroeging" en kies vervolgens de "Patroonmethode".
- Test: OrcaSlicer genereert een prisma-achtig patroon. Controleer de consistente extrusiekwaliteit en identificeer de scherpste hoeken met de minste artefacten (zoals openingen, uitstulpingen of deuken).
Bron: obico.io
3. Torenmethode: Minder gevoelig voor de kwaliteit van de eerste laag, maar duurt langer.
- Toegang: Selecteer in het menu "Kalibratie" "Drukvervroeging" en vervolgens "PA-toren".
- Test: De software genereert een toren waarbij de PA toeneemt met de hoogte (meestal 0,002 per mm voor Direct Drive, 0,02 voor Bowden). Onderzoek elke hoek om de hoogte te bepalen met scherpe, schone hoeken.
- Aanbeveling: Print met hogere snelheden (boven 120 mm/s) om de PA-impact onder normale printomstandigheden te zien.
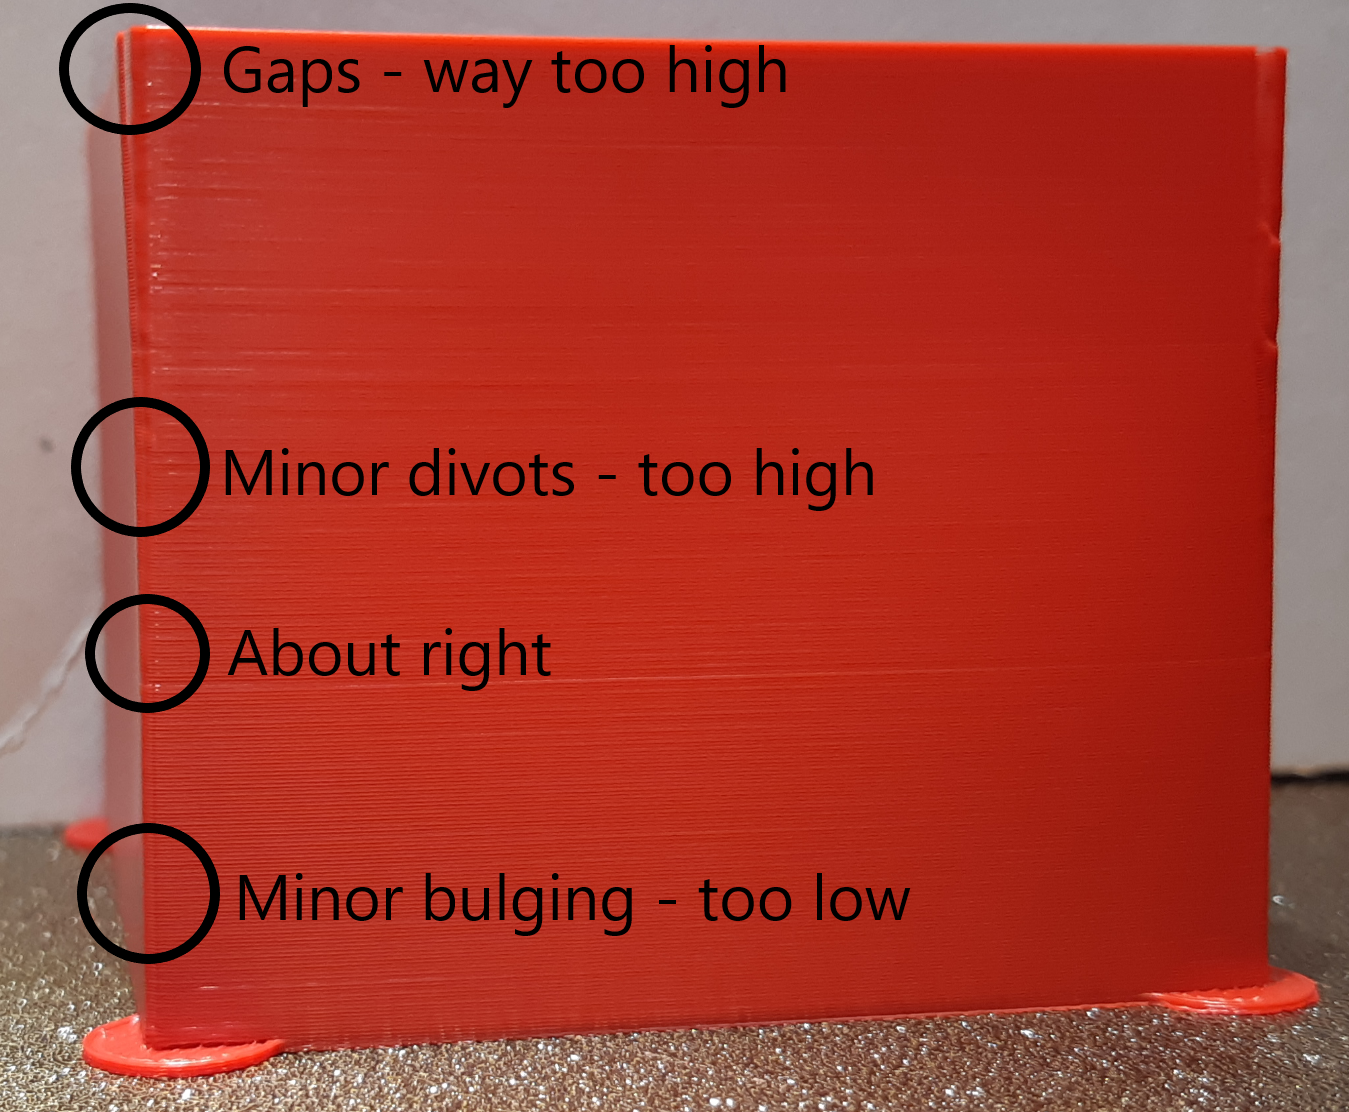
Bron: ellis3dp.com
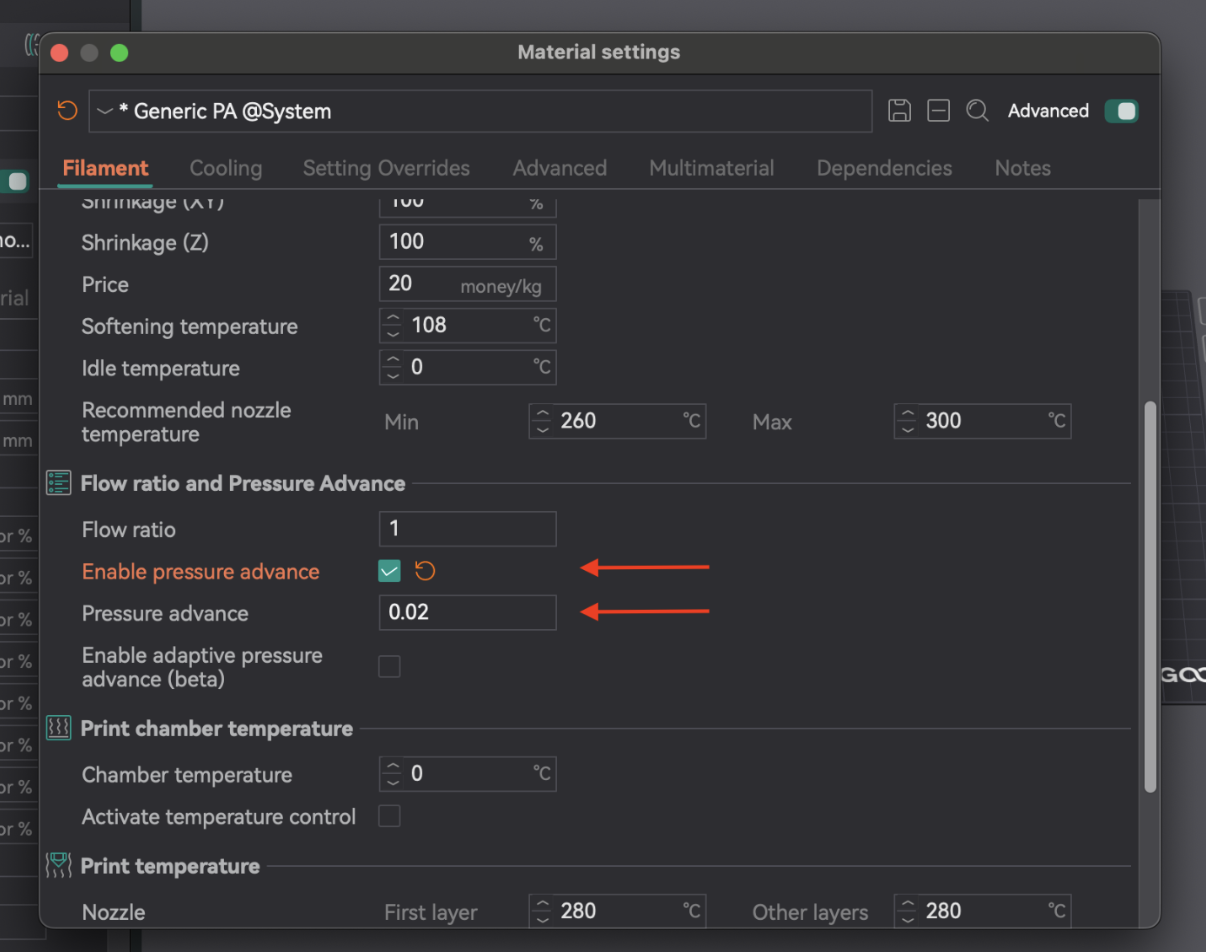
Zodra u de optimale PA-waarde hebt bepaald, opent u de filamentinstellingen (bewerkingspictogram naast het profiel). Schakel 'Drukvoorloop inschakelen' in en voer de waarde in. Sla het filamentprofiel op.
| Methode | Extrudertype | Voordelen | Nadelen | Belangrijkste observatie |
|---|
| Lijn | Beide | Snel en eenvoudig te testen | Sterk afhankelijk van de kwaliteit van de eerste laag | Schoonste lijnuiteinden, scherpste punt |
| Patroon | Beide | Visuele beoordeling van hoeken, geavanceerder | Nog steeds enigszins afhankelijk van de eerste laag | Meest consistente extrusie, scherpste hoek met de minste artefacten |
| Toren | Beide | Minder gevoelig voor de kwaliteit van de eerste laag, goed voor hoge snelheden | Kost meer tijd en materiaal | Beste algehele hoekkwaliteit op specifieke hoogte |
Tabel 4: Vergelijking van de drukvooruitgangsmethode
Terugtrekken trekt het filament terug voordat het verdergaat, waardoor er een negatieve druk ontstaat om lekkage, draden of klonters te voorkomen. Belangrijke parameters zijn de terugtreklengte, snelheid en Z-hop.
Intrekken werkt samen met drukvervroeging. Optimale intrekking helpt bij het beheersen van fysieke terugtrekking, terwijl PA de druk in de hotend regelt. Als PA niet gekalibreerd is, kan intrekken problemen opleveren. Het doel is de kortste lengte die het ontstaan van snaren minimaliseert zonder verstoppingen of "pokdalven" te veroorzaken.
Als er na het testen nog steeds sprake is van snoervorming, controleer dan eerst de instellingen voor temperatuur en stroomsnelheid en vervolgens de drukvervroeging. Deze basisinstellingen moeten correct zijn om het intrekken effectief te laten zijn.
- Toegang en configuratie: Maak een nieuw project aan. Ga naar "Kalibratie" > "Retractietest". Configureer "Start retractielengte", "Eind retractielengte" en "Stap" (standaard meestal 0 mm, 2 mm, 0,1 mm). Bowden-extruders hebben over het algemeen een langere lengte nodig (1-6 mm) dan directe aandrijving (0-2 mm).
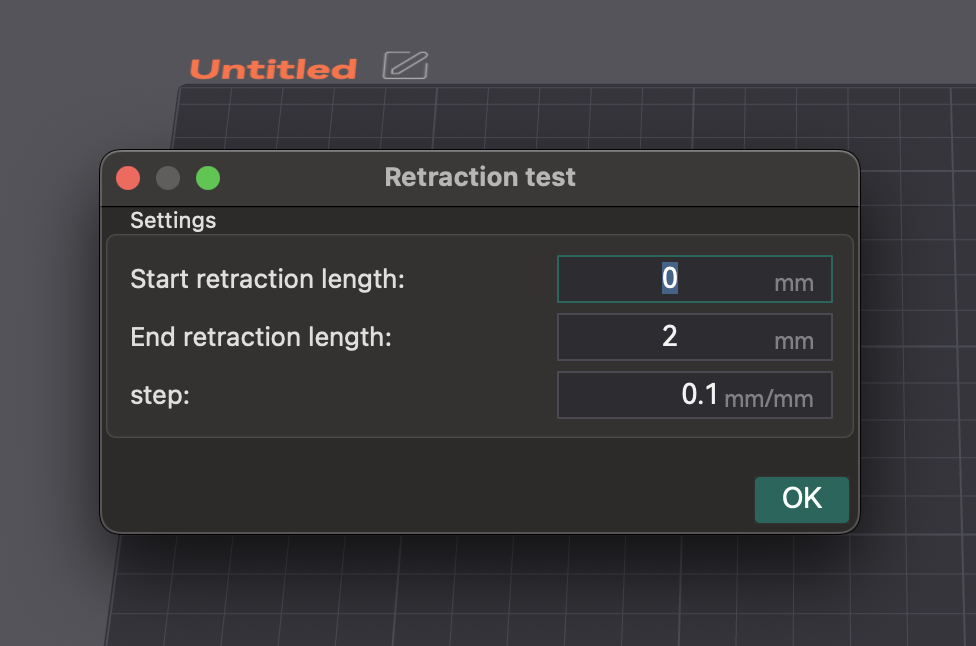
- Slicen en printen: Slice en print de retractietoren. Zorg ervoor dat "Normale" Z-hop is geselecteerd. U kunt naden op de binnenzijden van de toren in de preview tekenen voor een duidelijkere observatie van de stringing.
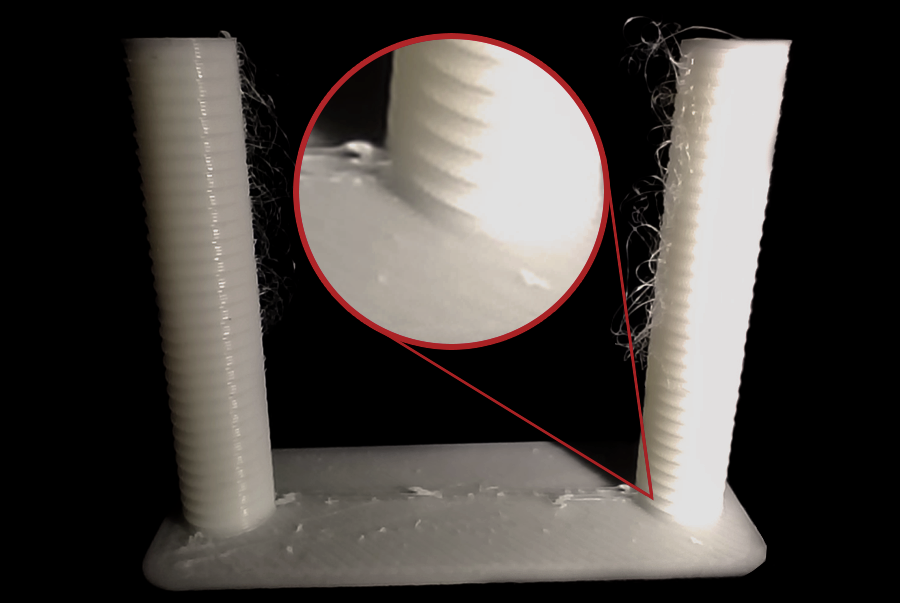
Bron: obico.io
3. Resultaten analyseren en aanpassen: Bekijk elke inkeping. Zoek de kortste lengte die draadvorming en lekkage minimaliseert zonder andere problemen. Voorbeeld: als de beste kwaliteit één inkeping vanaf de basis is met een stap van 0,1 mm, is de optimale lengte 0,2 mm. Open de filamentinstellingen, tabblad "Instellingen overschrijven", vink "lengte" aan onder retractie, voer een nieuwe waarde in en sla deze op.
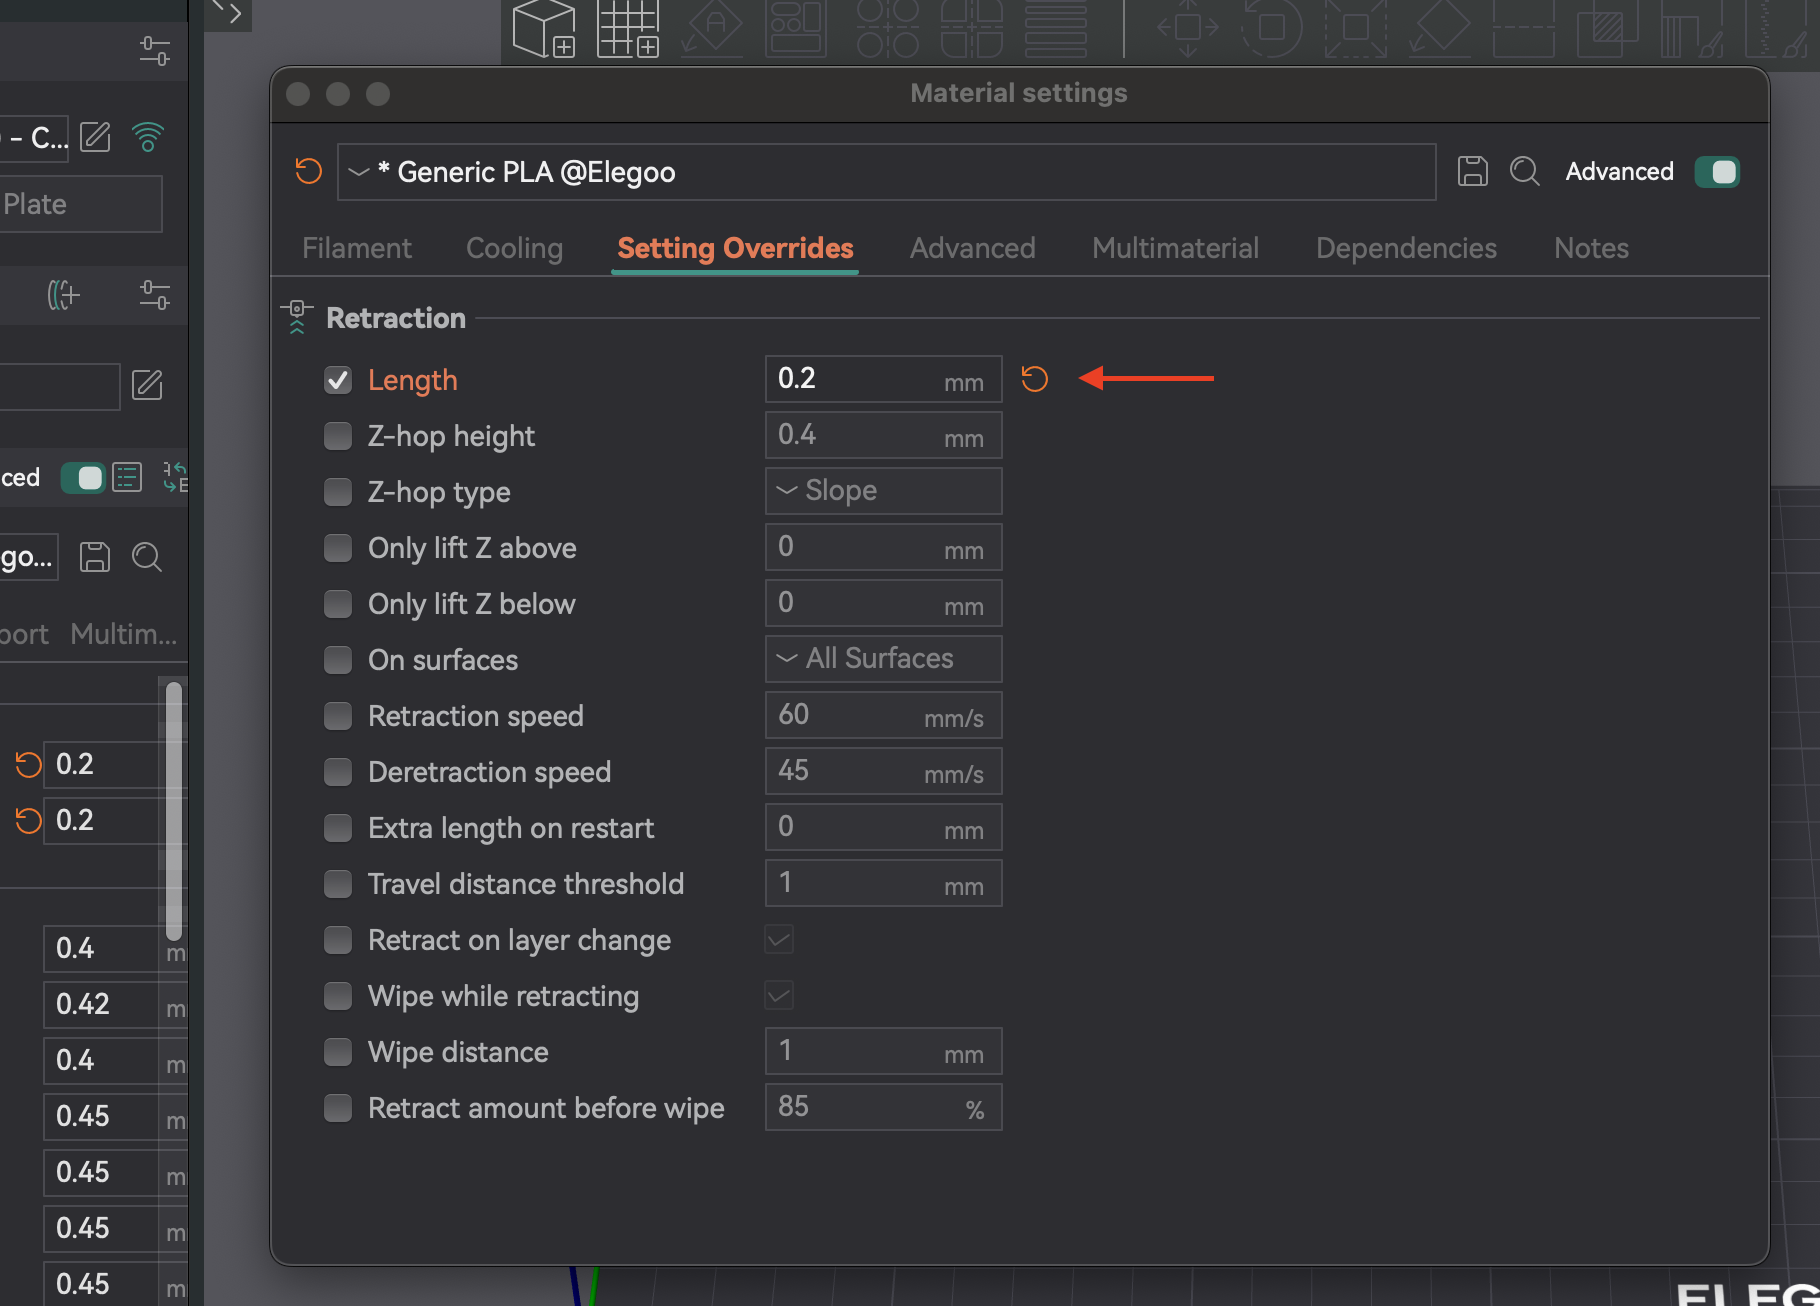
- Filamenttype: Verschillende materialen lekken verschillend. PLA/ABS heeft doorgaans een lagere intrekking (0,2-0,4 mm) nodig dan flexibele of hygroscopische filamenten.
- Droogfilament: Vocht is een veelvoorkomende oorzaak van draadvorming. Als de draadvorming aanhoudt, droog het filament dan. Dit is vaak het eerste wat u moet controleren.
- Installatie van de nozzle: Een losse of gedeeltelijk verstopte nozzle kan draadvorming veroorzaken. Controleer de installatie en verwijder regelmatig obstakels.
- Vegen tijdens het intrekken: Deze instelling zorgt ervoor dat de nozzle beweegt tijdens het intrekken, waardoor de nozzle wordt gereinigd en draadvorming/draadvorming wordt verminderd.
- Deretractiesnelheid: Regelt de herlaadsnelheid na het intrekken. Instellen op 0 gebruikt de intreksnelheid.
- Drempelwaarde voor de reisafstand: Trekt alleen in als de reisafstand een limiet overschrijdt, waardoor onnodig intrekken wordt voorkomen en draadvorming in kleine openingen wordt verminderd.
| Instelling | Beschrijving | Veelvoorkomend probleem | Oplossing/tip |
|---|
| Terugtreklengte | Hoeveelheid teruggetrokken filament. | Draadvorming, lekken, verstoppingen (indien te hoog) | Verhogen voor draadvorming, verlagen voor verstoppingen/putjes. |
| Terugtreksnelheid | Snelheid waarmee filament wordt teruggetrokken. | Draadvorming, klonten, schurend filament | Verhogen voor snellere respons, voorkomen schuren. |
| Z-Hop | Tilt de nozzle op tijdens de verplaatsing. | Schraapt de nozzle, klonten op het oppervlak | Inschakelen voor complexe prints, hoogte aanpassen. |
| Terugtreksnelheid | Snelheid voor het herladen van filament. | Onderextrusie bij begin van nieuwe regel | Instellen op 0 (gebruikt de terugtreksnelheid) of iets lager. |
| Drempelwaarde verplaatsingsafstand | Minimale verplaatsing voor terugtrekking. | Draadvorming in kleine openingen | Aanpassen om te activeren voor de relevante verplaatsing. |
| Vegen tijdens het intrekken | Spuitmond beweegt langs het pad tijdens het intrekken. | Zichtbaarheid van de Z-naad, lekken | Inschakelen om de naden van de buitenwand te verbeteren en lekken te verminderen. |
Tabel 5: Intrekkingsinstellingen en probleemoplossing
Tolerantie is hoe nauwkeurig uw printer afmetingen reproduceert. Het is cruciaal voor onderdelen die in elkaar passen (assemblages, in elkaar grijpende componenten). Maatafwijkingen worden veroorzaakt door krimp van filament en de mechanica van de printer. De tolerantietest helpt u het gedrag van uw printer te begrijpen en ontwerpen aan te passen voor een perfecte pasvorm.
Tolerantie is een kenmerk van de combinatie van filament en printer. Het is geen eenmalige configuratie. Verschillende filamenten krimpen verschillend, en zelfs merken/kleuren kunnen variëren. Test opnieuw wanneer u van filamenttype of merk wisselt of ingrijpende hardwarewijzigingen doorvoert. Onderhoud profielen per filament voor een consistente nauwkeurigheid.
- Toegang: Ga naar "Kalibratie" > "Orca-tolerantietest". Dit opent een nieuw project met het testmodel.
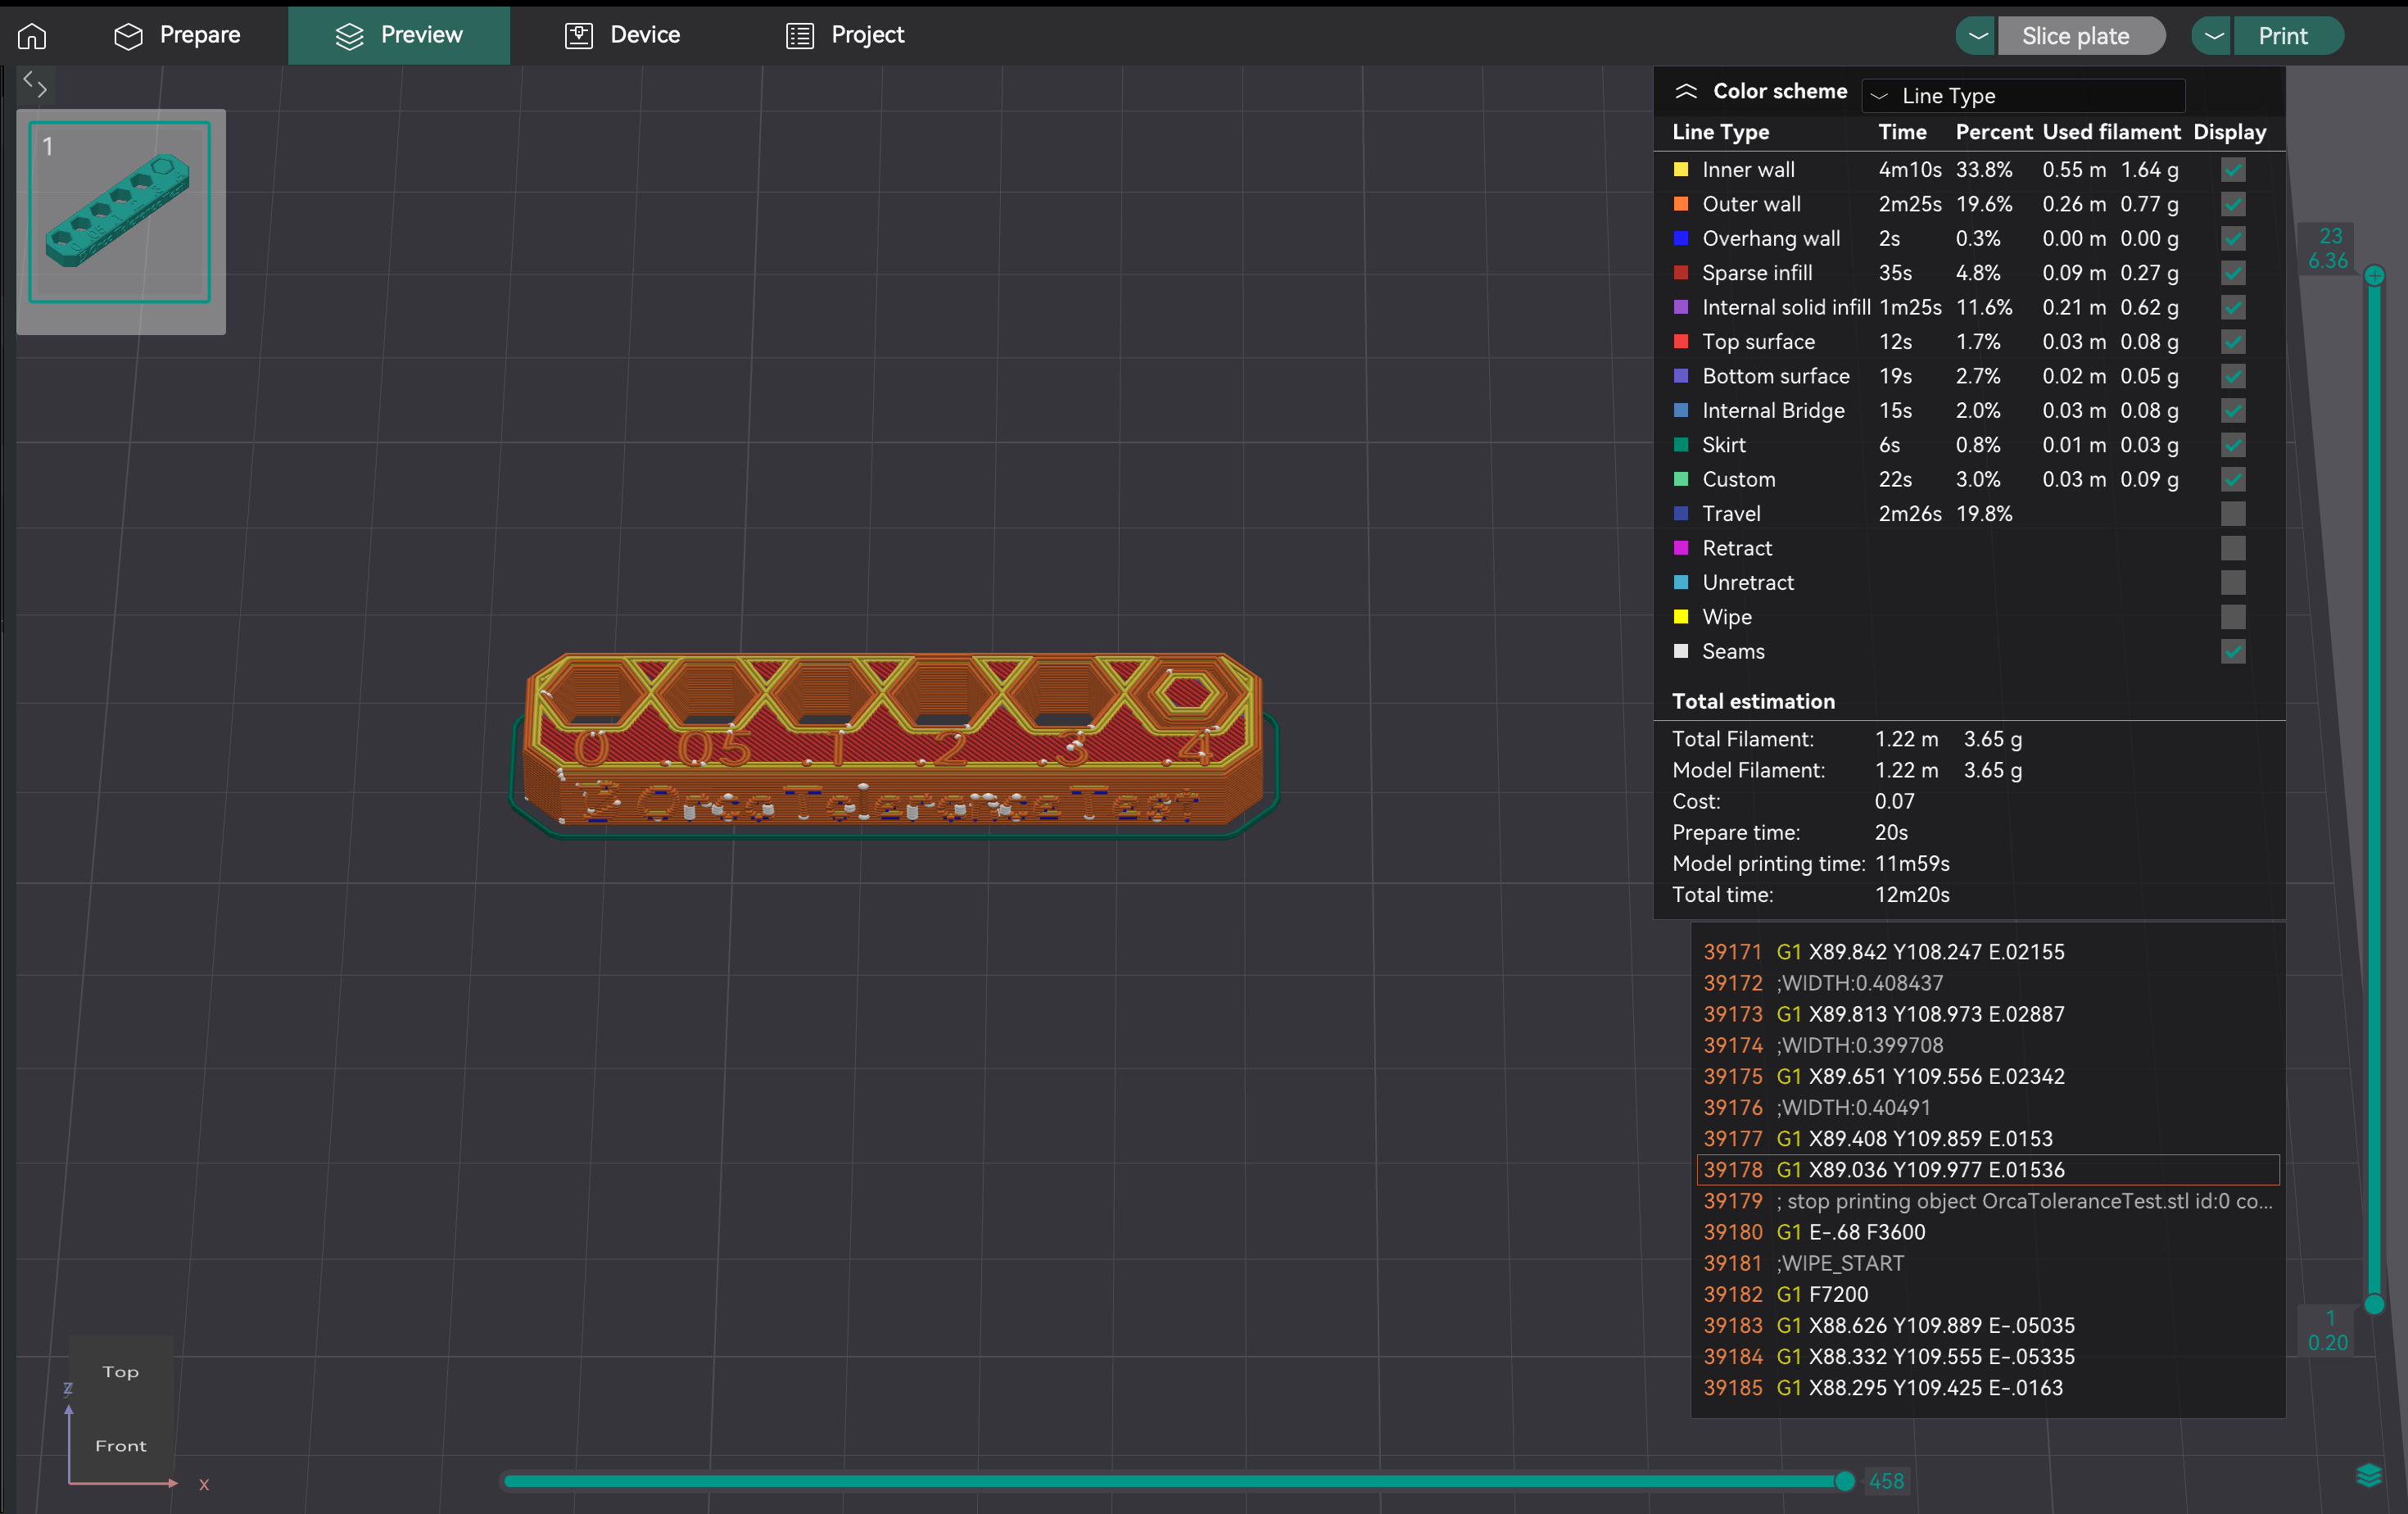
- Modelbeschrijving: Het model heeft een basis met zes hexagonale gaten (tolerantie van 0,0 mm, 0,05 mm, 0,1 mm, 0,2 mm, 0,3 mm en 0,4 mm) en een hexagontester.
- Printen: Selecteer de printer-, filament- en procesinstellingen. Slicen en printen.
- Belangrijk: Vermijd het gebruik van X-Y-gatcompensatie en X-Y-contourcompensatie (ingesteld op 0 mm) tijdens deze test, aangezien deze de resultaten kunnen beïnvloeden.
Nadat de print is voltooid, gebruikt u een M6 inbussleutel of de meegeleverde zeskanttester. Uw doel is om het kleinste gaatje op de testprint te vinden waar de tester met minimale of geen kracht doorheen kan schuiven, zonder merkbare wiebeling of speling. Dit specifieke gaatje vertegenwoordigt de werkelijke output van uw printer voor een "goede" of "soepele" pasvorm met dat filament.
Zo bepaalt u objectief of de pasvorm 'precies goed' is:
- Begin met de kleinste gaatjes: Probeer je tester eerst in de gaatjes van 0,0 mm, 0,05 mm en 0,1 mm te steken.
- Beoordeel de pasvorm van elk gaatje:
- Te strak: Als je de tester moet forceren, of als hij er gewoon niet in past, is dat gaatje te strak voor een "precies goede" pasvorm.
- Te los/Wobbelend: Als de tester er heel gemakkelijk in gaat en merkbare speling heeft of wiebelt, is dat gaatje te los voor een "precies goede" pasvorm.
- Precies goed: Dit is het krasste gaatje waar de tester soepel in gaat, waarbij lichte maar constante druk nodig is, en waar weinig tot geen speling zichtbaar is na het insteken.
- De aangegeven grootte van dit "precies goede" gaatje (bijv. 0,1 mm, 0,2 mm of 0,3 mm) geeft de inherente maatnauwkeurigheid van je printer aan voor gaatjes met dat specifieke filament. Deze waargenomen waarde is cruciaal om te bepalen hoe compensatie moet worden toegepast om de gewenste pasvorm te verkrijgen in toekomstige ontwerpen.

Bron: hta3d.com
Zodra u de "precies juiste" pasvorm op de tolerantietestprint hebt gevonden (bijv. het gat van 0,2 mm past perfect in de test), gebruikt u deze waarneming om uw X-Y gatcompensatie in OrcaSlicer aan te passen. Deze instelling wordt vervolgens toegepast op alle gaten in uw toekomstige ontwerpen om ervoor te zorgen dat ze met de gewenste pasvorm worden geprint.
- Scenario 1: Uw geprinte gaten komen consequent kleiner uit dan ontworpen (te krap).
- Voorbeeld: U ontwerpt een onderdeel met een speling van 0,2 mm en verwacht een "precies goede" pasvorm. Op uw tolerantietestprint is het gat van 0,2 mm te krap en past de tester slechts soepel in het gat van 0,3 mm. Dit geeft aan dat uw printer gaten maakt die ongeveer 0,1 mm kleiner zijn dan ontworpen.
- Actie: U moet uw X-Y-gatcompensatie verhogen met een positieve waarde. In dit voorbeeld zou het instellen van de X-Y-gatcompensatie op +0,1 mm ervoor zorgen dat alle gaten in uw toekomstige prints 0,1 mm groter worden afgedrukt, waardoor uw ontworpen gaten met een speling van 0,2 mm dichter bij de "precies goede" pasvorm komen.
- Scenario 2: Uw geprinte gaten komen consequent groter uit dan ontworpen (te krap).
- Voorbeeld: U ontwerpt een onderdeel met een speling van 0,2 mm en verwacht een "precies goede" pasvorm. Op uw tolerantietestprint zit het gat van 0,2 mm te los en past de tester alleen soepel in het gat van 0,1 mm. Dit geeft aan dat uw printer gaten maakt die ongeveer 0,1 mm groter zijn dan ontworpen.
- Actie: U moet de X-Y-gatcompensatie verlagen met een negatieve waarde. In dit voorbeeld zou het instellen van de X-Y-gatcompensatie op -0,1 mm ervoor zorgen dat alle gaten in uw toekomstige prints 0,1 mm kleiner worden afgedrukt, waardoor de ontworpen gaten met een speling van 0,2 mm dichter bij de "precies juiste" pasvorm komen.
Vergeet niet dat X-Y gatcompensatie specifiek bedoeld is voor interne kenmerken zoals gaten. X-Y contourcompensatie wordt gebruikt om de algehele buitenafmetingen van uw onderdeel aan te passen en wordt doorgaans niet aangepast op basis van de resultaten van deze specifieke gattolerantietest.
De maximale volumetrische snelheid (of maximale stroomsnelheid) is het hoogste volume filament (mm³/s) dat uw hotend consistent en probleemloos kan smelten en extruderen. Dit zorgt ervoor dat uw printer de gewenste doorstroming aankan, vooral bij hoge snelheden, zonder onderextrusie (de hotend kan niet snel genoeg smelten) of overextrusie (overmatige druk). Door deze limiet te bepalen, optimaliseert u de printsnelheden zonder dat dit ten koste gaat van de kwaliteit.
De maximale volumetrische snelheid is een limiet voor hotends en filamenten. Verschillende filamenten hebben unieke smeltstroomsnelheden. PLA, PETG en ABS hebben allemaal verschillende maxima. U moet elk filamenttype dat u met hoge snelheden wilt printen testen om specifieke volumetrische snelheidsinstellingen in elk filamentprofiel in te stellen.
- Toegang: Ga naar "Kalibratie" > "Maximale volumetrische snelheid".
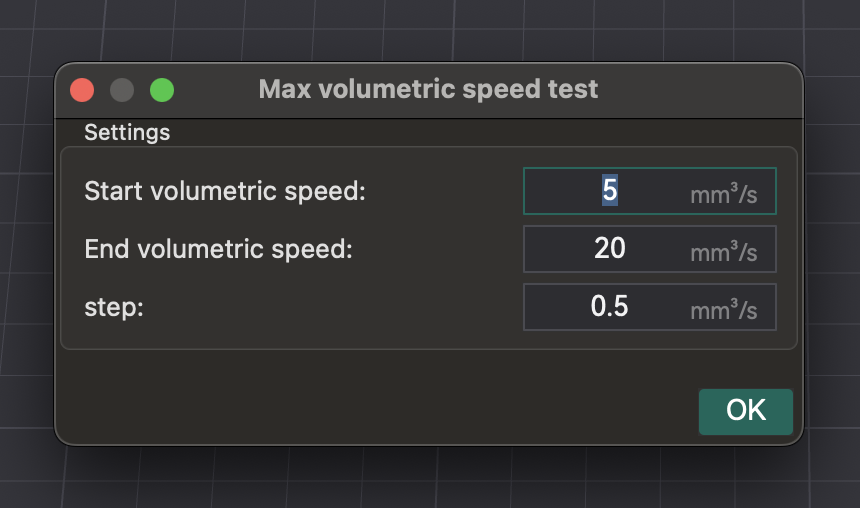
- Test: OrcaSlicer genereert een model. Print het uit en observeer de kwaliteit naarmate de snelheid (en volumetrische flow) toenemen. Identificeer waar de printkwaliteit afneemt (onder-extrusie, gaten, ruw oppervlak).
- Maximale veilige snelheid identificeren: Noteer de volumetrische snelheid vlak voor de afname. Dit is uw maximale veilige volumetrische snelheid voor die hotend en dat filament.
- Instellingen toepassen: Voer deze waarde in bij de filamentinstellingen in OrcaSlicer. Dit voorkomt dat de slicer snelheden aanstuurt die de capaciteit van uw hotend overschrijden.
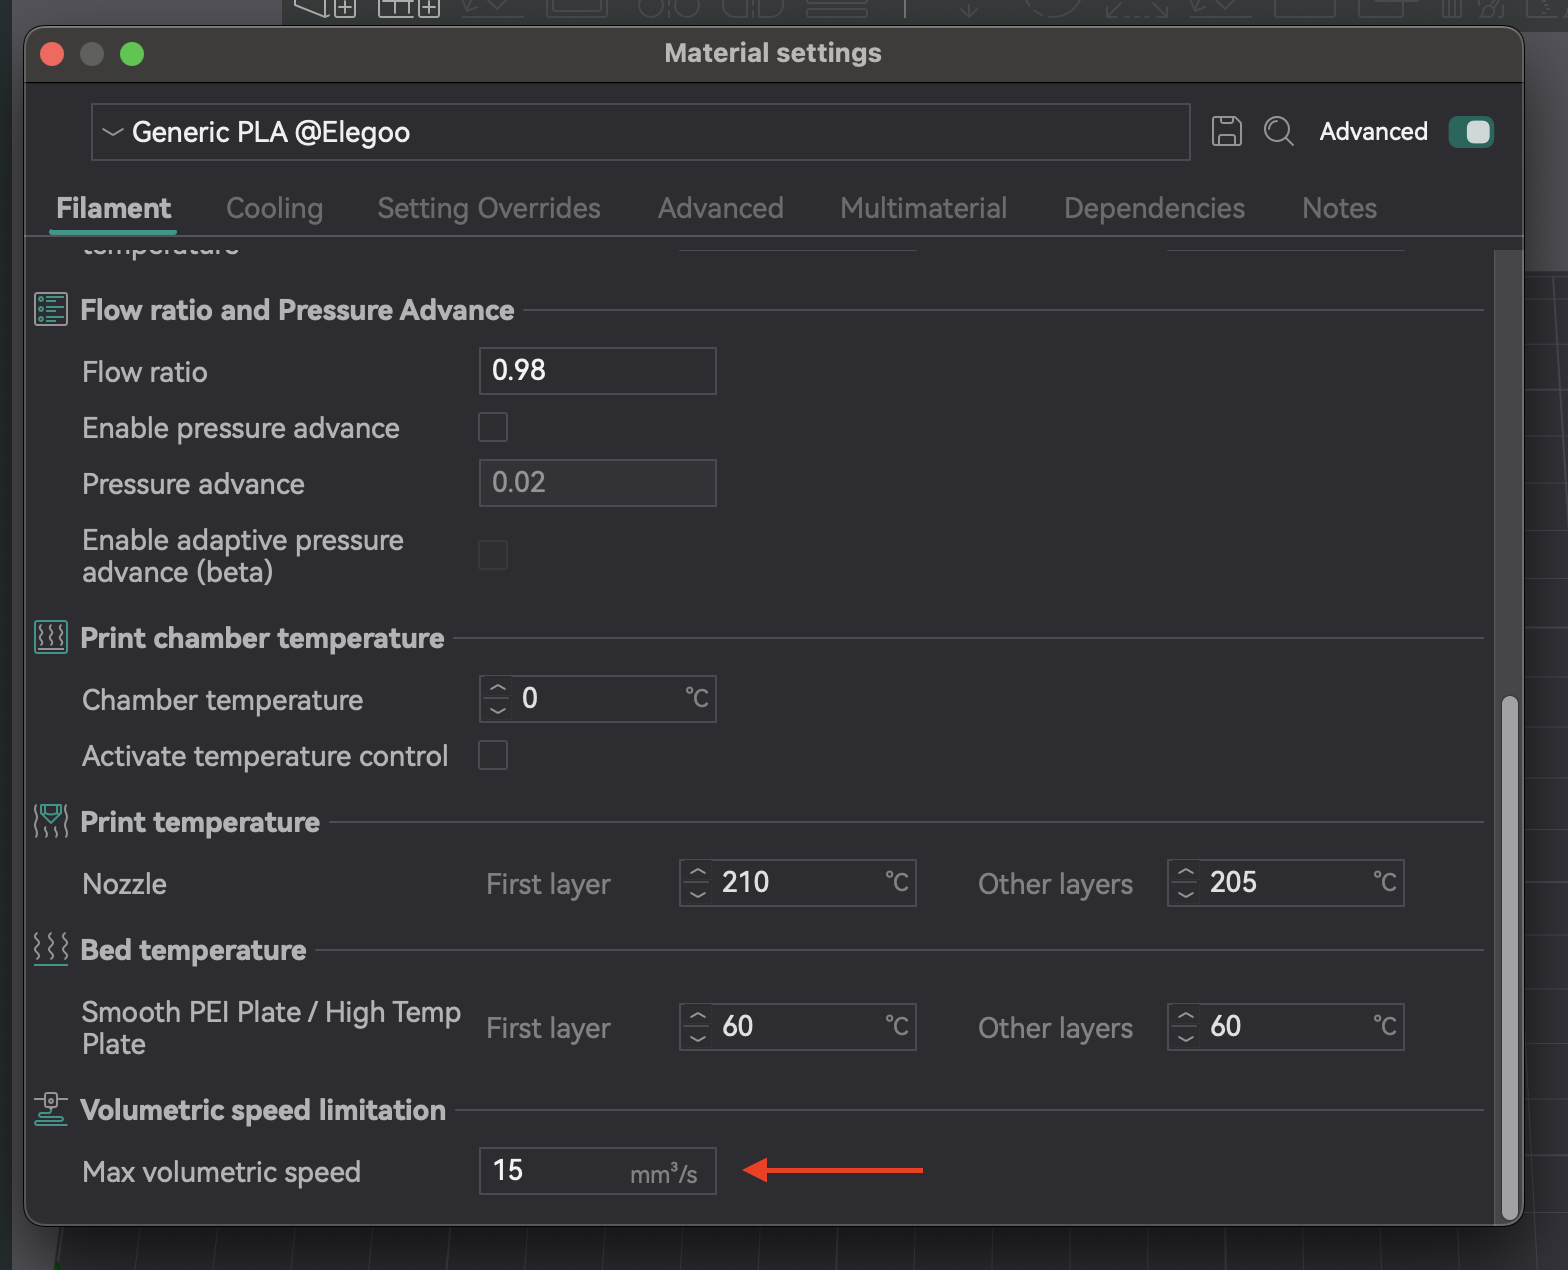
| Filamenttype/merk | Optimale maximale volumetrische snelheid (mm³/s) | Observaties |
|---|
| PLA (Generiek) | 16,75 | Onderextrusie en laagspleten voorbij dit punt |
| PETG (Prusament) | 14,5 | Verslechtering van de oppervlaktekwaliteit bij hogere snelheden |
| ABS (Hatchbox) | 18,0 | Consistente extrusie tot aan deze limiet |
Tabel 6: Resultaten van de maximale volumetrische snelheid
Verticale Fine Artifacts (VFA's) zijn subtiele, ritmische patronen of lijnen op prints, vaak nabij hoeken of richtingsveranderingen. Ze worden veroorzaakt door mechanische trillingen of resonantie in het bewegingssysteem bij hoge snelheid.
VFA-kalibratie bepaalt de praktische snelheidslimiet voor kwaliteit, los van de maximale volumetrische snelheid. Terwijl de volumetrische snelheid draait om de capaciteit van de hotend, houdt VFA rekening met de beperkingen van het bewegingssysteem. Uw printer extrudeert mogelijk voldoende filament, maar het frame, de riemen of de motoren kunnen trillingen veroorzaken als VFA's. De VFA-test biedt een "werkelijke" maximale printsnelheid waarbij de kwaliteit behouden blijft en controleert de stabiliteit van het bewegingssysteem nadat de volumetrische snelheid is ingesteld.
- Toegang: Ga naar "Kalibratie" > "Meer" > "VFA".
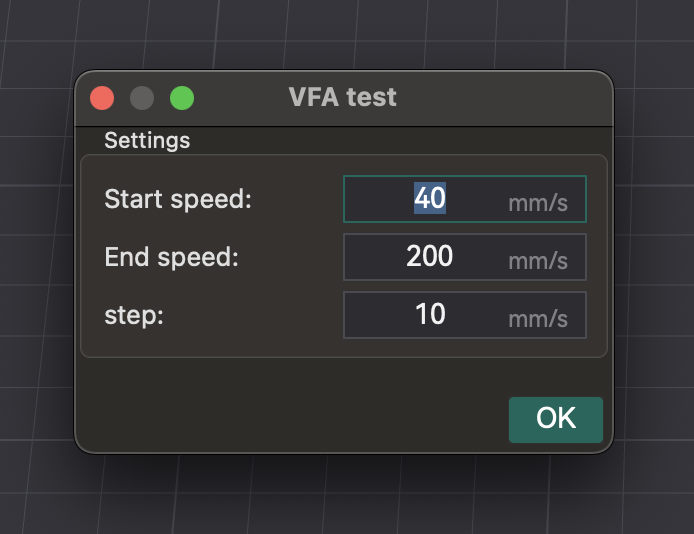
- Parameters instellen: Er verschijnt een venster om de "Startsnelheid", "Eindsnelheid" en "Stapsverhogingen" te configureren. Voorbeeld: 160 mm/s start, 500 mm/s eind, stappen van 20 mm/s.
- Analyseren op defecten: Snijd en print de VFA-snelheidstoren. Controleer visueel op stringing, onderextrusie, laagverschuivingen en oppervlakteafwerking. Identificeer de hoogste snelheid met een goede kwaliteit vóór degradatie. Het model heeft markeringen die overeenkomen met de snelheden. Voorbeeld: als onderextrusie begint bij inkeping 11 (160 mm/s start, stappen van 20 mm/s), is de optimale snelheid 360 mm/s (160 + (20 * 10)).
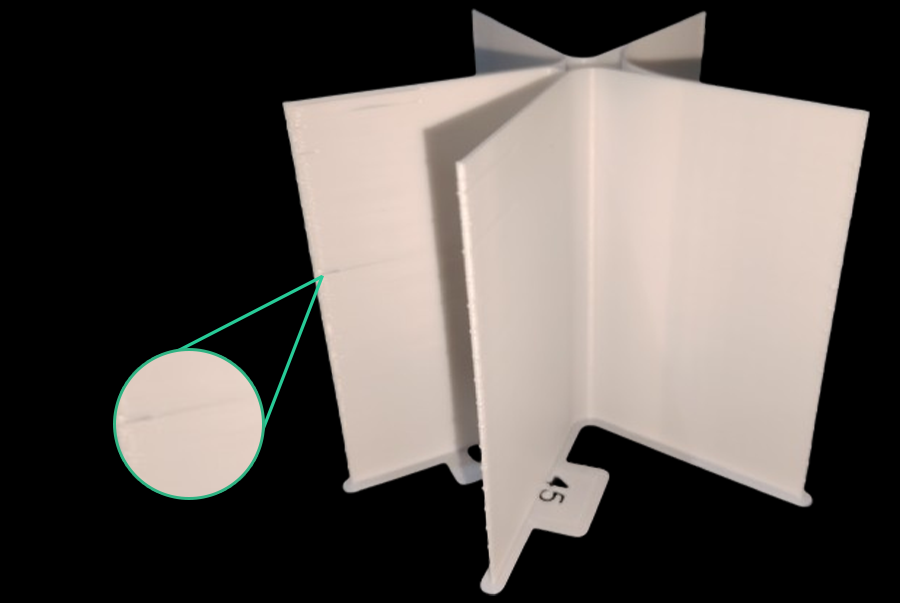
Bron: obico.io
Voor een optimale 3D-printkwaliteit is meer nodig dan alleen kalibratietests. Printeronderhoud, filamentbeheer en omgevingsbeheersing zijn ook nodig.
Regelmatig onderhoud is essentieel: controleer de nozzle op slijtage/verstoppingen, controleer de werking van de extruder, reinig het printbed en controleer de riemspanning. Regelmatige reiniging, het waterpas stellen van het printbed en het afstellen van de PID zorgen ervoor dat uw printer optimaal blijft.
De kwaliteit van het filament heeft invloed op de prints. Vocht in hygroscopische filamenten (PETG, nylon, TPU) veroorzaakt luchtbellen, sissen, draadvorming en zwakke onderdelen. Gebruik altijd nieuw, droog filament. Bewaar in afgesloten zakken/containers met droogmiddel. Droog vochtig filament in een droger of oven.
Een stabiele omgeving is cruciaal. Schommelingen in temperatuur, luchtvochtigheid of luchtstroom veroorzaken kromtrekken en inconsistenties. Gebruik indien mogelijk een behuizing. Controleer met een thermometer en hygrometer om problemen te voorkomen.
Kalibratie is een doorlopend proces, het is niet zo dat u iets instelt en er niet meer aan hoeft te denken. Instellingen zijn dynamisch en veranderen voortdurend.
- Nieuw filament: Kalibreer opnieuw voor nieuwe typen, merken of zelfs kleuren.
- Hardwarewijzigingen: Nieuwe wijzigingen in de lengte van de hotend, extruder of Bowden-buis vereisen een herkalibratie van de betreffende parameters.
- Verslechtering van de afdrukkwaliteit: Als de kwaliteit onverwachts afneemt, is herkalibratie vaak de eerste stap om de oorzaak te achterhalen.
Veel problemen met de afdrukkwaliteit worden veroorzaakt door kalibratieproblemen. Gebruik een systematische aanpak om deze te diagnosticeren en op te lossen, zodat u willekeurige aanpassingen voorkomt. Problemen tijdens de flowkalibratie (klikkende geluiden, ruwe afdrukken) wijzen vaak op problemen vóór de kalibratie of afhankelijkheden zoals temperatuur of E-stappen. Begin met fundamentele controles vóór specifieke slicerkalibraties.
| Probleem | Mogelijke oorzaak van kalibratie | Eerste stappen om te controleren |
|---|
| Slechte hechting van de eerste laag | Z-offset, bednivellering, temperatuur | Bed opnieuw nivelleren (handmatig/automatisch), Z-offset aanpassen, bedtemperatuur controleren. |
| Stringing/Oozing | Retractie, temperatuur, stroomsnelheid | Droog filament, voer de retractietest opnieuw uit, controleer de nozzletemperatuur. |
| Blobby/afgeronde hoeken | Drukvervroeging, printsnelheid | Voer de PA-test opnieuw uit (overweeg de torenmethode), verlaag de printsnelheid. |
| Onder-extrusie/gaten | Stroomsnelheid, temperatuur, maximale volumetrische snelheid | Voer de stroomkalibratie opnieuw uit, verhoog de nozzletemperatuur, controleer op verstoppingen. |
| Over-extrusie/ruwe oppervlakken | Stroomsnelheid, temperatuur | Voer de stroomkalibratie opnieuw uit, verlaag de nozzletemperatuur. |
| Dimensionale onnauwkeurigheid | Tolerantie, stroomsnelheid | Voer de tolerantietest opnieuw uit, controleer X-Y-compensatie. |
| Verticale fijne artefacten (VFA's) | VFA-kalibratie, invoervormgeving, mechanische problemen | Voer de VFA-test opnieuw uit, controleer riemen/frame, overweeg invoervormgeving. |
| Laagverschuivingen | Mechanische problemen (riemen, motoren), acceleratie | Controleer de riemspanning, inspecteer het frame, verlaag de acceleratie. |
Tabel 7: Stroomdiagram voor het oplossen van problemen met de afdrukkwaliteit (conceptueel)
Uitgebreide kalibratie met OrcaSlicer is onmisbaar voor elke 3D-printliefhebber of -professional. Door parameters zoals temperatuur, stroomsnelheid, drukvoorloop, retractie, tolerantie, maximale volumetrische snelheid en VFA zorgvuldig af te stemmen, haalt u het maximale uit uw printer. Deze precisie leidt tot prints van hogere kwaliteit, betrouwbaarder en nauwkeuriger, waardoor filamentverspilling wordt verminderd en de slagingspercentages worden verbeterd.
Kalibratie is een continu proces. Evalueer en verfijn uw instellingen telkens wanneer u nieuwe filamenten introduceert, hardware aanpast of veranderingen in de omgeving ervaart. Deze continue optimalisatie zorgt ervoor dat uw printer consistent optimaal presteert. Veel printplezier!
Also available in: Deutsch | English | Español | Français | Italiano | Polski | Português | Русский


