Dominando tus impresiones: Guía completa de calibración de OrcaSlicer
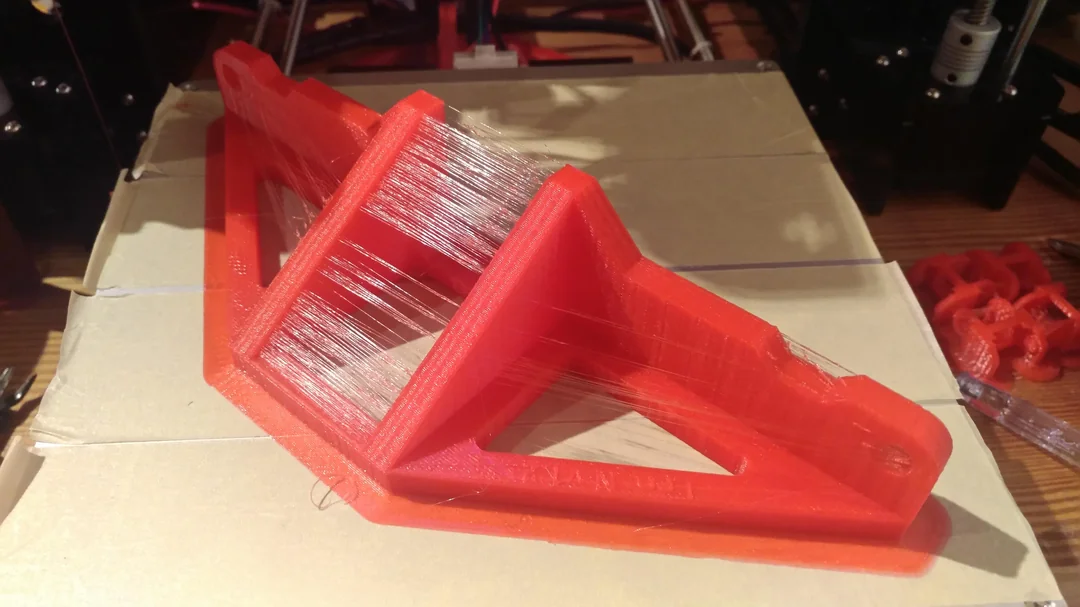
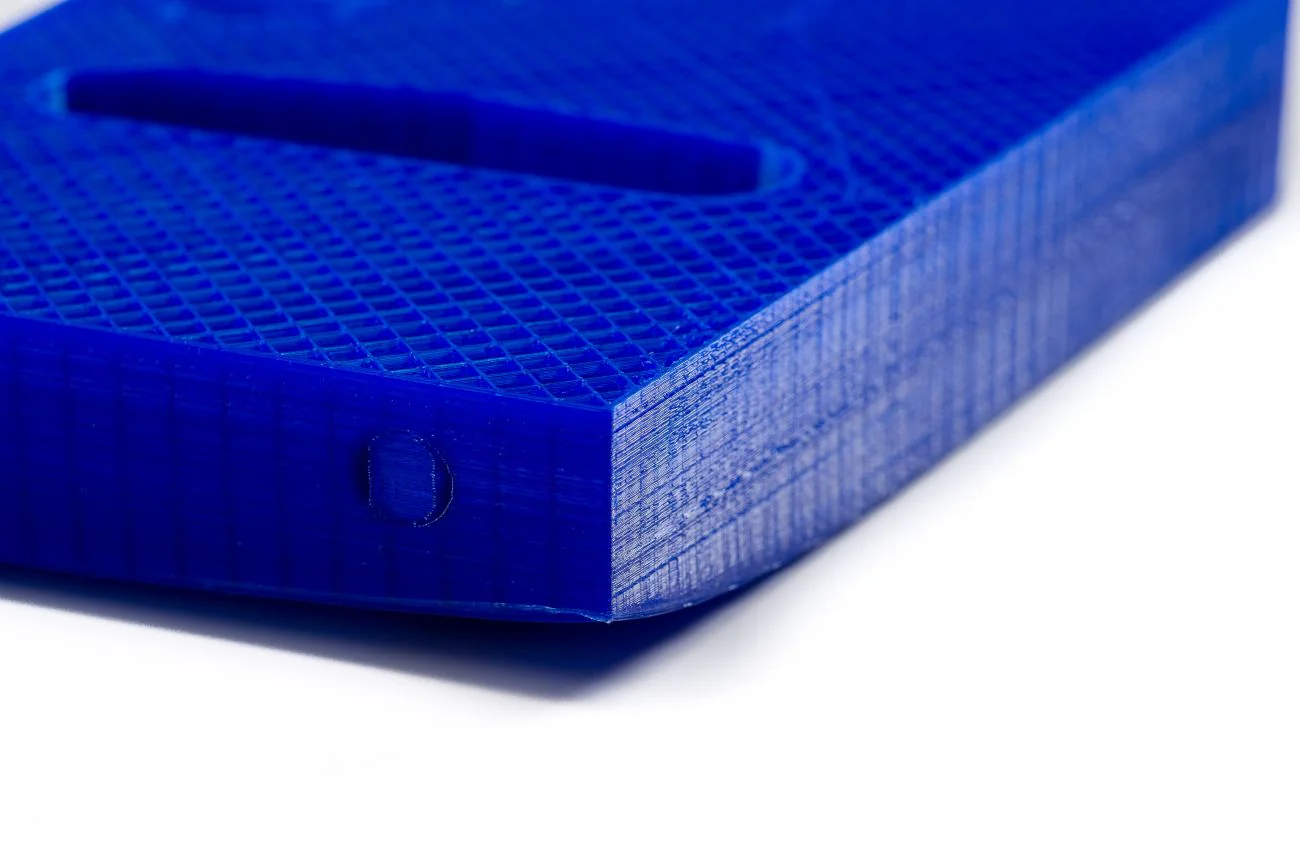
Lograr impresiones 3D de alta calidad depende en gran medida de una calibración precisa de la impresora. Sin ella, se encontrará con problemas comunes como la formación de hilos, la mala adherencia a la cama y dimensiones imprecisas. La calibración es fundamental para obtener resultados de impresión consistentes, fiables y excelentes.
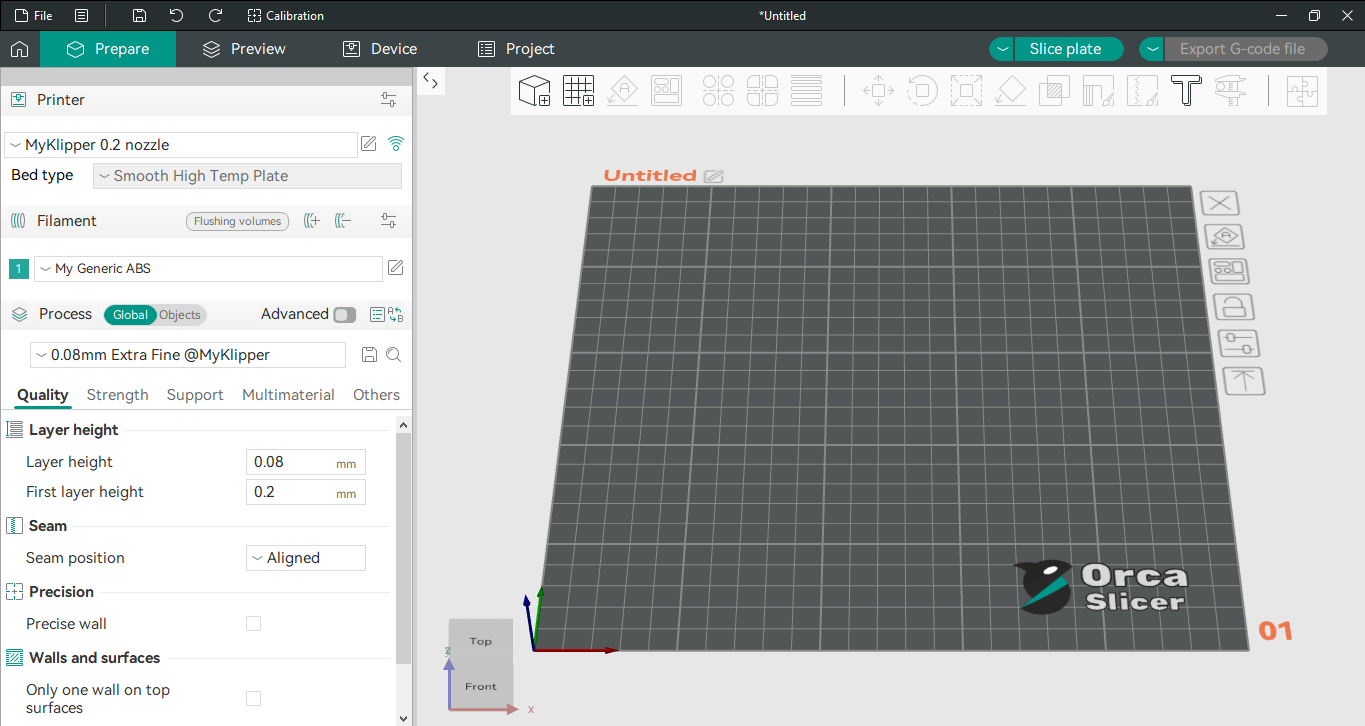
OrcaSlicer es un software avanzado de corte de código abierto con potentes herramientas de calibración integradas. Esta guía le ayudará a usar las últimas versiones estables de OrcaSlicer (normalmente la versión 2.3.0 o las compilaciones nocturnas 2.3.1 recientes) para optimizar su impresora. Cubriremos las calibraciones de temperatura, caudal, avance de presión, retracción, tolerancia, velocidad volumétrica máxima y artefactos finos verticales (VFA). Estas pruebas están diseñadas para realizarse en un orden específico, mejorando progresivamente la calidad de impresión.
OrcaSlicer ofrece funciones avanzadas como control preciso de las paredes, modo sándwich para un mejor acabado superficial, conversión de poliagujeros para geometrías complejas e integración perfecta con Klipper, OctoPrint y PrusaLink. Ofrece un control granular a la vez que es intuitivo, con diseño de arrastrar y soltar y perfiles de impresora prediseñados.
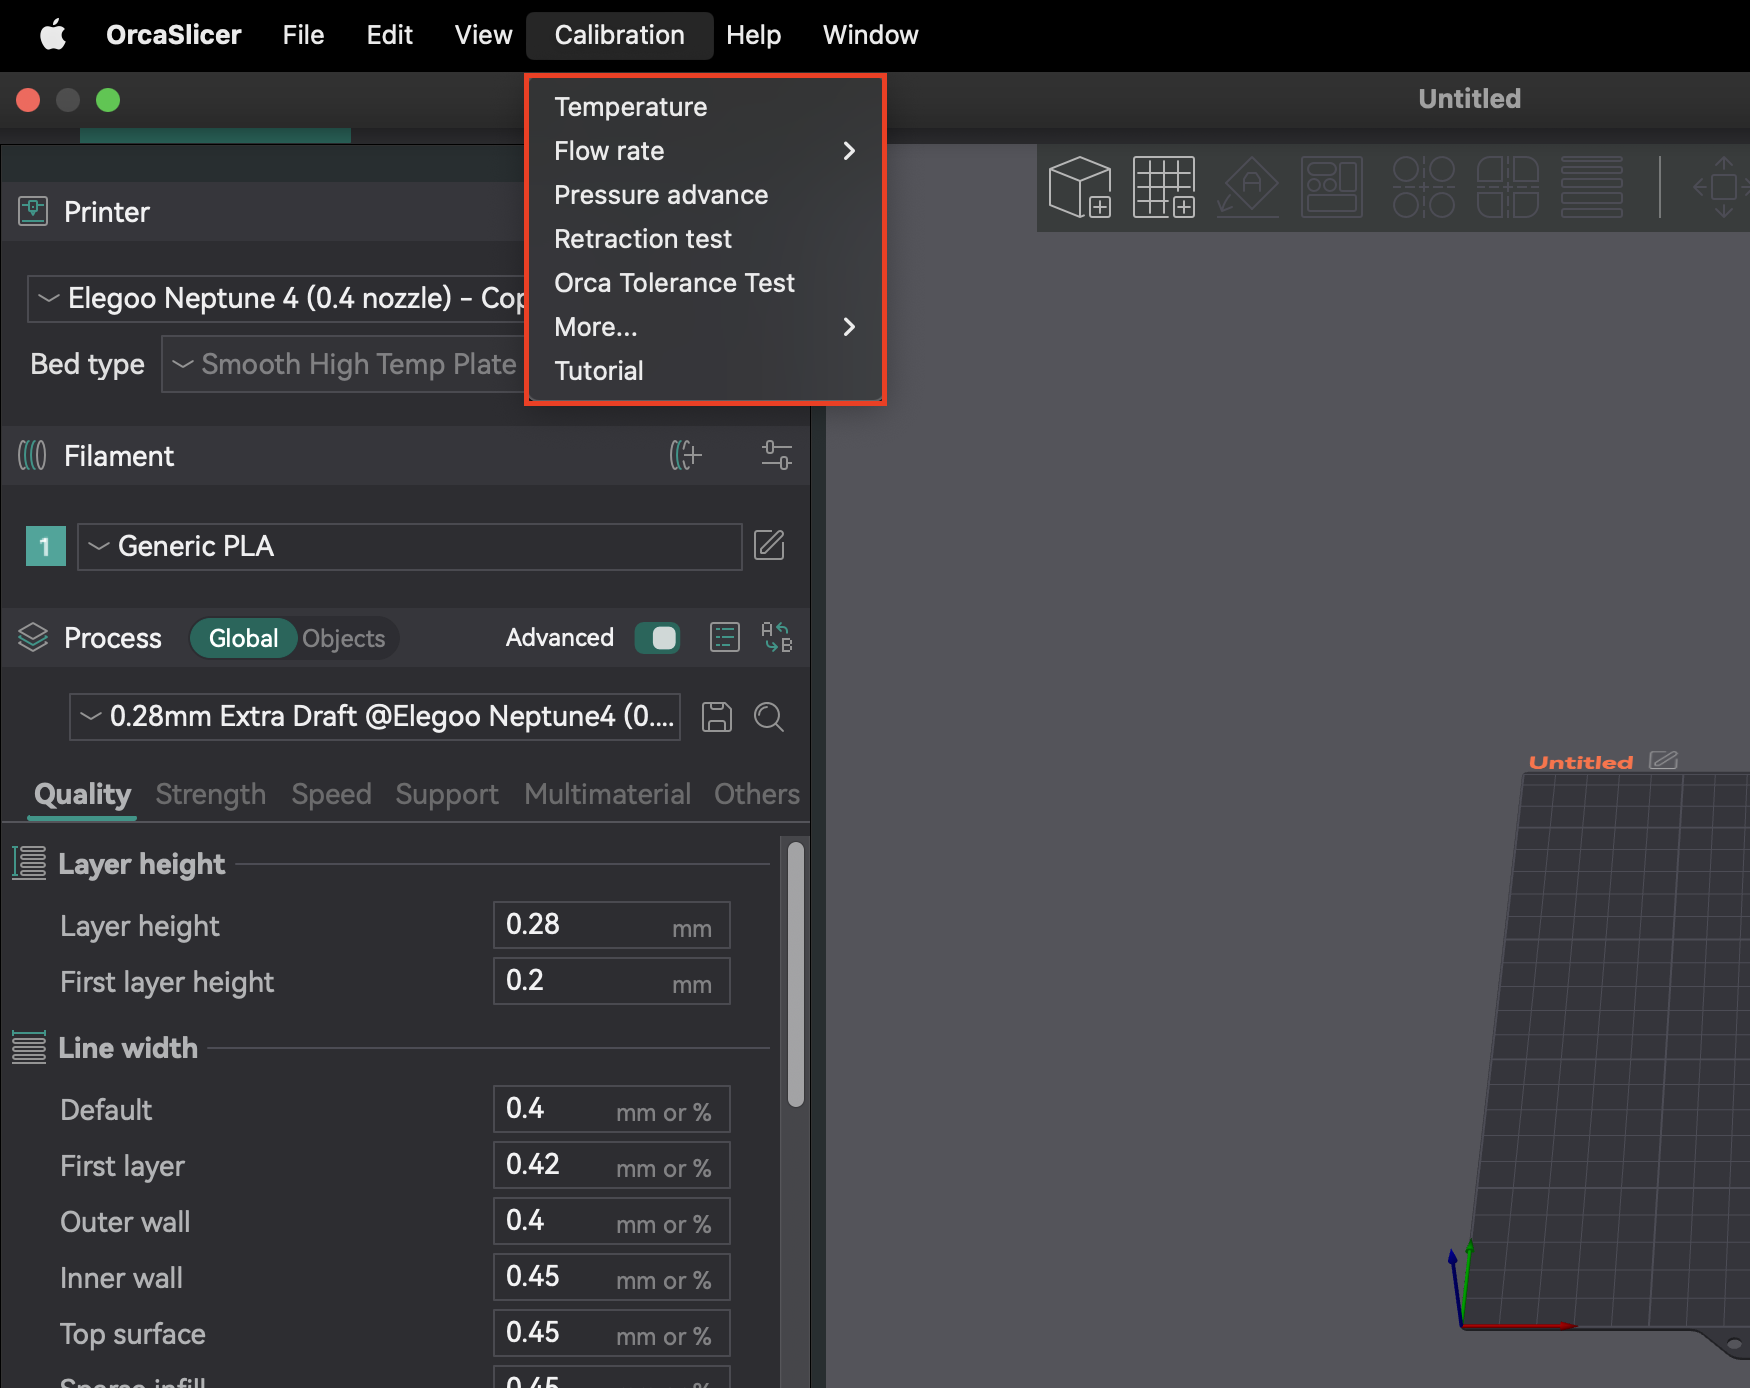
La mayoría de las funciones de calibración se encuentran en el menú "Calibración". Después de completar cualquier prueba de calibración, cree siempre un nuevo proyecto. Esto garantiza que OrcaSlicer salga del modo de calibración y restablezca los parámetros para sus próximas impresiones.
Seguir un orden de calibración específico es crucial, ya que muchos ajustes son interdependientes. Comenzar con los parámetros básicos garantiza resultados precisos para ajustes posteriores más específicos. Este enfoque sistemático minimiza la resolución de problemas y le ayuda a lograr una mejor calidad de impresión de forma eficiente.
| Paso de calibraci�ón | Propósito | Observación/Objetivo clave | Dependencia/Requisito previo |
|---|
| Temperatura | Optimizar la fusión y la unión del filamento | Mínima formación de hilos, mejor adhesión de capas | Ninguna (supone una buena configuración mecánica) |
| Caudal | Asegurar la cantidad correcta de extrusión del filamento | Superficie superior lo más lisa posible, sin huecos ni manchas | Temperatura, Pasos E/Distancia de rotación precisos |
| Avance de presión | Reducir artefactos por fluctuaciones de presión de la boquilla | Esquinas más afiladas, extrusión consistente | Caudal, Temperatura |
| Retracción | Minimizar la formación de hilos y el rezumado | Longitud mínima con mínima formación de hilos | Caudal, Avance de presión |
| Tolerancia | Reproducir con precisión las dimensiones del modelo | Ajuste óptimo entre las piezas impresas | Todas las calibraciones de extrusión/dimensionales anteriores |
| Velocidad volumétrica máxima | Determinar el caudal máximo del filamento sin problemas | Máxima velocidad antes de la subextrusión | Temperatura, Caudal |
| Desviación de esquinas, tirones y uniones | Reducción de artefactos en esquinas agudas | Esquinas más suaves, reducción de la ondulación | Caudal, Avance de presión |
| Conformado de entrada | Reducción de la ondulación y mejora de la calidad de impresión | Superficies más suaves, reducción de imágenes fantasma | Caudal, Avance de presión |
Tabla 1: Orden de calibración recomendado de OrcaSlicer
Antes de usar las herramientas avanzadas de OrcaSlicer, asegúrese de que los sistemas mecánicos y térmicos fundamentales de su impresora estén configurados. Estos pasos suelen realizarse directamente en el firmware de la impresora o mediante ajustes físicos, no en OrcaSlicer. Omitirlos puede causar problemas persistentes de calidad de impresión.
El desplazamiento Z define la distancia precisa entre la boquilla y la base de impresión para la primera capa. Es fundamental para la adhesión a la base. Si la boquilla está demasiado alta, el filamento no se adherirá; si está demasiado baja, puede raspar la base, causar una "pata de elefante" o provocar un clic en el extrusor.
Esto se debe principalmente a un ajuste físico o del firmware de la impresora. Si bien OrcaSlicer cuenta con un campo de desplazamiento Z (en Ajustes preestablecidos de la impresora > pestaña General), comprenda cómo lo gestiona el firmware de su impresora. La mayoría de las impresoras dependen de ajustes físicos o del firmware. Siempre realice primero la calibración del desplazamiento Z en su impresora. Use la configuración de OrcaSlicer solo para ajustes menores si su impresora permite el desplazamiento Z definido por el rebanador.
Una cama de impresión nivelada garantiza una adhesión uniforme de la primera capa en toda la superficie. Una cama irregular provoca que algunas zonas se adhieran bien y otras se levanten. OrcaSlicer ofrece "Malla de Cama Adaptable" para compensar pequeñas imperfecciones mediante el mapeo de la cama.
La malla de cama adaptable de OrcaSlicer es una herramienta de software, no sustituye una cama mecánicamente sólida y nivelada inicialmente. Confiar únicamente en el software sin una nivelación manual o asistida inicial (por ejemplo, con el método de papel) puede ocultar problemas mecánicos. Si la cama está muy deformada, la malla podría presentar problemas. Primero, nivele la cama mecánicamente, luego ajuste el desplazamiento Z y, por último, deje que la nivelación automática de su impresora o la malla de cama adaptable de OrcaSlicer realicen el ajuste.
Antes de ajustar el caudal en la cortadora, asegúrese de que los pasos E (Marlin) o la distancia de rotación (Klipper) del extrusor estén calibrados. Esto le indica a la impresora la cantidad de filamento que debe impulsar. Si la calibración es incorrecta, la impresora extruirá la cantidad incorrecta, lo que hará que la calibración del caudal de la cortadora sea inexacta. Esta es una calibración del firmware de la impresora, no una configuración de OrcaSlicer.
Una vez realizadas las configuraciones básicas de la impresora, utilice las pruebas de calibración integradas de OrcaSlicer para optimizar la calidad de impresión.
La temperatura afecta la fusión, el flujo y la unión del filamento. Si es demasiado baja, se produce subextrusión, mala adhesión y piezas débiles. Si es demasiado alta, se observan rezumamientos, hilos, deformaciones y manchas.
La calibración precisa de la temperatura depende del desplazamiento Z previo, la nivelación de la cama y el ajuste del PID. Si estos valores son incorrectos, los resultados de la torre de temperatura pueden ser engañosos. Asegúrese de que su impresora esté mecánicamente en buen estado y el PID esté ajustado antes de realizar pruebas de temperatura para obtener resultados precisos.
- Preparación: En OrcaSlicer, seleccione el material (PLA, PETG, etc.). Esto establece los rangos de temperatura predeterminados de la base y la boquilla. Vaya a "Calibración" > "Temperatura". Configure las temperaturas de inicio y fin personalizadas (el incremento es fijo de 5 °C).
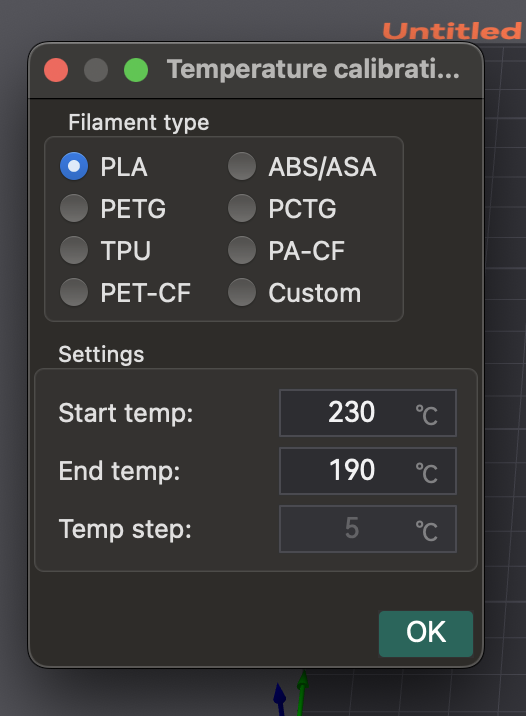
- Impresión de la torre: OrcaSlicer genera una torre de temperatura. Córtela e imprímala.
- Análisis de resultados: Después de imprimir, inspeccione cada capa para detectar hilos, adhesión, deformación y voladizo/puenteo. Encuentre el bloque de temperatura con la mejor calidad de impresión general y la menor cantidad de defectos.
- Aplicación de ajustes: Actualice la temperatura óptima de la boquilla en la configuración del perfil de filamento en OrcaSlicer. Guarde el perfil y cree un nuevo proyecto.
La temperatura es específica del filamento. Diferentes marcas o colores del mismo tipo de filamento pueden tener diferentes rangos óptimos. Realice esta prueba con cada filamento nuevo para crear una biblioteca de perfiles optimizados.
- Hilado/Exudación: Suele indicar que la temperatura es demasiado alta o que los ajustes de retracción están mal configurados.
- Mal adherencia de la capa/Subextrusión: La temperatura de la boquilla suele ser demasiado baja.
- Deformación: Puede deberse a temperaturas incorrectas de la base/boquilla o a un enfriamiento insuficiente.
| Tipo/Marca de filamento | Rango de temperatura probado | Temperatura óptima | Observaciones clave a temperatura óptima |
|---|
| PLA (Genérico) | 190-230 °C | 205 °C | Mínima formación de hilos, fuerte adhesión de capas, buenos salientes |
| PETG (Prusament) | 230-250 °C | 240 °C | Superficie lisa, sin deformaciones, buen puenteo |
| ABS (Hatchbox) | 230-260 °C | 245 °C | Reducción del agrietamiento, buena unión entre capas |
Tabla 2: Configuración y observaciones de la torre de temperatura
El caudal (multiplicador de extrusión) controla la cantidad de filamento extruido. Es crucial para superficies lisas y precisión dimensional. Si es demasiado alto, se produce sobreextrusión: manchas, filamentos y poca precisión. Si es demasiado bajo, se produce subextrusión: huecos, poca adhesión y mal acabado.
La calibración del caudal depende en gran medida de la temperatura y de los pasos E/distancia de rotación. Si su extrusor no está calibrado, los ajustes del caudal en la cortadora serán imprecisos. Asegúrese primero de que los pasos E sean correctos y de que la temperatura sea óptima.
La altura de la capa y la velocidad de impresión también pueden afectar el caudal óptimo. Si los límites de velocidad de impresión cambian, vuelva a ejecutar la calibración.
- Creación del proyecto de prueba: En OrcaSlicer, seleccione la configuración de impresora, filamento y proceso. Vaya a "Calibración" > "Pase 1". Esto generará nueve bloques, cada uno con un modificador de caudal diferente.
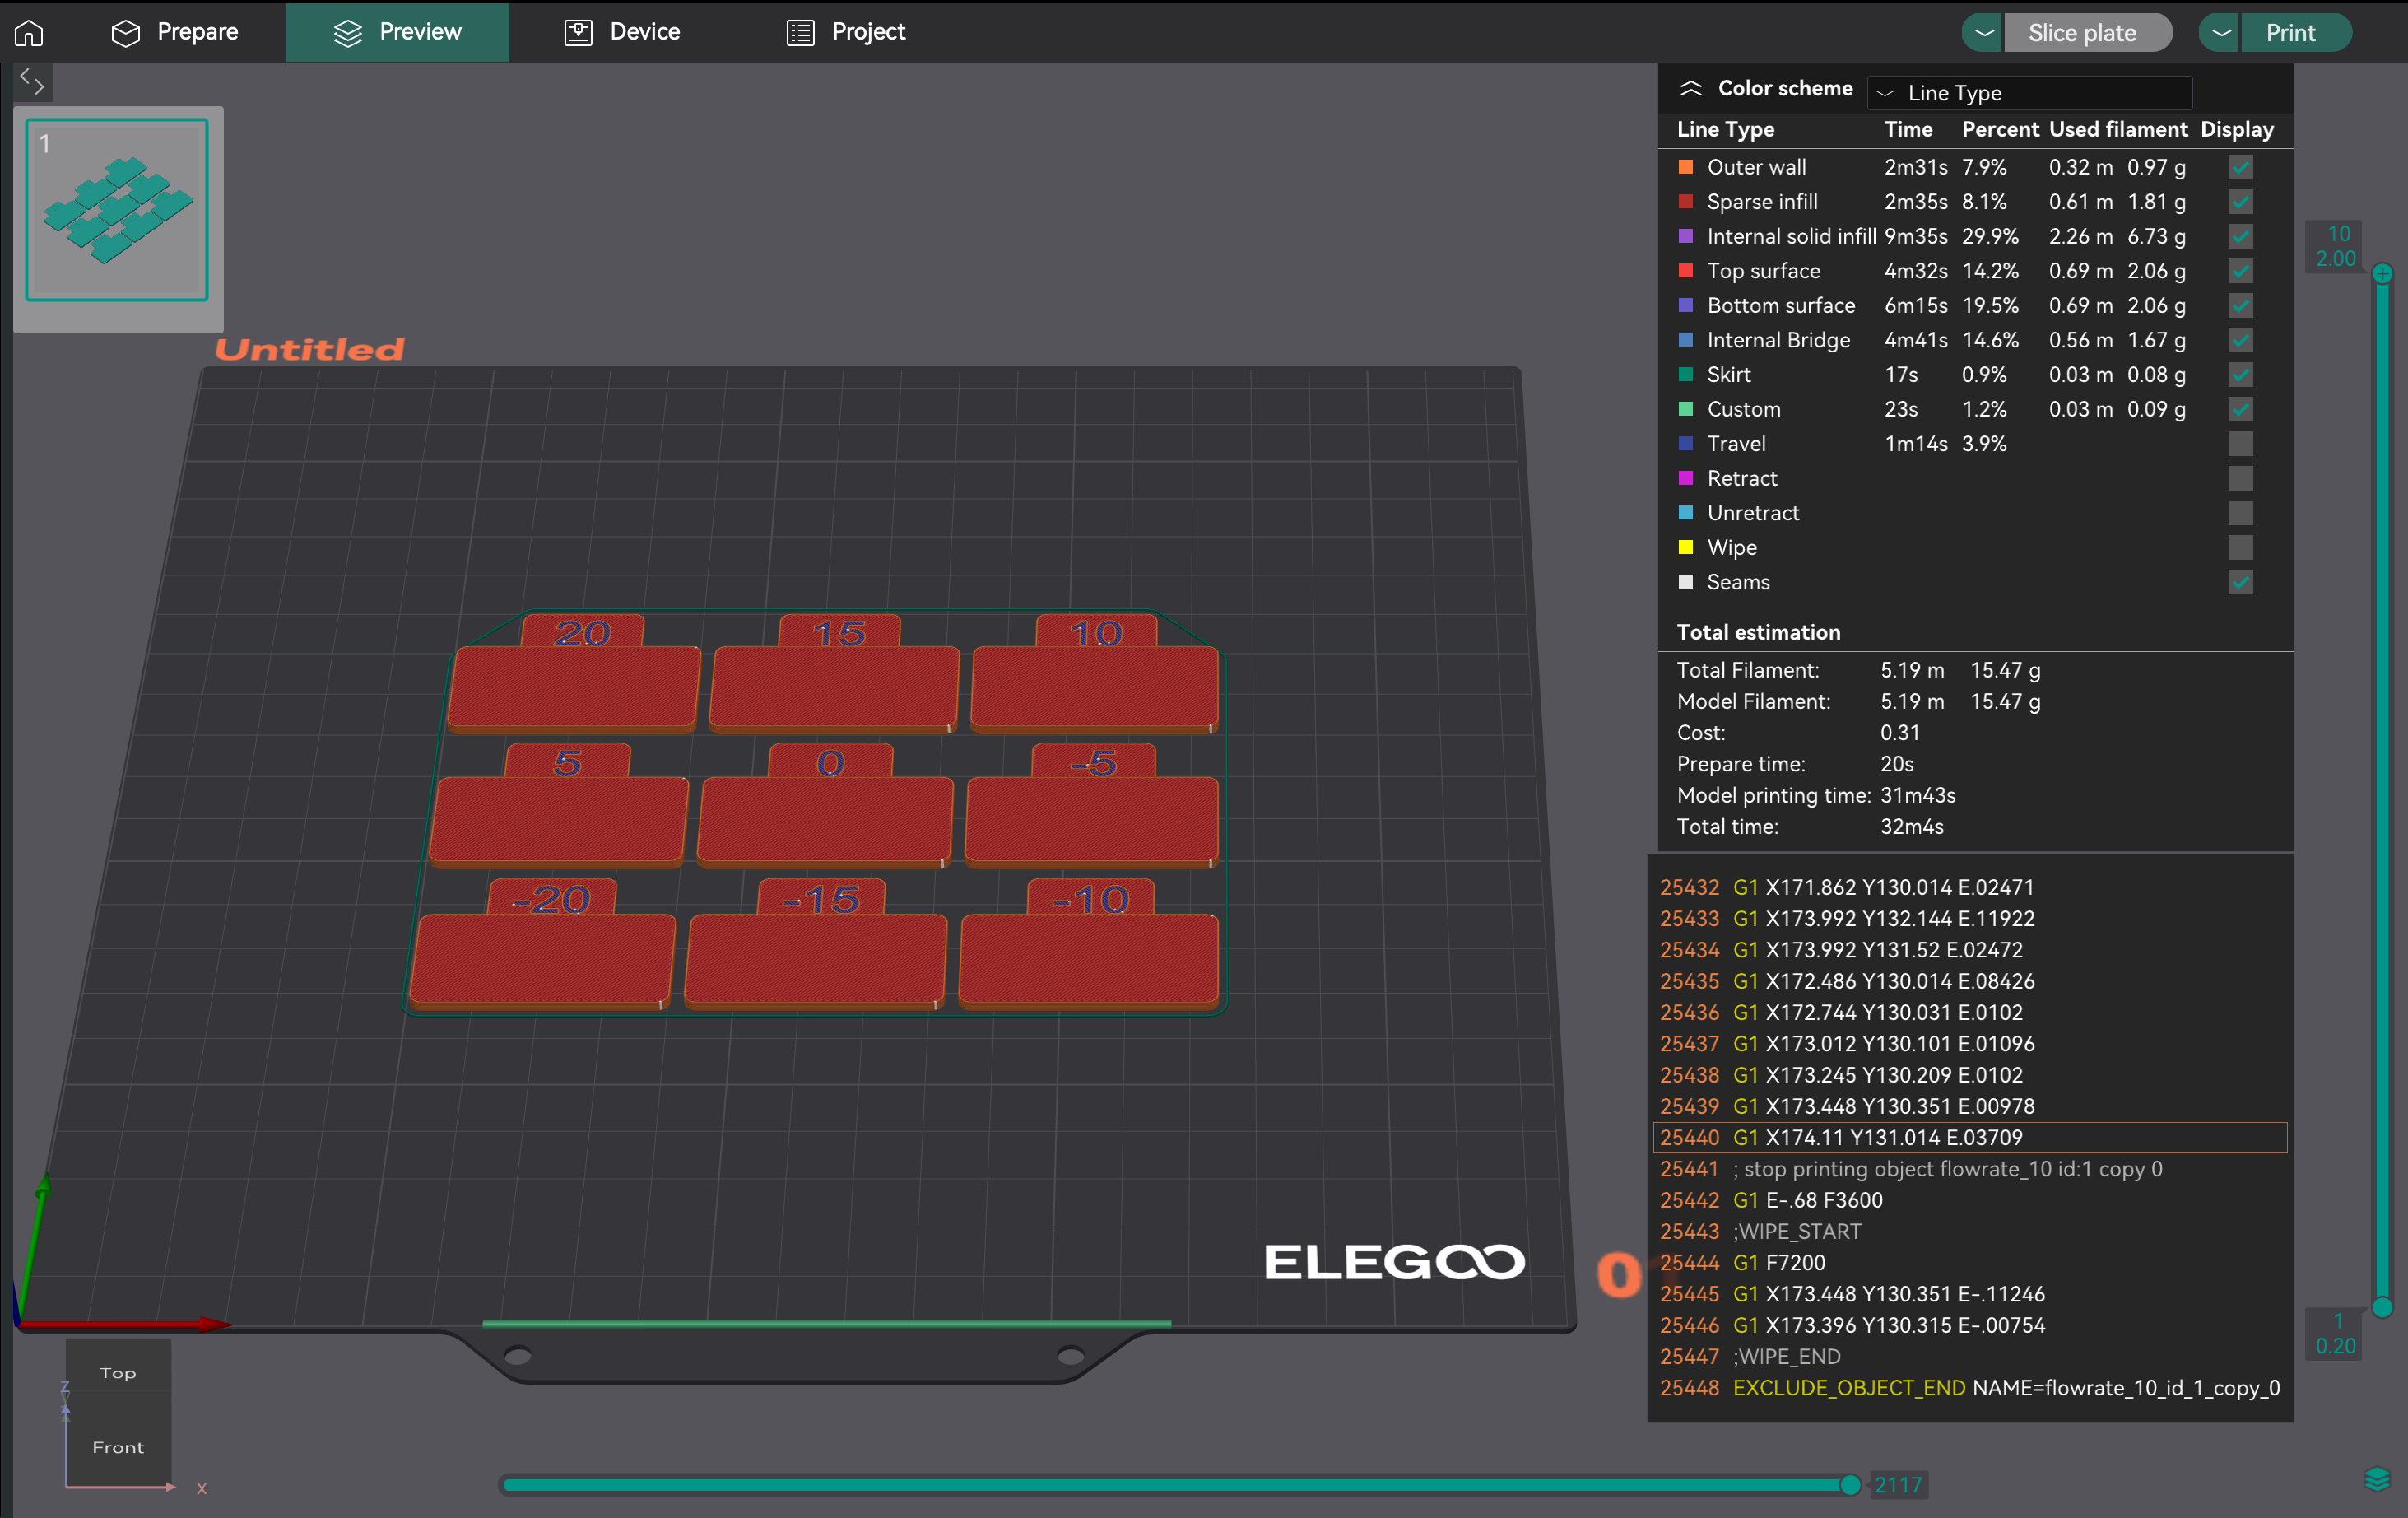
- Análisis de la superficie más lisa: Imprima el proyecto. Examine las superficies superiores. Encuentre el bloque con la superficie más lisa, sin sobreextrusión (crestas, manchas) ni subextrusión (huecos). Si dos son similares, elija el que tenga el mayor caudal.
- Cálculo del caudal: Calcule el caudal_nuevo = caudal_antiguo * (100 + modificador) / 100. Ejemplo: 0,98 * (100 + 5) / 100 = 1,029.
- Generación de un proyecto de ajuste fino: Cree un nuevo proyecto. Vaya a "Calibración" > "Pase 2". Esto generará diez bloques con modificadores de -9 a 0 para realizar ajustes precisos.
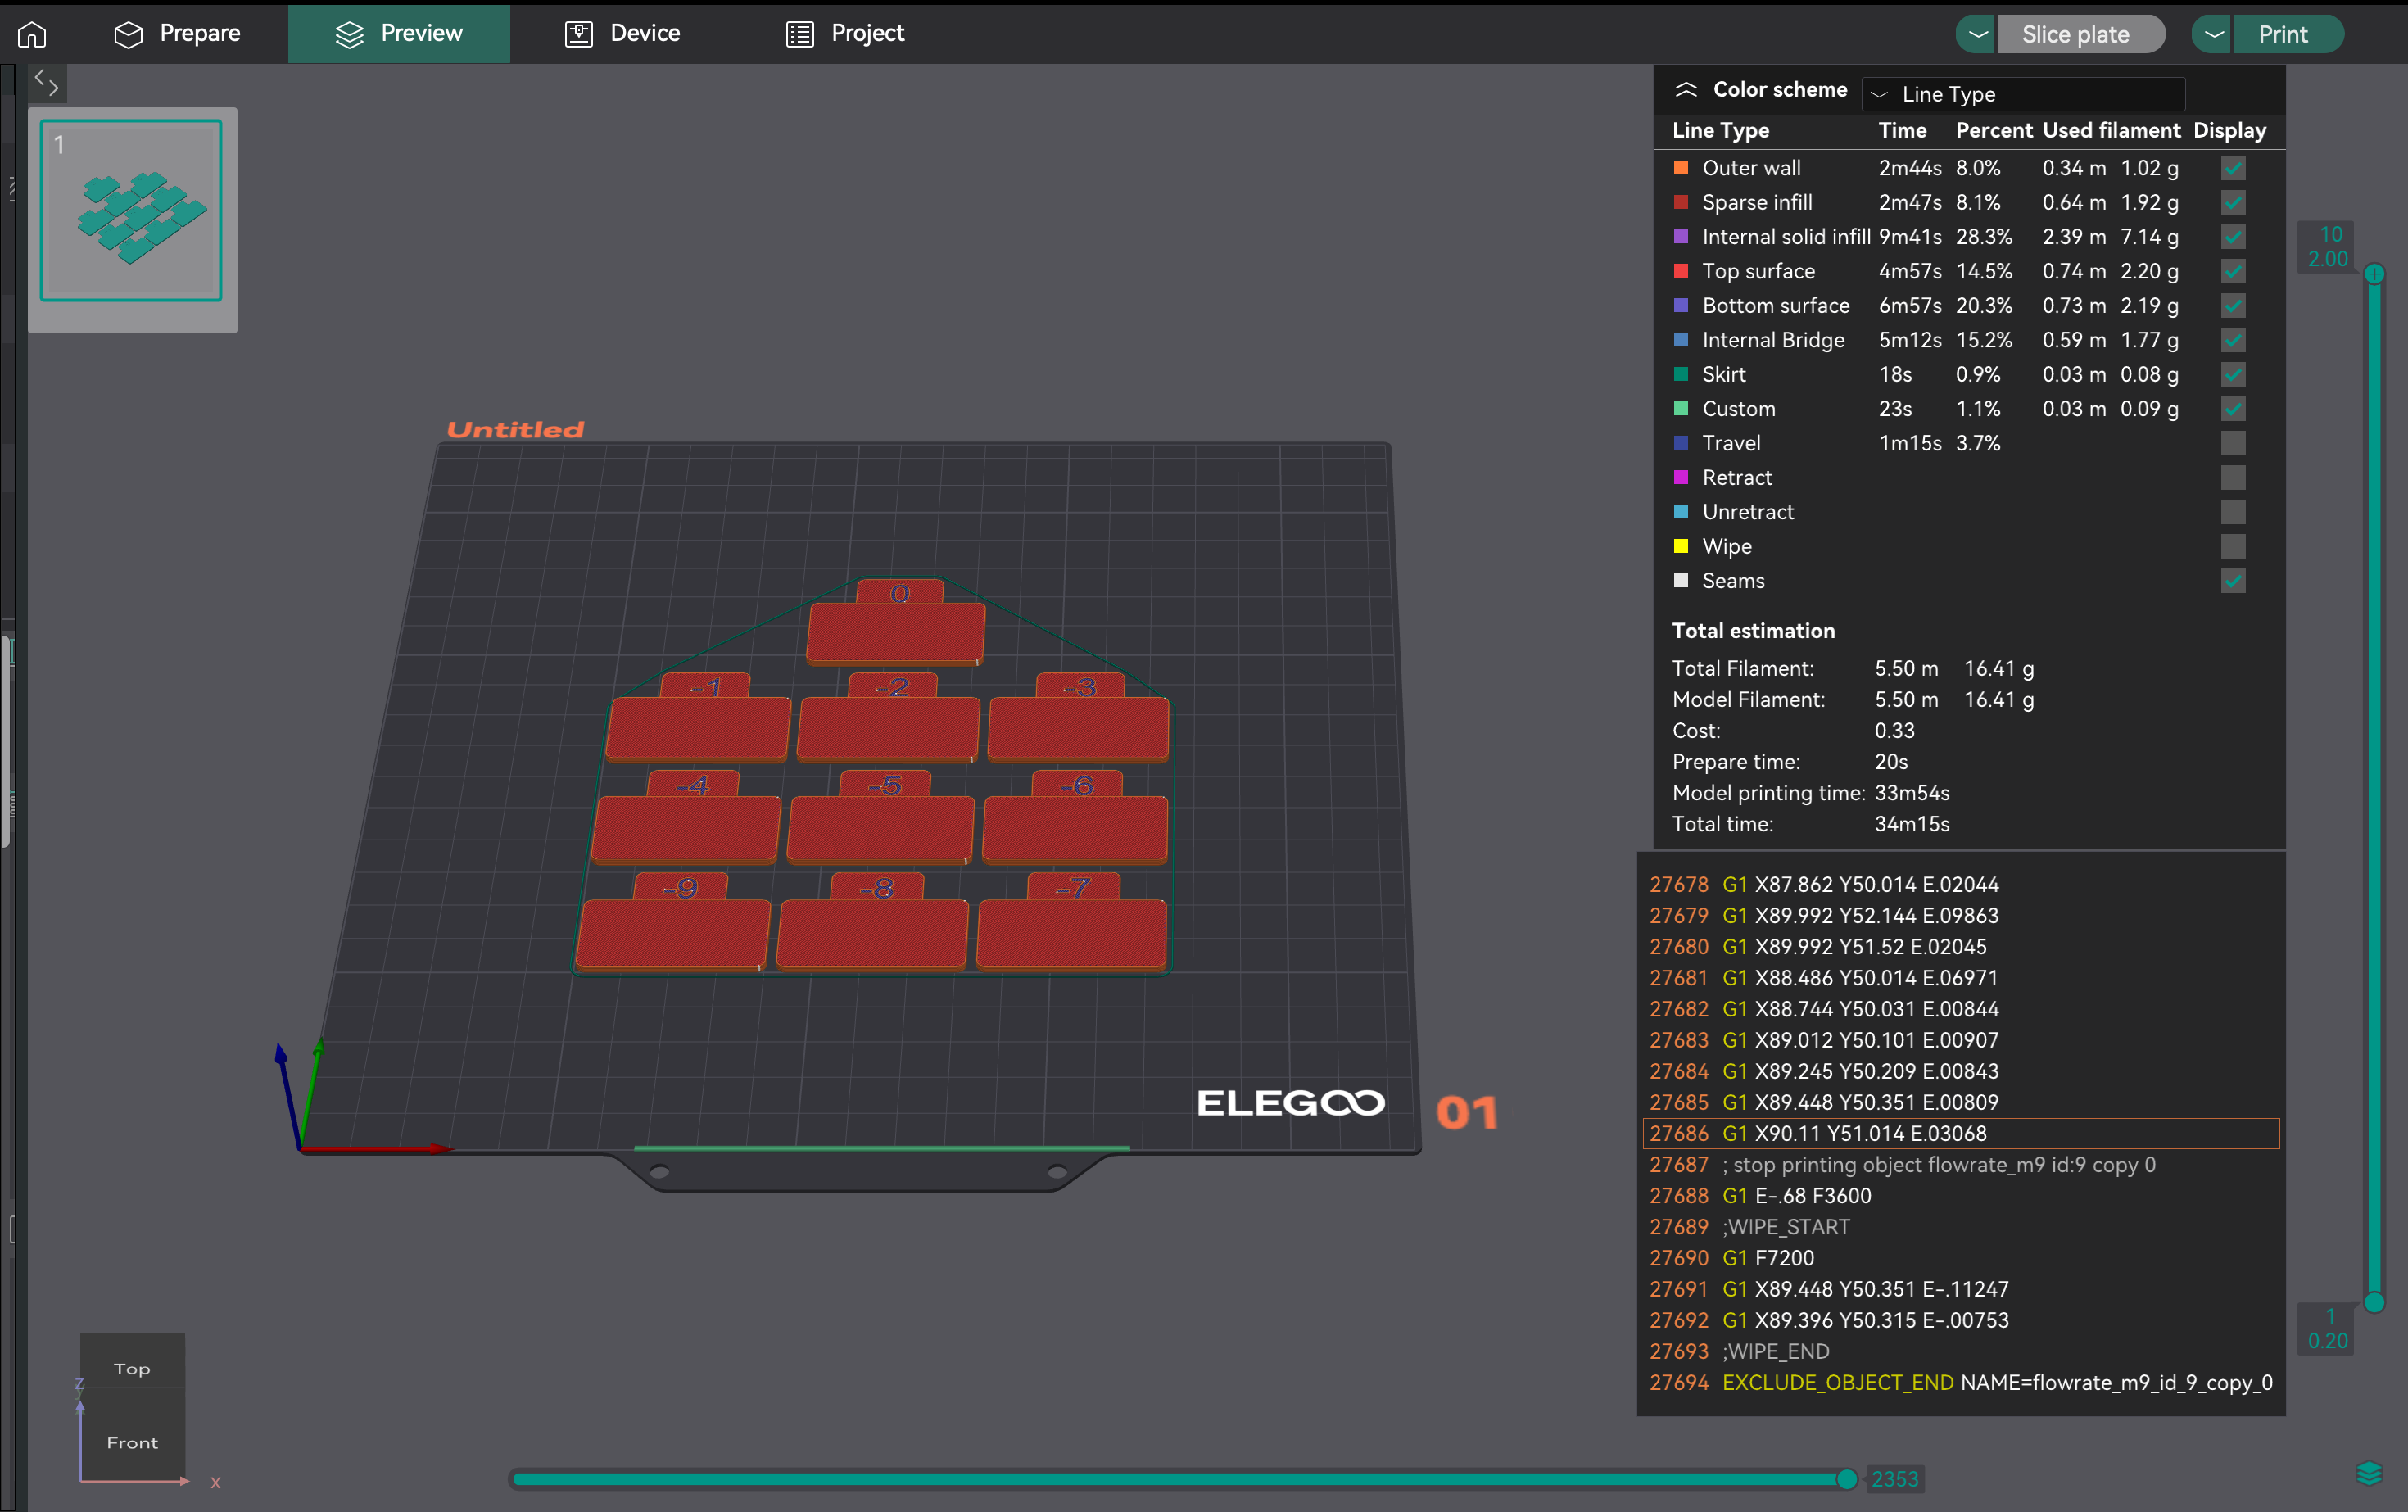
- Evaluación de la consistencia: Imprimir el paso 2. Examine las superficies superiores para comprobar la mejor calidad, adhesión de las capas y consistencia. Calcule la relación de flujo actualizada con la misma fórmula. Ejemplo: 1,029 * (100 - 6) / 100 = 0,96726.
- Aplicación de la configuración: Guarde la relación de flujo óptima final en la configuración del perfil de filamento de OrcaSlicer.
Solución de problemas de calibración de flujo integrada de OrcaSlicer: Guía de "Metacalibración"
Es posible que los resultados de calibración de flujo integrados en OrcaSlicer le parezcan pésimos y requieran intervención manual. Esto indica la necesidad de una guía de metacalibración: cómo solucionar problemas del proceso de calibración.
- Sobreextrusión/Arrastre inicial: Esto puede indicar que la temperatura de impresión es demasiado alta o que los pasos E/distancia de rotación no están calibrados. Vuelva a revisar los pasos E antes de volver a ejecutar la calibración del flujo.
- Clic del extrusor: Suele significar que la temperatura es demasiado baja para el flujo deseado, lo que provoca que el motor del extrusor salte. Aumente ligeramente la temperatura de la boquilla o reduzca la velocidad volumétrica máxima (se explica más adelante) antes de volver a intentar la calibración del flujo.
- Inconsistencia en la prueba/Resultados ambiguos: Si las impresiones de calibración se ven mal, pero otras impresiones son correctas, considere lo siguiente:
- Velocidad de impresión de la prueba: La velocidad predeterminada podría ser demasiado rápida. Intente reducir la velocidad de las impresiones de calibración.
- Ajustes del ancho de línea: Si el ancho de línea (en los ajustes del proceso) es demasiado grande para la boquilla, puede causar sobreextrusión. Asegúrese de que los anchos sean adecuados (por ejemplo, 0,45 mm para una boquilla de 0,4 mm). * Subjetividad de la prueba visual: La evaluación visual puede ser subjetiva. Para obtener resultados más objetivos, imprima un cubo de pared simple:
- Imprima un cubo de pared simple (p. ej., 20 x 20 x 20 mm, 0 % de relleno, 1 perímetro).
- Mida el espesor de la pared con un calibrador.
- Calcule el espesor de pared deseado (p. ej., 0,4 mm para una boquilla de 0,4 mm).
- Ajuste la relación de flujo: Nueva relación de flujo = Relación de flujo actual * (Espesor de pared deseado / Espesor de pared medido).
- Persistencia de problemas: Si la calibración del flujo falla constantemente, es probable que una calibración previa (temperatura, pasos E/distancia de rotación o problemas mecánicos) siga siendo incorrecta. No proceda con el avance o la retracción de presión hasta que el flujo esté ajustado de forma fiable.
| Aprobado | Rango del modificador | Número de bloques | Fórmula de cálculo | Propósito |
| :---- | :---- | :---- | :---- |
| Aprobado 1 | +5 a -5 | 9 | FlowRatio_new = FlowRatio_old * (100 + modificador) / 100 | Calibración inicial para encontrar el rango óptimo aproximado |
| Aprobado 2 | -9 a 0 | 10 | FlowRatio_new = FlowRatio_old * (100 + modificador) / 100 | Ajuste preciso para una relación de flujo óptima |
Tabla 3: Resumen de los pasos 1 y 2 de calibración de caudal
El avance de presión (PA) compensa los cambios de presión en la boquilla durante las fluctuaciones de velocidad (aceleración/desaceleración). Previene esquinas redondeadas, manchas y "granos" mediante el preajuste de la extrusión para mantener un flujo uniforme.
Siempre realice la calibración del avance de presión después de la calibración del caudal. Si el caudal es incorrecto, la presión arterial (PA) se compensará de forma imprecisa. Un caudal estable es esencial para una PA eficaz. Si sus pruebas de PA no son precisas, revise primero las calibraciones de caudal y temperatura.
Los valores de PA varían significativamente según el tipo de extrusor (Direct Drive o Bowden), el tipo/marca de filamento, el tamaño de la boquilla, la temperatura del hotend y las modificaciones del hardware. Cada material tiene un flujo de fusión único, y los cambios en la longitud del camino óptico afectan a la PA. Esto significa que la PA a menudo requiere recalibración para diferentes configuraciones o materiales.
OrcaSlicer le solicita que seleccione el tipo de extrusor (Direct Drive o Bowden). Los valores de PA varían considerablemente según la longitud del recorrido del filamento. Las configuraciones Bowden suelen requerir valores de PA más altos.
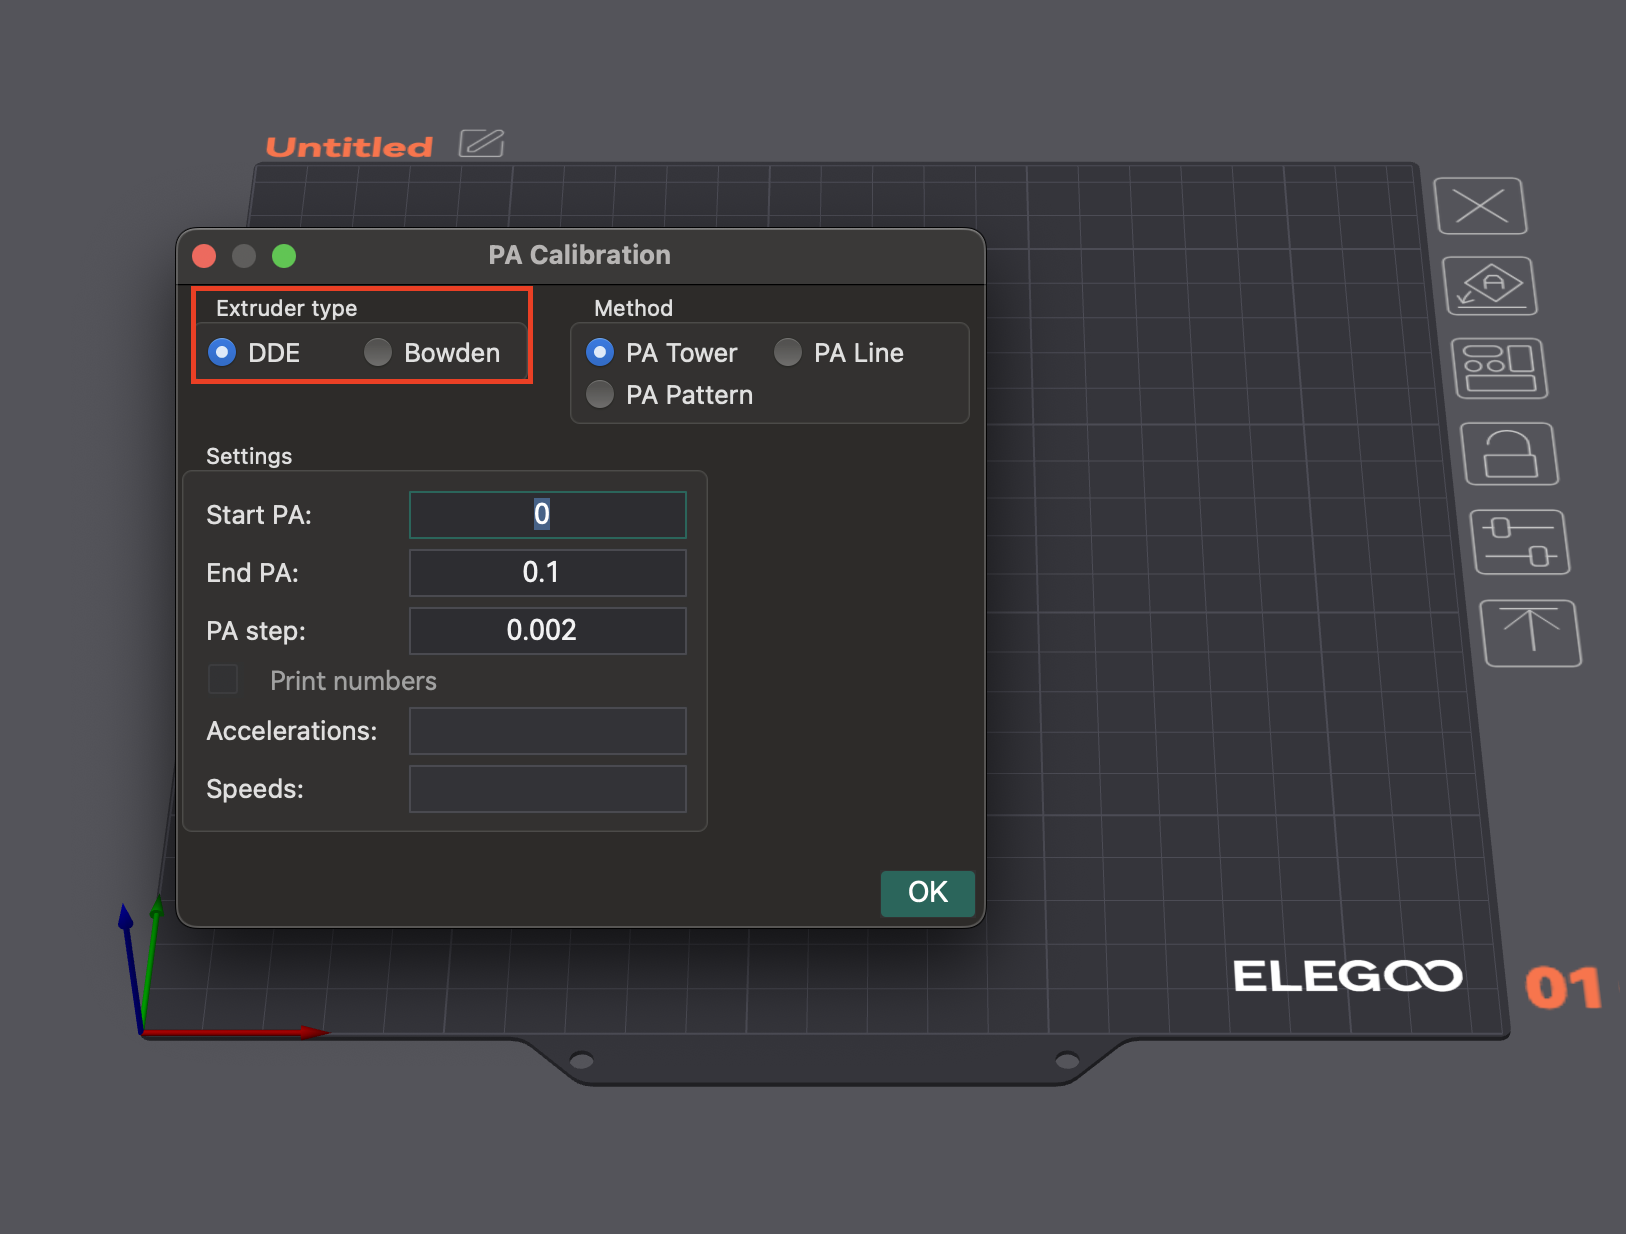
OrcaSlicer ofrece múltiples métodos para la calibración del avance de presión:
- Método de línea: Este método ayuda a identificar rápidamente el valor óptimo de avance de presión.
- Acceso: Vaya a "Calibración" > "Avance de presión" > "Línea de PA".
- Prueba: OrcaSlicer genera una serie de líneas, cada una impresa con un valor de PA incrementalmente diferente. El objetivo es observar dónde el inicio y el final de cada línea se ven más limpios y la transición hacia adentro y hacia afuera es más nítida, lo que indica la extrusión más consistente.
- Dependencia: Este método depende de la calidad de la primera capa. Asegúrese de que la cama esté correctamente nivelada antes de realizar esta prueba.
- Método de patrón: Evaluación visual de las esquinas.
- Acceso: En el menú "Calibración", seleccione "Avance de presión" y luego elija "Método de patrón".
- Prueba: OrcaSlicer genera un patrón con forma de prisma. Examine la consistencia de la calidad de la extrusión e identifique las esquinas más afiladas con la menor cantidad de artefactos (como huecos, protuberancias o hendiduras).
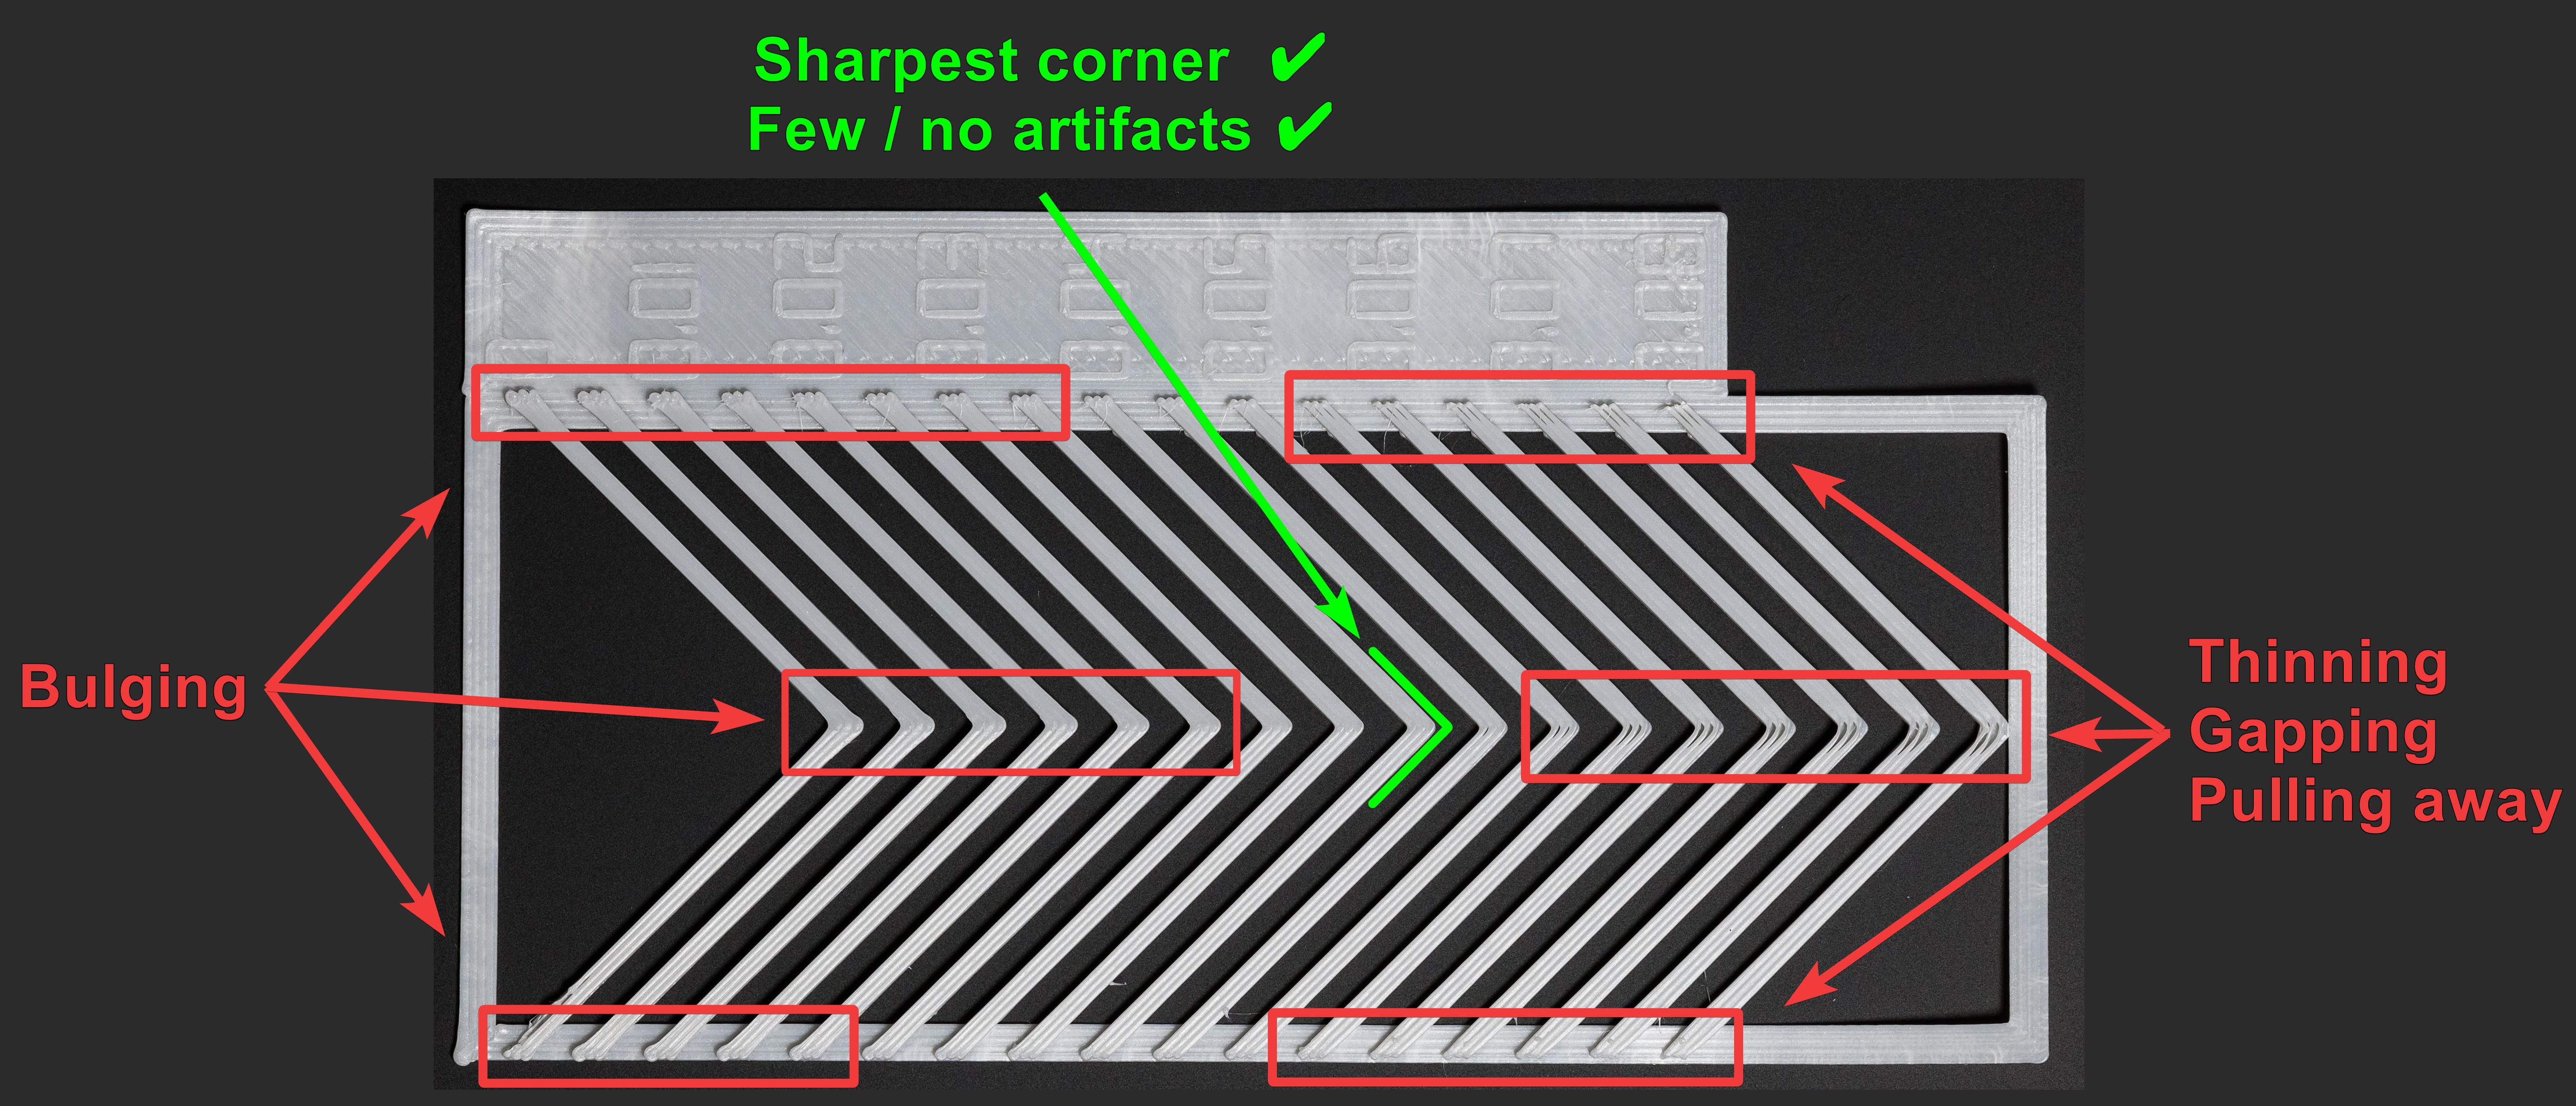
Fuente: obico.io
3. Método de Torre: Menos sensible a la calidad de la primera capa, pero más lento.
- Acceso: En el menú "Calibración", seleccione "Avance de Presión" y luego "Torre de PA".
- Prueba: El software genera una torre donde la PA aumenta con la altura (normalmente 0,002 por mm para Direct Drive, 0,02 para Bowden). Examine cada esquina para determinar la altura con esquinas nítidas y limpias.
- Recomendación: Imprima a velocidades más altas (superiores a 120 mm/s) para observar el impacto de la PA en condiciones de impresión típicas.
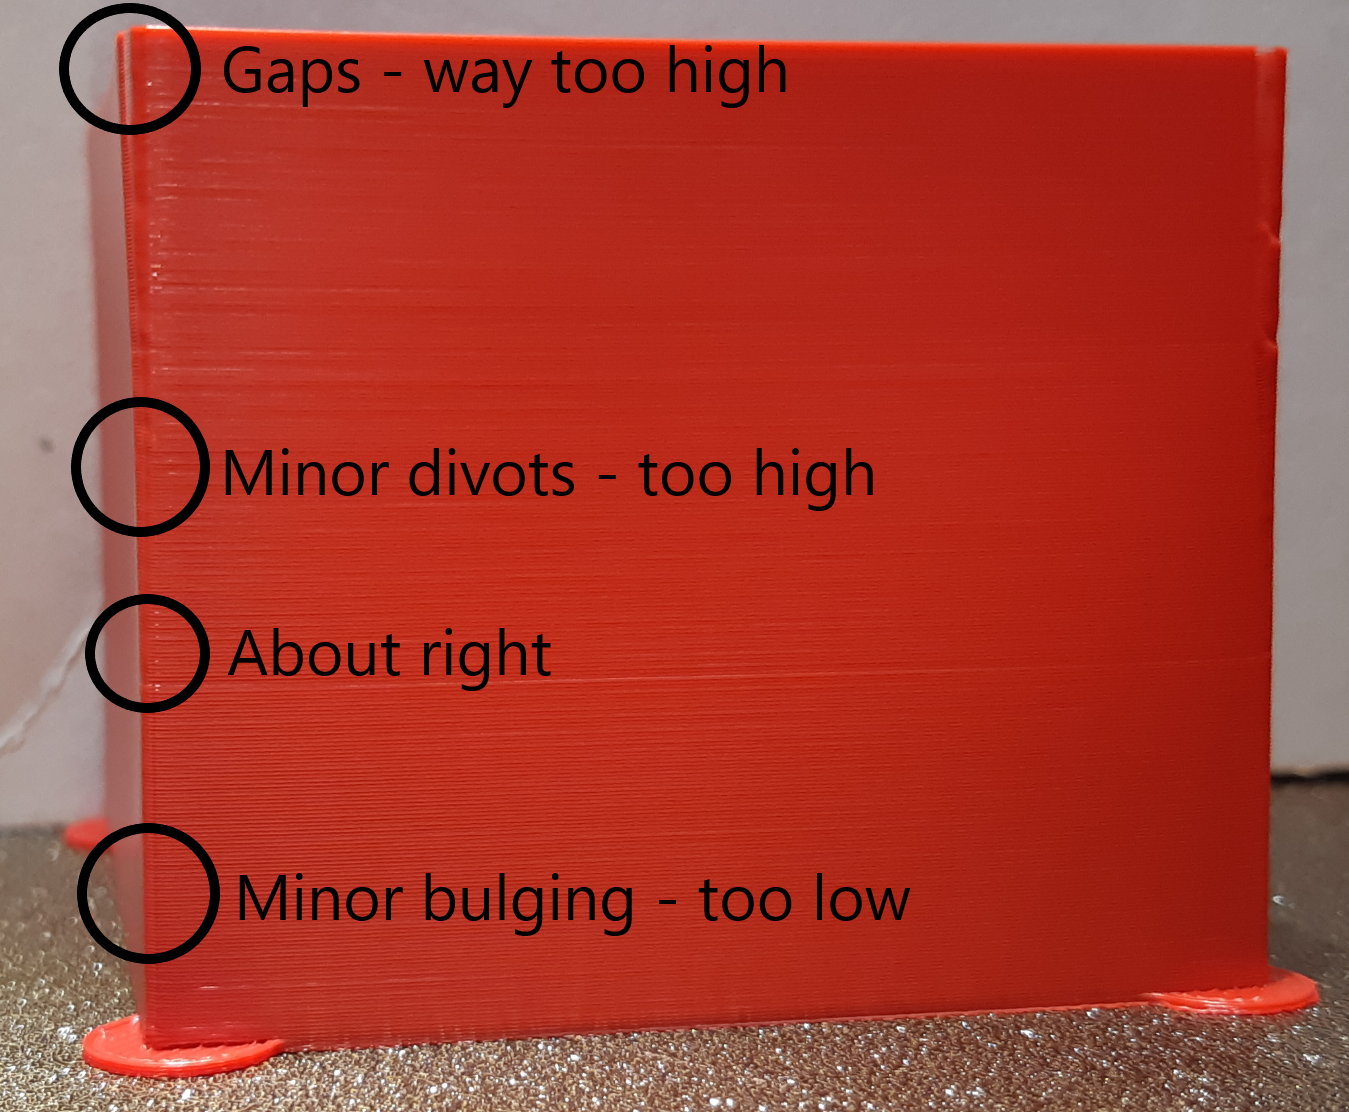
Fuente: ellis3dp.com
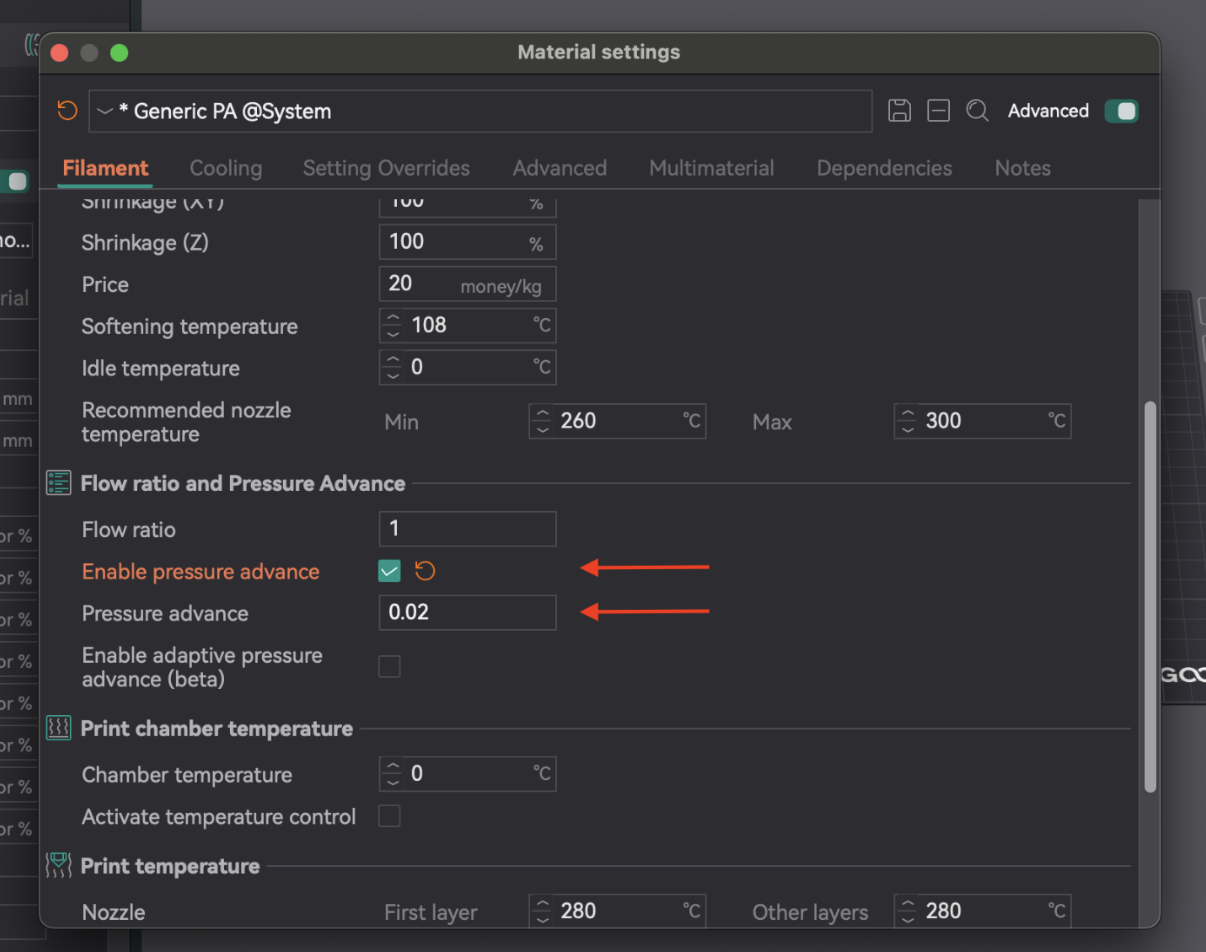
Una vez determinado el valor óptimo de PA, abra la configuración del filamento (icono de edición junto al perfil). Active "Habilitar avance de presión" e introduzca el valor. Guarde el perfil del filamento.
| Método | Tipo de extrusor | Ventajas | Desventajas | Observación clave |
|---|
| Línea | Ambos | Rápido y sencillo de probar | Altamente dependiente de la calidad de la primera capa | Extremos de línea más limpios, punto más nítido |
| Patrón | Ambos | Evaluación visual de las esquinas, más avanzada | Aún algo dependiente de la primera capa | Extrusión más consistente, esquina más nítida con menos artefactos |
| Torre | Ambos | Menos sensible a la calidad de la primera capa, bueno para altas velocidades | Requiere más tiempo y material | Mejor calidad general de esquina a una altura espec�ífica |
Tabla 4: Comparación del método de avance de presión
La retracción retrae el filamento antes de que se mueva, creando una presión negativa para evitar supuraciones, hilos o grumos. Los parámetros clave son la longitud de retracción, la velocidad y el salto Z.
La retracción interactúa con el avance de presión. Una retracción óptima ayuda a controlar el retroceso físico, mientras que la PA gestiona la presión en el hotend. Si la PA no está calibrada, la retracción puede presentar dificultades. El objetivo es lograr la longitud más corta posible que minimice la formación de hilos sin causar obstrucciones ni marcas.
Si la formación de hilos persiste después de las pruebas de retracción, vuelva a evaluar primero los ajustes de temperatura y caudal, y luego el avance de presión. Estos ajustes básicos deben ser correctos para que la retracción sea efectiva.
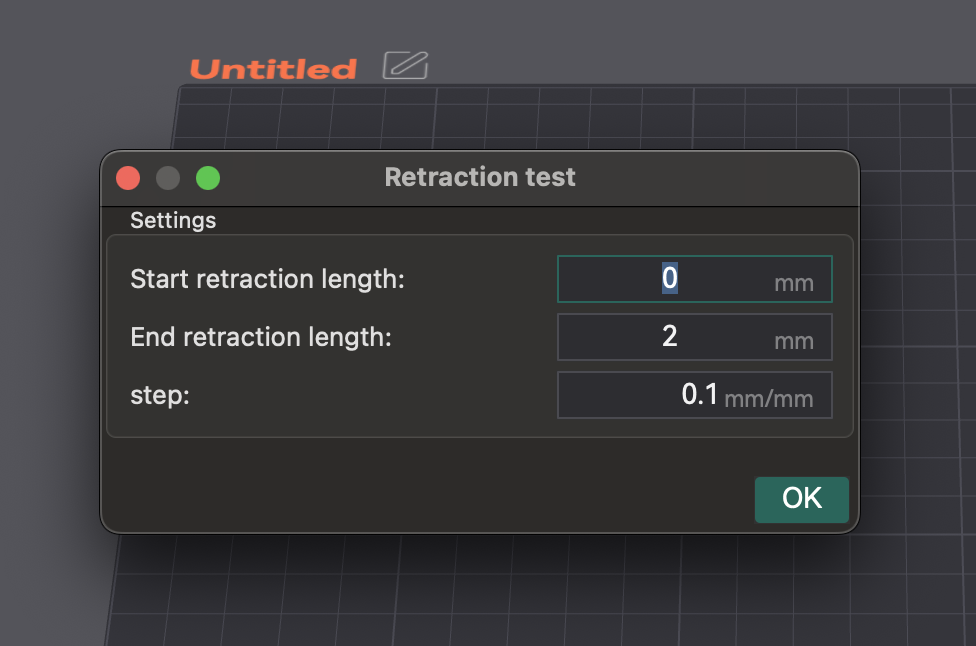
- Acceso y configuración: Cree un nuevo proyecto. Vaya a "Calibración" > "Prueba de retracción". Configure "Longitud de retracción inicial", "Longitud de retracción final" y "Paso" (los valores predeterminados suelen ser 0 mm, 2 mm y 0,1 mm). Los extrusores Bowden suelen requerir longitudes mayores (1-6 mm) que los de accionamiento directo (0-2 mm).
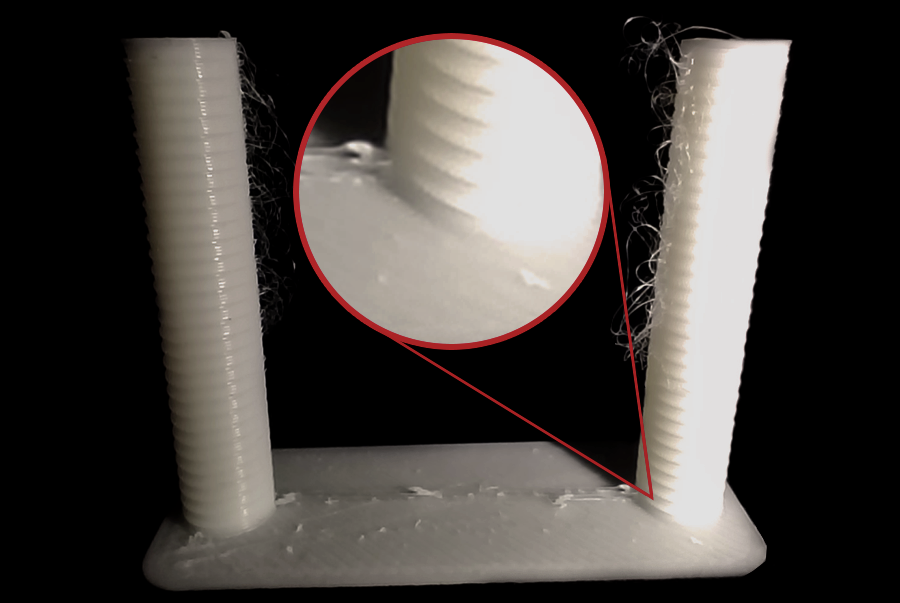
- Corte e impresión: Corte e imprima la torre de retracción. Asegúrese de que el salto Z "Normal" esté seleccionado. Puede pintar las costuras en los lados interiores de la torre en la vista previa para una mejor visualización del encordado.
Fuente: obico.io
3. Análisis de resultados y ajustes: Examine cada muesca. Encuentre la longitud más corta que minimice la formación de hilos y el rezumado sin otros problemas. Ejemplo: si la mejor calidad está a una muesca de la base con un paso de 0,1 mm, la longitud óptima es de 0,2 mm. Abra la configuración del filamento, pestaña "Anulaciones de configuración", marque "longitud" en la sección de retracción, introduzca el nuevo valor y guárdelo.
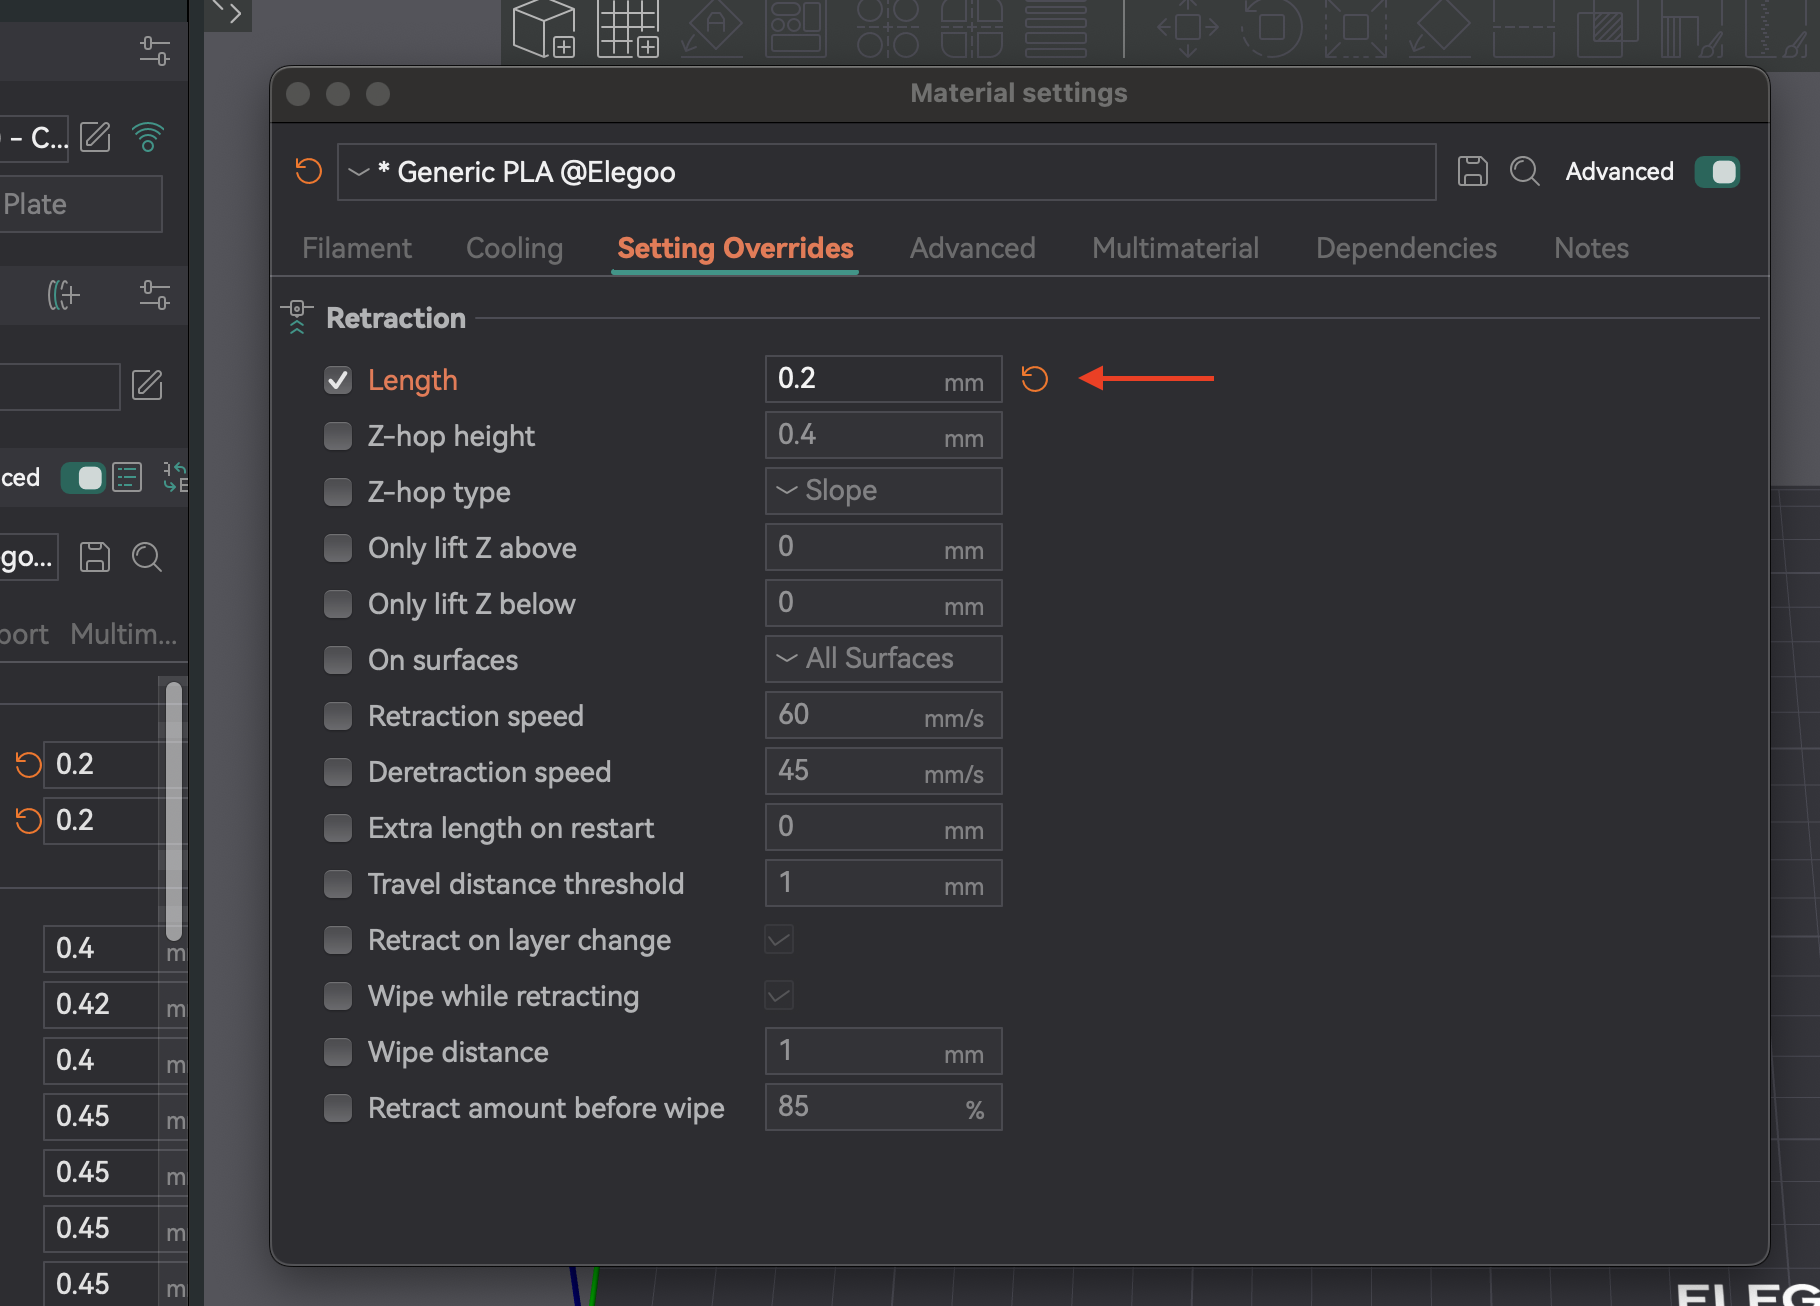
- Tipo de filamento: Los diferentes materiales supuran de forma distinta. El PLA/ABS suele necesitar una retracción menor (0,2-0,4 mm) que los filamentos flexibles o higroscópicos.
- Secado del filamento: La humedad es una causa común de formación de hilos. Si persisten, seque el filamento. Esto suele ser lo primero que debe comprobar.
- Instalación de la boquilla: Una boquilla suelta o parcialmente obstruida puede causar formación de hilos. Compruebe la instalación y limpie las obstrucciones con regularidad.
- Limpiar durante la retracción: Este ajuste hace que la boquilla se mueva durante la retracción, lo que la limpia y reduce la formación de hilos/supuración.
- Velocidad de desretracción: Controla la velocidad de recarga después de la retracción. Al ajustarlo a 0, se utiliza la velocidad de retracción.
- Umbral de distancia de recorrido: Se retrae solo si el recorrido supera un límite, lo que evita retracciones innecesarias y reduce la formación de hilos en pequeños espacios.
| Configuración | Descripción | Problema común | Solución/Consejo |
|---|
| Longitud de retracción | Cantidad de filamento retraído. | Filamentos retorcidos, supuración, obstrucciones (si es demasiado alta) | Aumentar para filamentos retorcidos, disminuir para obstrucciones/marcas. |
| Velocidad de retracción | Velocidad de retracción del filamento. | Filamentos retorcidos, gotas, desgaste | Aumentar para una respuesta más rápida, evitar desgaste. |
| Z-Hop | Eleva la boquilla durante el recorrido. | Rozaduras de la boquilla, gotas en la superficie | Habilitar para impresiones complejas, ajustar la altura. |
| Velocidad de desretracción | Velocidad para recargar el filamento. | Subextrusión al inicio de una nueva línea | Establecer en 0 (usa la velocidad de retracción) o ligeramente inferior. |
| Umbral de distancia de recorrido | Recorrido mínimo para la retracción. | Filamentos retorcidos en pequeños huecos | Ajustar para activar el recorrido correspondiente. |
| Limpiar mientras se retrae | La boquilla se mueve a lo largo de la trayectoria durante la retracción. | Visibilidad de la costura en Z, supuración | Habilitar para mejorar las costuras de la pared exterior y reducir la supuración. |
Tabla 5: Configuración de retracción y solución de problemas
La tolerancia se refiere a la precisión con la que la impresora reproduce las dimensiones. Es crucial para las piezas que encajan entre sí (conjuntos, componentes entrelazados). Las variaciones dimensionales se deben a la contracción del filamento y a la mecánica de la impresora. La prueba de tolerancia le ayuda a comprender el comportamiento de la impresora para ajustar los diseños y lograr un ajuste perfecto.
La tolerancia es una característica de la combinación de filamento e impresora. No se configura una sola vez. Los distintos filamentos se encogen de forma distinta, e incluso las marcas y colores pueden variar. Repita la prueba al cambiar el tipo o la marca de filamento, o al realizar modificaciones importantes en el hardware. Mantenga los perfiles por filamento para una precisión constante.
- Acceso: Vaya a "Calibración" > "Prueba de tolerancia de Orca". Esto abrirá un nuevo proyecto con el modelo de prueba.
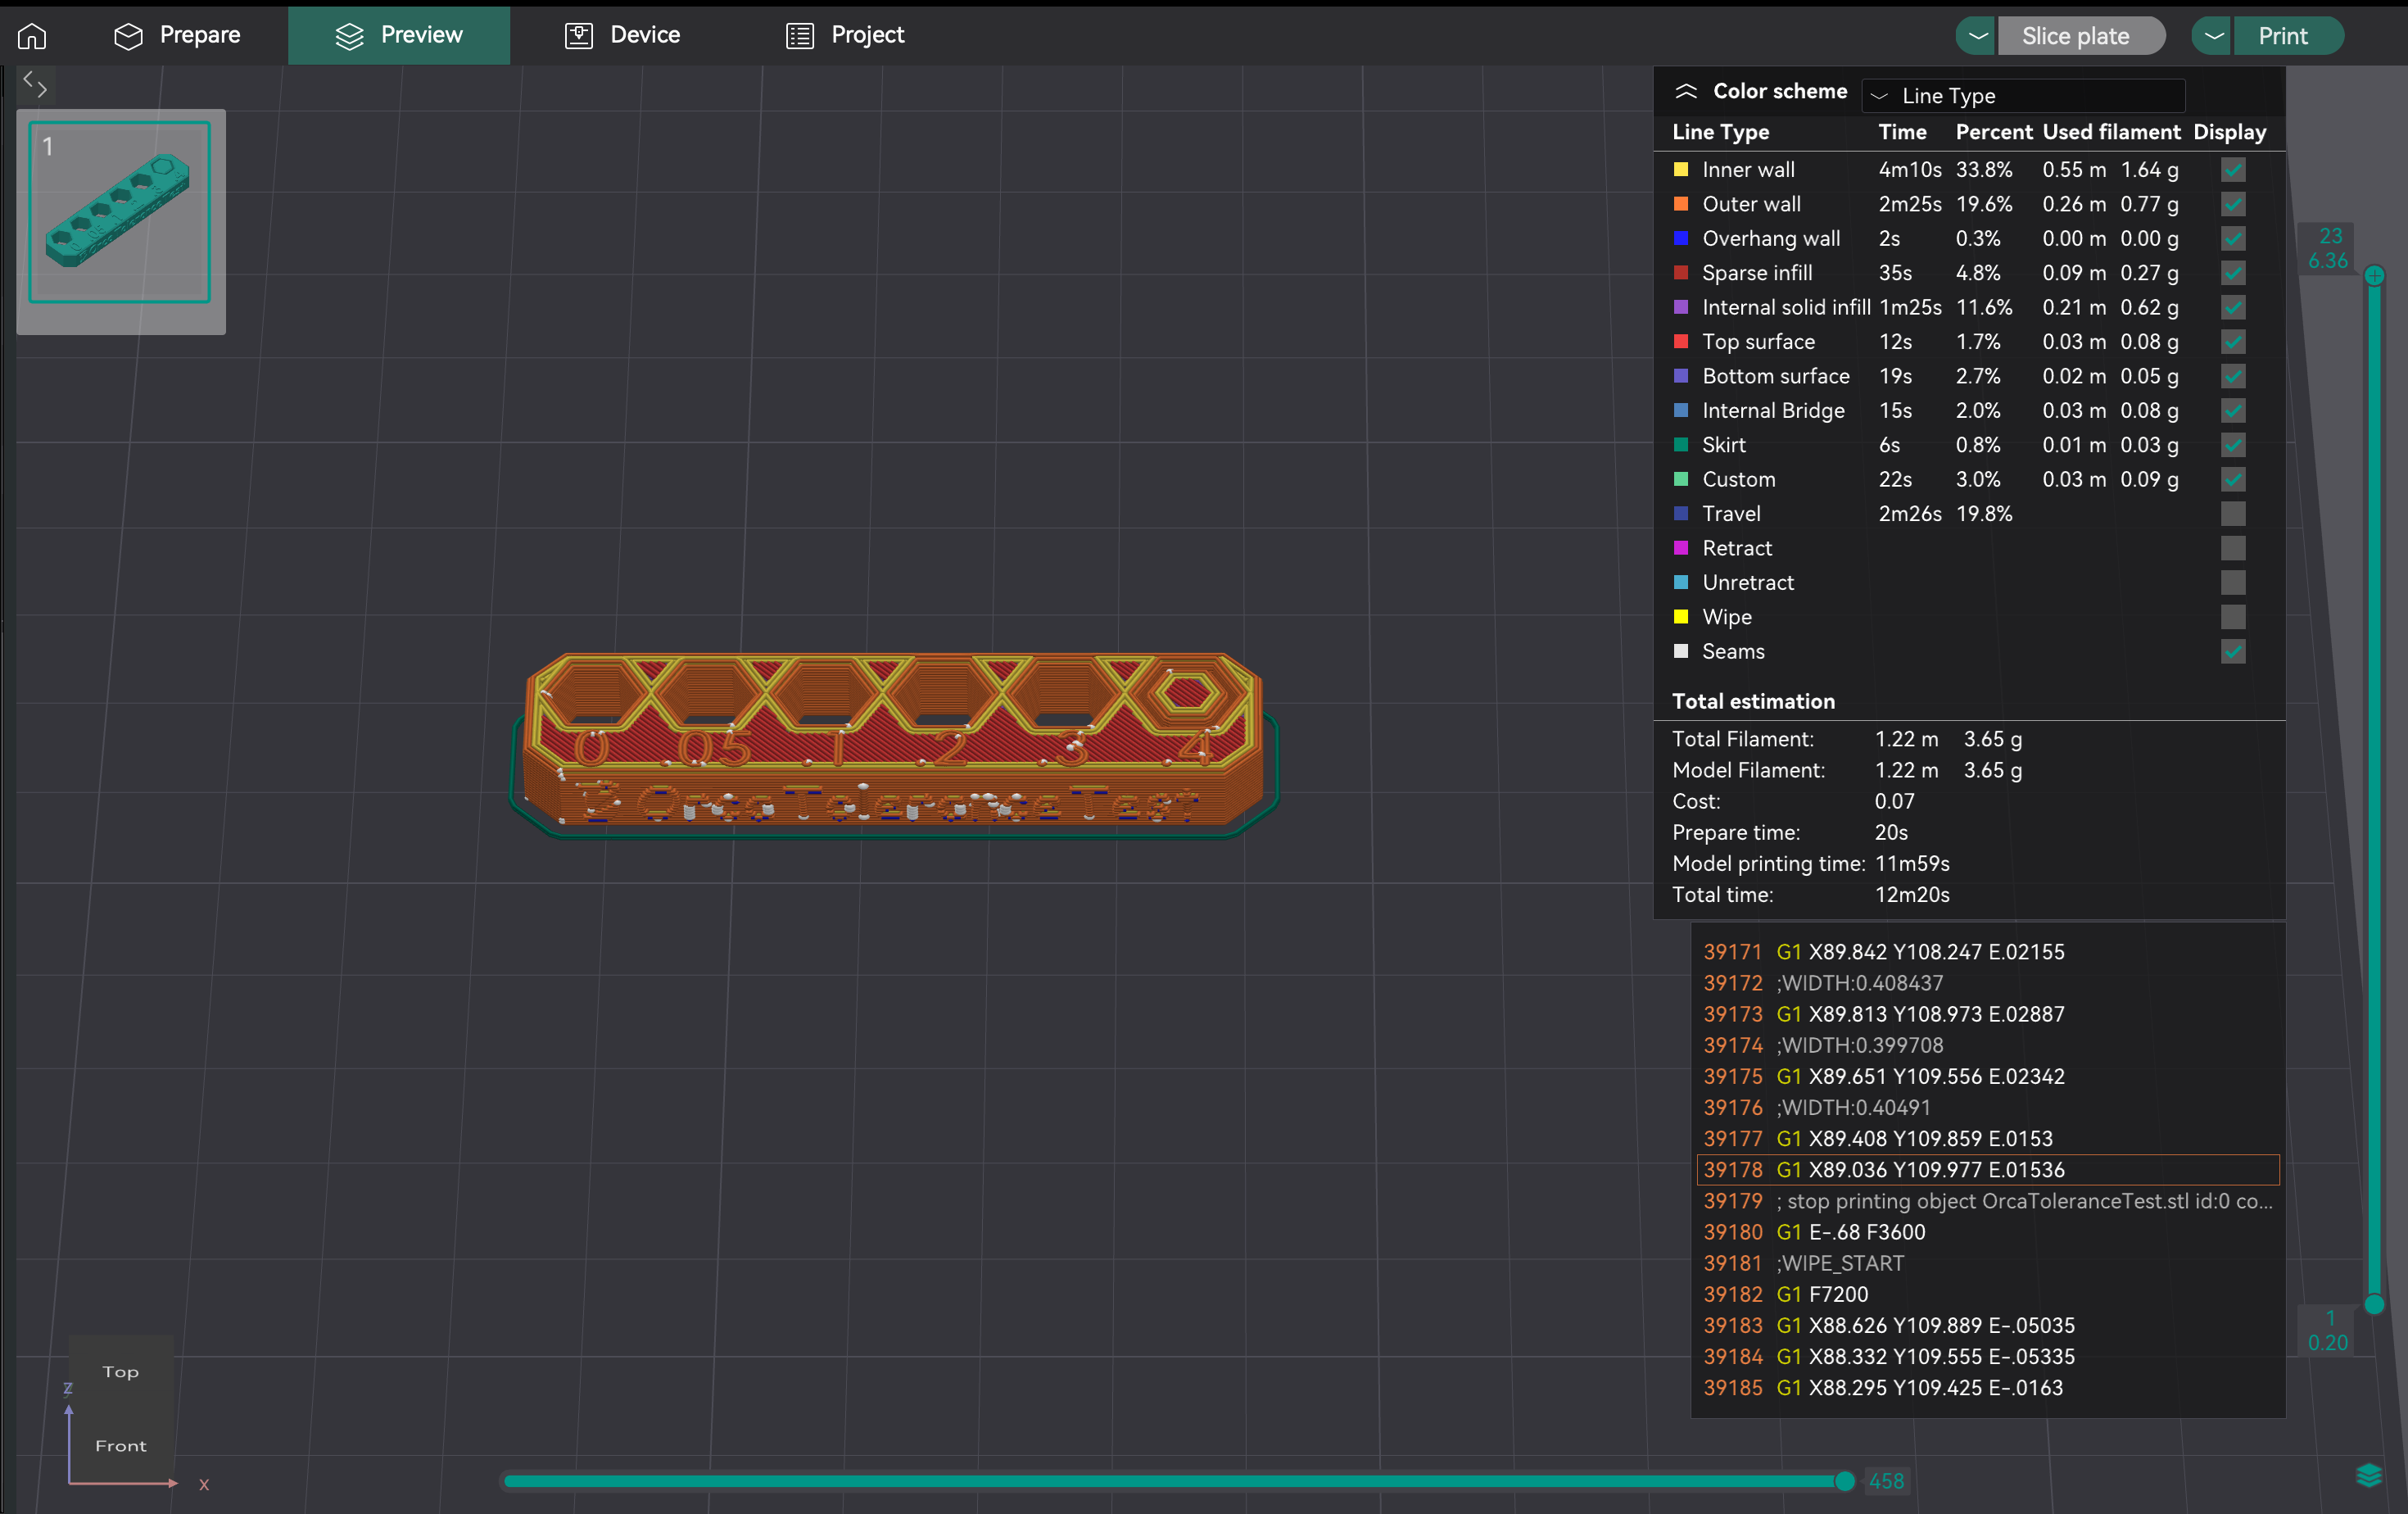
- Descripción del modelo: El modelo tiene una base con seis orificios hexagonales (tolerancia de 0,0 mm, 0,05 mm, 0,1 mm, 0,2 mm, 0,3 mm y 0,4 mm) y un comprobador de hexágonos.
- Impresión: Seleccione la configuración de impresora, filamento y proceso. Corte e imprima.
- Importante: Evite usar la compensación de orificios X-Y y la compensación de contorno X-Y (configuradas a 0 mm) durante esta prueba, ya que pueden distorsionar los resultados.
Una vez finalizada la impresión, utilice una llave Allen M6 o el comprobador hexagonal incluido. El objetivo es identificar el orificio más pequeño de la impresión de prueba en el que el comprobador pueda deslizarse con mínima o ninguna fuerza, y sin que se note ninguna ondulación ni holgura. Este orificio específico representa la salida real de la impresora para un ajuste perfecto con ese filamento.
A continuación se explica cómo determinar objetivamente este ajuste "perfecto":
- Empieza por los agujeros más pequeños: Intenta insertar el comprobador en los agujeros de 0,0 mm, 0,05 mm y 0,1 mm.
- Evalúa el ajuste de cada uno:
- Demasiado apretado: Si tienes que forzar el comprobador o simplemente no entra, el agujero está demasiado apretado para un ajuste perfecto.
- Demasiado suelto/inestable: Si el comprobador entra con mucha facilidad y presenta una holgura notable o se mueve, el agujero está demasiado suelto para un ajuste perfecto.
- Justo a la medida: Este es el agujero más apretado, donde el comprobador entra suavemente, requiriendo una presión ligera pero constante, y tiene poca o ninguna holgura perceptible una vez insertado. 3. El tamaño indicado de este orificio "perfecto" (p. ej., 0,1 mm, 0,2 mm o 0,3 mm) indica la precisión dimensional inherente de su impresora para orificios con ese filamento específico. Este valor observado es crucial para determinar cómo aplicar la compensación y lograr el ajuste deseado en futuros diseños.

Fuente: hta3d.com
Una vez que haya identificado el ajuste perfecto en la prueba de tolerancia (por ejemplo, el orificio de 0,2 mm encaja perfectamente en la prueba), usará esta observación para ajustar la compensación de orificios X-Y en OrcaSlicer. Esta configuración se aplicará a todos los orificios de sus futuros diseños para garantizar que se impriman con el ajuste deseado.
Escenario 1: Los orificios impresos resultan constantemente más pequeños de lo diseñado (demasiado estrechos).
Ejemplo: Diseña una pieza con un orificio de 0,2 mm de paso esperando un ajuste perfecto. En la prueba de tolerancia, el orificio de 0,2 mm queda demasiado estrecho y el comprobador solo encaja perfectamente en el orificio de 0,3 mm. Esto indica que la impresora está haciendo orificios aproximadamente 0,1 mm más pequeños de lo diseñado.
Acción: Debe aumentar la compensación de orificios X-Y con un valor positivo. En este ejemplo, si se establece la compensación de orificios X-Y en +0,1 mm, todos los orificios de las futuras impresiones se imprimirán 0,1 mm más grandes, lo que hará que los orificios de 0,2 mm diseñados se acerquen más al ajuste perfecto. Escenario 2: Los orificios impresos resultan constantemente más grandes de lo diseñado (demasiado flojos).
Ejemplo: Diseña una pieza con un orificio de 0,2 mm esperando un ajuste perfecto. En la prueba de tolerancia, el orificio de 0,2 mm queda demasiado flojo y el comprobador solo encaja perfectamente en el orificio de 0,1 mm. Esto indica que la impresora está haciendo orificios aproximadamente 0,1 mm más grandes de lo diseñado.
Acción: Debe reducir la compensación de orificios X-Y con un valor negativo. En este ejemplo, si se establece la compensación de orificios X-Y en -0,1 mm, todos los orificios de las futuras impresiones se imprimirán 0,1 mm más pequeños, lo que hará que los orificios de 0,2 mm diseñados se ajusten mejor al ajuste perfecto.
Recuerde que la compensación de agujeros X-Y se utiliza específicamente para características internas como agujeros. La compensación de contorno X-Y se utiliza para ajustar las dimensiones externas generales de la pieza y no suele ajustarse en función de los resultados de esta prueba de tolerancia de agujeros específica.
La velocidad volumétrica máxima (o caudal máximo) es el volumen máximo de filamento (mm³/s) que el hotend puede fundir y extruir de forma constante y sin problemas. Esto garantiza que la impresora pueda gestionar el flujo controlado, especialmente a altas velocidades, sin subextrusión (el hotend no funde lo suficientemente rápido) ni sobreextrusión (presión excesiva). Determinar este límite optimiza la velocidad de impresión sin sacrificar la calidad.
La velocidad volumétrica máxima es un límite para el hotend y el filamento. Cada filamento tiene su propio índice de fluidez. El PLA, el PETG y el ABS tienen valores máximos diferentes. Debe probar cada tipo de filamento que vaya a imprimir a alta velocidad para establecer ajustes específicos de velocidad volumétrica en cada perfil de filamento.
- Acceso: Vaya a "Calibración" > "Velocidad volumétrica máxima".
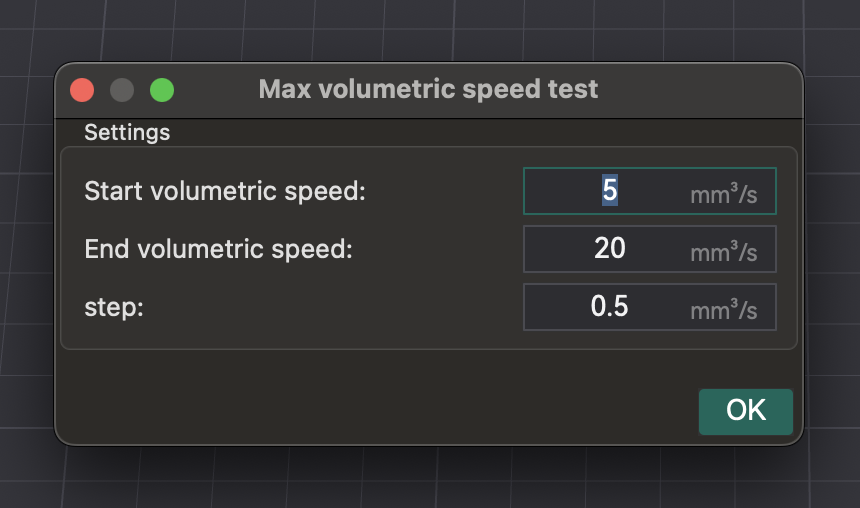
- Prueba: OrcaSlicer genera un modelo. Imprímalo y observe la calidad a medida que aumenta la velocidad (y el flujo volumétrico). Identifique dónde se degrada la calidad de impresión (subextrusión, huecos, superficie rugosa).
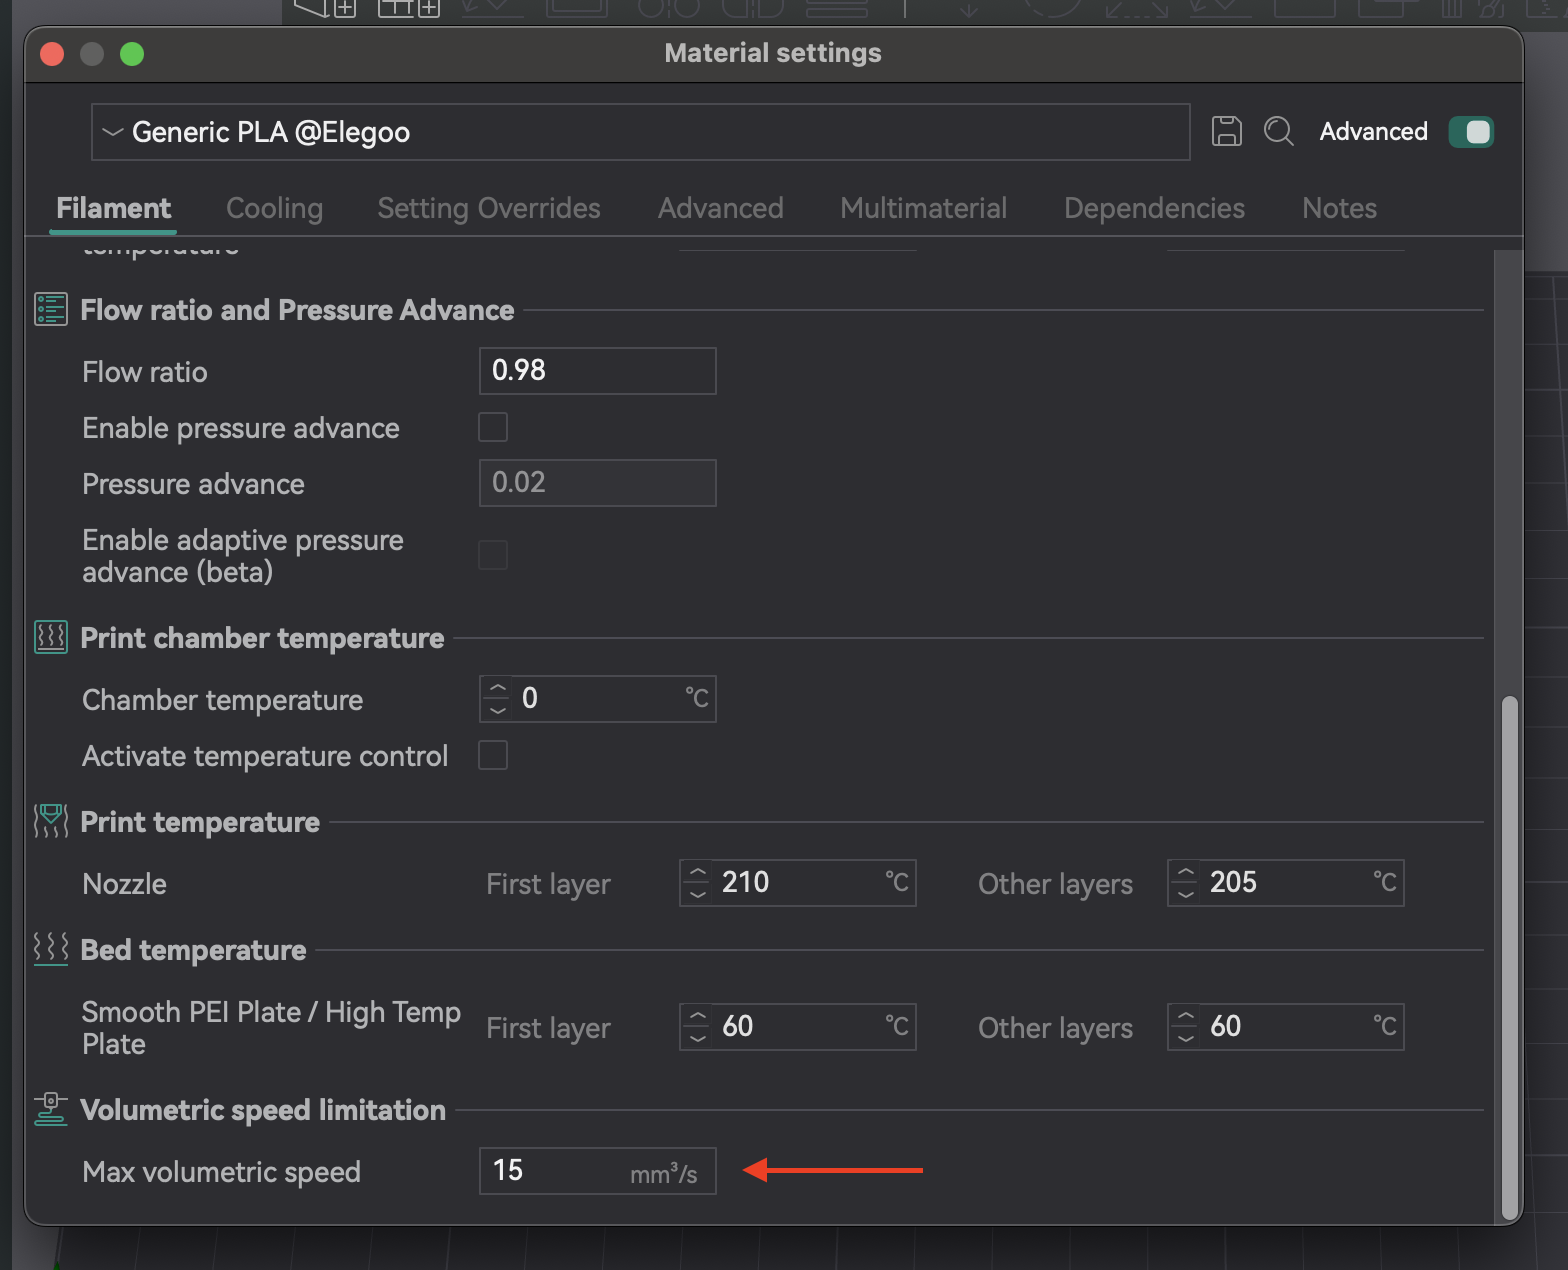
- Identificación de la velocidad volumétrica máxima segura: Anote la velocidad volumétrica justo antes de la degradación. Esta es la velocidad volumétrica máxima segura para ese hotend y filamento.
- Aplicación de ajustes: Introduzca este valor en los ajustes de filamento de OrcaSlicer. Esto evita que el cortador imponga velocidades que excedan la capacidad de su hotend.
| Tipo/Marca de filamento | Velocidad volumétrica máxima óptima (mm³/s) | Observaciones |
|---|
| PLA (Genérico) | 16,75 | Subextrusión y espacios entre capas más allá de este punto |
| PETG (Prusament) | 14,5 | Degradación de la calidad superficial a velocidades más altas |
| ABS (Hatchbox) | 18,0 | Extrusión consistente hasta este límite |
Tabla 6: Resultados de velocidad volumétrica máxima
Los Artefactos Verticales Finos (AFI) son patrones o líneas sutiles y rítmicos en las impresiones, a menudo cerca de las esquinas o en los cambios de dirección. Son causados por vibraciones mecánicas o resonancia en el sistema de movimiento a alta velocidad.
La calibración del VFA determina el límite práctico de velocidad para la calidad, a diferencia de la velocidad volumétrica máxima. Mientras que la velocidad volumétrica se refiere a la capacidad del hotend, el VFA aborda las limitaciones del sistema de movimiento. Su impresora puede extruir suficiente filamento, pero su bastidor, correas o motores podrían introducir vibraciones como VFA. La prueba VFA proporciona una velocidad de impresión máxima "real" donde se mantiene la calidad, comprobando la estabilidad del sistema de movimiento después de configurar la velocidad volumétrica.
- Acceso: Vaya a "Calibración" > "Más" > "VFA".
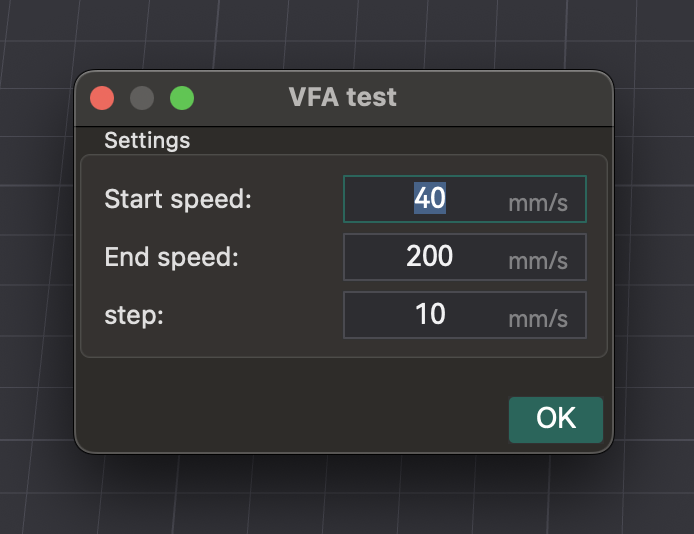
- Configuración de parámetros: Aparece una ventana para configurar la "Velocidad inicial", la "Velocidad final" y los "Incrementos de paso". Ejemplo: 160 mm/s inicial, 500 mm/s final, incrementos de 20 mm/s.
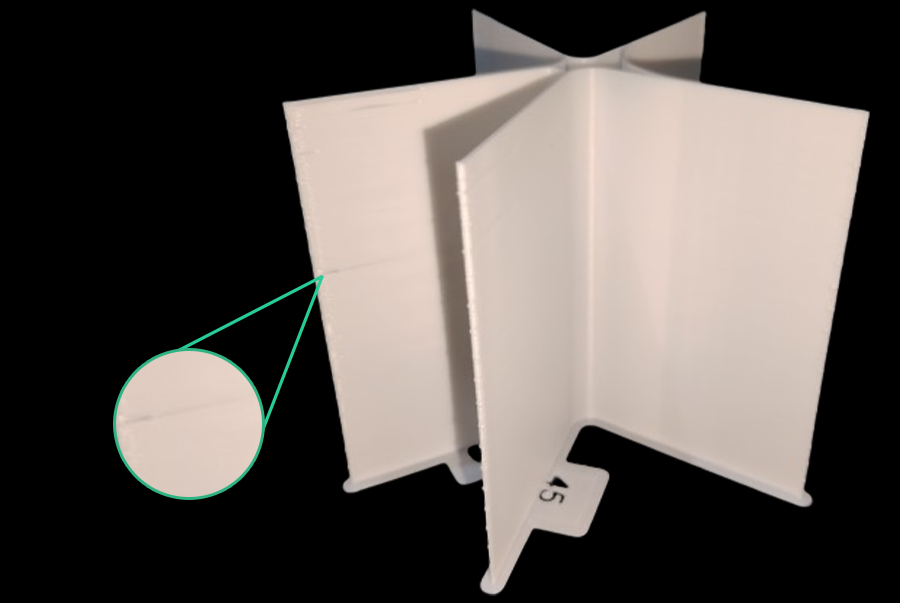
- Análisis de defectos: Corte e imprima la torre de velocidad del VFA. Inspeccione visualmente si hay hilos, subextrusión, desplazamientos de capa y el acabado superficial. Identifique la velocidad más alta con buena calidad antes de la degradación. El modelo tiene marcas correspondientes a las velocidades. Ejemplo: si la subextrusión comienza en la muesca 11 (160 mm/s inicial, incrementos de 20 mm/s), la velocidad óptima es 360 mm/s (160 + (20 * 10)).
Fuente: obico.io
Una calidad óptima de impresión 3D requiere más que solo pruebas de calibración. Requiere mantenimiento de la impresora, gestión del filamento y control ambiental.
El mantenimiento regular es fundamental: revise la boquilla para detectar desgaste u obstrucciones, asegúrese del funcionamiento del extrusor, limpie la cama y verifique la tensión de la correa. La limpieza rutinaria, la nivelación de la cama y el ajuste del PID mantienen la impresora en óptimas condiciones.
La calidad del filamento afecta las impresiones. La humedad en filamentos higroscópicos (PETG, nailon, TPU) provoca burbujas, silbidos, formación de hilos y piezas débiles. Utilice siempre filamento fresco y seco. Guárdelo en bolsas o recipientes sellados con desecante. Seque el filamento húmedo en una secadora o en un horno.
Un entorno estable es crucial. Las fluctuaciones de temperatura, humedad o flujo de aire causan deformaciones e irregularidades. Si es posible, utilice un recinto. Monitoree con un termómetro e higrómetro para evitar problemas.
La calibración es continua, no se configura y se olvida. Los ajustes son dinámicos y cambian.
- Filamento nuevo: Recalibrar para nuevos tipos, marcas o incluso colores.
- Cambios de hardware: Los cambios en la longitud del hotend, el extrusor o el tubo Bowden requieren la recalibración de los parámetros afectados.
- Degradación de la calidad de impresión: Si la calidad disminuye inesperadamente, la recalibración suele ser el primer paso para diagnosticar la causa.
Muchos problemas de calidad de impresión se deben a problemas de calibración. Utilice un enfoque sistemático para diagnosticarlos y resolverlos, evitando ajustes aleatorios. Los problemas durante la calibración del flujo (clics, impresiones irregulares) suelen indicar problemas de precalibración o dependencias como la temperatura o los pasos E. Comience con comprobaciones básicas antes de calibrar las cortadoras.
| Problema | Posible causa de la calibración | Primeros pasos para la comprobación |
|---|
| Adherencia deficiente de la primera capa | Desplazamiento en Z, nivelación de la cama, temperatura | Vuelva a nivelar la cama (manual/automático), ajuste el desplazamiento en Z, verifique la temperatura de la cama. |
| Hilos/rezuma | Retracción, temperatura, caudal | Filamento seco, repita la prueba de retracción, verifique la temperatura de la boquilla. |
| Esquinas redondeadas/con grumos | Avance de presión, velocidad de impresión | Repita la prueba de PA (considere el método de torre), reduzca la velocidad de impresión. |
| Extrusión insuficiente/Huecos | Caudal, temperatura, velocidad volumétrica máxima | Vuelva a calibrar el caudal, aumente la temperatura de la boquilla, verifique si hay obstrucciones. |
| Extrusión excesiva/Superficies rugosas | Caudal, temperatura | Vuelva a calibrar el caudal, disminuya la temperatura de la boquilla. |
| Imprecisión dimensional | Tolerancia, Caudal | Repetir la prueba de tolerancia, verificar la compensación X-Y. |
| Artefactos Verticales Finos (VFA) | Calibración de VFA, Conformación de Entrada, Problemas Mecánicos | Repetir la prueba de VFA, verificar las correas/bastidor, considerar la conformación de entrada. |
| Desplazamientos de Capa | Problemas Mecánicos (correas, motores), Aceleración | Verificar la tensión de la correa, inspeccionar el bastidor, reducir la aceleración. |
Tabla 7: Diagrama de flujo de resolución de problemas de calidad de impresión (conceptual)
La calibración completa con OrcaSlicer es indispensable para cualquier aficionado o profesional de la impresión 3D. Ajustando cuidadosamente parámetros como la temperatura, el caudal, el avance de la presión, la retracción, la tolerancia, la velocidad volumétrica máxima y el VFA, podrá aprovechar al máximo el potencial de su impresora. Esta precisión se traduce en impresiones de mayor calidad, fiables y precisas, lo que reduce el desperdicio de filamento y mejora las tasas de éxito.
La calibración es un proceso continuo. A medida que introduzca nuevos filamentos, modifique el hardware o experimente cambios ambientales, reevalúe y ajuste la configuración. Esta optimización continua garantiza que su impresora rinda siempre al máximo. ¡Que disfrute de la impresión!
Also available in: Deutsch | English | Français | Italiano | Nederlands | Polski | Português | Русский


