How to Setup OctoPrint on the Prusa i3 3D Printer

Can't find a Raspberry Pi? Check out Orange Pi for OctoPrint. Boards and complete kits are available now!
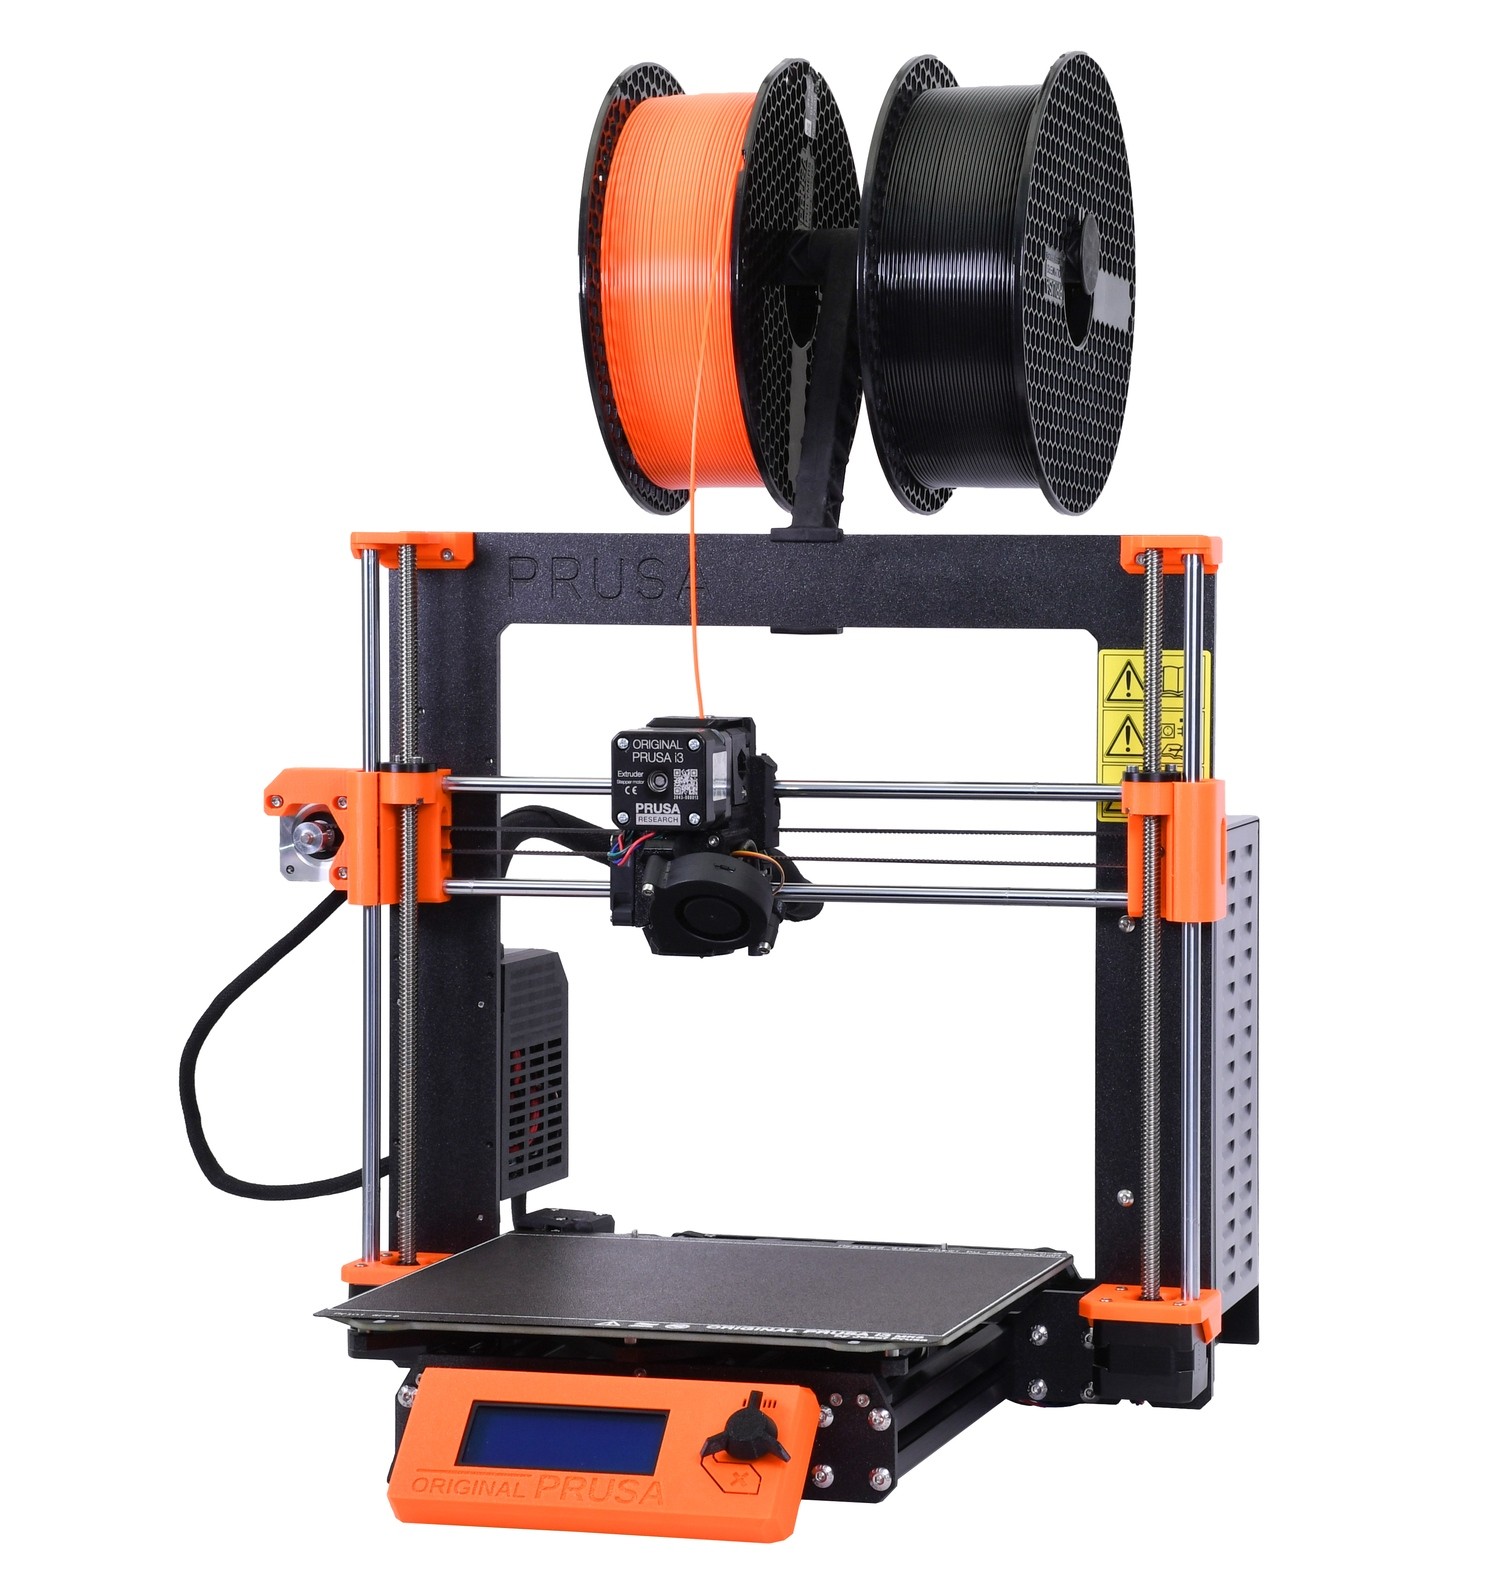
Prusa, a leading 3D printing company, is the inventor of DIY desktop FDM (and, more recently, SLA) 3D printers. It is a well-known brand in the industry, synonymous with dependability and quality.
Prusa has produced numerous award-winning 3D printers over the years, none more so than the Prusa i3. The Prusa i3 is the company's most popular printer, and the MK3S+ is the most recent variation on the i3 model.
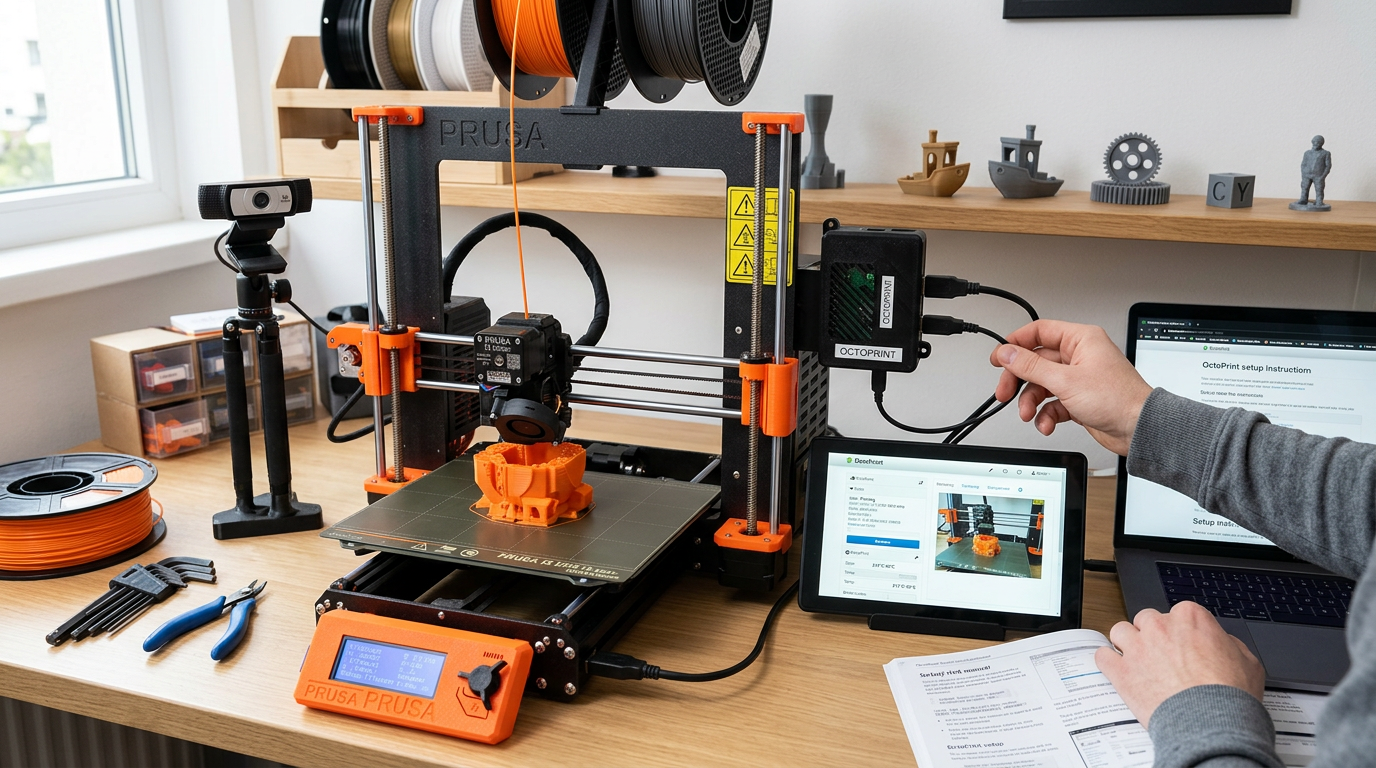
The Prusa is a solid 3D printer, but it lacks some features that OctoPrint can provide. OctoPrint gives you the ability to remotely monitor and control your 3D printer. And this is one feature that improves your printing experience regardless of how good your 3D printer is.
If you want to know which 3D printers are the best from a data-driven standpoint, you can take a breather and read our unbiased and data-driven 3D printer review.
Regardless of the best 3D printer, in this article, we will walk you through the process of installing Octoprint on your Prusa i3.
Step by Step Guide on How to Setup Octoprint on Prusa i3
This guide will assist you in making the most of your Prisa i3 MK3S+'s already powerful and feature-rich configuration. Once OctoPrint is configured with your Prusa, you will be able to get a lot more out of your printer than you are now. You will be able to send gcodes to the printer, start, pause, and stop printing, control your printer via the OctoPi interface, and monitor the prints from anywhere in the world with the addition of a webcam. With the addition of a few plugins, you can further enhance the experience.
We know you're excited, so let's jump right in and get started.
Prusa Printers
To connect your Prusa 3D printers to OctoPrint, you will need a Raspberry Pi for the connection. You have the option to choose from a multitude of Raspberry Pi’s and almost all of them do provide a sufficient amount of power.
However, there has been a lot of speculation around Raspberry Pi Zero W. To clear the air around it, Prusa has officially announced that the RPi Zero is not powerful enough to utilize advanced Octoprint features and plugins, like video streaming, and thus it is not recommended by the OctoPrint project.
You may find a few forums where they endorse RPi Zero but make a note that technically, the RPi Zero can be used but as it delivers less power, it can only run basic features. If you want to restrict yourself to basic features then you can certainly try to use it, but OcoPrint has many awesome plugins that let you create amazing timelapses and monitor and control your 3D printer from anywhere, so I would recommend a getting a pi that can handle OctoPrint’s great features.
Hardware Needed
- Raspberry Pi A, A+, B, B+, 2B, 3A+, 3B, 3B+, 4B 1/2/4GB, or Zero W/2 (Raspberry Pi 3 or higher recommended)
- Power Supply
- If your RasPi lacks built-in WiFi, you can use a WiFi dongle.
- Depending on your printer, you may require a USB cable.
- An SD or microSD card with at least 8GB capacity for your RasPi.
- A computer with a functional SSH client, such as PuTTY. SSH is built into the Terminal on Mac/osX and Linux.
- To flash your SD card, you'll need a (micro)SD card reader.
- WiFi hotspot
1. Flashing the OctoPrint Image
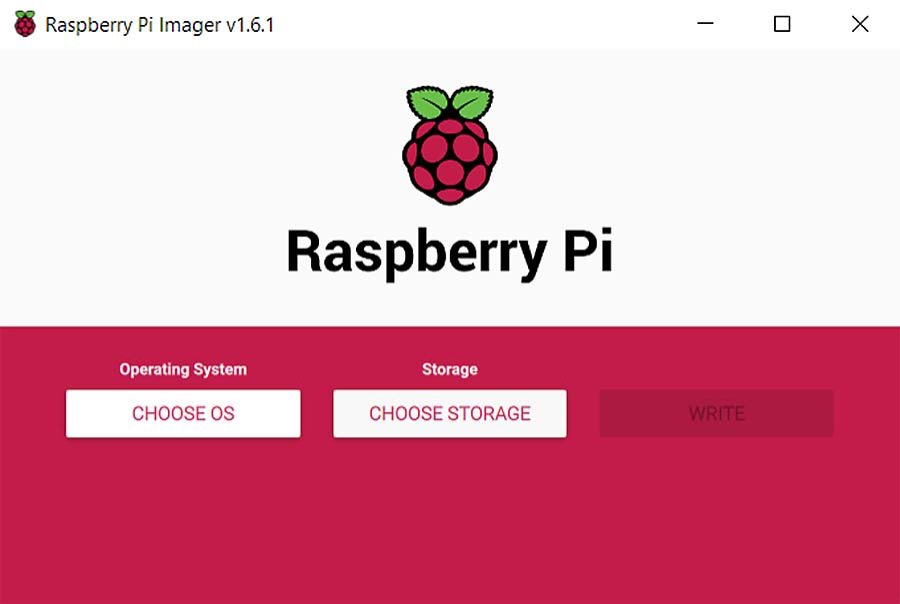
It is no longer necessary to edit config files after flashing since the Raspberry Pi Foundation released their "Raspberry Pi Imager." All of this can be set up in the imager's Advanced options menu. You can even download images using Raspberry Pi Imager.
- You must first download and install the Raspberry Pi Imager on your computer.
- Choose your operating system and proceed as follows:
- Using the 'CHOOSE OS' button, go to 'Other specific purpose OS' -> 'OctoPi' ->'stable' version.
- By pressing Shift + Ctrl + X, you can access the Advanced Options. Enable SSH to immediately set a hostname (the name of the Raspberry Pi on the network) and primary password, as well as your WiFi network and password to connect to the Raspberry Pi later.
- Then, under 'CHOOSE STORAGE,' select your SD card before clicking 'WRITE' to begin the flashing process.
2. Connecting the Raspberry Pi
Connect your RPi to the printer via USB after inserting the (micro)SD card. After that, turn on your RPi. The Raspberry Pi Zero W will be connected to the printer via GPIO pins rather than USB. This is something we recommend you do before proceeding. For these configurations, however, you can power it with a 5V phone charger and connect it later.
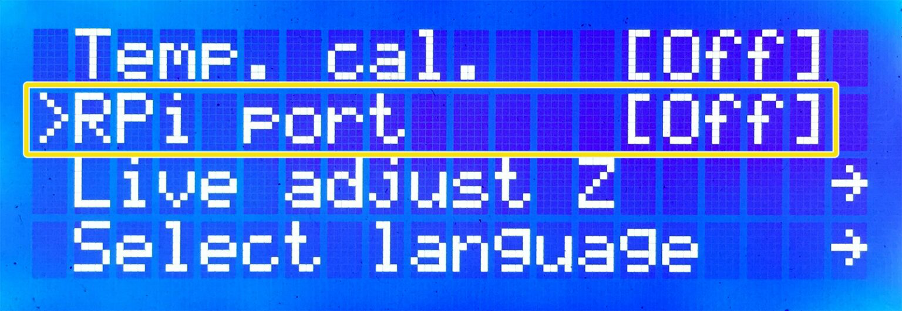
Deactivate the RPi port when connecting to the printer via USB (LCD menu -> Settings -> RPi Port and set it to "Off").
All Raspberry Pis can be linked via USB. The RPi Zero, on the other hand, can be connected to the MK3S' Einsy Rambo via its GPIO pins. If you want to use the RPi Zero, you must use a different GPIO-based procedure (explained later in this article).
3. Setup the Camera for OctoPrint
This is an optional step, but it is time-consuming and can help you improve your printing experience in a variety of ways. Those who do not wish to install a camera may proceed to the next step. Those who want to learn how to mount a camera can continue reading.
We're going to install a webcam right now. Installing a webcam has two benefits: it allows for remote monitoring and control of your 3D printer, as well as the creation of mesmerizing Octolapse videos (time-lapse videos created in OctoPrint).
Camera Selection
Camera selection can be difficult, but we've got you covered. With so many camera options available, it's easy to become confused or overwhelmed. All you need to know is that the most common cameras used with OctoPrint are USB Webcams and Raspberry Pi cameras.
USB webcam
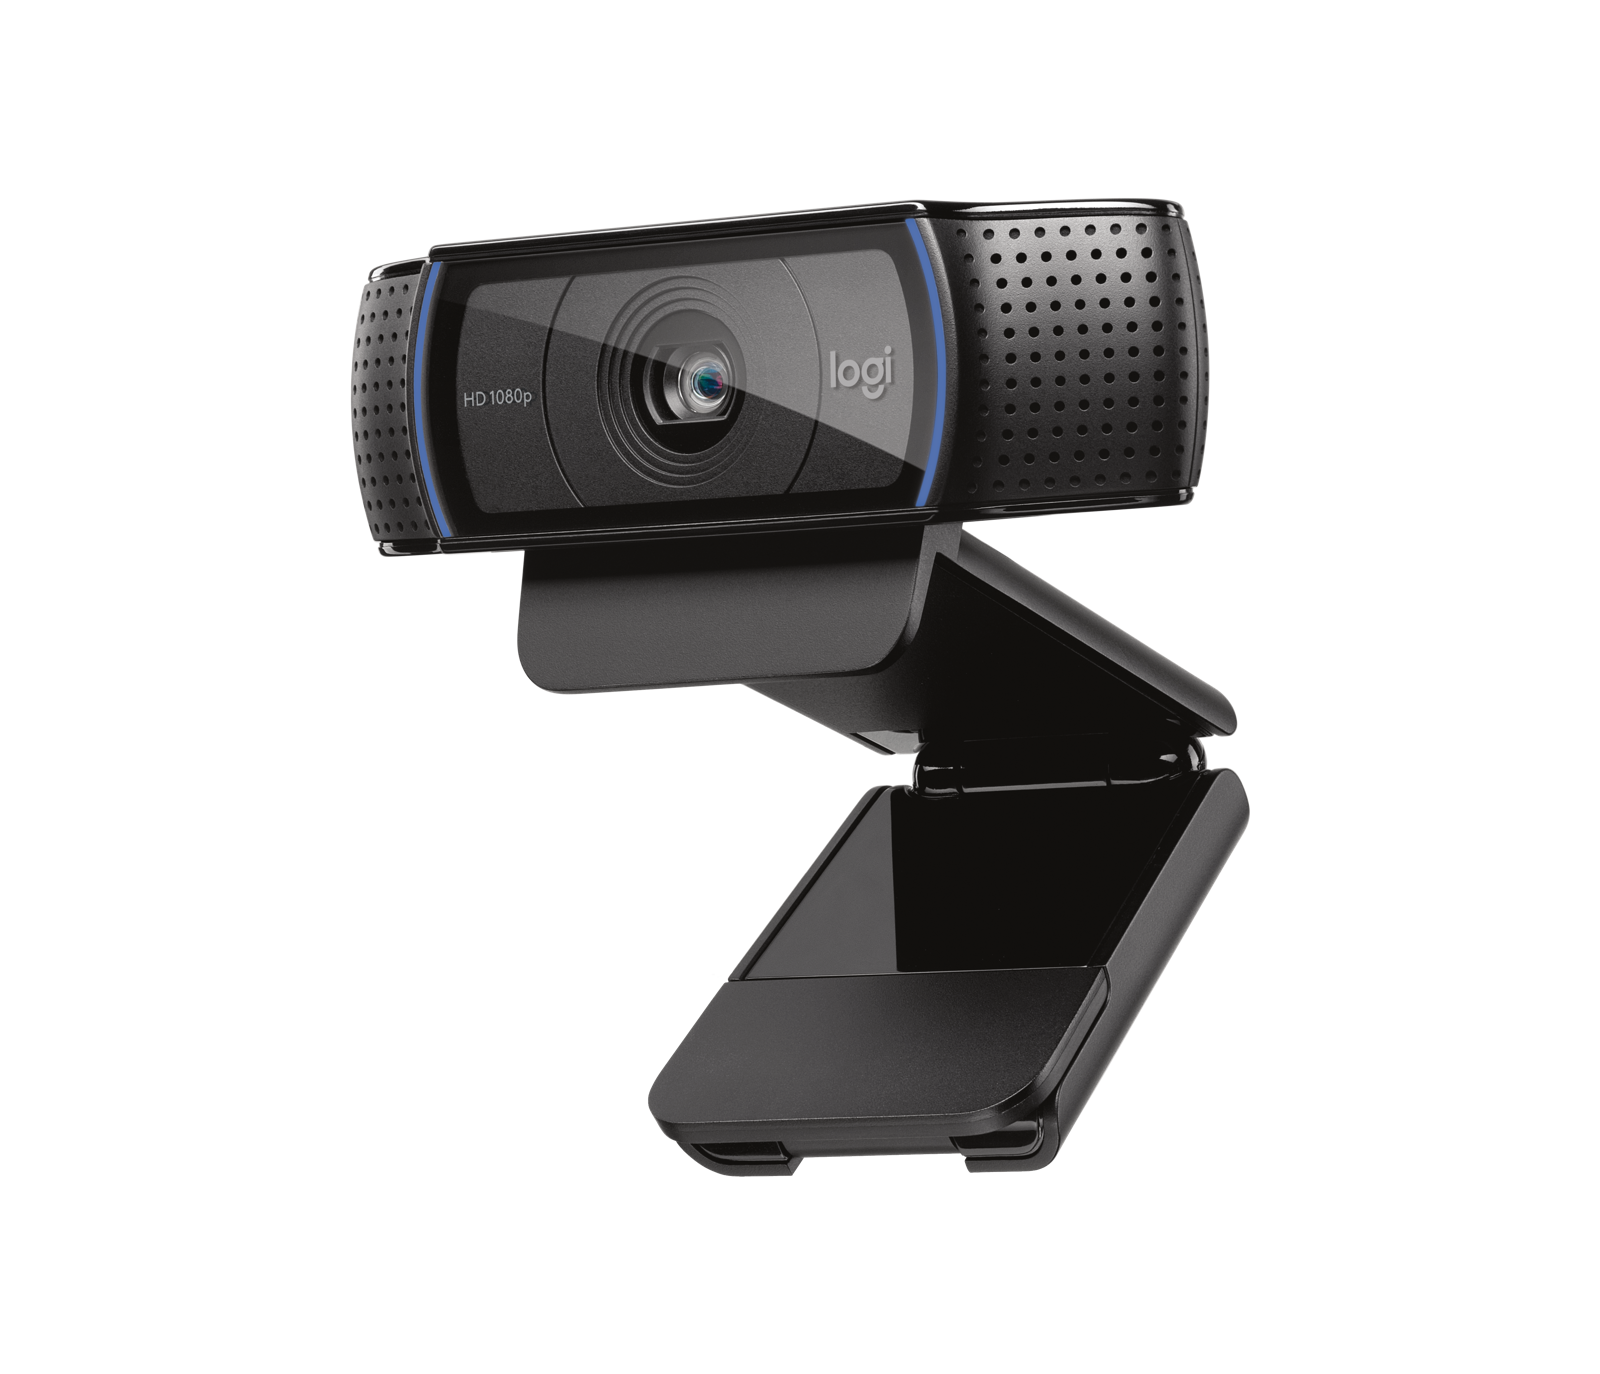
A USB webcam is as simple to install as plugging it into a USB port and placing it on its mount. They do, however, have a disadvantage in terms of image quality, which can be subpar at times.
Consider the Logitech C920 Pro and the Logitech C270. Both are by far the best webcams available, but they are quite pricey. Other low-cost options are also available. You can learn more about a few more options and additional information on the options provided above by reading our detailed article on OctoPrint webcams.
Raspberry Pi Cameras
The most obvious advantage of using a Raspberry Pi camera is cost savings. In terms of performance, they also outperform USB cameras. Furthermore, because the Raspberry Pi has such a large community, nearly all camera configuration issues are resolved and documented on their community pages. A Raspberry Pi camera could be simpler to set up.
You have several options here as well, but we won't go into detail because you can choose the camera by reading our OctoPrint webcams article.
Connections
Connecting a webcam to your Raspberry Pi is as simple as connecting cables. If you choose a USB webcam, connect the USB cable to the Raspberry Pi device. If you're using a Raspberry Pi camera, plug a ribbon cable into both the camera and the Pi, with the blue side in the Pi device and the other side in the Raspberry Pi camera.
Mounting a Camera
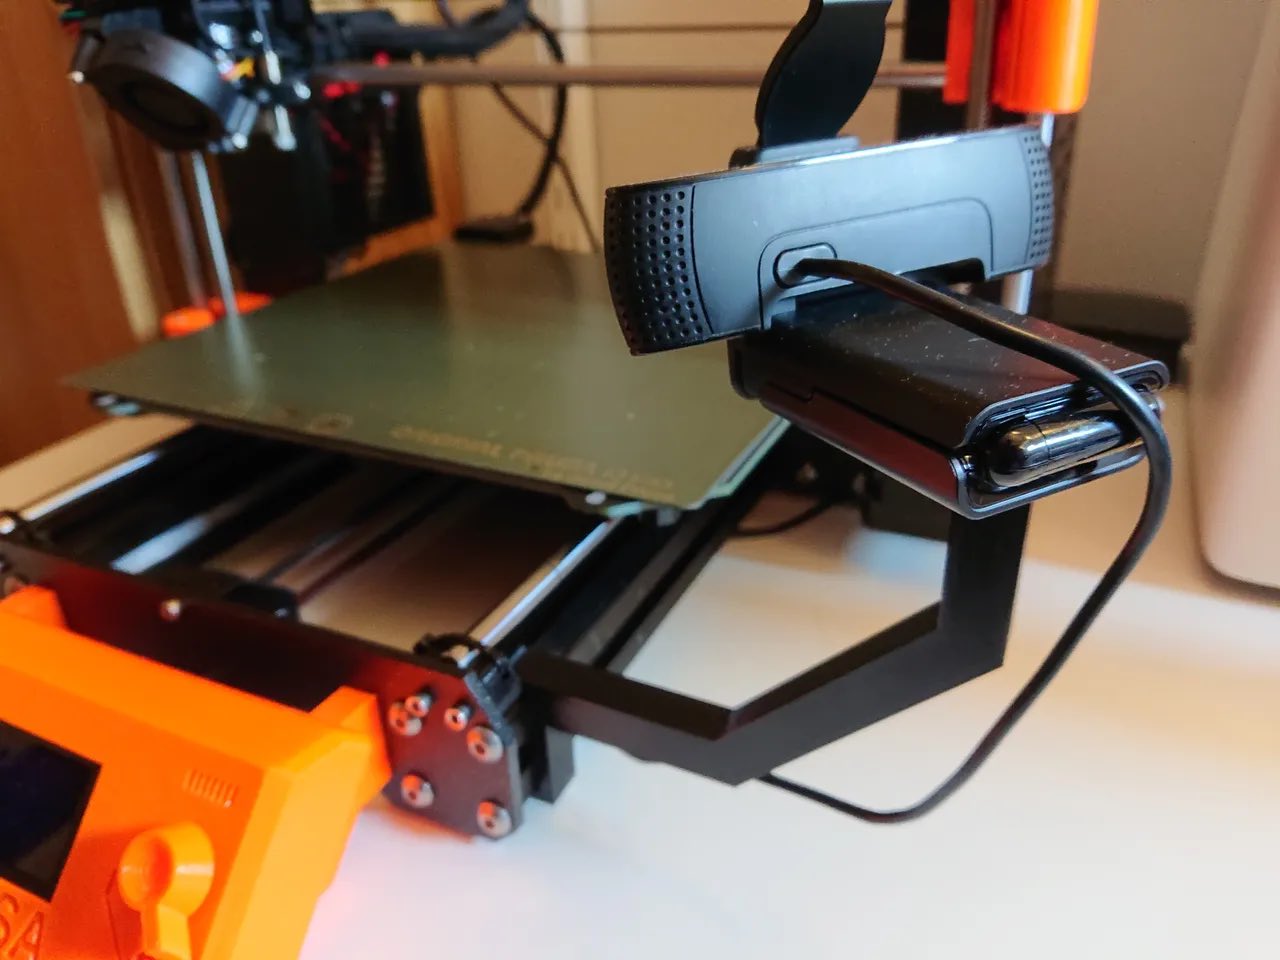
The next step is to mount the camera after you've established your connection. Setting up the camera on your Prusa model will necessitate the use of a camera mount. The best way is to go to the Prusa Printers website and look for a suitable mount. You'll have no trouble finding a suitable free-to-download STL file.
The file page will also include all of the instructions you'll need to print and then install the camera mount.
Position & Lighting
You'll also need to experiment with camera positioning so that the print is visible, and plugins like Obico and Octolapse can fully visualize your prints. This is influenced not only by position but also by light. Some users use an additional light source if their workspace is dark. Consider purchasing an LED light that can be clipped to the printer's table. Simply place the light source behind the camera.
4. Finding the IP
The RPi will need a few minutes to boot up before connecting to your network. The RPi IP address should then be visible in most mobile IP scanning apps. The IP address will begin with the same prefix as your computer but end with a different suffix. It's also likely to be called "Octoprint" and/or "Raspberry Pi" or something similar. Local IP addresses that are commonly used are 10.0.0.XXX and 192.168.0.XXX.
5. Launching and configuring Octoprint
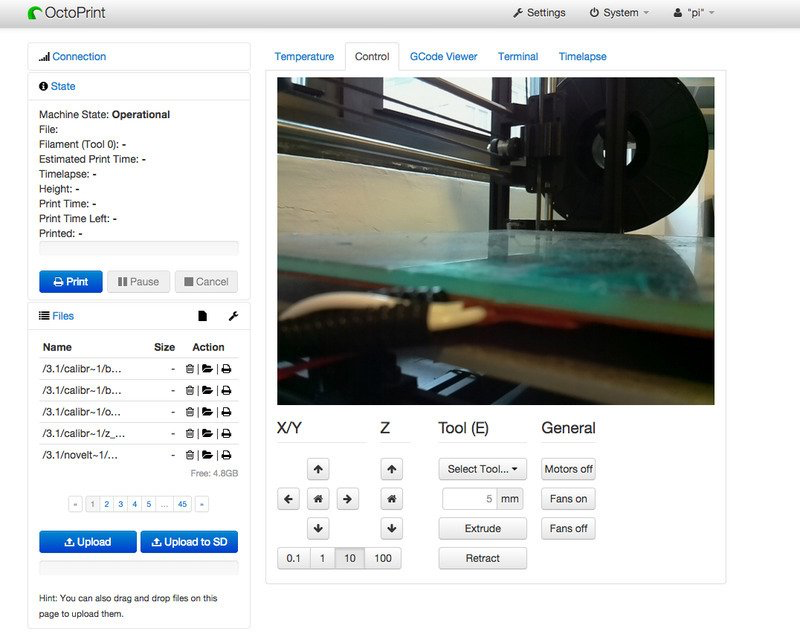
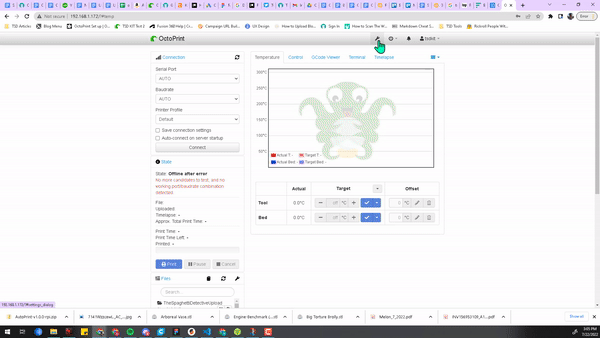
Open your browser and enter "octopi.local" or the RPi's IP address. You could be greeted by a welcome wizard. Please review it and add a printer profile. The Printer profile must then be configured.
To configure your profile, install plugins, or change any other general settings, click the Settings-wrench in the top right corner of the window.
To edit, select "Printer profiles" and click the pen icon. Change the values in the table below under "Print bed & Build volume." All other settings can be left at their defaults. This only affects Octoprint's control over your printer and has no effect on sliced G-codes.
You can leave 'Serial Port' and 'Baudrate' on "AUTO" (found in the left vertical pane) for RPis connected via USB, and then click the Connect button. Congratulations! You can now use Octoprint with your printer. Octoprint will prompt you to update. Do this now, before you install any plugins.
OctoPrint Connection with Raspberry Pi Zero (not recommended for using advanced OctoPrint features)
1. 3D Printing the Raspberry Pi Zero frame
The first step is to prepare your hardware. While the rest of the hardware can be purchased on the market, the frame can be 3D printed. As a result, we'll start by 3D printing the Raspberry Pi Zero frame. This frame serves as a spacer and serves as a template for the General-Purpose Input/Output pins.
Prusa also prefers that users print out the frame, so the CAD file is available for free on the Prusa website. You can get the file by following the steps below.
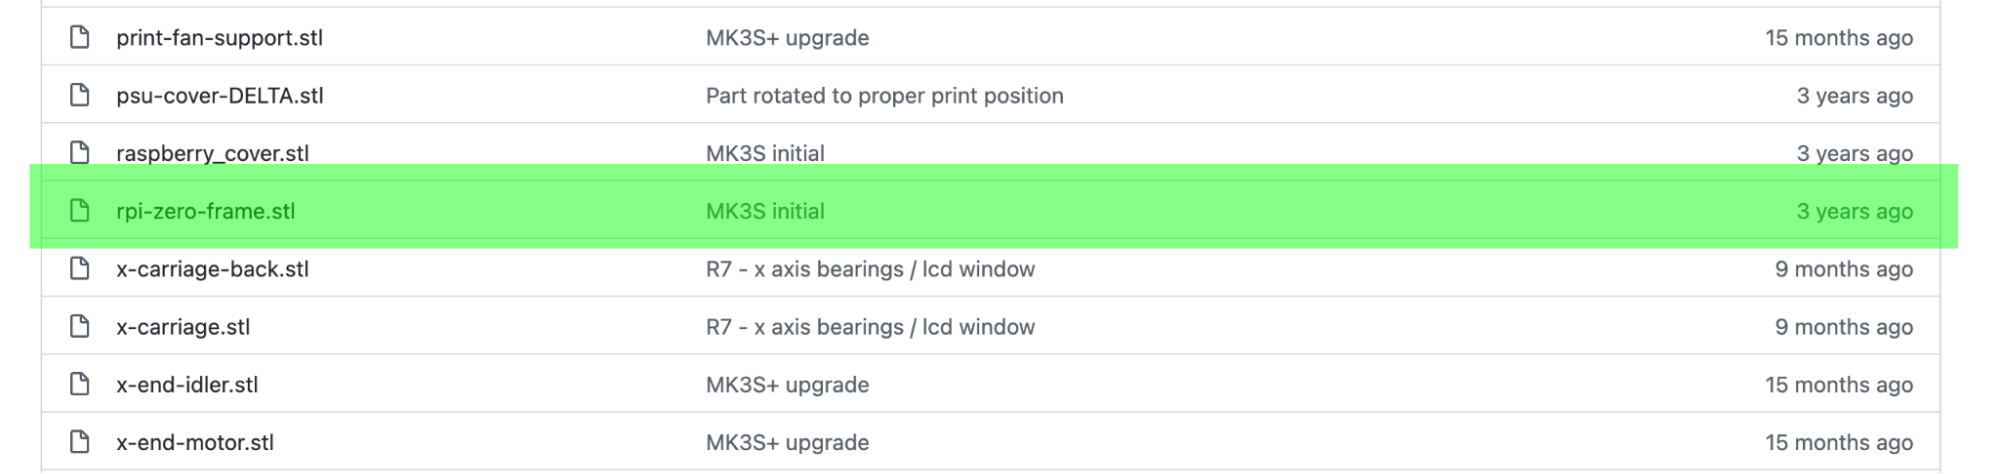
- The STL file is hosted on Github, which can be accessed directly or via the Prusa website. Search for project files on the Prusa link, then go to the Github page.
- Navigate to Printed-Parts > STL > rpi-zero-frame.stl once on the Github page.
- Download and 3D print this file.
2. Cut removable back
The next step is to remove your Einsy-removable board's back. You will find markers for cutting the removable piece on this board. Prusa has made plans to remove it.
Keep in mind that this step is not for those who do not have the Einsy mainboard; additionally, while cutting, unplug the printer, do not cut any excess parts, and be careful.
3. GPIO Header
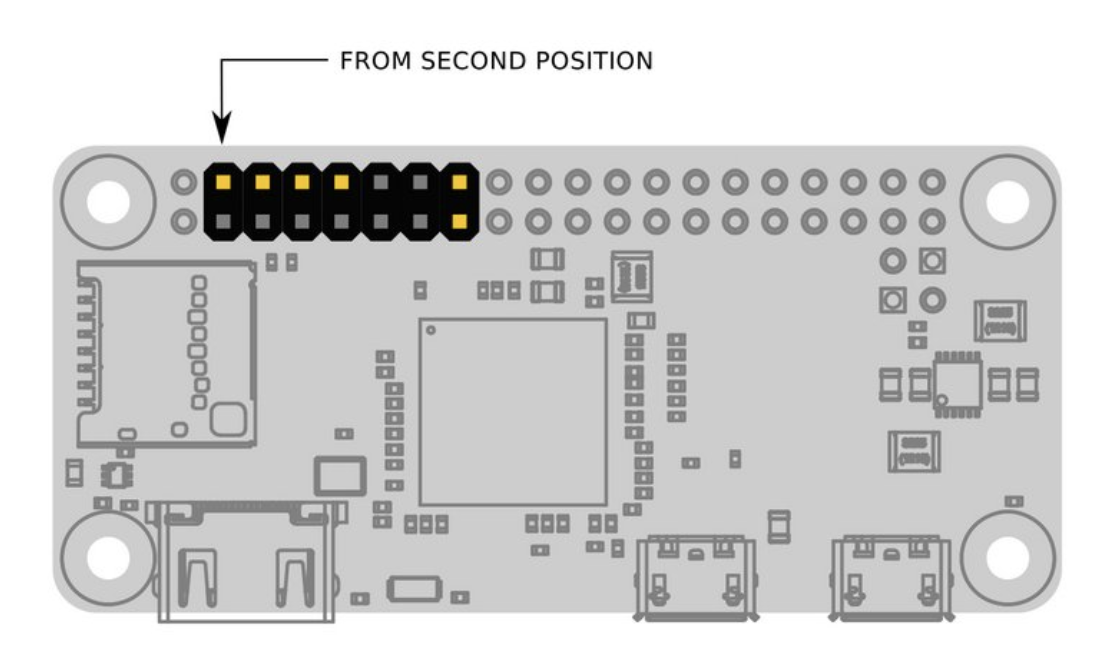
The GPIO header will be soldered to the Raspberry Pi next, but first we must prepare it. A GPIO header is required for connecting the Einsy board to the Raspberry Pi.
Take your header strip and cut it into 7x2 pieces. Then, as shown in the image, remove the pins that aren't needed. When finished, the header is ready to be soldered to the board.
4. Prepare the frame
Once the GPIO header is ready, thread the pins through the 3D printed frame and connect it to the Pi Zero.
5. Solder
After connecting the GPIO header to your frame, the next step is to solder it to keep the pins in place. When soldering, use caution and, if necessary, seek assistance from adults or professionals. To connect the Raspberry Pi to the Prusa, solder to the Pi's 5V, GND, TXD, RXD, and GPIO22 pins.
6. Configure the SD Card
The SD card must now be configured. Earlier the Prusa team used to offer a pre-configured Raspberry Pi image but it is not maintained now. It is deemed outdated by Prusa. So, to configure the SD Card, you need to follow the process shared earlier in this article.
7. Configure WiFi
OctoPrint requires WiFi, so you must also configure the WiFi connection. Navigate to the root directory on your SD card to enable this. Because of this:
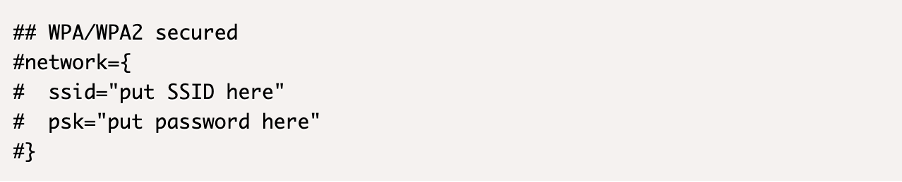
- Open the file octopi-wpa-supplicant.txt.
- As shown in the image, uncomment the WPA/WPA2 secured lines, network, SSID, and psk lines.
- Enter your network ID (ssid) and password (psk). Then look for the country configuration in the list below. Uncomment your country (or, if it doesn't exist, enter your country code).
- Save the file, exit, and eject the SD card after making these two changes.
8. Connect Pi to the Einsy Board
We are now nearing the end of the process of installing OctoPrint on the Prusa i3. We only need to connect the Raspberry Pi to the Einsy board now that the SD card and WiFi have been configured. Connect the pi to the Einsy board of the 3D printer.
9. Turn "RPi port" to "On"
The last step is to connect your printer. Navigate to settings, then to the RPi port, and turn it on. This completes the OctoPrint configuration on the Prusa i3.
10. Testing
You can now begin experimenting with OctoPrint and reaping its benefits. Some of you may still require assistance in order to begin using the software. So go to http://octopi.local/. You will be guided through the setup process and will be able to set your OctoPrint username and password here.
Now that the account has been created, you can begin controlling your printer by moving the nozzle, adjusting the temperature, and even sending gcode files and printing.
Install Plugins
The installation procedure has been completed. However, we are not always satisfied with what we have and so to get the most out of the printer via OctoPrint you can install some additional plugins. Obico for OctoPrint (successor of The Spaghetti Detective) is one of the most popular and useful plugins.
All you have to do is:
- Open a browser and navigate to the OctoPrint page. Go to Settings, then Plugin Manager, and finally Get More. We will install the Obico for OctoPrint plugin to show you the standard process for installing any OctoPrint plugin.
- Enter Obico in the search bar and install the "Obico for OctoPrint" plugin.
Obico for OctoPrint
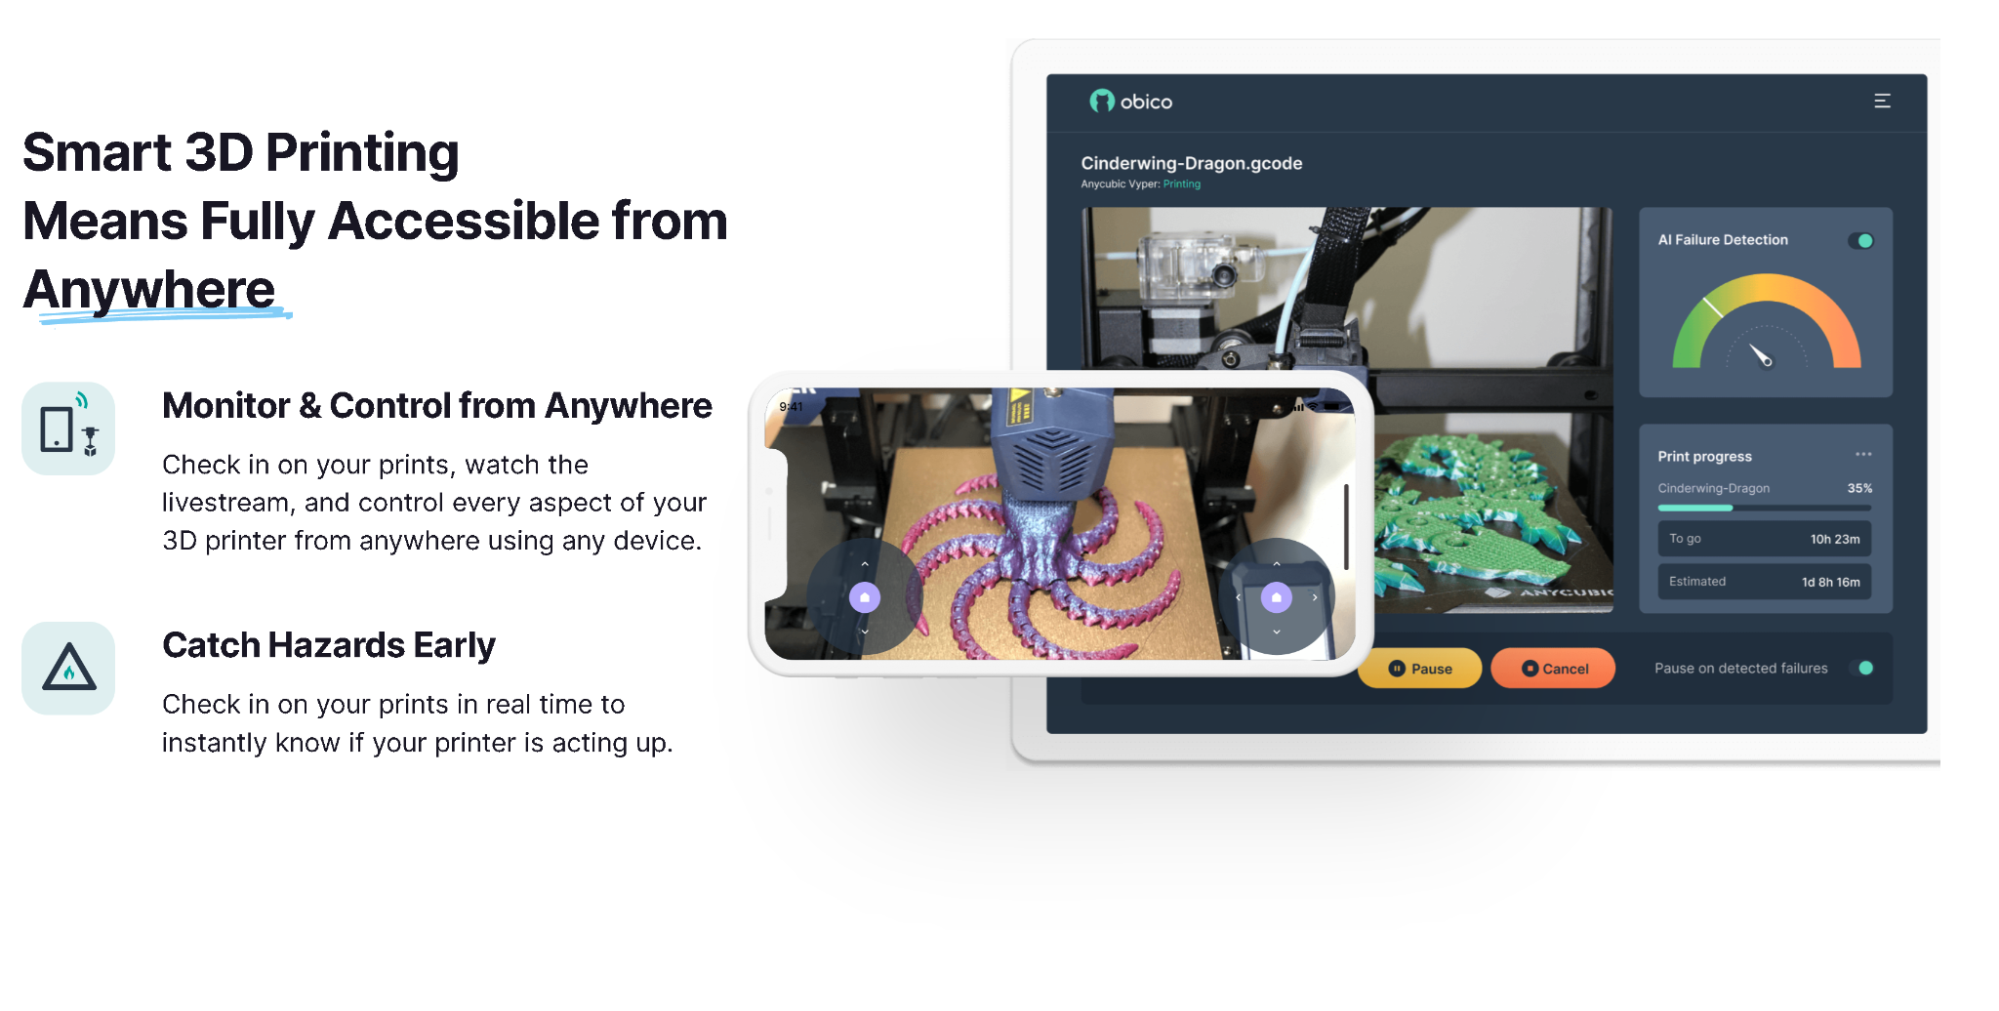
Obico is essential software for any printer or printing farm that uses OctoPrint. It is a remote monitoring and controlling application that will completely transform your 3D printing experience. It expands on OctoPrint's work and pushes it even further. You can monitor, control, and watch the printer print your part from anywhere in the world using Obico for OctoPrint.
It is one of the few plugins that monitors prints using an AI engine. The AI engine can intervene and take corrective action, such as pausing, stopping, or terminating the printing operation, in the event of failures, spaghettis, or even fire hazards. These revolutionary features are a must-have for anyone who wants to securely access their printers from anywhere.
OctoPrint works great when you are connected to the same local network as your Raspberry pi, but OctoPrint cannot be accessed when away from home, and the OctoPrint user interface doesn’t work that great on a mobile device regardless of which network you are connected to.
Obico for OctoPrint not only provides the best remote monitoring and webcam streaming plugin, but you can also start, pause, and cancel your prints at any time and from any location! You can upload files and start prints from your phone, desktop, or tablet. You can even access the full OctoPrint user interface safely and securely from anywhere with Obico’s OctoPrint tunneling feature. Most of the time, Obico’s mobile app or web app offer most of the controls and features needed for basic monitoring and control of your 3D printer, but the tunneling feature is great when you need to access a specific OctoPrint plugin or an advanced feature within OctoPrint.
There are hundreds more amazing OctoPrint plugins. Explore more plugins in the OctoPrint plugin repository or check out our blog on the best OctoPrint plugins.