How To Setup OctoPrint the Easy Way

Can't find a Raspberry Pi? Check out Orange Pi for OctoPrint. Boards and complete kits are available now!
What is OctoPrint and why do I need it?
OctoPrint is the most popular 3D printing software for wirelessly monitoring and controlling your 3D printer.
Hundreds of thousands of printers rely on OctoPrint's awesome snappy web interface daily to manage their workflows. In addition there are a ton of awesome plugins that take the power of remote 3D printer monitor and control to a whole new level. In this guide, we will tell you what you need to get OctoPrint set up with your 3D printer and how install it.
Prefer to watch a video to guide you through the process? Check out our video on setting up OctoPrint and getting started with OctoPrint plugins!
Hardware
What hardware do I need?
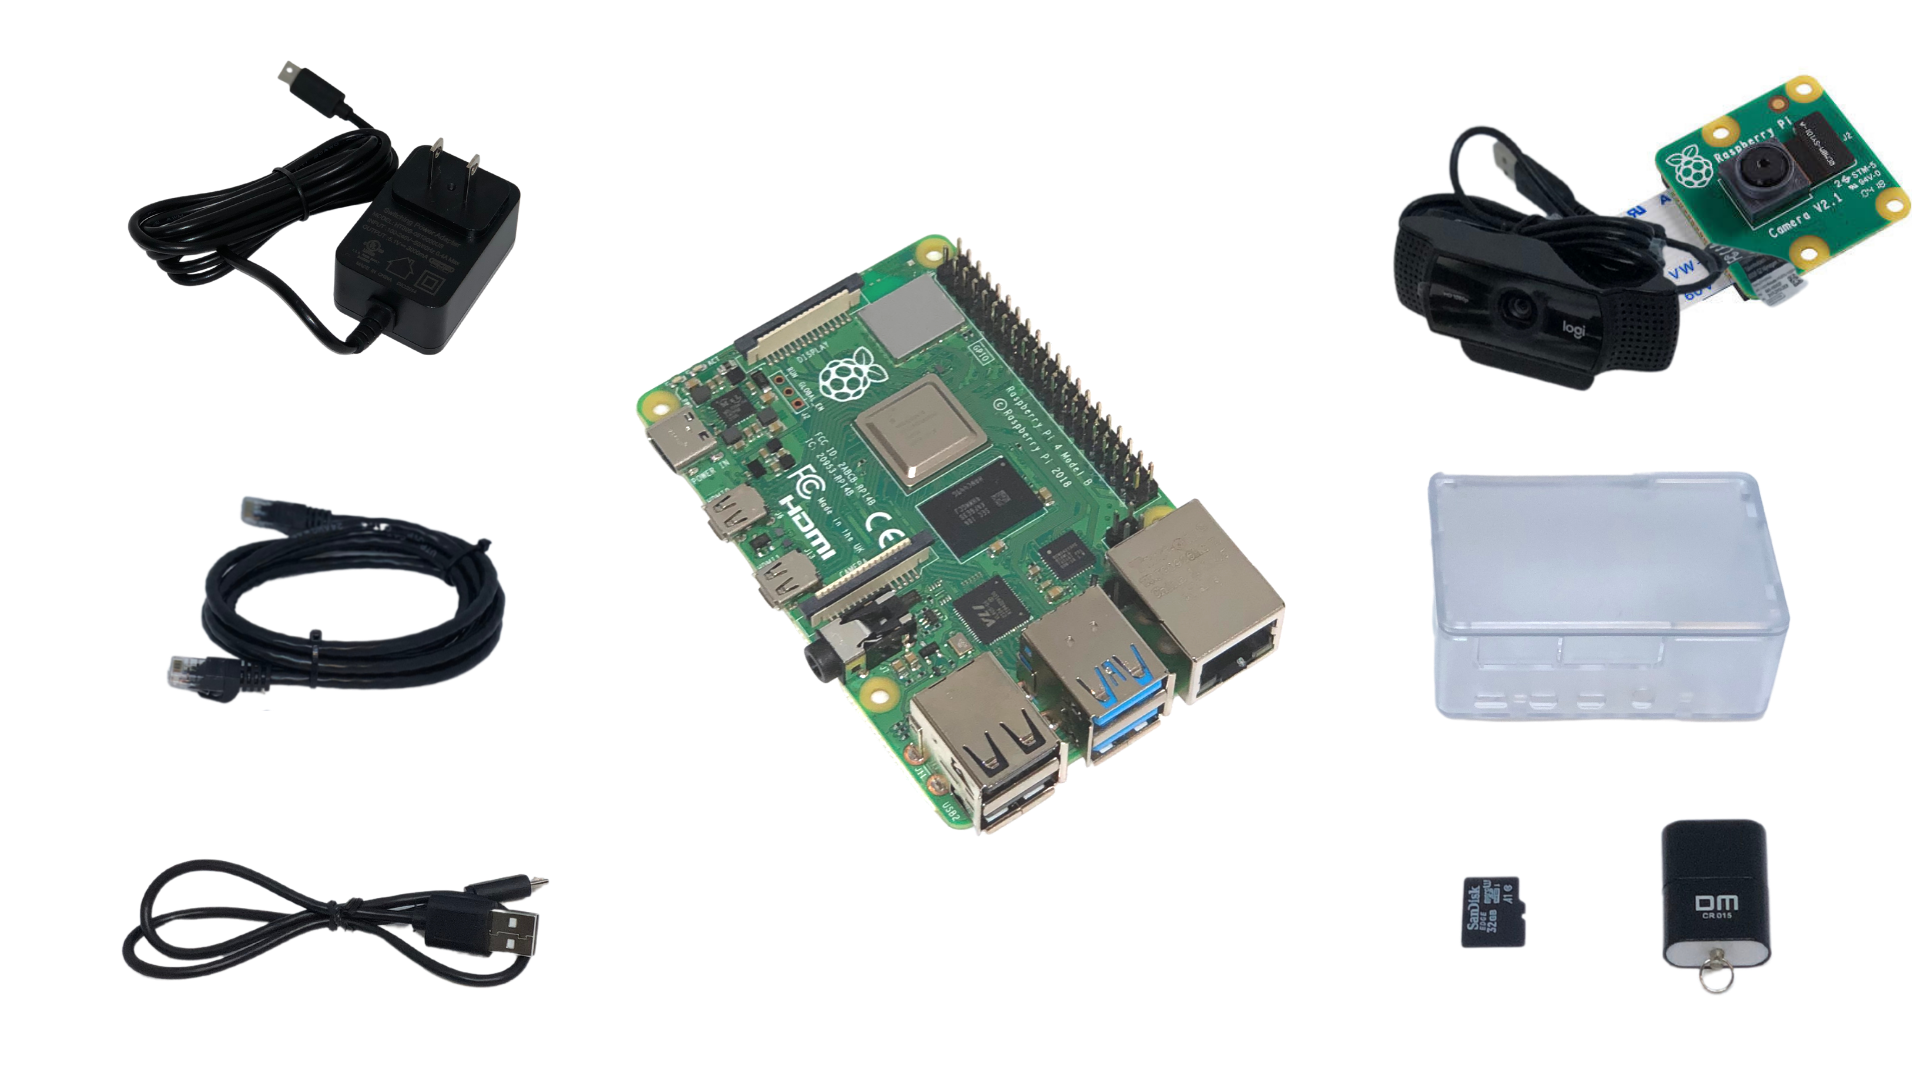
Minimally, the following hardware is required:
-
Raspberry Pi
- A Raspberry Pi Model 3B or Raspberry Pi Model 4B will work best. We recommend the 4B as it is more powerful and not much more expensive than the 3B.
-
USB power cord
-
USB printer cord
-
SD card (at least 16GB)
We also suggest the following items:
-
A case for the Raspberry Pi
-
Heat sinks
-
Ethernet cable if you are connecting to a router
Where do I get the hardware?
There are two ways to acquire the hardware:
-
Buy the components separately: If you are interested in getting each component separately, Amazon is a great place to start, but there are also some great and highly reputable authorized Raspberry Pi dealers who have e-commerce sites. Vilros and The Pi Shop are two certified resellers but there are others as well.
-
Kit: There are many kits that come with some or all of the hardware needed. TH3D sells an OctoPrint kit that includes everything you need to get started. You can find more complete kits on octoprint.org. Canakit is another popular brand that sells kits with most of the needed hardware included. Some of these kits come with OctoPrint already installed on the SD card while others simply provide the hardware needed.
A camera is not required but you'll probaly want one
Adding a camera to OctoPrint allows you to watch the printer from another room or from another state with one of the awesome remote monitoring plugins like The Spaghetti Detective. A camera will also enable you to record awesome time-lapse videos.
Okay, but which camera should I get?
There are hundreds if not thousands of cameras out there that will work for OctoPrint, it can be hard to pick. A Raspberry Pi camera or a USB webcam are the two main options to consider.
In our experience, Raspberry Pi cameras tend to provide better quality results, but they are not as easy to manage. You'll need to print a mount for it, and the ribbon cables can be quite a pain.
The Raspberry Pi Camera or the Raspberry Pi Camera V2 will give you pretty great results for monitoring your prints, but if you are interested in creating high quality jaw-dropping time-lapse videos, then you'll probably want to check out the Raspberry Pi High Quality Camera.
Setup and Install
Download the Raspberry Pi Imager
- Download the Raspberry Pi Imager from raspberrypi.org/software
- The software is available for both Windows and Mac.
Install and run the imager

- Select Choose OS,
- Select other specific purpose OS,
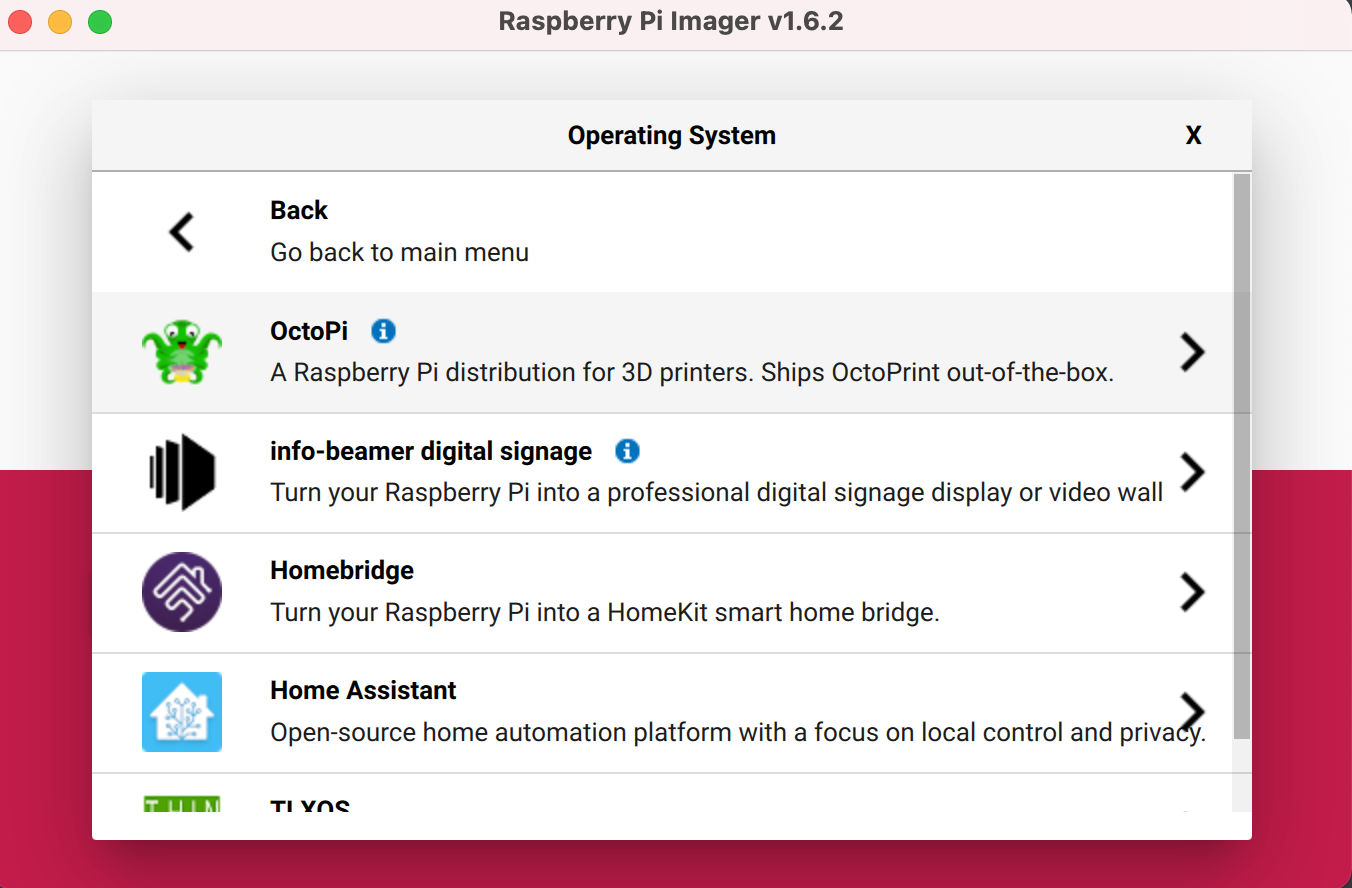
- Select Octopi. This will automatically download the latest version of the Octopi image from octoprint.org
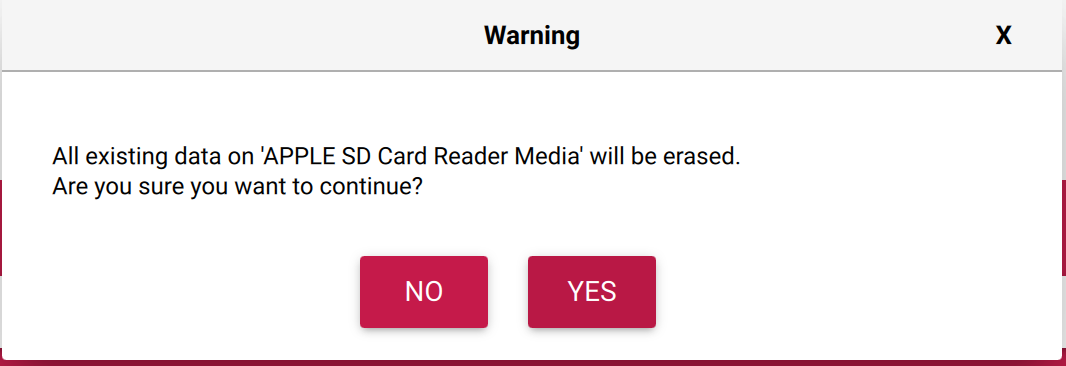
- Under Choose Storage, select the SD card that you want to install OctoPrint on. Make sure you don't have any important files on this SD card as it will be wiped.
- Don't click write yet You'll want to secure your Pi and configure the wifi first.
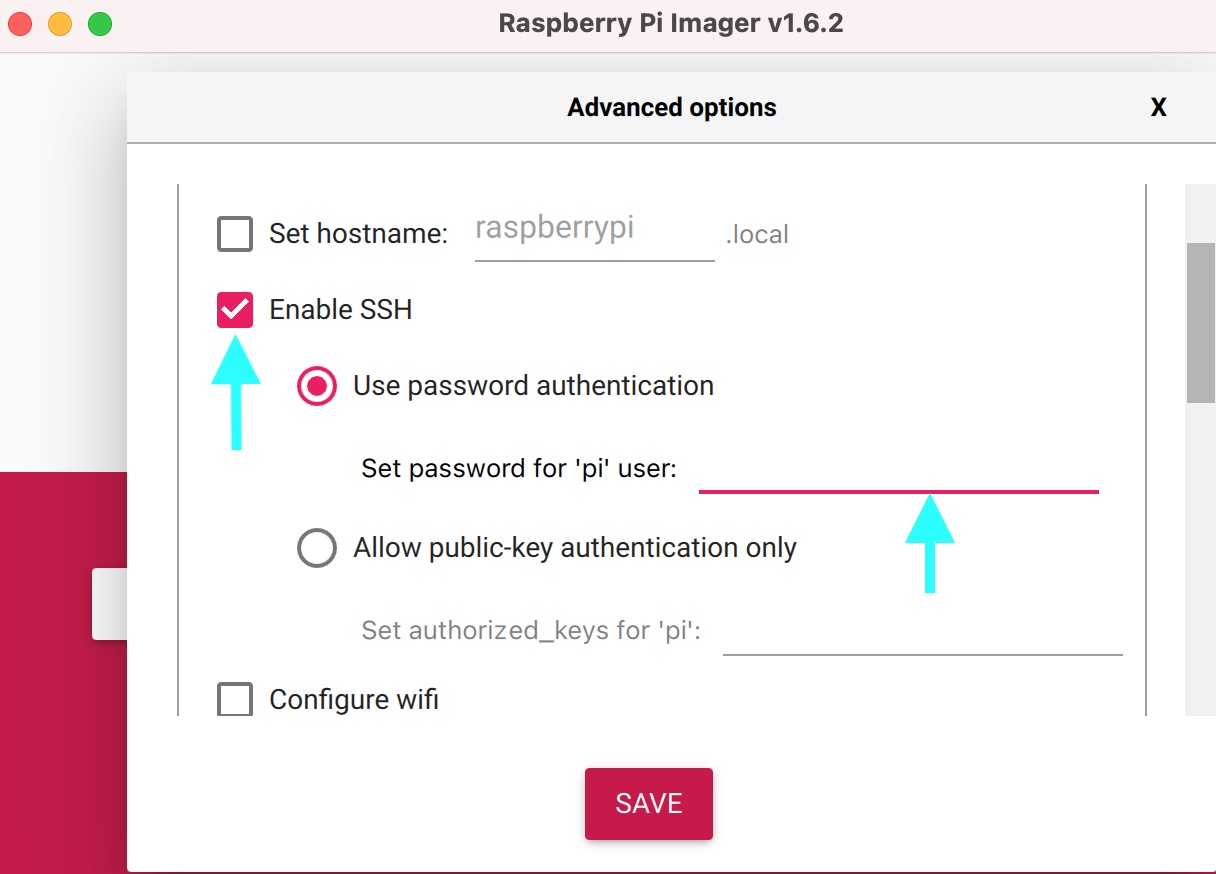
Secure your Raspberry Pi
- By default, the password to SSH into your Octopi instance is raspberry and the username is pi. This is not very secure. You'll want to change the password to prevent possible attacks from malicious users.
-
Press Control+Shift+x (CMD+Shift+x on mac) to bring up the Raspberry Pi imagers advanced options menu.
-
Click enable SSH and enter a secure password for the raspberry pi user. The username is pi and the password is the one you just created.
Connect your Raspberry Pi to the internet
We recommend connecting your raspberry pi directly to your wireless router or home ethernet ports if possible as this will provide the best streaming results. However, most users do not have easy access to a wired connection, so we will assume you will want to configure wifi.
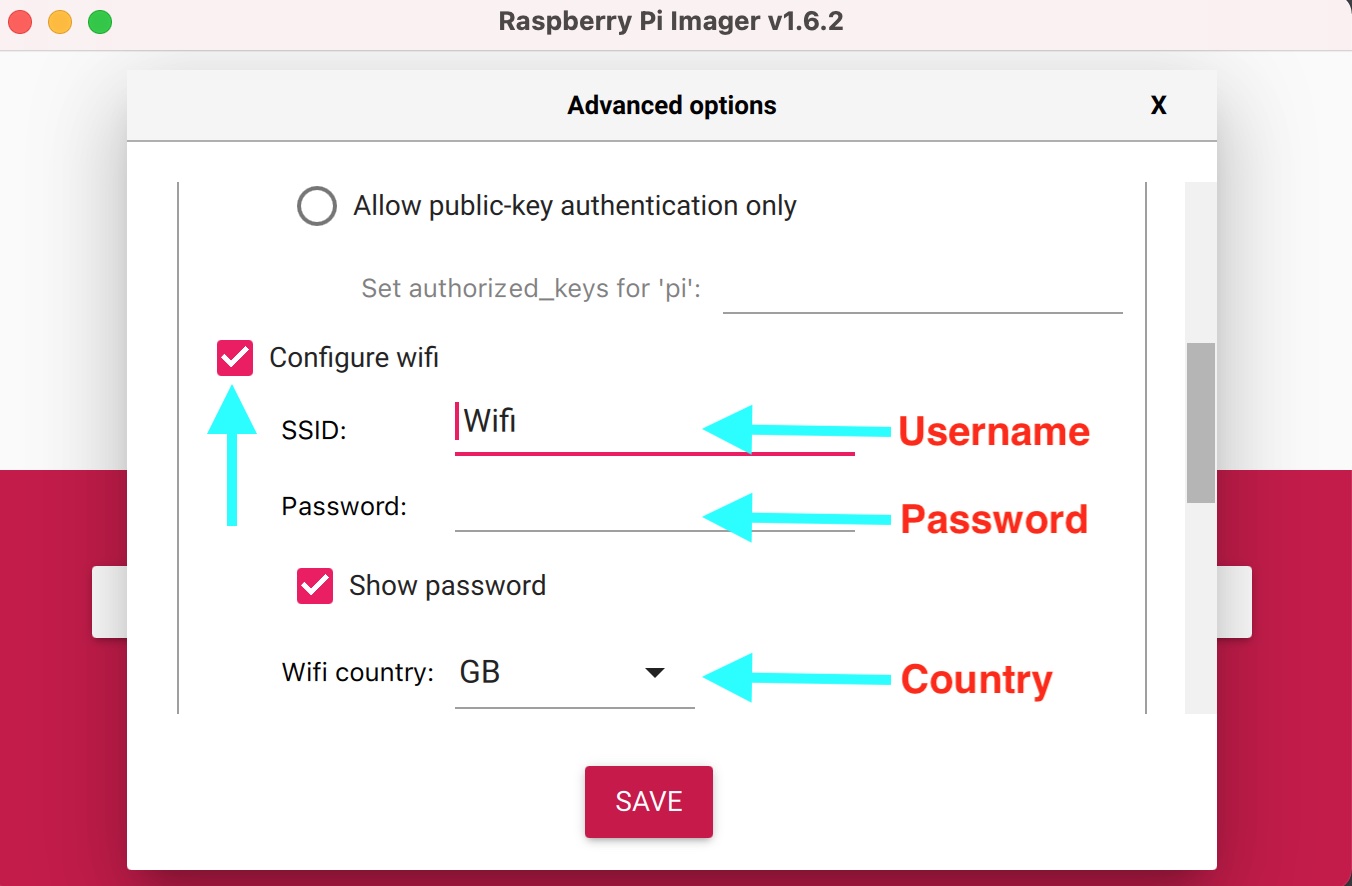
Configure Wifi with OctoPrint
-
With the Raspberry Pi imager, wifi configuration is a breeze. Simply enter your username and password under Configure wifi.
-
Be careful, this entry is space and case sensitive, so enter the username and password exactly as it appears on your router.
-
Under the country code section choose the country that you are in.
-
Click save and then click write. Once complete, eject the SD card from your computer.
Connect to OctoPrint
-
Put the SD Card into the bottom of the Raspberry Pi (upside-down).
-
Plug the power cable into the Raspberry Pi and the outlet.
-
It will take a moment for OctoPrint to connect.
-
Tip: Watch the green "ACT" led on the Pi. It will flash on and off for a while and then it will turn off. Once solid, your pi is connected to the internet and OctoPrint.
Connect the Hardware
Step 1: Connect the heatsinks
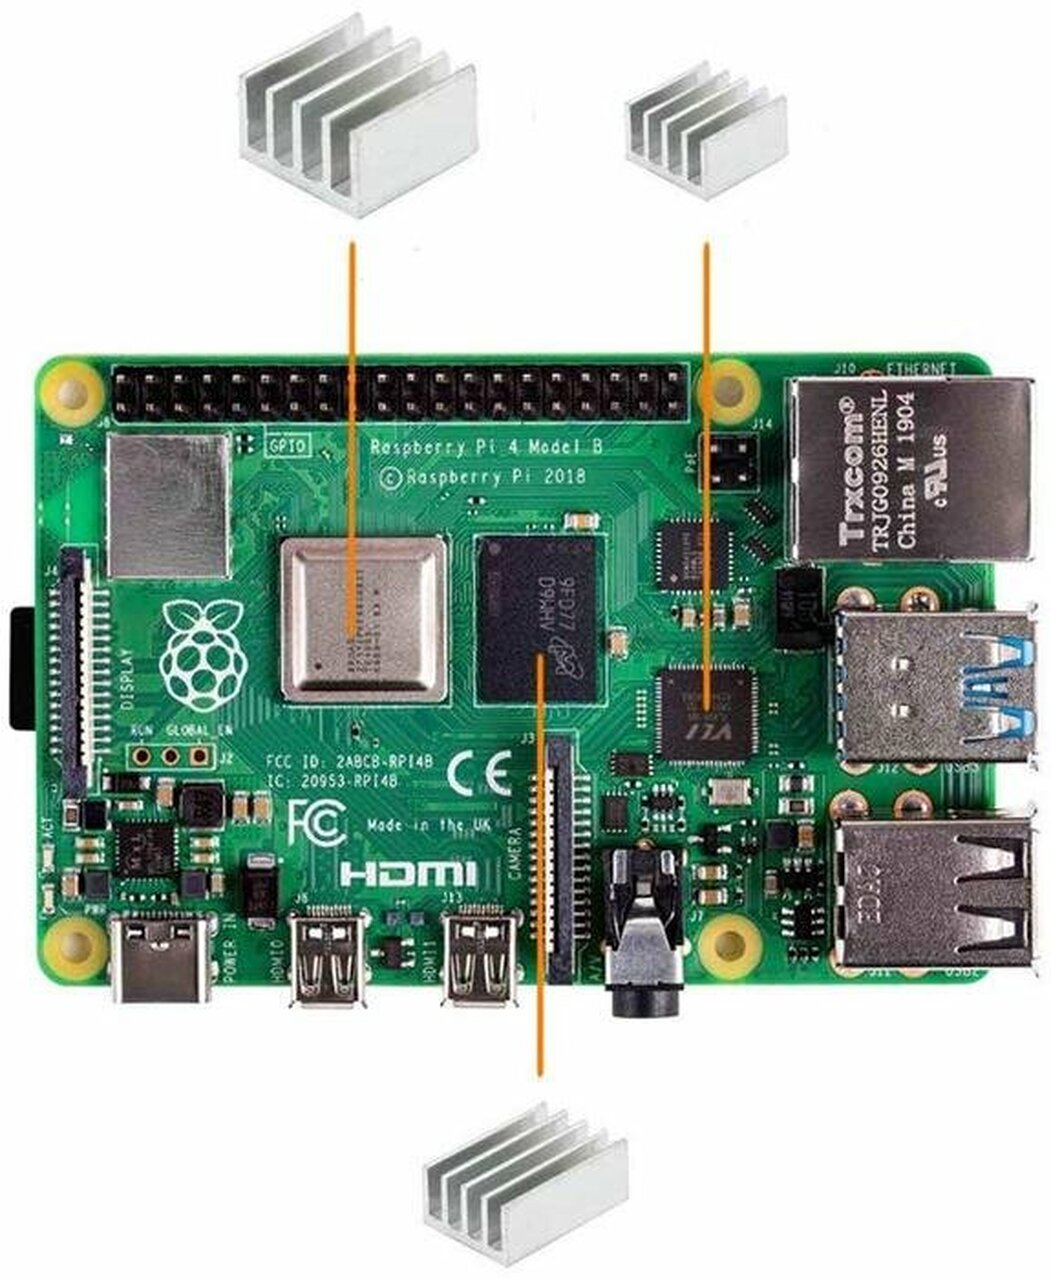 If you have them, place the heat sinks on the Raspberry Pi.
Step 2: Put the Raspberry Pi in the case
Place the Raspberry Pi into the case if you have one.
Step 3: Plug the printer cable into the Pi.
Plug the printer cable (micro USB, mini USB, or standard printer cable depending on your 3D printer) into the Raspberry Pi.
Step 4: Plug the power cable into the Pi.
- Plug the USB C power adapter into the Raspberry Pi.
Step 5: Connect the webcam
- If you are using a USB webcam, connect the webcam by plugging the usb cable into any of the USB ports on the Raspberry Pi.
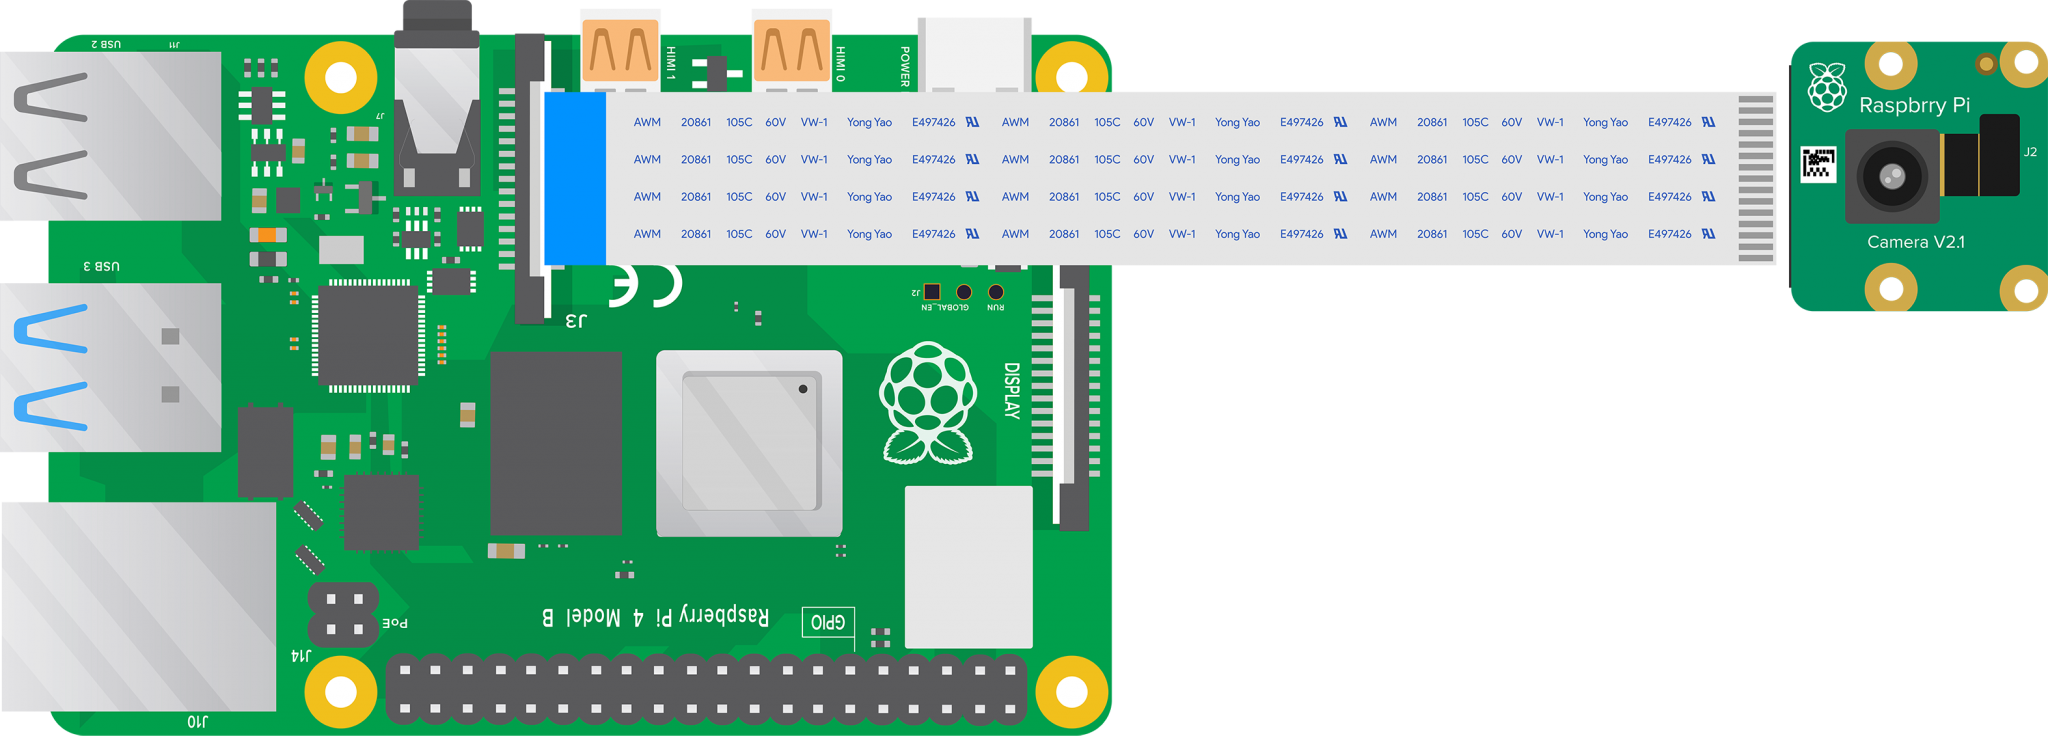
- If you are using a Raspberry Pi camera, place the ribbon cable into the camera and the Pi as shown below. Be very careful with the cable.

- Place the other side of the ribbon cable into the pi as shown below. The blue side of the cable should be facing the HDMI port on the Raspberry Pi.
How Do I mount the camera?
There are many different ways to mount your camera. 3D printed mounts, tripods, webcam arm mounts, or even old boxes will all work.
Check out our article on Ender 3 webcam setup for OctoPrint for a more details on webcam setup. While we demonstrate the setup on an Ender 3, the information will be relevant for most brands and models of 3D printers.
Printer Connection
Turn your 3D printer on, if it isn't already.
- Plug the printer cable into your 3D printer.
- Plug the power cable into a power outlet.
At this point, the Raspberry Pi should be powered on, connected to the internet and your 3D printer.
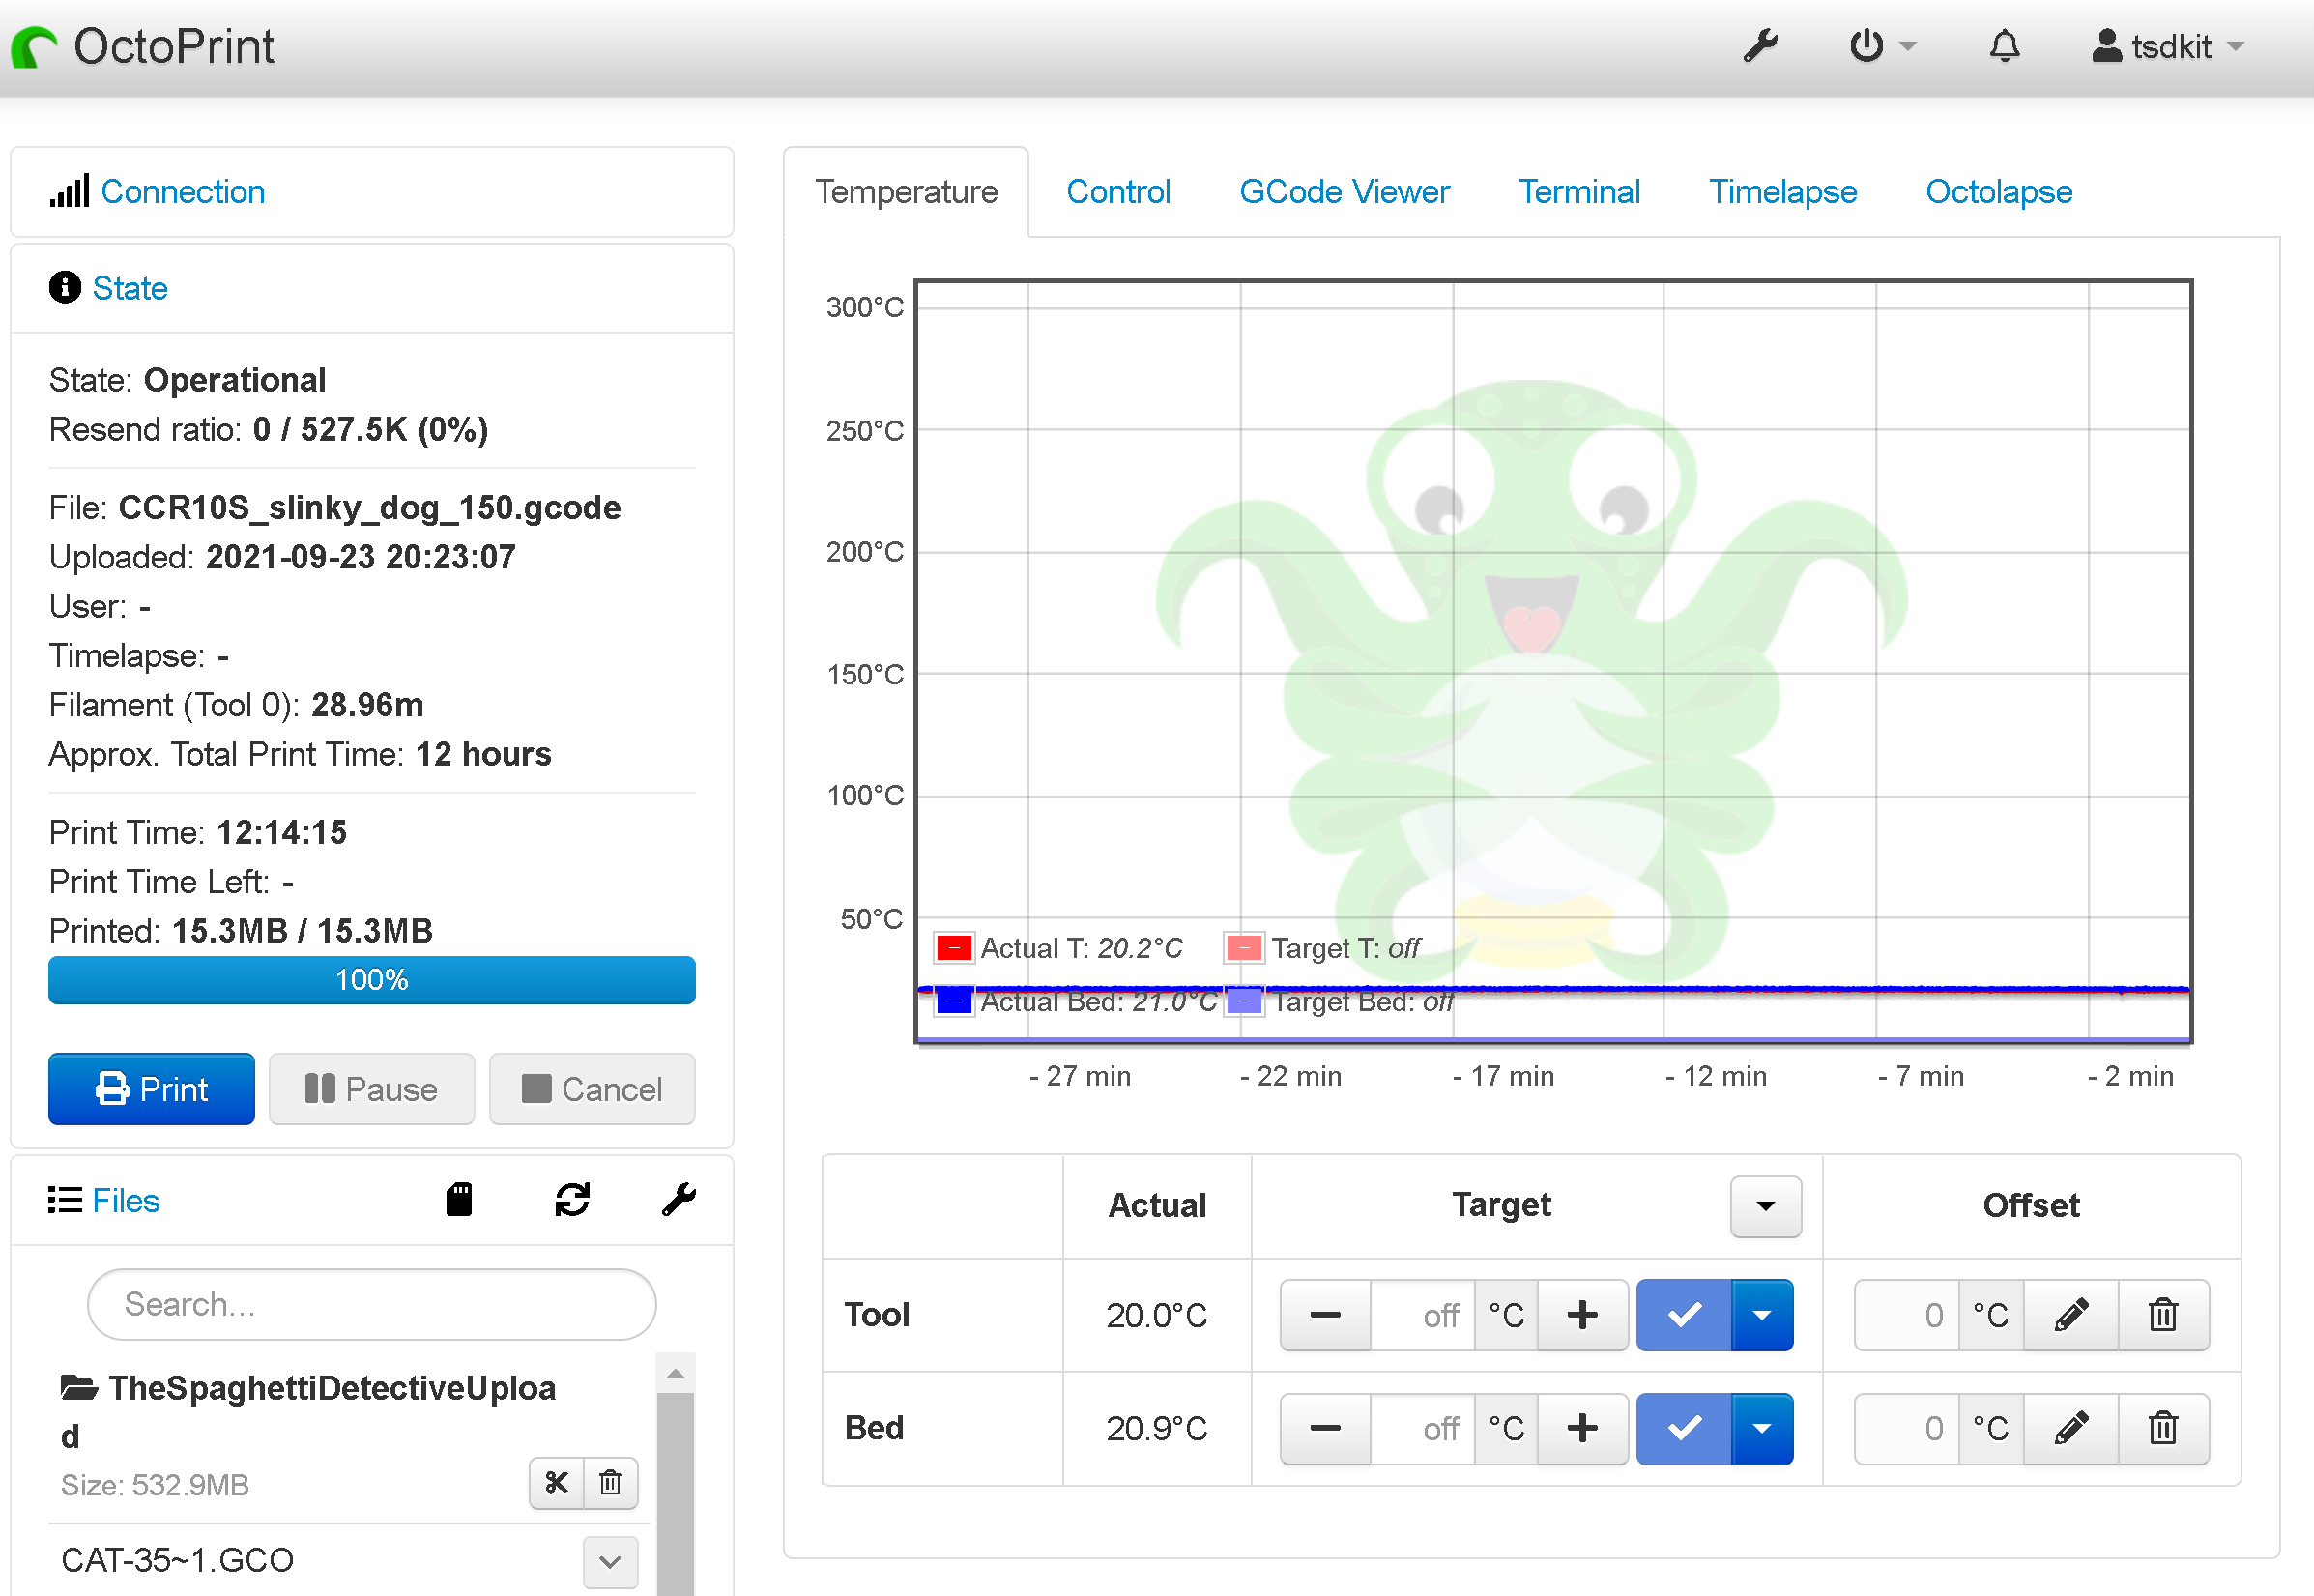
Access the OctoPrint user interface
To access the OctoPrint interface, open a web browser on your computer and type http://octopi.local into the url bar. This should bring you right to the OctoPrint login screen.
If octopi.local does not work, you will need to locate your Octopi's IP address. You can locate your Octopi's IP address multiple ways. Here are two:
-
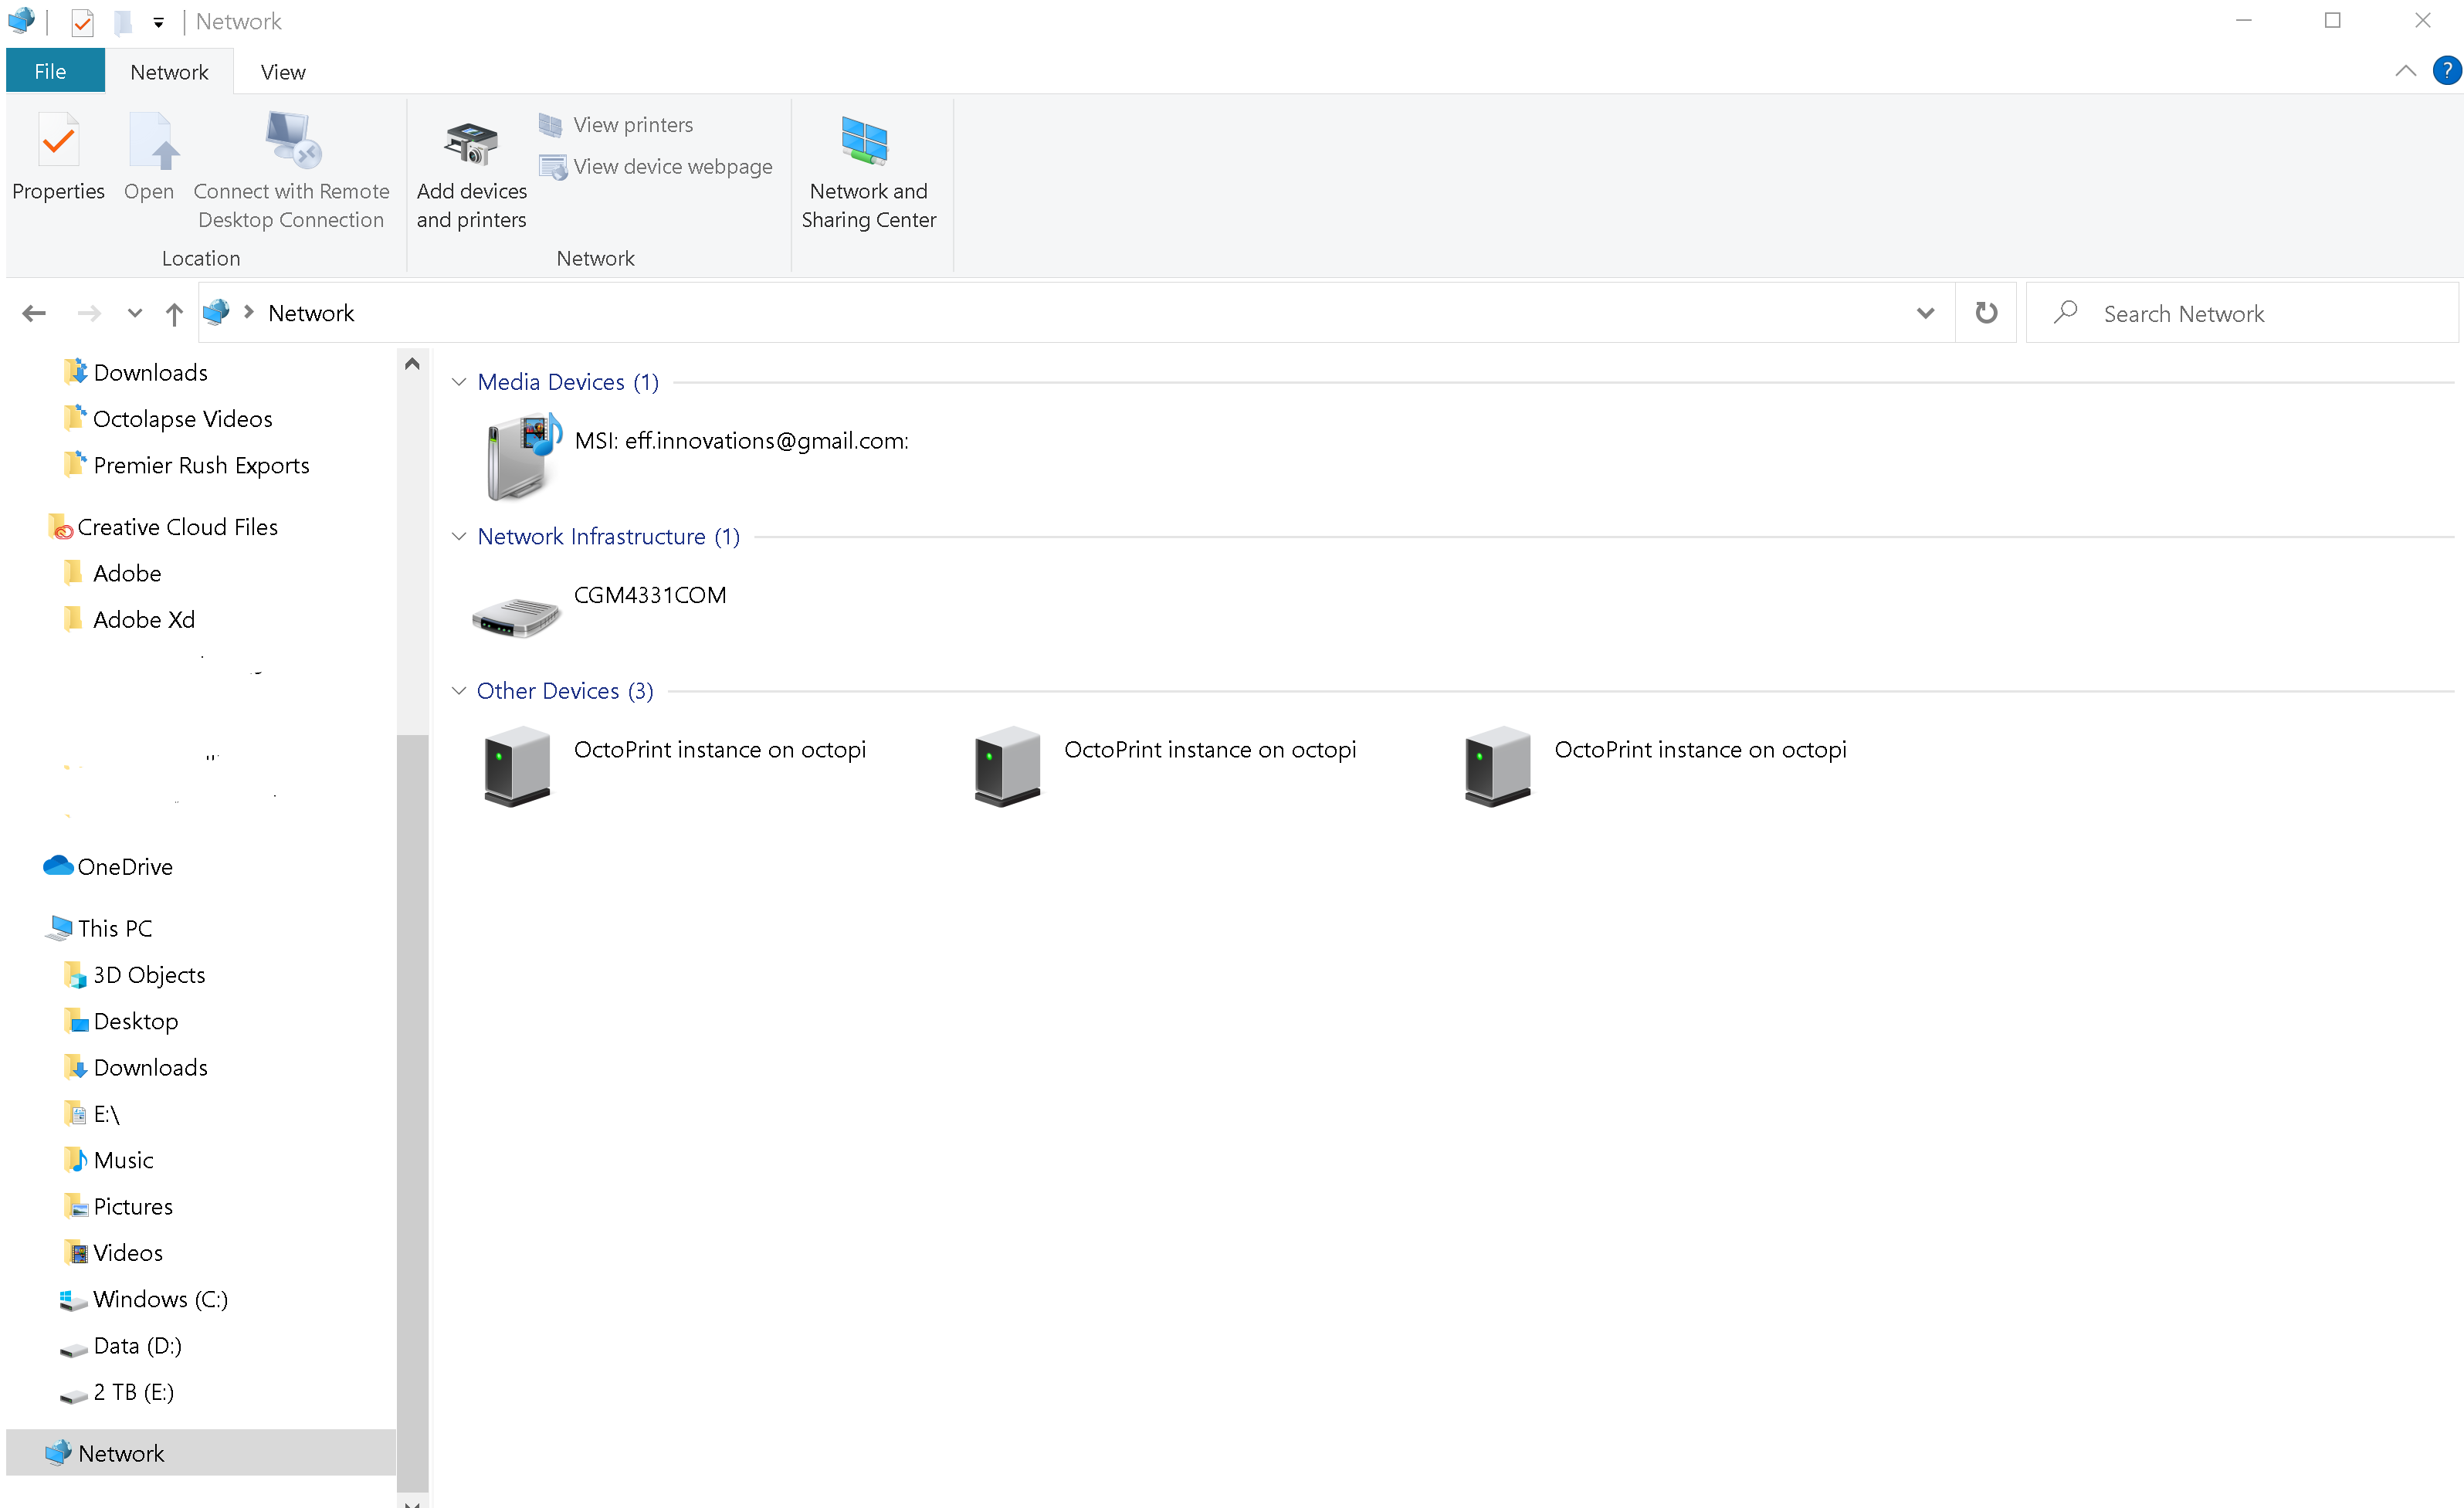
Windows File Explorer
-
On a windows computer:
-
Open the File Explorer
-
Click the Network tab
-
Note: If you have Network Sharing disabled, you will need to turn it on in order to see your Pi in the network tab.
-
Your home router Another option is to find the IP address through your home Wi-Fi router settings. You will need your router username and password (this may be different from your WiFi password), and you will need to know your router's IP address. If you don't know it, PC Mag has a great article on accessing your Wi-Fi Router's settings.
-
Once you have your router's IP address and the username and password for the router, type the ip address into a browser url. It might be , "192.168.1.1" or it might be something else.
-
You will be greeted by some type of login screen. Enter your username and password.
-
You should see something like "connected devices." Select it, and you will see all of the devices currently connected to your router. The once with "Octopi" in it is the one you are looking for. Once you find it, type the IP address into a browser window.
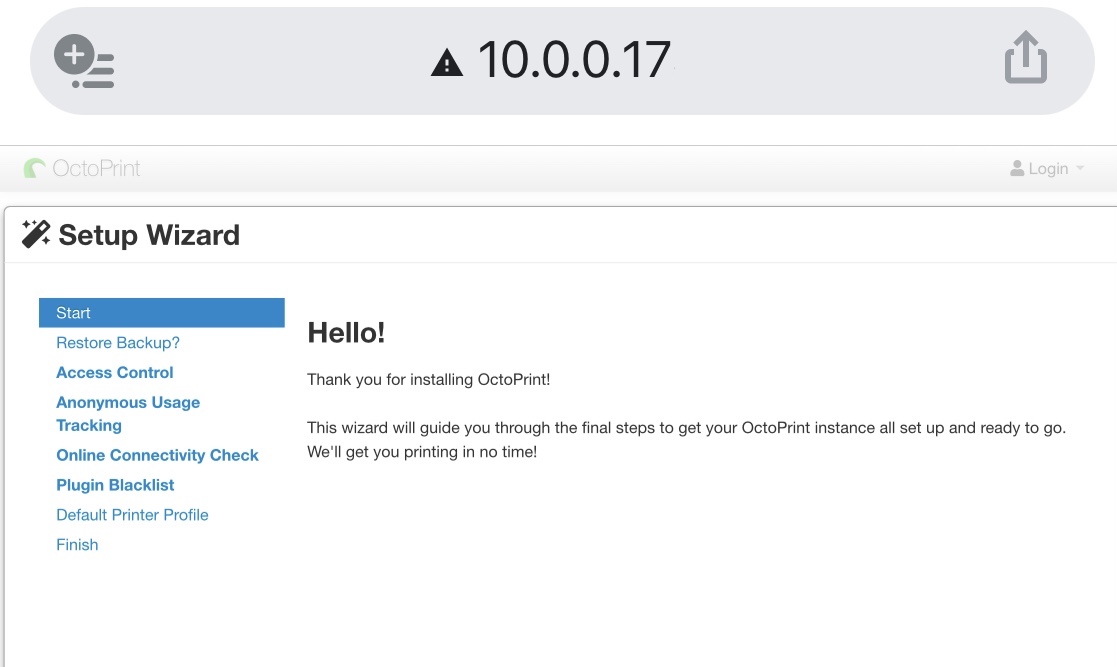
Complete the Setup Wizard
-
Once you are able to access the OctoPrint Interface, follow the on-screen instructions to complete the Setup Wizard.
-
You'll want to set your 3D printer's build volume and nozzle diameter in the printer profile section. Note, this information does not change any slicer related Gcode settings, only controls within OctOprint.
Install Obico for OctoPrint to Monitor and Control Your 3D Printer From Anywhere
Obico for OctoPrint is an OctoPrint plugin that eliminates the need for you to be connected to the same network as your 3D printer. OctoPrint only works when you are connected to the same network as your 3D printer, but with Obico, you can monitor and control your 3D printer from the grocery store or from half a world away. As it’s browser-based software, you can access it from any device and operating system. In addition, Obico’s AI failure detection system can watch your prints for you and alert you, or even pause the printer, when a failure is detected. You can use Obico on your phone, desktop or tablet.
You can follow the full Obico for OctoPrint setup guide, or just follow the steps below to install the Obico for OctoPrint plugin.
This guide assumes you are connecting to the Obico Cloud. If you are connecting to a self-hosted Obico Server, you will need to use the address of your self-hosted server.
Hardware requirements
Before you start, make sure:
- OctoPrint is installed and set up correctly. The easiest way to set up OctoPrint is to get a Raspberry Pi and follow this guide.
- A webcam is set up for your printer and connected to OctoPrint. The 3D Printing Zone has an excellent video for it.
- There is sufficient lighting to illuminate the printing area of your printer. If your printer is in a lighted room, you are probably fine. If you'll print with light off, you will need to make sure the printing area is illuminated when your printer is printing. A LED strip or small LED lamp will do the trick.
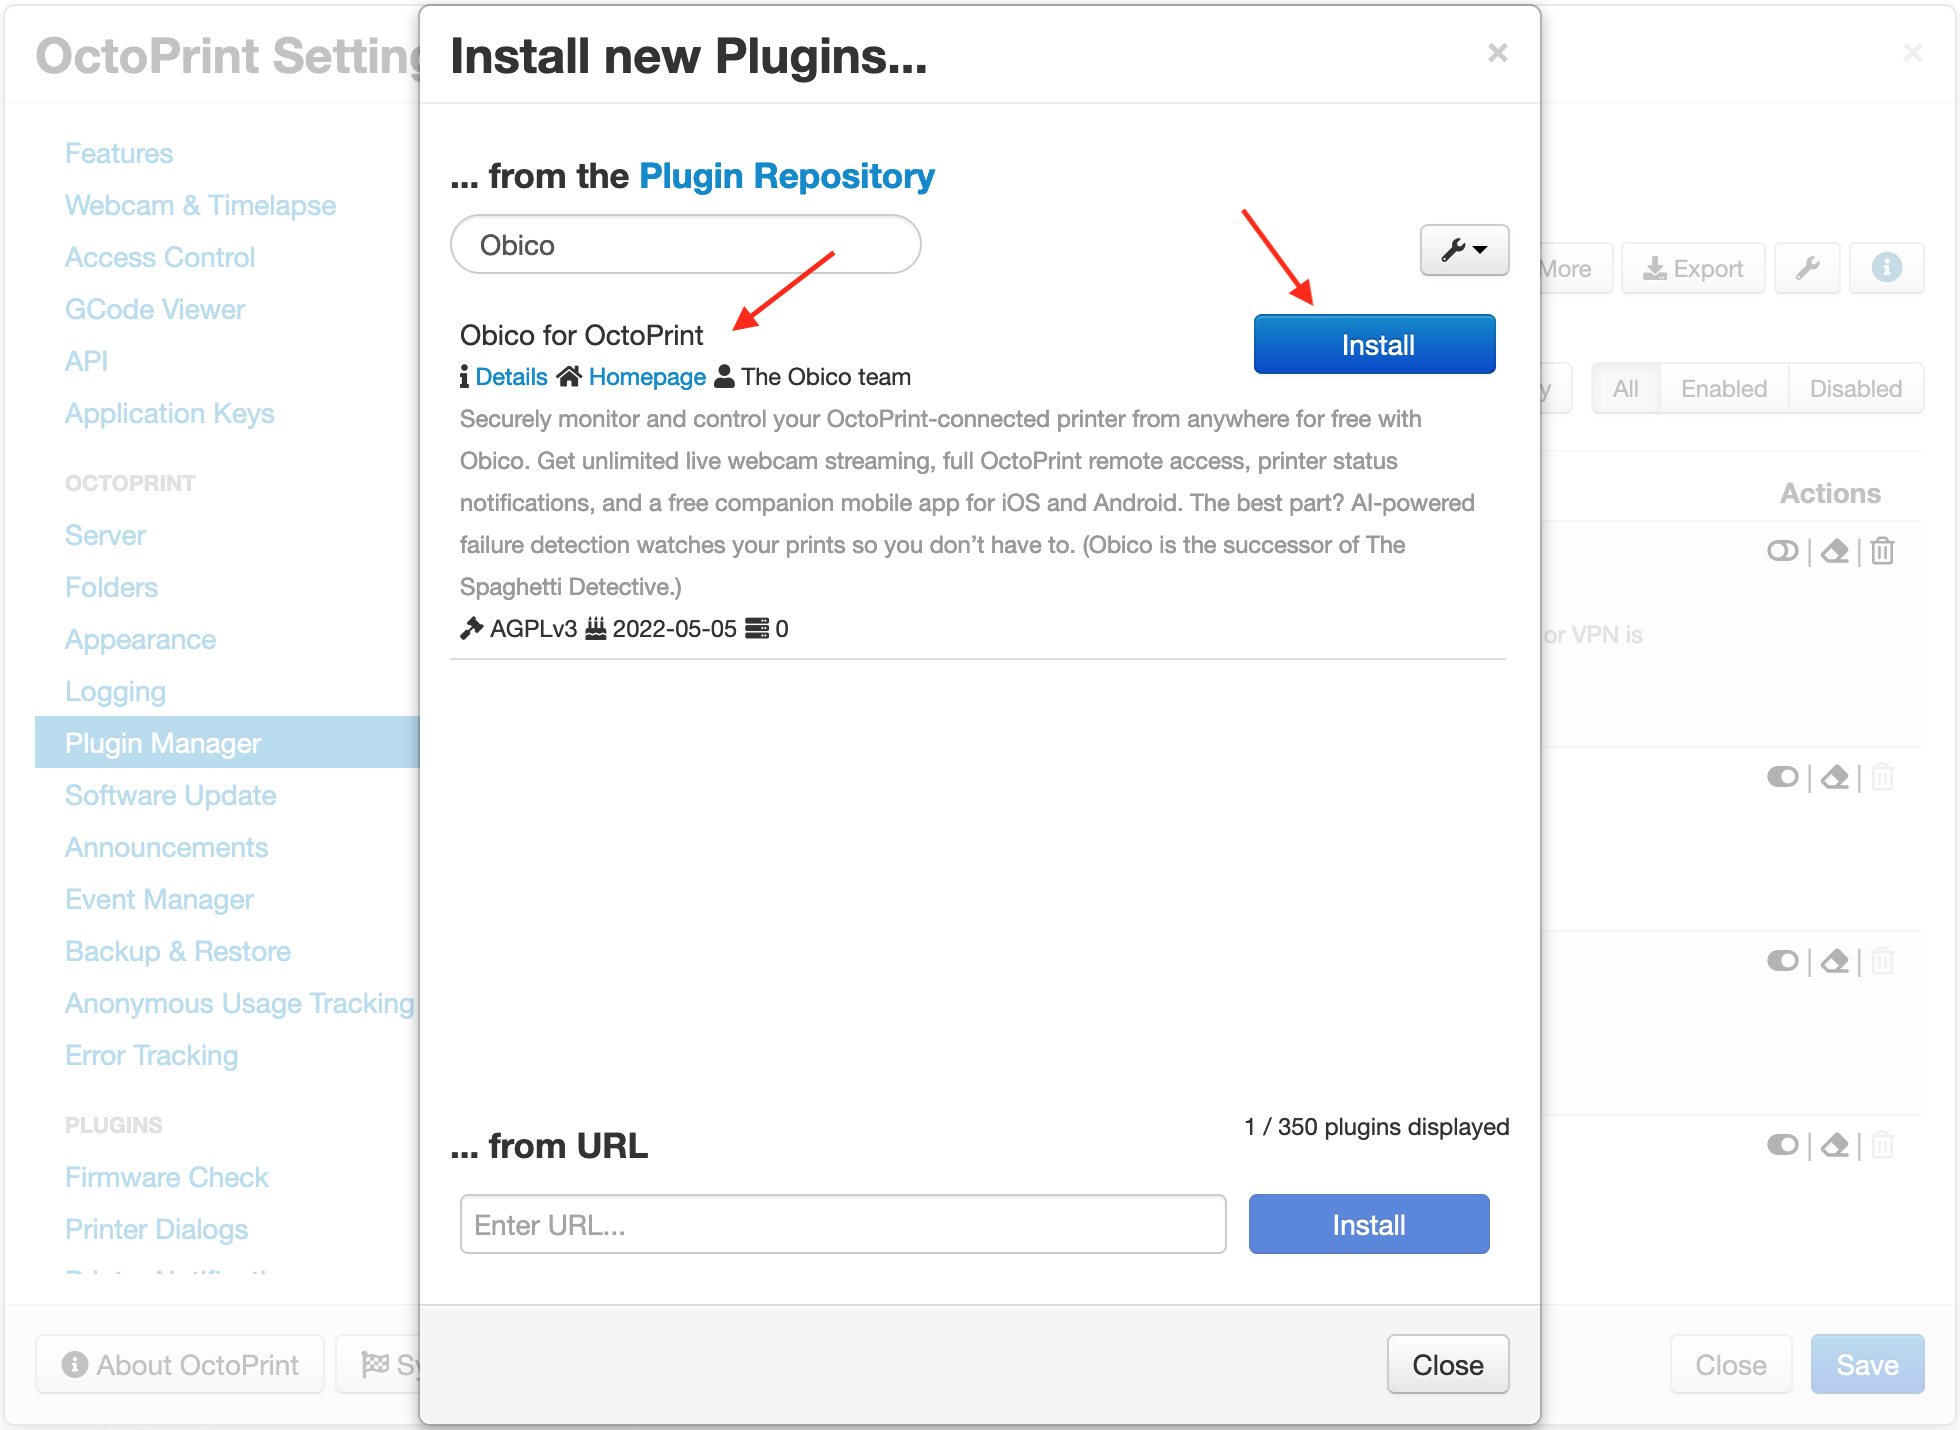
Step 1: Install "Obico for OctoPrint" plugin.
- Open OctoPrint page in a browser.
- Open OctoPrint settings page by clicking the wrench icon (🔧).
- On the settings page, click "Plugin Manager", then "Get More...".
- Type "Obico" in the box, you will see "Obico for OctoPrint" plugin.
- Click "Install".
- Click "Restart Now" when OctoPrint asks.
Step 2: Sign up for an Obico account.
Follow instructions in the "📱 Mobile App" tab if you are using the Obico mobile app, or the "🌐 Web App" tab if you are using the web app.
Your Obico account is the same for the mobile app and the web app. If you sign up for an account using the mobile app, you can sign in to the web app later with the same email and password. And vice versa.
All functions are available equally in the mobile and the web app. However, with the mobile app, you can receive push notifications on your phone to easily track the print progress, and get alerted in case a failure is detected.
- 📱 Mobile App
- 🌐 Web App
- Download the Obico app from the Apple App Store or Google Play Store.
- Open the mobile app. Click through the first time tour and then tap “Let’s Go!”.
- Simply tap "YES!" on the "Hardware Required" screen.
- Tap "Sign Up/Sign In" button to proceed to the sign up/sign in screen.
- Sign up with your email, Google or Facebook account. If you have already registered, click the "Sign In" button and sign in to your account.
If you are connecting to a self-hosted Obico Server, press the wrench icon (🔧) on the top-left corner of the sign-up screen to change the server address.
- Open the Obico Server sign up page in a new browser tab.
- Sign up with your email, Google or Facebook account. If you have already registered, click the "Sign In" button and sign in to your account.

Step 3: Launch the "Link Printer" wizard in the Obico app
If you are phone or computer is one the the same local network as your OctoPrint is, the Obico app can find your OctoPrint automatically. This is the easiest way to link printer to your Obico account.
- 📱 Mobile App
- 🌐 Web App
- Press "Link Printer" button on the welcome screen. If you don't see that screen, tap the menu icon (☰) on the top-left corner, and select "Link New Printer".
- Choose "OctoPrint" on the next screen.
- Assuming you have followed the previous steps and installed the plugin, you can simply click the "Yes, plugin is installed" button.
- The app will start scanning for the OctoPrint connected to the same local network.
- If the OctoPrint is found, simply click the "Link" button and the app will do the rest for you.
If, however, the app can't find your OctoPrint after 1 minute of scanning, you need to follow the Manual Setup Guide to link your OctoPrint using a 6-digit code.
- Optionally, you can now give your printer a name. If you skip this step, your printer will have the default name "My Awesome Cloud Printer".
- On the welcome page, click the "Link Printer" button.
- Click "OctoPrint" on the page that asks you to select a platform.
- Assuming you have followed the previous steps and installed the plugin, you can simply click the "Next" button.
- The app will start scanning for the OctoPrint connected to the same local network.
- If the OctoPrint is found, simply click the "Link" button and the app will do the rest for you.
If, however, the app can't find your OctoPrint after 1 minute of scanning, you need to follow the Manual Setup Guide to link your OctoPrint using a 6-digit code.
- On the message dialog, click the "Link Now" button. This will open a new browser tab for a few seconds. This new browser tab is needed to finish a "handshake" with your OctoPrint. If the handshake fails, you will need to switch to the Manual Setup Guide to link your OctoPrint using a 6-digit code.
- Optionally, you can now give your printer a name. If you skip this step, your printer will have the default name "My Awesome Cloud Printer".
What's next?
Check out your printer feed!
Press "Go Check Out Printer Feed!" to see everything you care about your printer: the webcam feed, heater temperature, time remaining on the print job, and more! Remember, you can see your printer feed anywhere you go, as long as you have an internet connection on your phone!
Test the magical failure detection!
AI-powered failure detection sounds too magical to be true? See the magic in action for yourself.
Change printer settings.
The default settings for your printer in Obico are the ones that most users find the most reasonable. But feel free to tweak them to your liking:
- Change notification settings (mobile app only). By default you receive push notifications when a possible print failure is detected. You will also get status update on your lock screen when your printer is printing. But you can choose to receive a lot more.
- Change printer settings, such as if Obico should pause your printer when a failure is detected.
Install Additional Plugins
One of OctoPrints greatest features is its open-source plugin system. In the Plugin Manager you can install plugins for visualizing how level your bed is, creating magic-like time-lapse videos, customizing OctoPrint's User interface and more.
There are hundreds of plug-ins available that do all sorts of things. Check out our post on the Best OctoPrint Plugins here to see the most popular OctoPrint plugins and learn how to install them.